
I welded a thing!
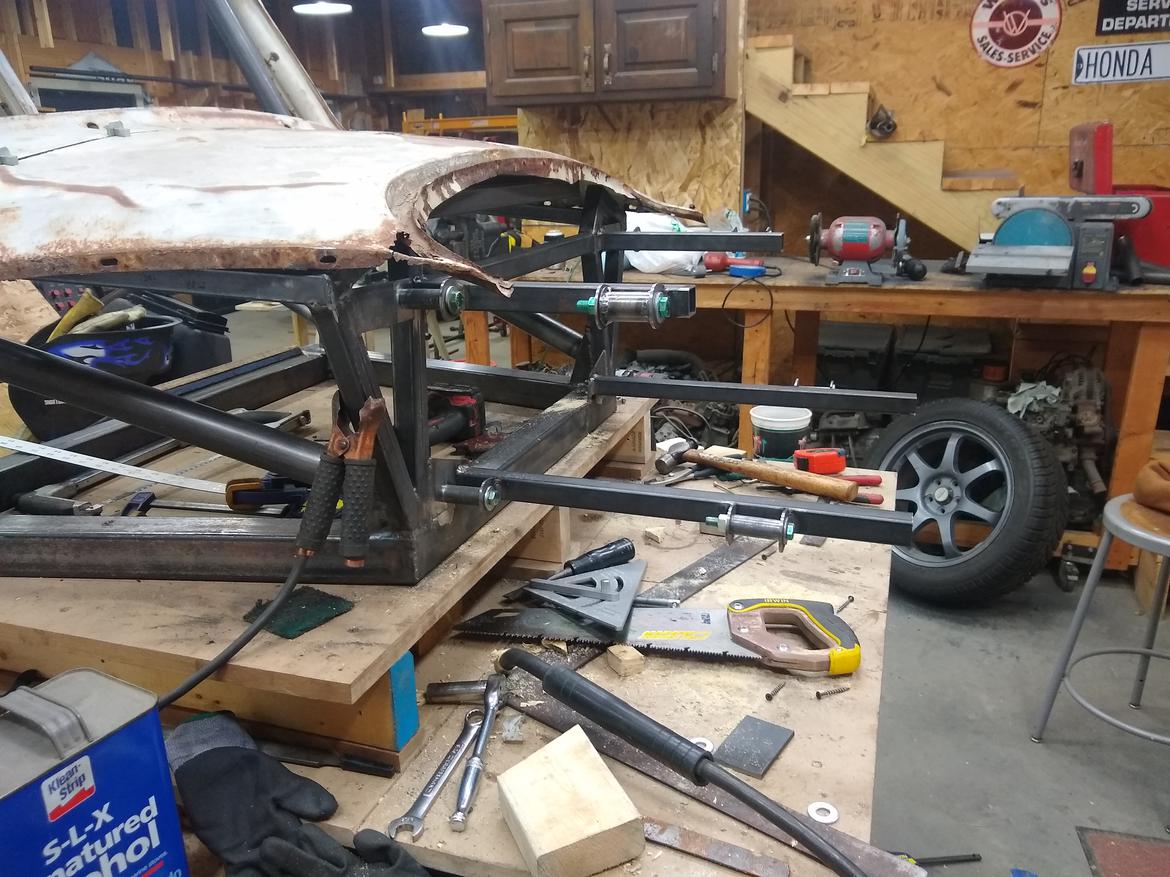
Welded in the front suspension mounts. You can see how the bushings are going to work in double shear.

You can also see how close the front suspension is to the hood. It will work but I am going to bend the front upper A-arm to gain a few inches of clearance for the suspension cover aerothingy.
I also learned some stuff. Although I liked the theory of my suspension location jigamathing in practice it didn't work as well as I hoped. I mean it located the parts where I wanted which is good but it was a pain to work around and I don't think it really saved any time. For drilling the holes in the bulkhead it worked great though. I think next time (and for the rear suspension) I will just bench fixture the suspension pivots on the 1x1 tubing, then locate the 1x tubing. In total I had about 3 hours of messing with the fixture and I think I probably could of had the same result with 3 hours of careful measuring. If I was building more of these I would weld a metal fixture that locates sacrificial bushings and that would get rid of the issues with wood frame. I'll try a different approach in the rear and compare them.
+ 1.5 Hrs, Total 85.5. No money spent or steel used that hasn't been accounted for.
Also it's time to do a build area cleanup again..
Inspiring build. Always stoked when its at the top of the page.
No car progress but EP 5 is up. I got out of my video editing funk and put it together. The good news is I also have enough for Episode 6 so I will get editing on that also.
This weekend I pretty much stood in one spot watching things spin around and around for 4.5 hrs.
But I got all my suspension pivots lathed including liberating the OEM LBJ bungs from the A-Arms.


Despite ~150 lathe chuck/un-chuck operations, I only crashed the lathe chuck into the bed 1 time when I started it with the chuck installed.
4.5 Hrs, total 90 Hrs.
Added $3.69 for 1 lb of Grade 5 5/8 SAE washers.
Great work. Are you planning to install grease zerks in those joints?
I'm also curious how the shock bell crank fits relative to the steering rack.
I am planning to weld a thickening plate for grease zirks. I just have to wait to see where it will fit during suspension travel.
I knew it was turning. But I like to call it lathing. You mill stuff on a mill. Grind things with a grinder. Saw things with a table saw. Why shouldn't you lathe things on a lathe.
I like to learn new things. I finally got to watch episode 5 and TIL I learned to use masking tape as a template but clean the oil off the metal first.
In reply to Stampie (FS) :
Glad to hear I could help. I'm not sure where I picked up that little gem. I know I didn't invent it. Probably was buried in someones thread on the Locostusa forum.
Last night I did another 1.5 hours of work (Total 91.5 might get to my 100 hour update after the weekend). I got the bushing sleeves welded for the front suspension and added 2 tubes (16.5 & 21.5", $2.15) to suspension frame. It's not a lot of work but it took a surprising amount of time to turn, prep, fixture and weld the bushings.

I am pleased with my "accuracy" they are all withing +/- .005 on length, and after installation they all spin.

After I triangulate the front suspension frame I'm trying to decide if I:
A. Build front suspension
or
B. Build rear of chassis
Added angly pieces to the front (2x 9.25", $1.05. 1.0 HR).

That will finish the front for the time being. Next stop, rear of chassis.
It's been a few days since I got anything done. Last night I got a start on the rear of the chassis. The chassis is going to split at 6 bolts at the engine bay. So I started the structure that will stay with the chassis and include the rear down tubes for the roll bar. There will be 1 bolt per side at the top of this by the rear bodywork, 1 bolt per side at the bottom rear corner, and then 2 additional mounts on the forward rails that will support the engine mounts.


2.0hrs, +9.5' 1x1 Tube @ $6.46
Just Checking.. Masking tape doesn't count in the Challenge Budget right?


Was working on the suspension details in SketchUp before I built the rear suspension while also watching Youtube videos of all these modern cars wrapped in Camo, Plaid, and Text and thought.. What about 1960's wallpaper paterns? Thought everyone might appreciate seeing it.
It looks hilarious but would take.. FOREVER to make unless it was wrapped. And wrapping is WAY out of budget. Maybe someday it will get ridiculous patterned paint..
One of the dirt oval guys I saw in Wichita once legitimately covered his late model in wallpaper.
In reply to nocones :
Actually I think you're on the right track, but maybe choose one of these deadly wallpaper patterns. It would be much more fitting for the angry character of the car, and I think people would love the obscure reference!
In reply to Pete Gossett (Forum Supporter) :
I love the obscure random evil associated with those patterns. I thought about those kinds of patterns anyway but since a wrap is out of the question I had to think of something I could theoretically paint. Maybe if I eventually get the car wrapped I will go with a pattern like that. It would be awesome.
Using actual wallpaper is an option I hadn't even actually considered. I mean.. that wouldn't work at all.. right?
In reply to nocones :
You might have to get creative with the scissors to get it to contour around the car, and I'm not sure you could keep the pattern aligned at all, but if nothing else a bit of 3M spray adhesive should hold it in place.
Added a crossbar to the top of the rear chassis. Platforms will be built off the corners of this bar for the rear down tubes to land at. This will also be where 1 of the bungs for the removable rear chassis goes. I mocked one of them up to trial the deign. It's a piece of random 34 mm OD x 2.5 mm 4130 that I got from my old works dumpster (The dumpster at the time was not posted as private property), and then a piece of .125 plate welded to the end to make the pocket. I'm going to use Grade 5 1/2" fine thread bolts.


+2Hrs, +31" 1x1 ($1.76)
I added some diagonals and welded the corners of the cross bar.

I'm trying to decide where the bolt for the rear subframe mount will go. I can put it right in the node with a captive nut or just off the node. If it's in the node I can't access the nut and if anything happened it would be grinder time. Next to the node I would still use a captive nut but if I needed to I could drill it out and access the back to put a wrench on it. But into the node looks so much more "proper"..

+1.5 hrs (97), +57" 1×1 @ $3.23
re: wallpaper - When I had my old Saab challenge car (4-5 YEARS ago now, wow), I used spray adhesive to attach a garage sale patterned fabric to my hood and spoiler.
I thought it looked cool but I'm not sure many others agreed. Decoupage!

"I thought it looked cool but I'm not sure many others agreed. Decoupage!"
As a kid, I thought that bald guys would do well to glue doll's hair onto their heads . . .Toupeecoupage !
Worked on the box for the rear roll cage downtubes. Embedded in this is a weld nut for the engine subframe bolt. One challenge for me with weldnuts has always been getting them centered in the hole. If they are off and the bolt touches the plate it is frustrating forever and sometimes you can't get the bolt in. Typically I am just very careful about it. I oversize the hole to give some space but it still doesn't work everytime. But then I remembered.. I now own a Lathe! I chucked up the nut and turned a small lip on the edge that inserts into the oversized plate hole. The depth is equal to the unthreaded section of the nut to ensure there are no weakend threads.


So now I had the weldnuts in the plate and could mockup the box.
I ended up putting the bung just above the node. This worked the best for weld nut spacing and doesn't require any additional metal.


The only issue with this is it protrudes into formerly unmodified body structure. It will still be inside the actual body and in the spirit of cut everything I'm fine with this.
I'm also trying to decide if the car will have rear windows or not. No rear windows is more prototype looking. Also The rear bulkhead will exist about 4" behind the B pillar in the middle of the window. Id also like to split the body so the rear half behind the doors can be removed for engine access (Like a real LMP car). This complicates the use of windows. But without windows you can't see the engine.
+1.75 Hrs, +0.44sq-ft 4130 plate ($4.84)
In reply to nocones :
I was looking over a Factory Five 818 at the last autox. While your LMP360 is more of a racecar than it is, I thought the exposed engine in the back of it just looked rather unfinished.
Will your bulkhead have a window & rearview mirror on the windshield for watching traffic on track, or are you building a solid bulkhead?
nocones said:
Was working on the suspension details in SketchUp before I built the rear suspension while also watching Youtube videos of all these modern cars wrapped in Camo, Plaid, and Text and thought.. What about 1960's wallpaper paterns? Thought everyone might appreciate seeing it.
It looks hilarious but would take.. FOREVER to make unless it was wrapped. And wrapping is WAY out of budget. Maybe someday it will get ridiculous patterned paint...
If this thing doesn't get a paisley patterned fabric roof, I'm going to be very disappointed.


