


I have reinforced the Belcrank mounts. I added a flange to the chassis mount and 2 more plates to the shear tab thing.


+1.5 hrs, $0.34 worth of plate.

I have reinforced the Belcrank mounts. I added a flange to the chassis mount and 2 more plates to the shear tab thing.
+1.5 hrs, $0.34 worth of plate.
I've been dialing in the front fenders in CAD a little more to figure out what the first atempt at finishing out the inside will be. I've been drawing some additional inspiration from a "road car".
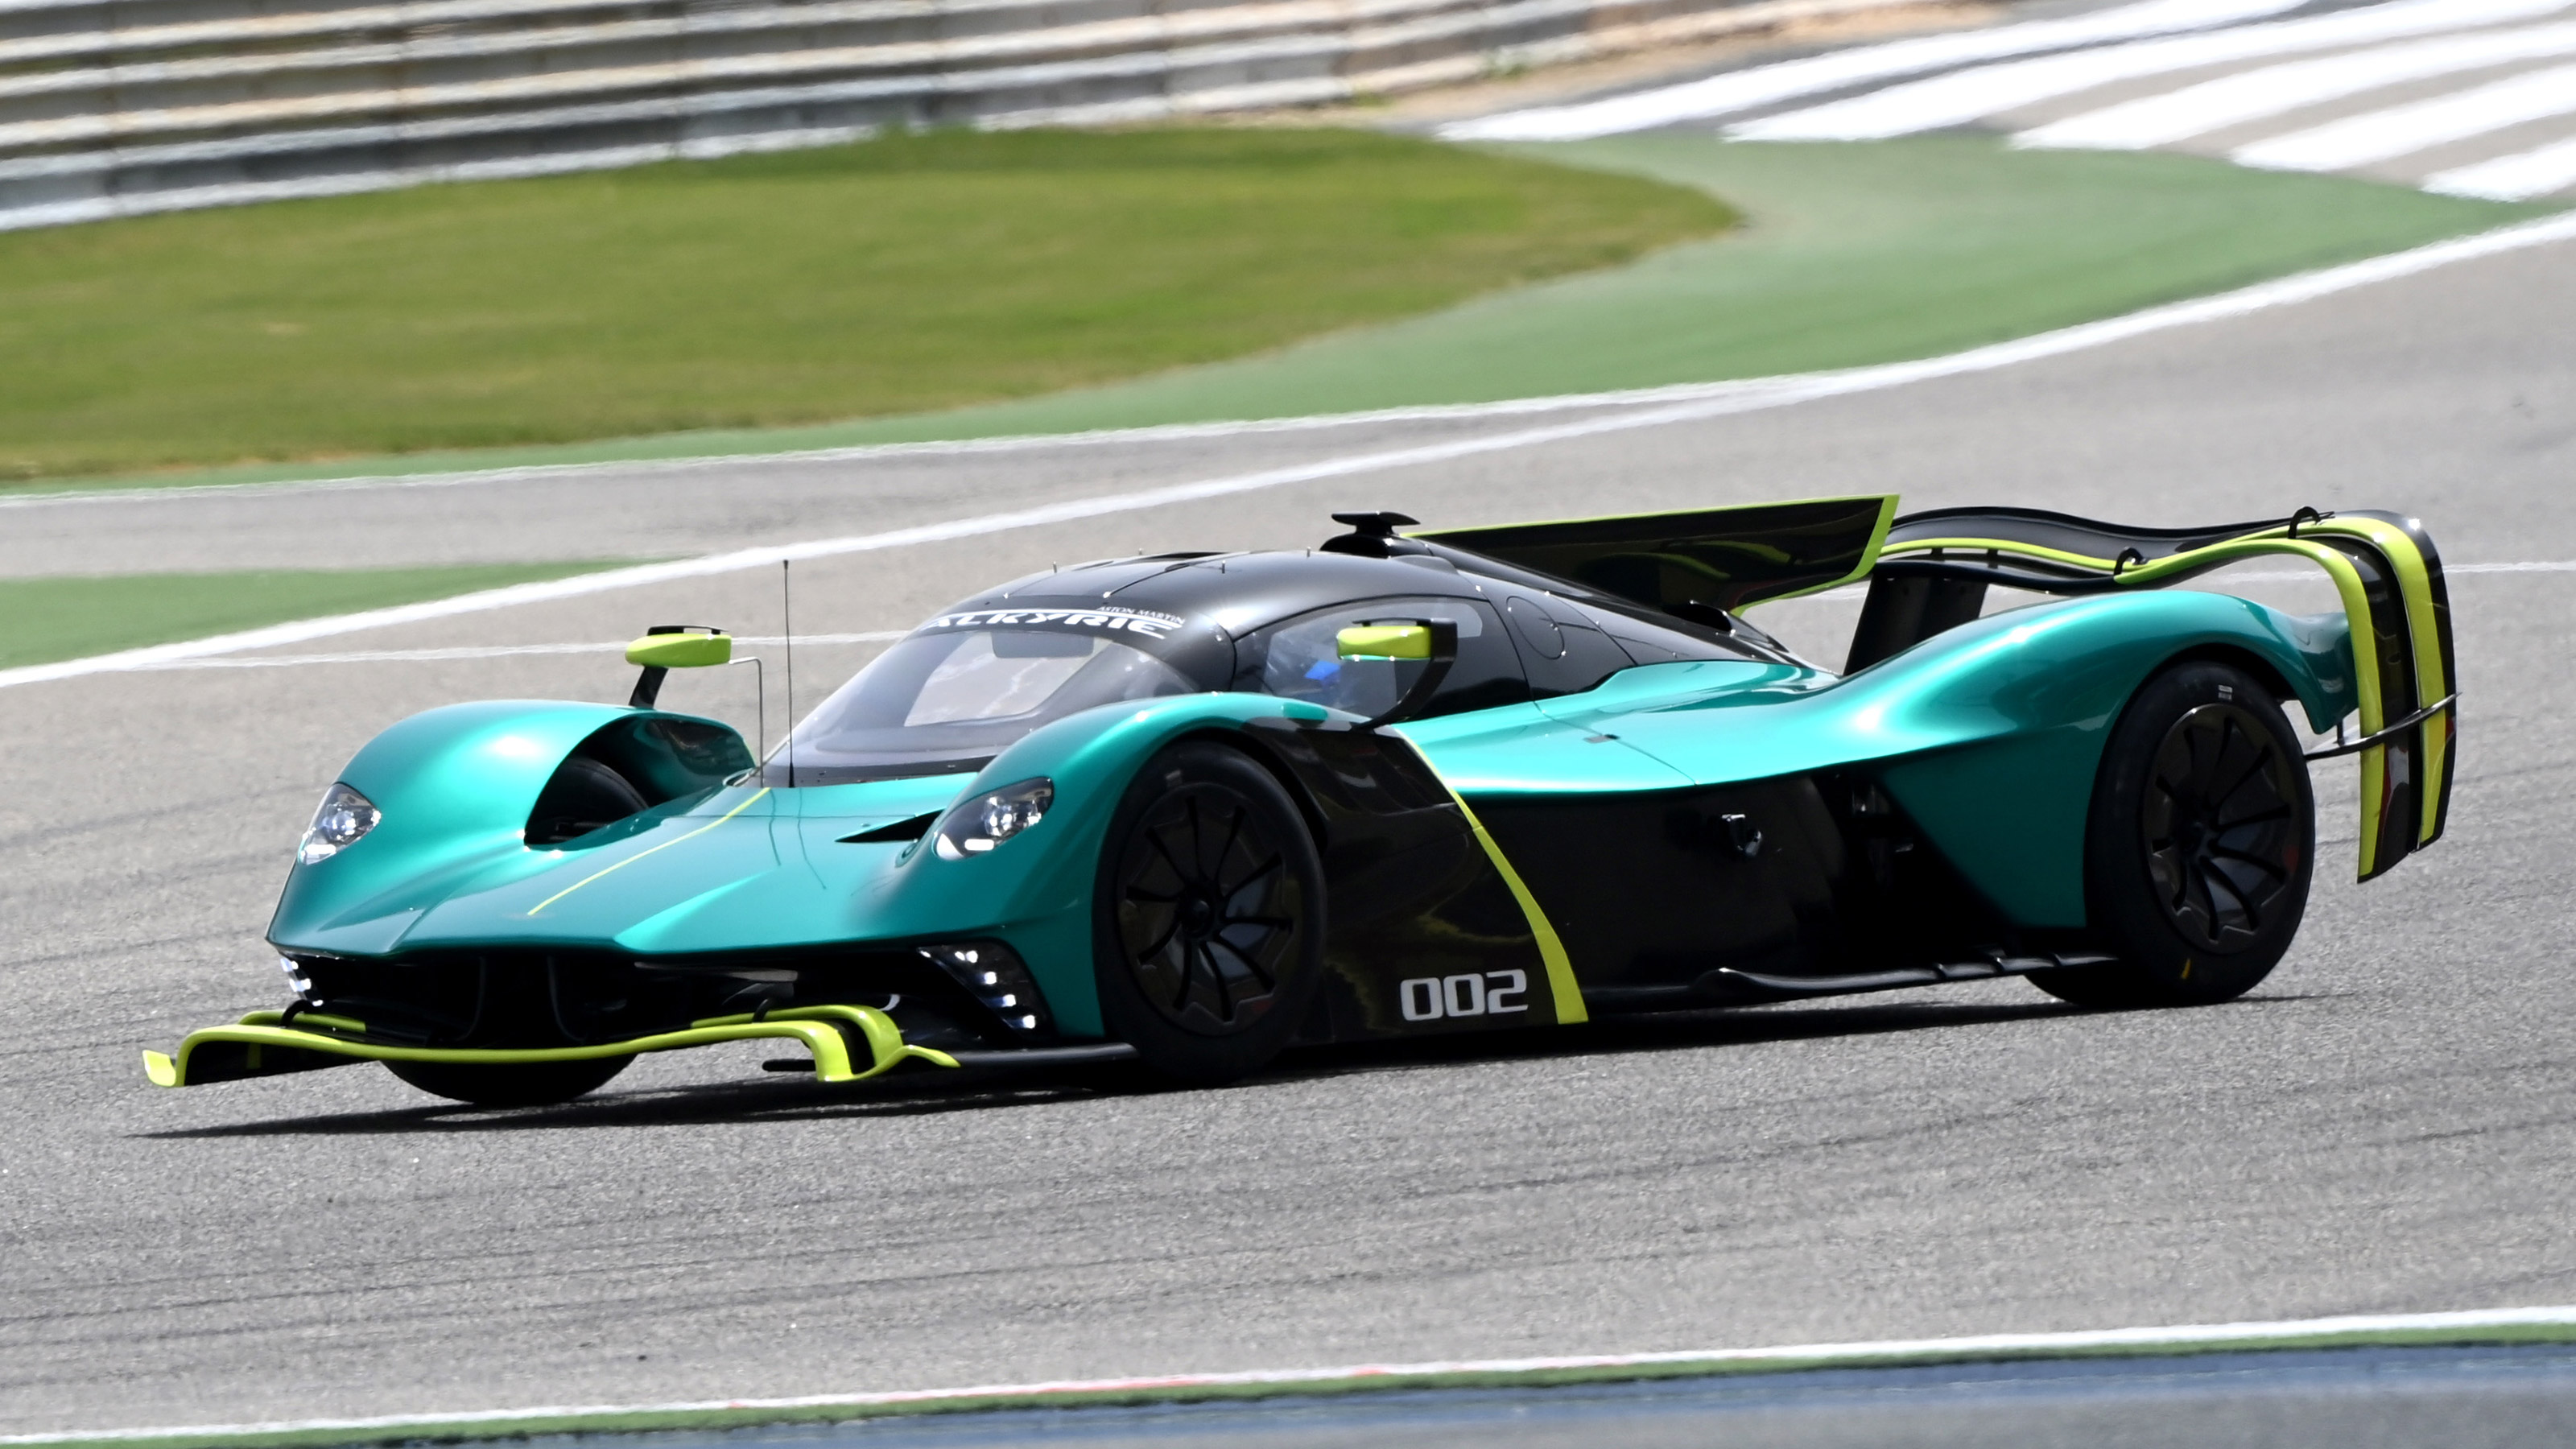

The AM Valkyrie shrouds the front of the wheel but in the rear the Inner fender steps out to provide a large fin behind the tire that directs air out. After some looking this design makes a lot of sense for a LMP looking car with Road Car wheel lock (Turning). The turning drives the inside of the fender inobard of the car, but the relief at the back lets the fender be slender behind the wheel while still being wide enough at front. The natural shape of the 360 fenders are a little wider then the wheels in the front and it looks like this width can be blended into the "Shroud" piece to provide that break behind the tires.
Since pictures are worth 11tymillion words.


For fun I downloaded a Valkyrie model and borrowed it's front wing. Amazingly that is the Valkyrie front wing unmodified fit the front of the LMP360. I also modeled some side pods that really lean into the Valkyrie look. Since the Valkyrie is kinda the budget unlimited attempt at turning a road car into a LMP/F1 type car it would make sense that my cut rate garage attempt shares some commonality.
This version of the CAD model also features accurate sized wheels at the correct overall width. The fender to body clearance is a little narrower then previous models, and the tires are substantially narrower then the previous CAD models, but it is accurate to the car that was at the challenge.
I hope to be mocking the fenders up in builders board this weekend with the RFP1's at the corrected ride height with the shortened pullrods.
Didn't quite make it to fenders this weekend but did get the Belcrank reinforcement done, reassembled everything and mounted the RFP1S.

I set the ride height on the boxes then figured out the closest lock on the lift. The lock was 1.5" below ride height which was real convient so I pulled the bolts out of the pullrods and set the wheels on the boxes and the chassis is sitting on the lift on a lock. This puts the wheels 1.5" above ride height which is the maximum bump travel (it's about 3/4" chassis clearance). I will install / mount the fenders with minimal clearance with the wheels at full bump then at ride height they will have a gap.

So the new tires and rims are substantially narrower then the ones ran last year. The car is 3" narrower overall which will let it fit on the trailer without transit tires like a monster truck but the rear view is a little less impressive.

+2hrs, +$0.38
Just to be clear the RFP1s are not challenge legal are just for Trackdays and non challenge Autox.

Fantastic. I love any progress you do to this car. A ton of it goes into the automotive spank bank that will hopefully come out in my next project.

It's a gift that your sciencing through this thing will allow you to achieve extreme levels of grip without "needing" giant meats. Light weight + science + slammage = Hoover. Results seem positive!
A turbo might give you all kinds of fun excuses, however. ![]()
In reply to rustomatic :
I do happen to have a 2002 WRX in the driveway that may wind up donating it's heart to this post challenge life...

so, I did a quick OptimumLap analysis back in February, which probably under estimates weight (1660#s 'race'), and has absolute WAGs on Ax, Cl, Cd, and Lon/Lat-G.max... but it finds that 185whp is worth the same time savings compared to lots of downforce around VIR.full

I would take the 'outright' laptimes with more than a couple grains of salt... since OptimumLap doesn't include elevation/banking information. So, it's optimistic by an unknown amount.
Monday night I spent about an hour messing with the fenders balancing them on the tires and taping them on and having them fall off and generally getting frustrated. When I did the fenders the first time I just kinda welded them on and didn't care as much so since I was trying to get them on with more science I was trying to be more careful about it. I ended up calling it quits to come back after having a think. I realized I could just weld on some bars that hold them in place to the bottoms that I clamp to the chassis. That way I coukd adjust them for width and along the car for placement. I'm not sure why I didn't think of that Monday.

So now that the fenders will stay in place I positioned them to allow the wheels full lock at full bump and with minimal front camber set their width. I then cambered the wheels fully to start forming the framework that will get sheeted, and this is as far as I got.


So that's +4 hrs total to get the front fenders in the right place and half the substructure done. Tonight I hope to get the rest of the substructure done so I can add the frame mounts then use builders board to mock up the metal. I will add the conduit cost as 1 item. So far I'm at 10' added.
More progress on fendering.
I added a pair of tubes to define the inside edge of the fender. These tubes have to be inboard of the tire when fully turned or they could alternatively be in front to the tire. I was hopeful that the flat A-arm shroud would be far enough forward to be able to tuck the wheel when turned behind.
It's hard to describe but when you look at the front of the car the shroud can cover the opening that allows the front of the tire to pass behind the fender, but my issue compared to a car like the Valkyrie or the Praga R1 is my nose is much shorter. My shroud will need to attach to the fenders behind the front of the wheels so I ended up having to have the vertical drop down inside of the turned extreme inner edge of the wheel.
It reduces the width of the shroud piece compared to what I was expecting but, it still will be 7" wide.
I added some builders board to parts of the fender to see how the shape would look with non-compound curves. They aren't done, there is quite a bit more parts to add to get to the shrouds. It's a little Zeppelin looking and ideally the inboard most part would be a compound curve. I may try doing fiberglass for the furthest inboard part to give it some more roundness but that's probably a long term upgrade. I so far am liking the look, and from the driver's seat the view out is suitably ludicrous.


I will be adding another completely vertical piece to this to lower further the inboard edge of the fender. I know it's hard to visualize this stuff and if my words are confusing and they dont provide clarity I apologize but I just wanted to keep people up to date as I work.
Hopefully Tonight I will have the 2nd fender to match and have the rest of the shape defined.
+2 hours, + 3' conduit

Man this just gets better and better ![]()

I was just watching THIS video of Abbie Eaton's first time back on track since her broken back. She is driving a Revolution prototype and I thought the design esthetic was so close to what you are doing with your LMP360. Figured I would share some image captures. Keep up the amazing work on this car!


I can't help but think that revolution thing has had a lot of "this looks cool" applied to it, rather than things done for a reason.
That video introduced me to the revolution as well. It's a pretty looking thing. I've not found as many detailed pictures of it nor some pictures of one taken all apart.
So fender progress continued and I have managed to make framework and mounts for both front fenders. I'm not trying to be a tease but I'm 5 hours from the 450 Hr update and I think I will have the full front end mockup done for that so large revealing pictures will wait.
I also started on the front wing / splitter / bottom of the fenders frame.
The un-aeroed car was hard enough to get on and off the trailer and I knew with ~20" more overhang there was no hope so removable was the way to go. The front fenders being designed for 10" wheels are not tall enough for car so they will be extended. I'm splitting the front fenders so the extension will be mounted to the outer part of the wing element. I know it's heavy but at least for now I've decided the structure inside the element will be a pair of lateral tubes. These will extend into the fender extension and have a bolt to tie the fender back together.
Remember overall the car will have a uninterrupted 54" wide main element about 4" off the ground. This will have end plates that will be inboard of the fenders. Outboard of the hood there will be additional elements between the hood and fenders. In front of the fenders will just be a flat splitter 2.5" above the ground with some kind of end fence. I may attach dive planes above the splitter.
On the chassis I cut some 5/8 tube down as sleeves and welded 4 tabs to the car. The front support was attached and is made out of 3/4" and 1/2" square tube. So removing 6 bolts will drop the entire assembly off the car. This will make nothing below the high part of the nose in front of the axle so the approach angle will be line 70*. I'll probably weld some mounts to the trailer that I can mount the assembly to for transit.

The end result is relatively light and strong enough that I (240lbs) can stand on the forward bar in the middle. The sides at the ends deflect when I put weight on them but "twisting" in the mount arms seems to be a non issue I think the lateral tubes would bend first.


+2 hrs, I'll edit in the Cost of the tubes and conduit used when I total it up this afternoon.
Next post will hopefully be the 450 Hr update with the front mockup complete.

Removable front aero clip is very F1 ![]() I bet you could make the lower attachments passive capture, and use hood latches for the top attachments, then you could pull a lever in the car to drop your front aero easily without tools.
I bet you could make the lower attachments passive capture, and use hood latches for the top attachments, then you could pull a lever in the car to drop your front aero easily without tools.
In reply to maschinenbau :
I thought about that, I may keep my eye out for a solution. I'm somewhat concerned that anything toolless will inherently have play. A hood or trunk latch would maybe work but weight is a concern as is cost because I don't have any. I'll look at toggle latches some of them are pretty cheap not sure if they would be strong/stiff enough.
Tightening pants waiting for the 450hr post.
In reply to nocones :

I'd suggest putting the 3/4" bar up front, and the 1/2" behind... or just put two 3/4" bars in there instead. 80% of the splitter load is going to be generated in the front 25% of the splitter.
In reply to sleepyhead the buffalo :
Right now it's 1" in the back 3/4" at front because I'm relying on the 1" to support the front of the fenders. The fenders alone have some flex and the outside edge needs some support. I may see how bendy the 3/4 feels. Its wierd because the 3/4 and 1/2" isn't substantially cheaper then the 1" so I tend to use it.
then I'd suggest using two 1" bars, and making a "truss structure" of 1" bars between them.
you could fill in the area between the truss and spar elements with foam... or just skin between them with steel skin, and "we" can work out a leading edge and trailing edge treatment in foam/wood/glass
In reply to sleepyhead the buffalo :
I was going to reach out and post some pictures with some dimensions and constraints in the aero thread in the next few days. I'm mostly just building the fender extensions and support truss.

nocones said:

maschinenbau said:Removable front aero clip is very F1
I bet you could make the lower attachments passive capture, and use hood latches for the top attachments, then you could pull a lever in the car to drop your front aero easily without tools.
you might poke around "Professional Awesome's" site... they've got a splitter mounting system that has a piece in the back that 'catches' some mounts on the splitter (these might be front and back)... and then I think they use custom fiber tension 'rods' in the front to aid any unsupported cantilever loads. Might be some inspirationt to work from.

Super cool build! How are you creating the graceful gentile bends in the EMT conduit?
To get this:
I think the fender needs to continue the flat top farther inward.
This:
Needs the tube with 3 horizontal pieces of tape to be as high as the tube outboard of it, live completely perpendicular to the ground, and have the whole tube live 2-3" inward of where the peak currently is. The flat top and vertical surface of the inner fender of an LMP car is a distinct look you are loosing with the more pod shaped fenders.
You'll need to log in to post.


