


Should have said Greenville, right?

Should have said Greenville, right?

That would indeed work better.
Also, I laugh every time I read your signature. Although it's less funny now that the seller of the far better engine also lied.
It is what it is. You pay your money and take your chances. Unfortunately most people are not honest these days, so the chancesare greater. Still ppicked up an engine that I heard run and made no smoke or noise. So hopefully I bought myself another 50k or so.

tuna55 wrote: I am positive that you have more of an audience than the two of us. Don't actually let me be an irritant, though. I understand update delays as well as you do!
He's right. Add that total to 3. Car isn't my style, but I got so hooked reading your Neon build that I can't stop reading this one.

Spectacular update. I love watching this thing come together.

Not sure we can call this a beater anymore...
get your 50k out of the motor then do something drastic. Turbo?
Twins.![]()
And THANK YOU all for being loyalrreaders. Hopefully it is at least as entertaining to read as it is to build and write.

You're doing good work. I can't wait for the start up video.

Eh, there's a lot of us following; we just don't always post unless there is a foot picture.

Looking forward to the burnout video
I had forgotten just how expensive plumbing a fuel system is
Dont expect any picture heavy updates for a bit. Right now im doing wiring and plumbing, which don't look like anything is happening until BAM! Done and tidy.
Ive got most of friday and today in the efi/engine bay side of things. It'd go a whole lot quicker if I wasn't so ocd about every harness i build.
This won't be a full streetrod/wiretuck job, but pretty darn close.Its my shop truck, and my shop specializes in wwiring. So its got to look good and function properly. Also, im throwing every trick i ever learned at it, as well as some new stuff I've always wanted to try.
A normal harness takes me about 60 hours start to finish. Thats for your basics/carb engine. Nothing fancy. Thats also using quality harness kits. The ez, while decent parts, is far from complete and logical. Would not reccomend for a first time install.
The efi conversion, using a stock donor harness, usually takes me about 20 hours by itself. So...
Efi harness almost done. Plumbing at 60%. Couple spots of welding to do and I can hang the front clip and pressure test the fuel system.
Still waiting on some an fittings from ebay for the surge tank.
Im broke. As soon as I know the fuel system doesn't leak, the front clip is on, and all the undercar stuff is done, im putting it to the side for a while. Until I can free up some money.
you mean as soon as the car is complete you are going to let it sit?
![]()
Nah. Needs interior, tons of electrical, etc. Im actually pretty close. ..
psh, no interior b/c driveabeater.
Lol. Definitely a possibility.
ive been at it HARD. im beat. im broke. im hurting pretty bad. my house is trashed, my shop is trashed. my dads shop is trashed.
but the damn thing RUNS!!!!
[URL=http://i54.photobucket.com/albums/g108/dusterbd13/1964%20elcamino/20141102_115223_zpssoz0at54.mp4][/URL]
ill do a full update/budget/progress post sometime this week.
maybe.

Congrats! Ya, there's more than the two following your progress!
so, budget first:
previous total: 9345.43
money spent:
tailgate hinge rebuild kit, eBay: 23.99
fuel pressure tester adapter port, eBay: 18.99
180 degree 6an fitting, eBay: 5.06
2 90 degree 6an fittings, eBay: 9.36
80 smd taillight bulbs, eBay: 4.64
cheapest tach on eBay: 12.40
80 watt Cree switchback bulbs, eBay: 39.90
front clip fastener kit, eBay: 56.00
headlight switch, headlight bulbs, stainless spray paint, oreilleys: 51.73
cts sensor, idiot light sender, cap, rotor, wires, oreilleys: 88.53
ngk spark plugs, oreilleys: 17.52
adel clamps, fuel hose, ses light, Bradley auto parts: 15.68
fuel line and clamps, pep-boys: 49.46
fuel line and clamps, advance: 36.51
new total (remember my limit of 10k?) 9775.20
when I last gave an real update, it was pretty weak. just a simple few paragraphs on the fact that I'm plumbing/wiring. not what you’ve come to expect and love from my updates. I know my few loyal readers expect a bit of a story, a bit of humor, tons of pictures, and some recounting of the trials and tribulations of being a cash strapped hot rodder with a family.
well, hopefully this update does not disappoint.
so I said previously I was working on wiring and plumbing. ill start with the wiring.
wiring is how I pay for these cars. I build harnesses for others, find and repair gremlins, do efi conversions, etc. usually for people with a bunch more money than me, so I can just order the stuff I need to do it the nice, neat, clean, and simple way. I don’t have they're money, well, I have some of it, but not as much as they do. so I'm stuck doing it the hard, labor intensive, and sometimes backwards way. this does not, however, mean that I cannot do a quality, clean, good looking job with these constraints. after all, 90% of wiring in in the install, not the parts. however, without the parts, you cannot do an install.
anyway, I had a few boxes of stuff to work with. box 1 contained the ez21 circuit harness. box two contained the stock efi stuff (wiring, sensors, computer, etc) from the engine donor 89 chevy fullsize truck. boxes 3 through 7 contained assorted lengths of wire, connectors, terminals, convoluted tubing, adel clamps, etc. some new, some used, some of unidentified origin.
previously, I showed how I rough mounted the fuse panel and began to basic route the ez harness. this is the easy and quick part. to get the back section of the harness to the taillights, I used the stock burned up ribbon cable with the new wiring duct taped to it, to pull it through the body cavities. this tail section included a key-on lead for the fuel pump, back up lights, tail and turn lights, running lights, fuel level, dome circuit, third brake light, etc. only wires that’s actually finished back there at the moment are the fuel sending unit and the key-on pump lead. the key on is powering the low pressure pump. I then moved on to the engine management wiring. this consisted of de-looming the stock gm stuff, saving what convoluted tubing I could, and plucking out the wires that would not be re-used. there's not a whole lot in that harness as compared to others I've done. I also re-routed a lot of it, extending and shortening where necessary. this was purely for cosmetic and structural differences. I kept all of the stock sensors, relays, etc. relocated the grounds and some of the sensors to clean things up, and re-loomed the harness. I used adel clamps wherever possible to retain the harness out of harms way and out of the way of line of sight with the air cleaner on. the fuel pump fuse and relay for the high pressure pump were relocated to under the heater box cover where they will be the least intrusive to the visual package.
while doing this, I used a trick that I absolutely love. most charge wires from an alternator are 10 gauge or smaller. this is fine until heavy constant load, when they will become the bottleneck in a high amperage charging system. my alternator is a 120 amp unit. not the biggest by any stretch, but at max output plenty enough to fry the factory 12 gauge charge wire. I tend to use 8 gauge or bigger charge wires on all my harnesses. I source this wire from the high strand count car audio amp wiring kits. usually one kit will doe three or four cars. I also grab the wiring from pull-a-part whenever I find it in good shape. another trick I used was to add extra grounding from engine to body and frame. this creates a more stable system voltage, as well as less interference with the EFI stuff. up front on the engine is a 4 gauge lead directly from block to frame. I also re-used the factory braided ground strap for the engine donor, slightly reaming one hole to fit the starter bolt through it. this effectively directly grounds the starter to frame, making the starter work a little better. other notes on the efi stuff are as follows: the factory firewall pass-through is filled with some rubbery epoxy crap. took me 4 hours to get it all taken apart, cleaned up, and ready for re-use. the ESC module has been relocated to inside the cabin to make appearances a little cleaner. the computer is mounted with a modified factory dash speaker bracket in the factory dash speaker location. wiring run through the kick panel vent holes and tucked up nicely. I added a power distribution block on the passengers side powered by 8 gauge directly off starter and through fusible links. this powers the relays, ecm, and main harness. also ran a 10 gauge lead from this to the power distribution block on the drivers side that I had mounted previously. this will be used to power various relays and such, but keep any wires from running across the firewall behind the engine. at this point, if you're still reading, you're either wanting to learn this stuff, bored to tears, or a masochist. I applaud you for reading that any which way you look at it. long story short, look at the pictures and you'll see what I'm talking about and how nicely it all came out.
[URL=http://s54.photobucket.com/user/dusterbd13/media/1964%20elcamino/20141017_162026_zps150b7c33.jpg.html]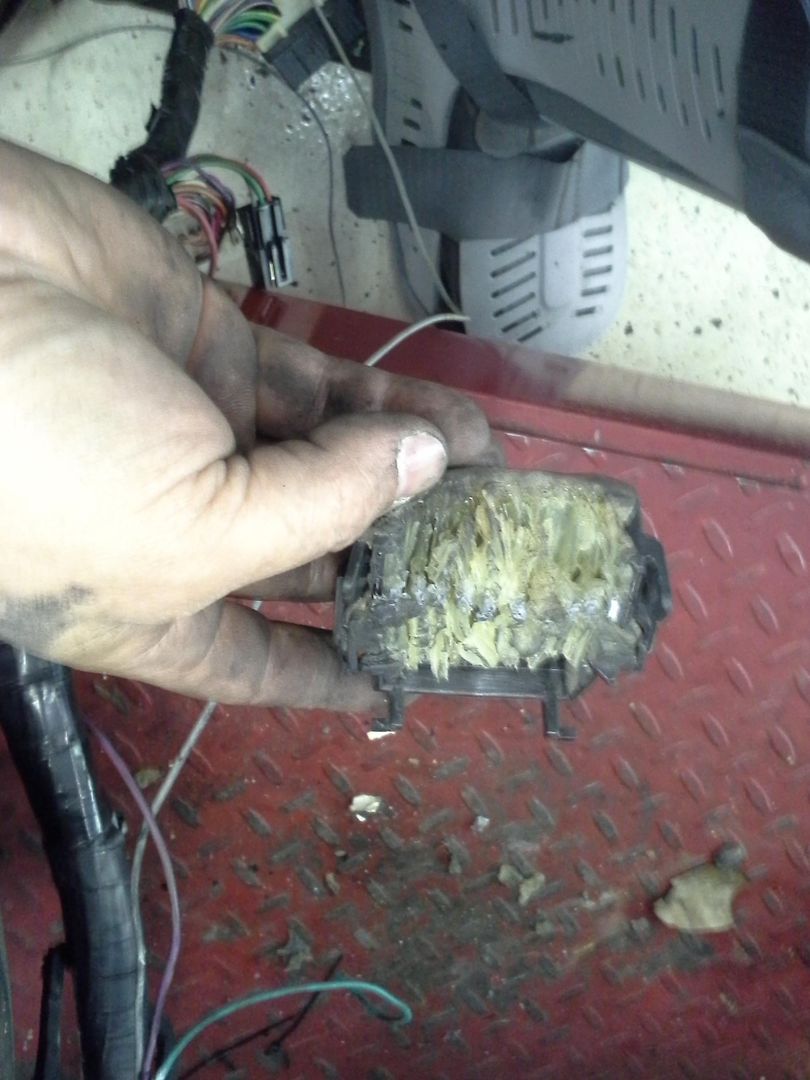 [/URL]
[URL=http://s54.photobucket.com/user/dusterbd13/media/1964%20elcamino/20141020_132500_zpsd022b576.jpg.html]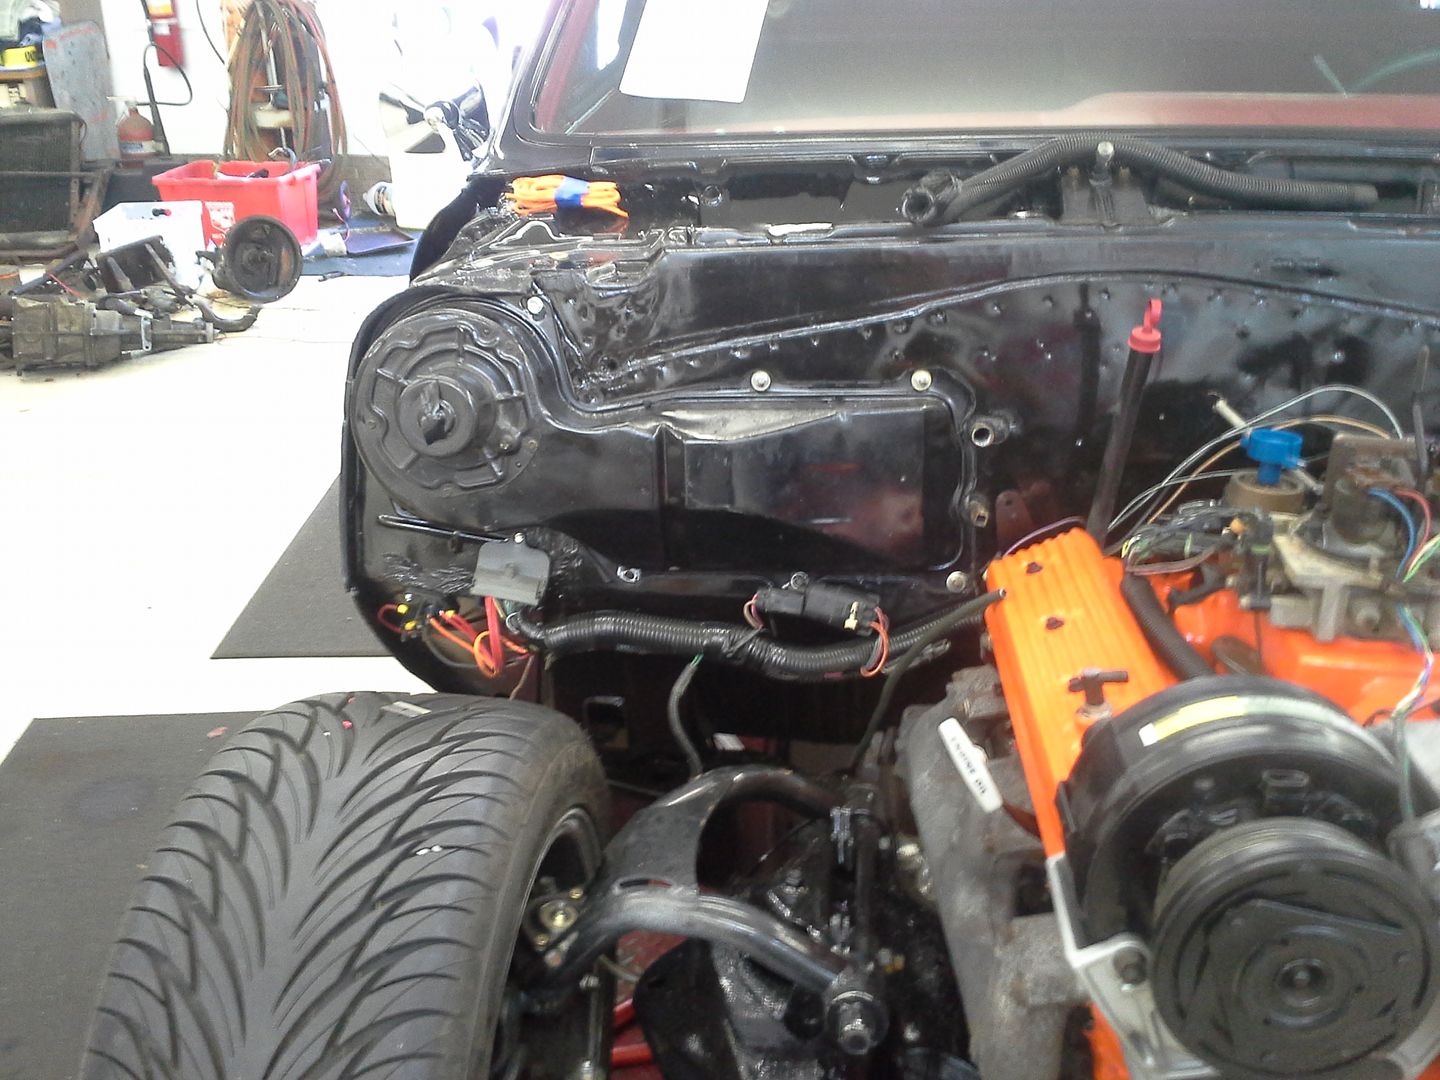 [/URL]
[URL=http://s54.photobucket.com/user/dusterbd13/media/1964%20elcamino/20141020_132508_zpsc27d4c5a.jpg.html]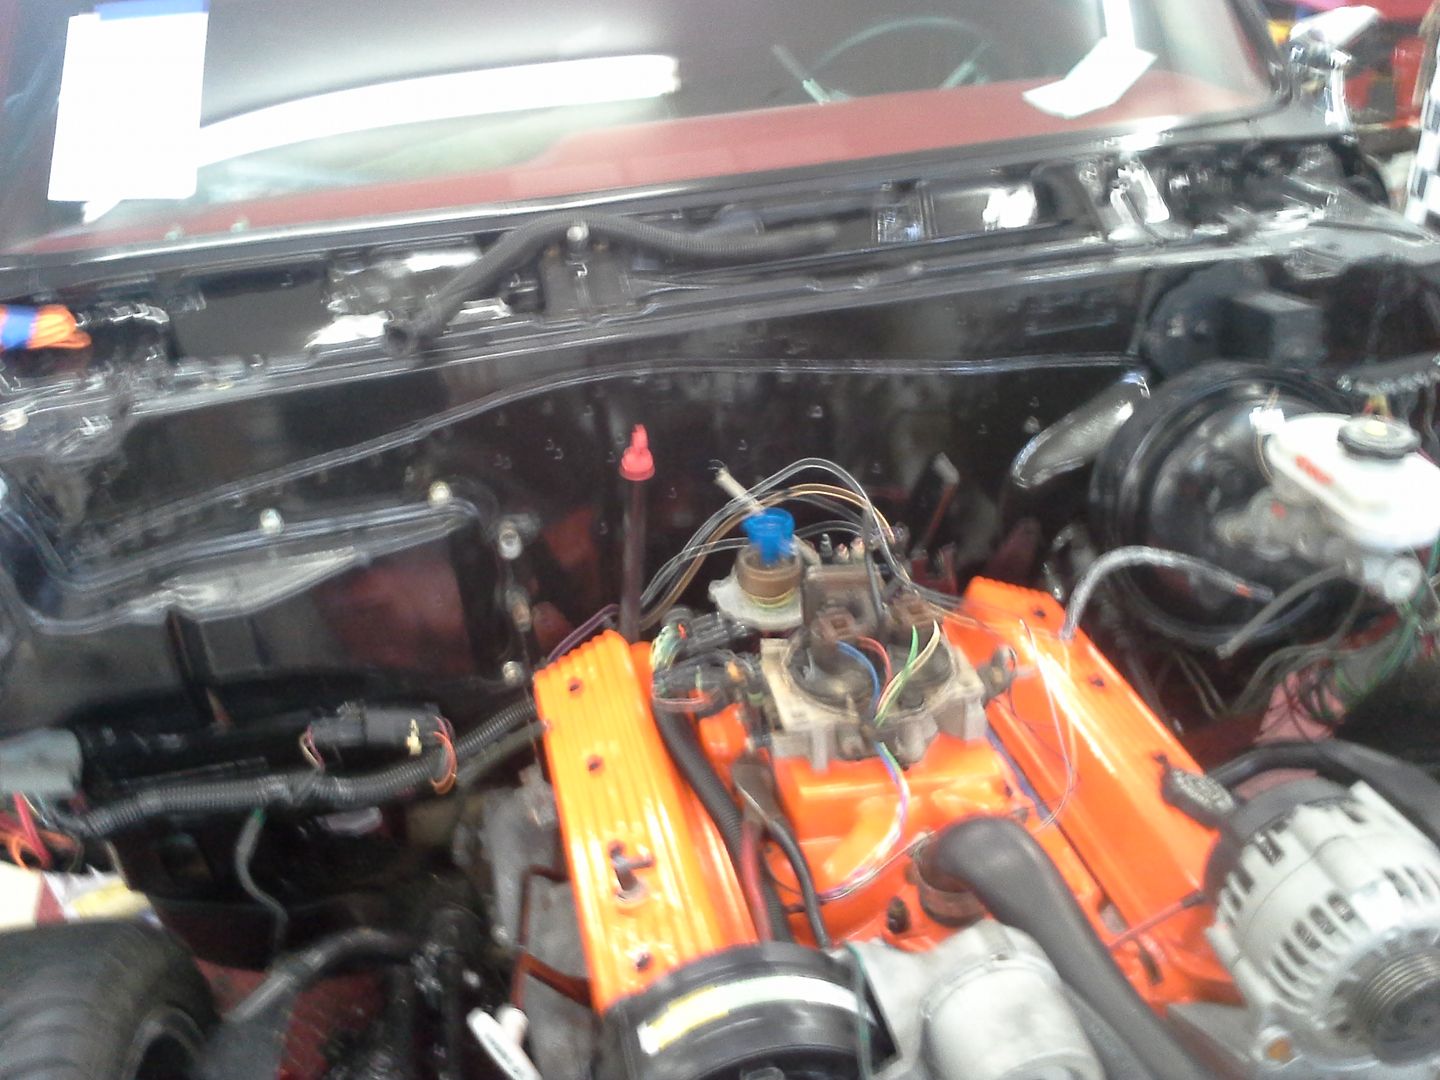 [/URL]
[URL=http://s54.photobucket.com/user/dusterbd13/media/1964%20elcamino/20141023_204715_zps26f78826.jpg.html]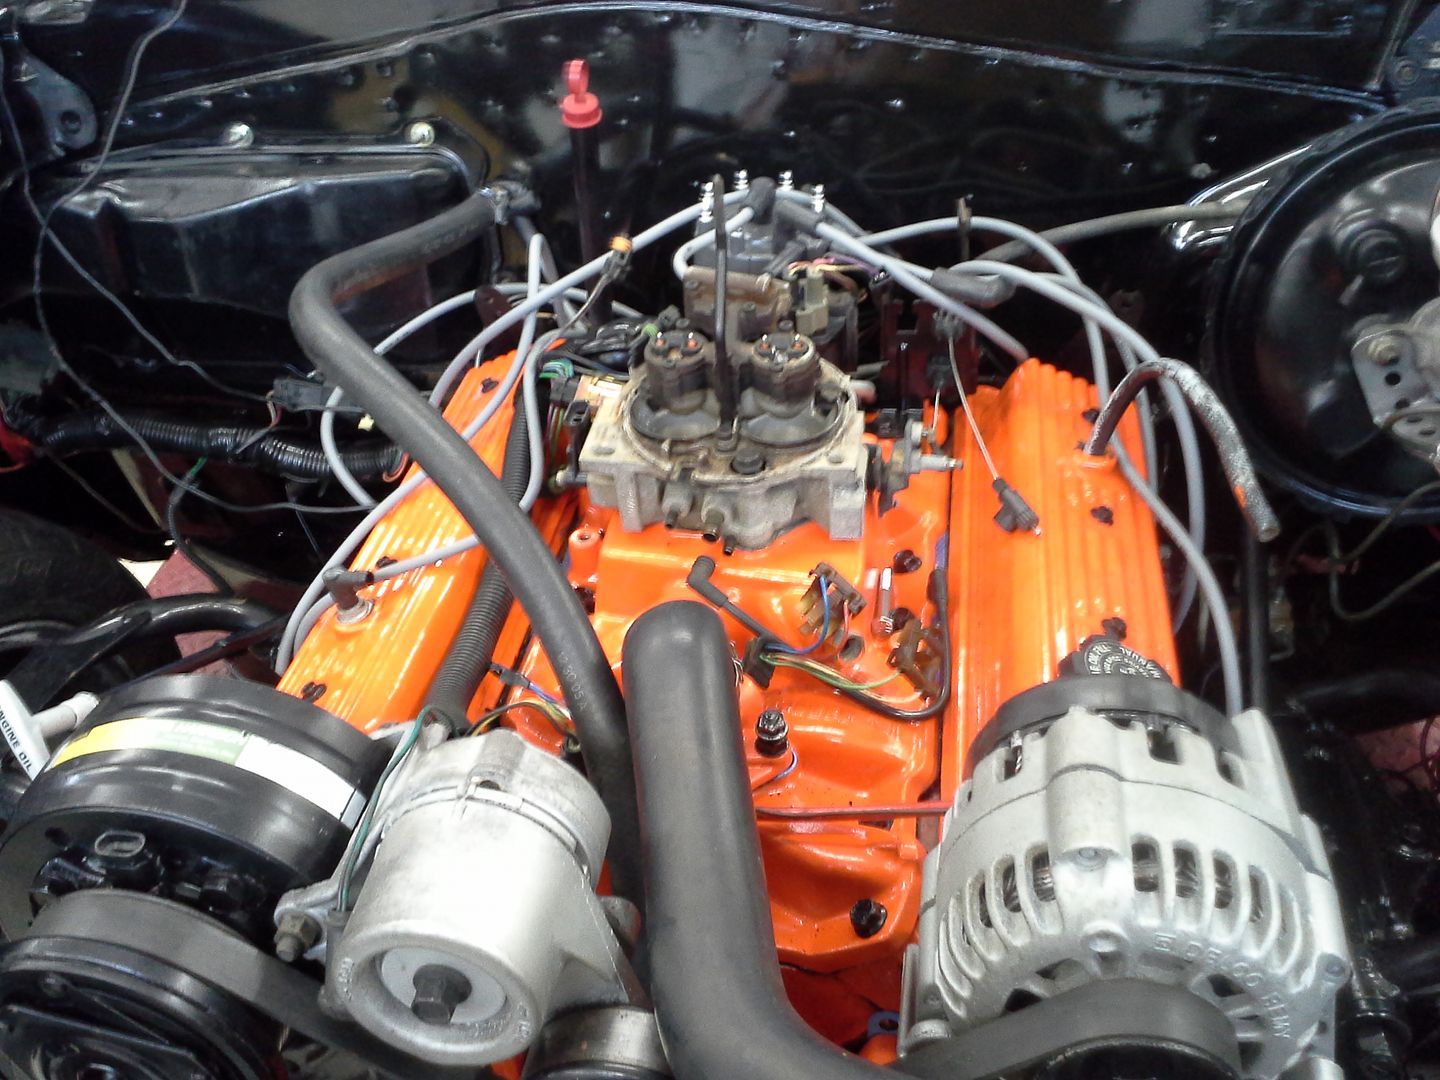 [/URL]
[URL=http://s54.photobucket.com/user/dusterbd13/media/1964%20elcamino/20141025_182150_zpsc573dd6b.jpg.html]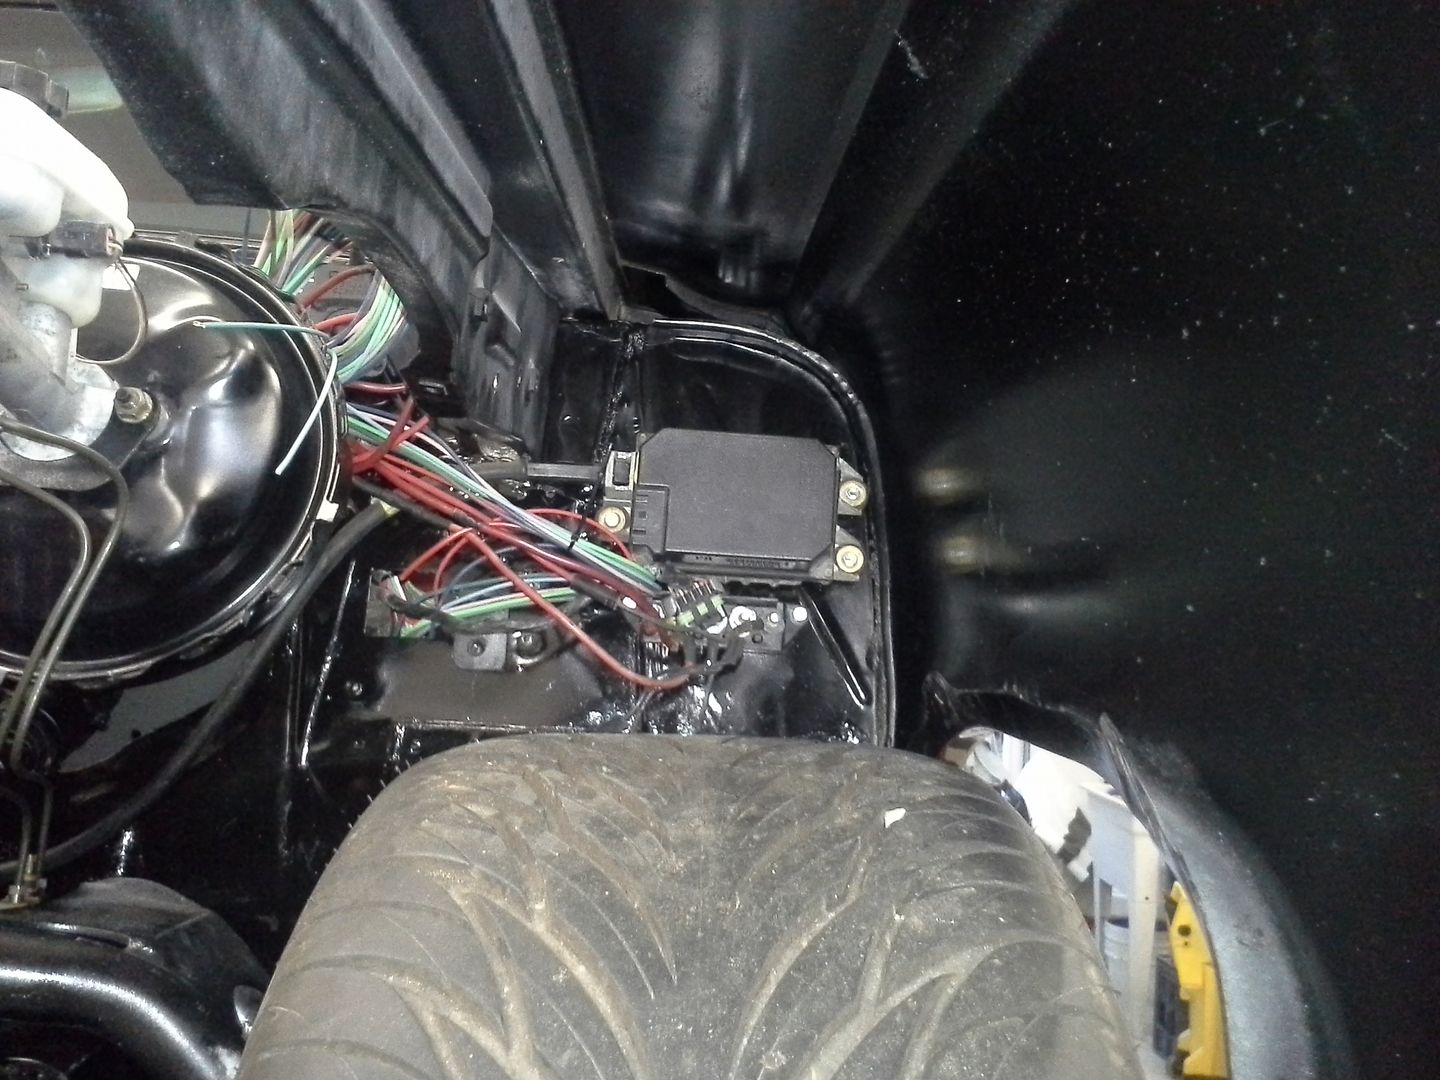 [/URL]
[URL=http://s54.photobucket.com/user/dusterbd13/media/1964%20elcamino/20141025_184024_zpsc4ad526b.jpg.html]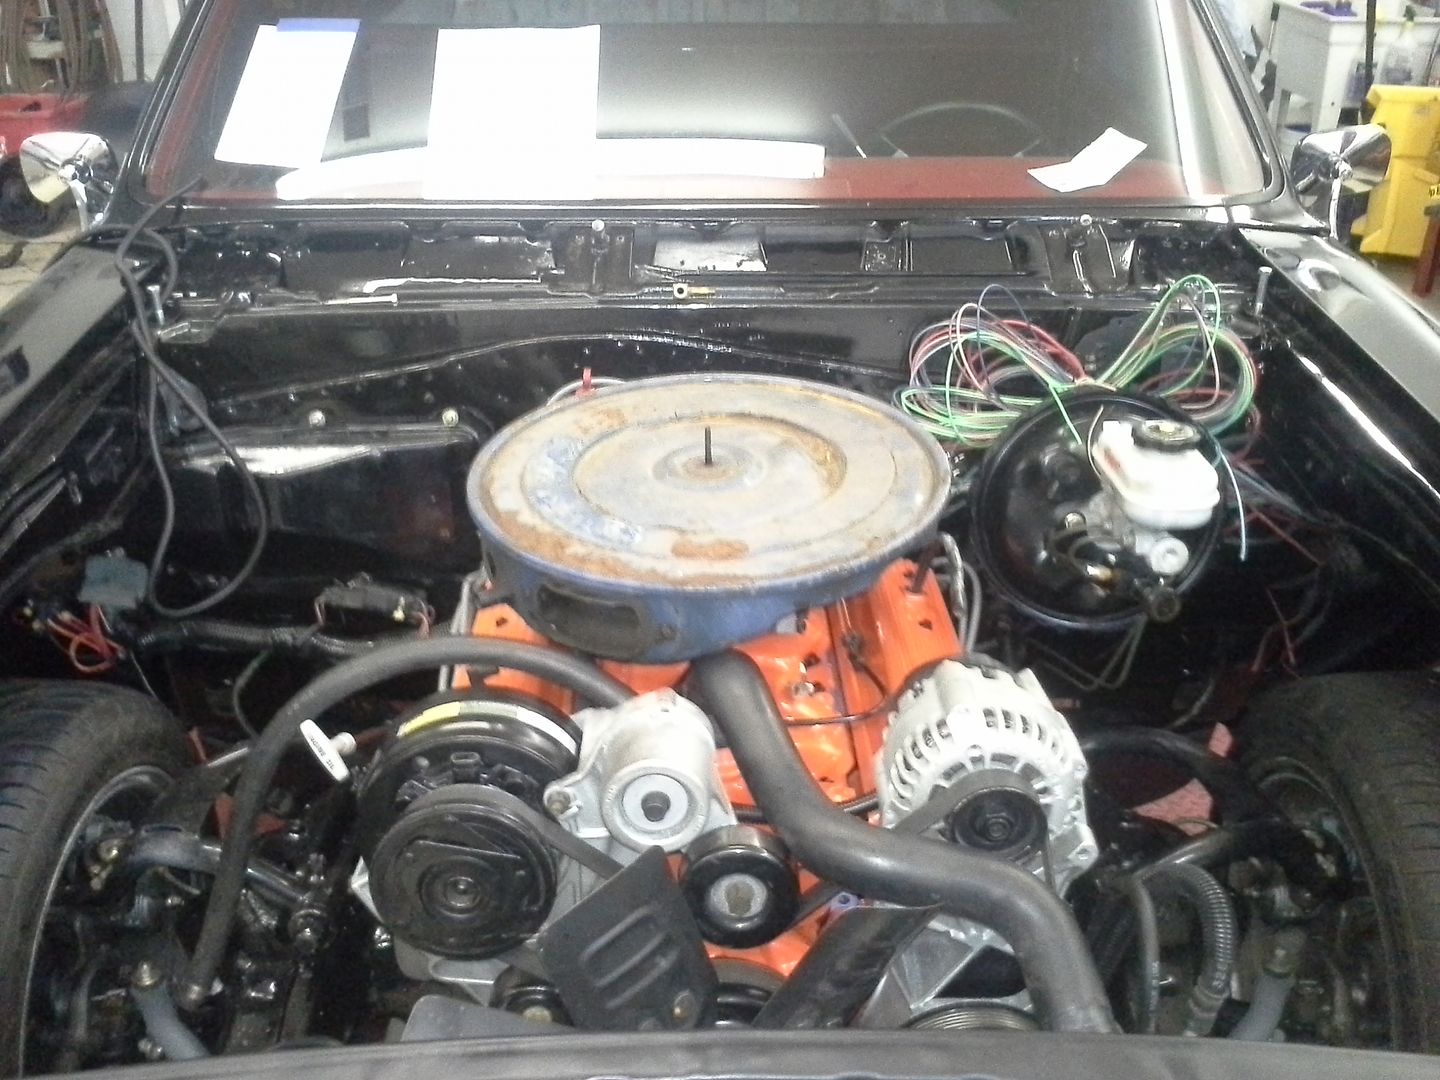 [/URL]
[URL=http://s54.photobucket.com/user/dusterbd13/media/1964%20elcamino/20141102_161731_zps82a0277b.jpg.html] [/URL]
I then moved onto the fuel system plumbing. plan a had been a rail mounted pump and return bung in the tank. I did some more research and found that this just wont work due to starvation issues below half a tank. plan b was to use the Monte Carlo fuel module. it was 3/8 too tall for my tank. I then went completely back to the drawing board, and decided to run a two pump, surge and main system. what this means is the stock tank is feeding a low pressure pump through the stock sending unit. this low pressure pump dumps into a 2 liter tank called a surge tank. this surge tank is plumbed in such a way as to be full at all times. it is fed by the low pressure pump, and all the unused fuel from the engine dumps back in it as well. the overflow goes back into the main tank via the return bung. this surge tank gravity feeds a high pressure pump (e2000 in my case) which feeds the engine. purpose of the surge tank is to always have fuel at the inlet of the pump regardless of fuel slosh in the main tank. I mounted my surge behind the right rear tire on a piece of angle iron. mounted the high pressure pump below it to the frame rail with adel clamps. plumbed it with the cheapest -6an push lock fittings I could find, one straight, two 90's, and a 180. all the bends required some fine tuning for my application. I also used high pressure rubber fuel line over the push lock, secured with a efi hose clamp. at 15psi fuel pressure, the system is way overbuilt. but it should be bulletproof. I also added a dedicated fuel pressure gauge adapter at the throttle body. it’s a nipple/Schrader valve arrangement for diagnostic purposes. no need for a permanent little gauge in the engine bay. low pressure pump is mounted to a bracket that is mounted to the fuel tank mounts. high pressure pump fired by relay/ecm from the tbi. low pressure is on when the key is on.
[URL=http://s54.photobucket.com/user/dusterbd13/media/1964%20elcamino/20141029_112630_zps4667db7a.jpg.html]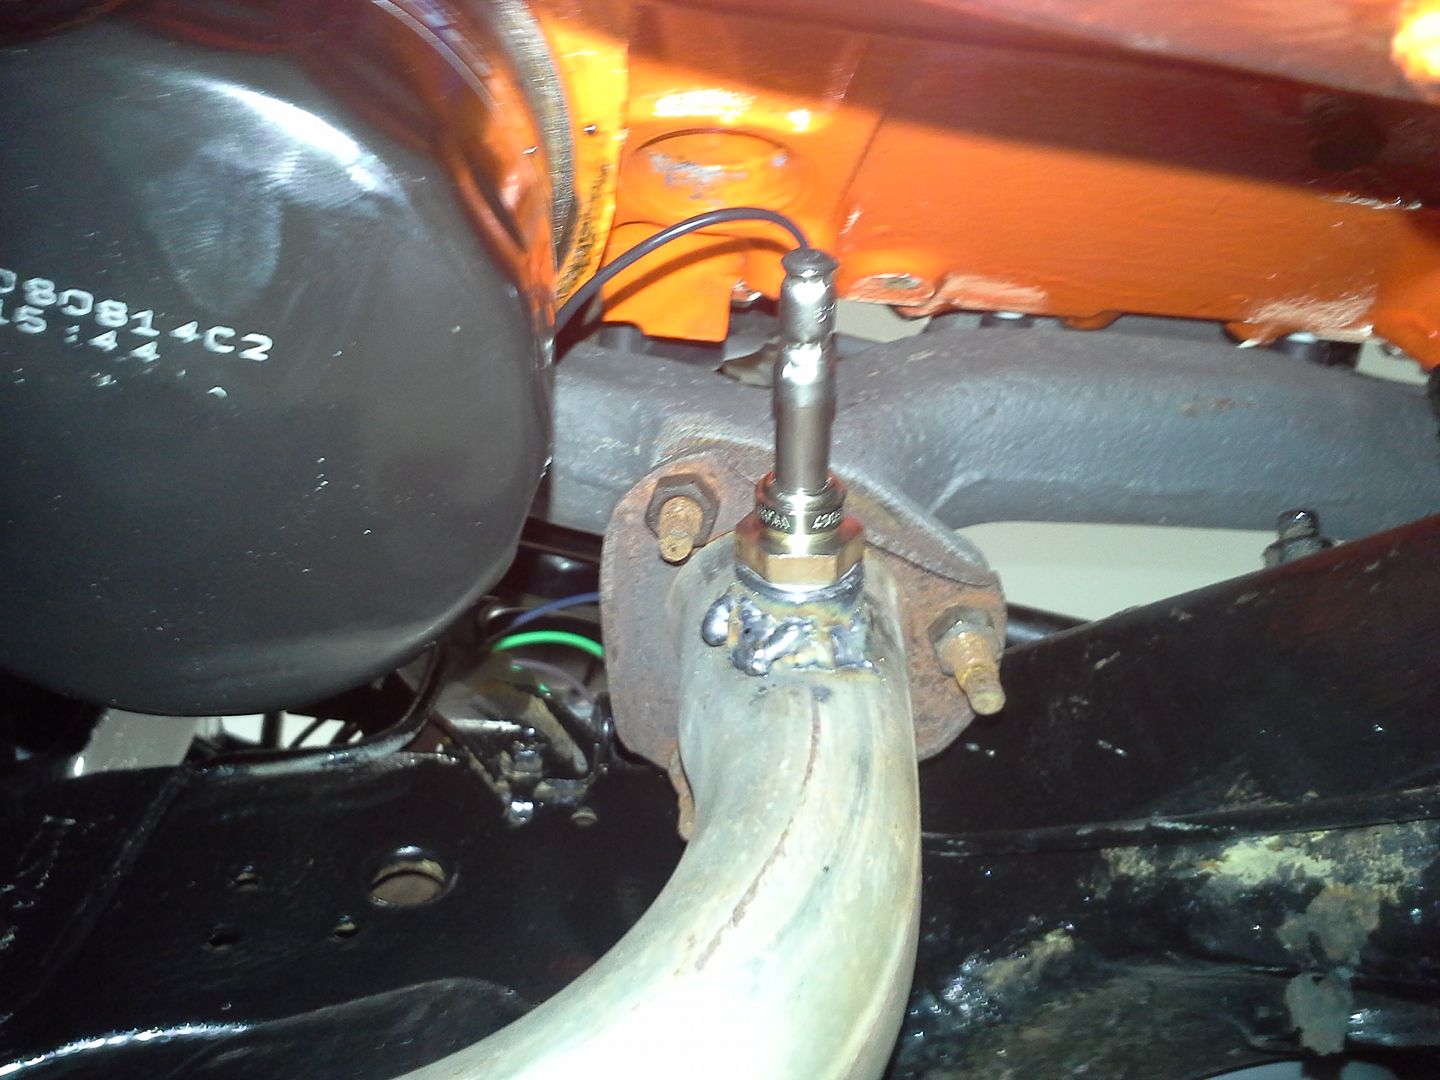 [/URL]
[URL=http://s54.photobucket.com/user/dusterbd13/media/1964%20elcamino/DSC01988_zps9c43befa.jpg.html]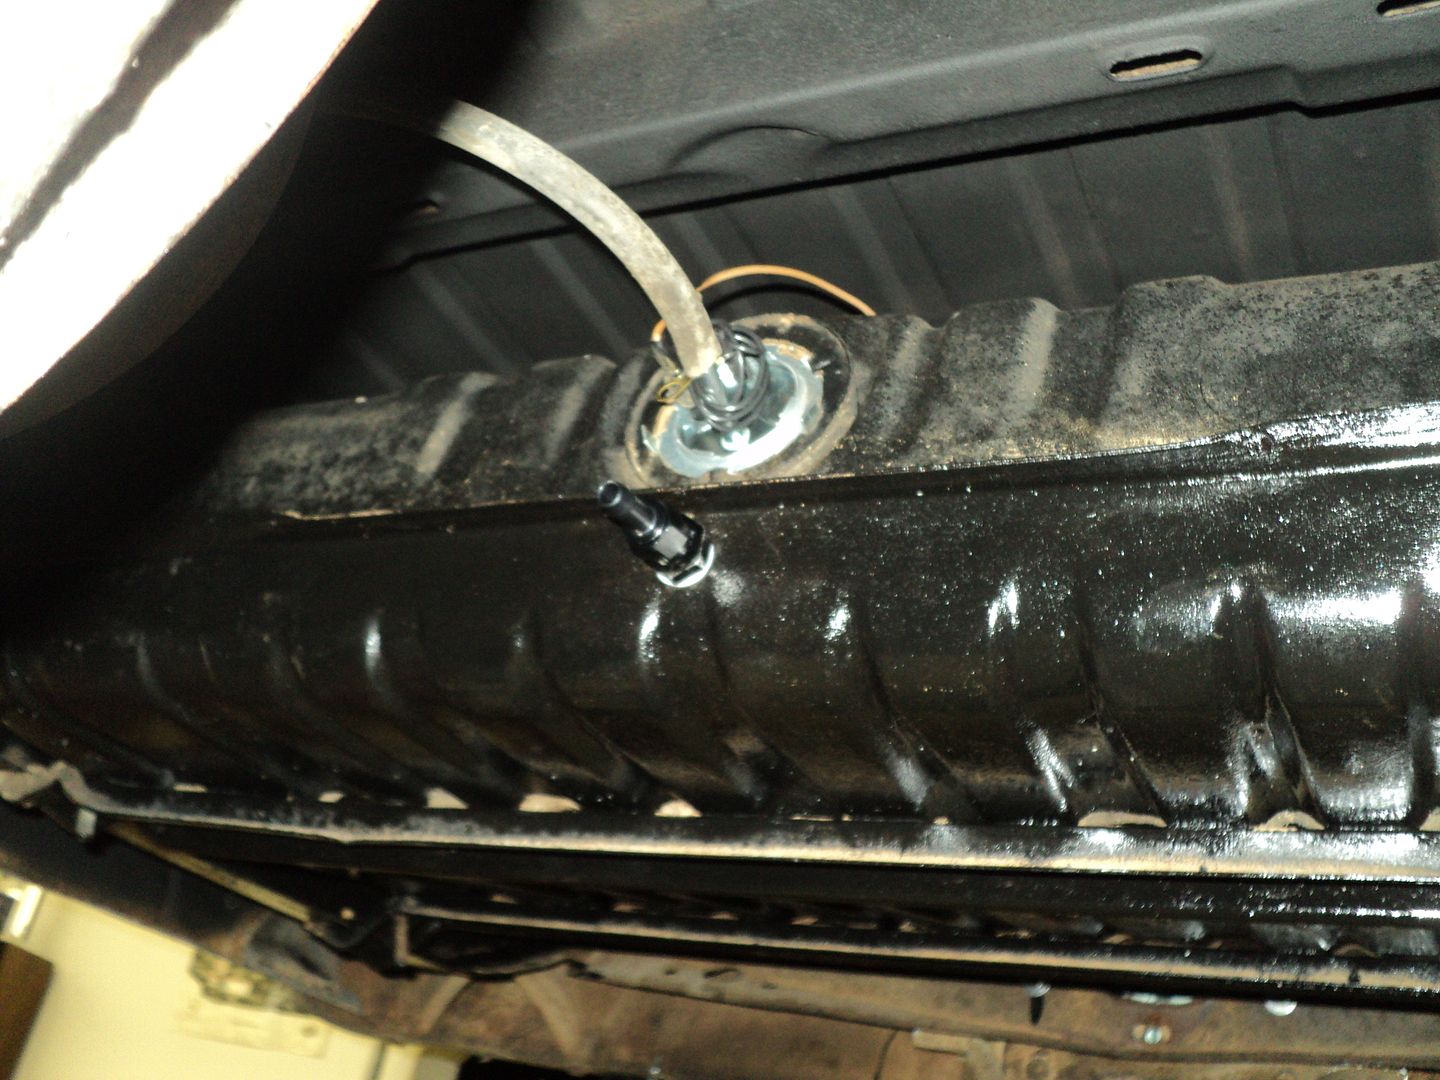 [/URL]
[URL=http://s54.photobucket.com/user/dusterbd13/media/1964%20elcamino/20141102_085220_zps577a70b3.jpg.html]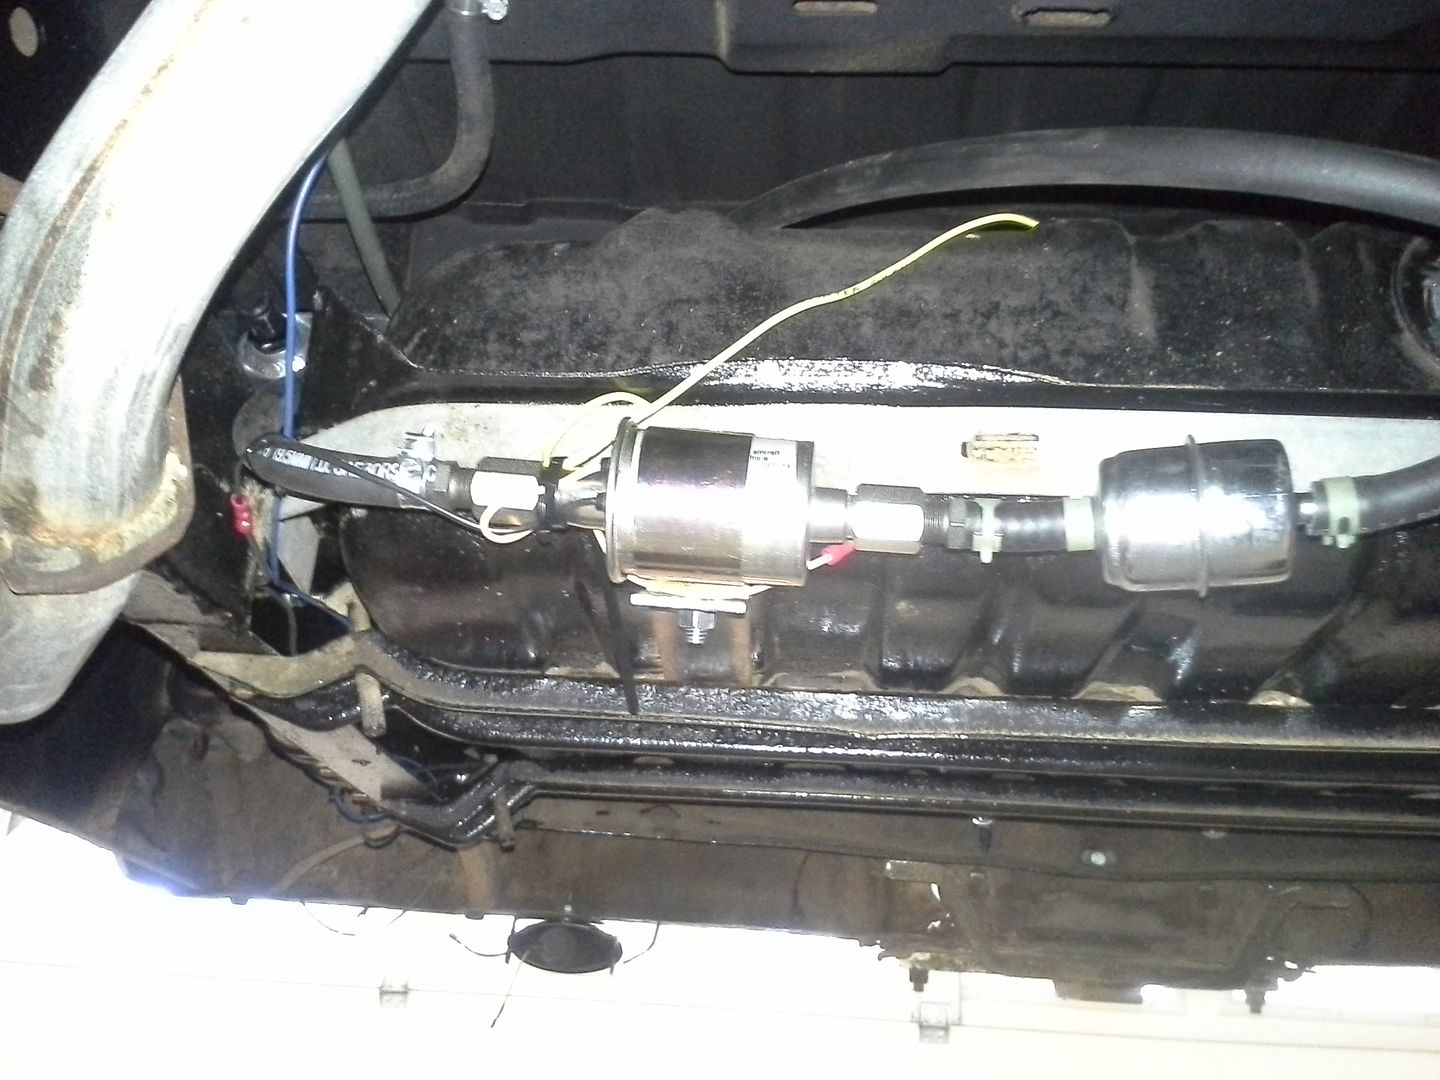 [/URL]
[URL=http://s54.photobucket.com/user/dusterbd13/media/1964%20elcamino/20141102_085254_zpsb80d9108.jpg.html]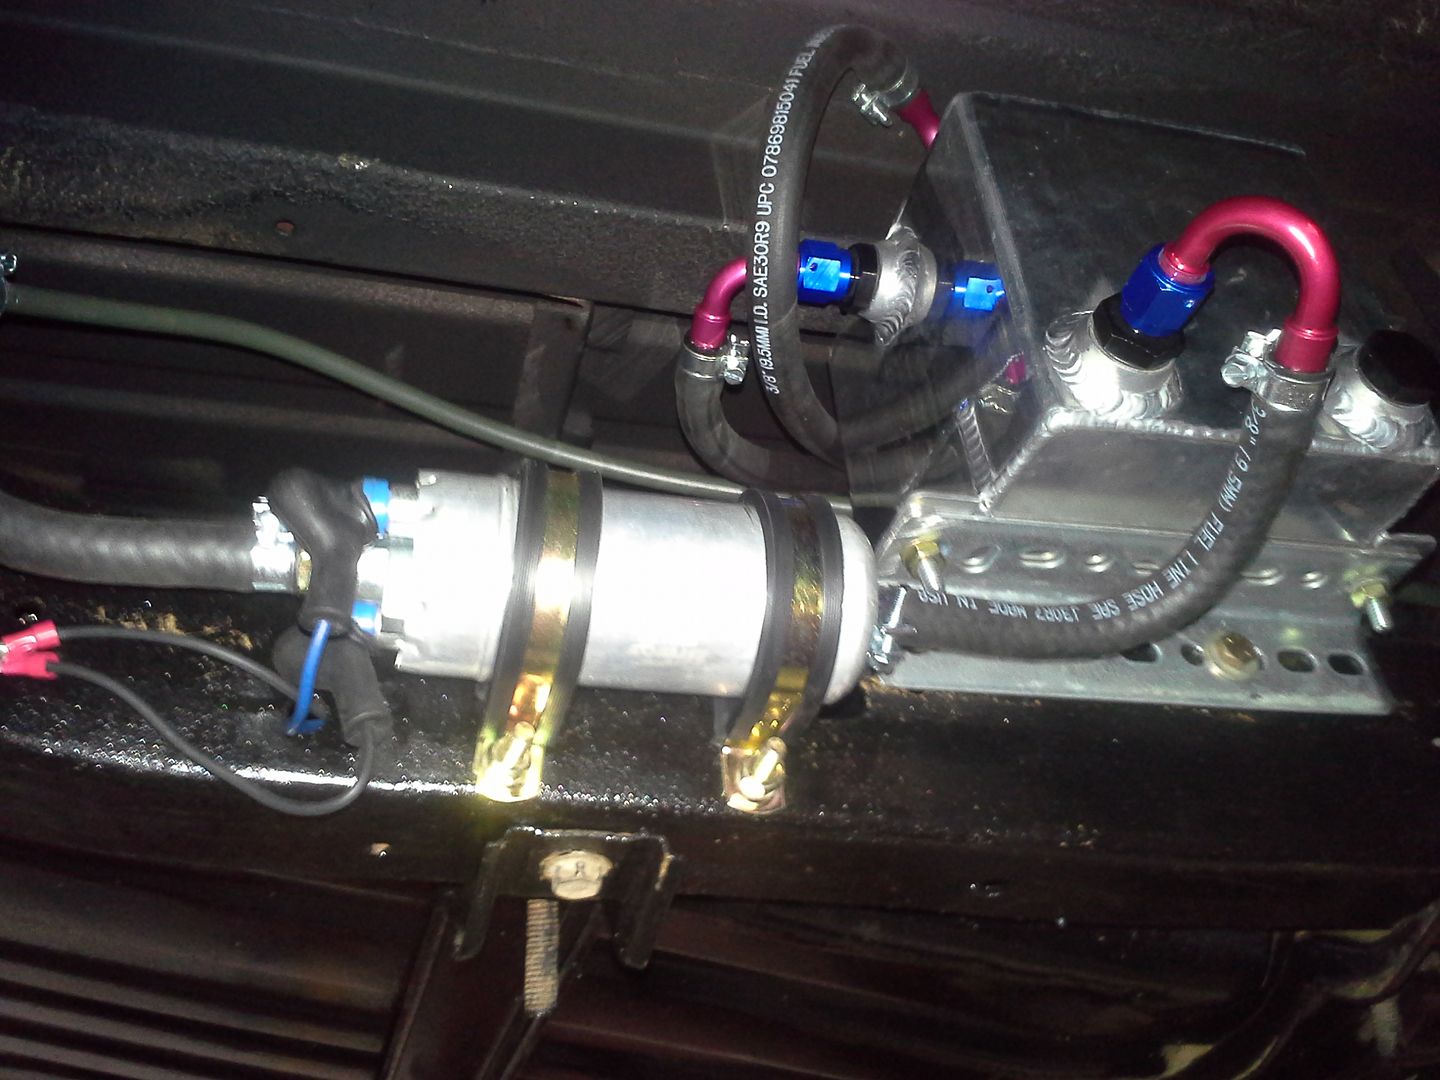 [/URL]
up next was doing the finishing touches on the engine. senders for the idiot lights, install cooling system, adding power steering cooler and fluid, adding oil, plugs, wires, cap, rotor, etc. I made a nice hard mount for the trans cooler, as the zip-tie things were pissing me off. I also cleaned and painted the core support (blitz black on the inside, gloss on the outside), the radiator (from scuzzy aluminum to black), mounted the cruise control module (module left over from my s10 days, longer cable from pull-a-part vortec blazer), plumbed in the brake proportioning valve and Camaro master that was given to me, made a firewall plate to replace the fuse box out of Lexan, etc. pretty much got ready to fire it up.
[URL=http://s54.photobucket.com/user/dusterbd13/media/1964%20elcamino/20141026_151711_zps6f995752.jpg.html]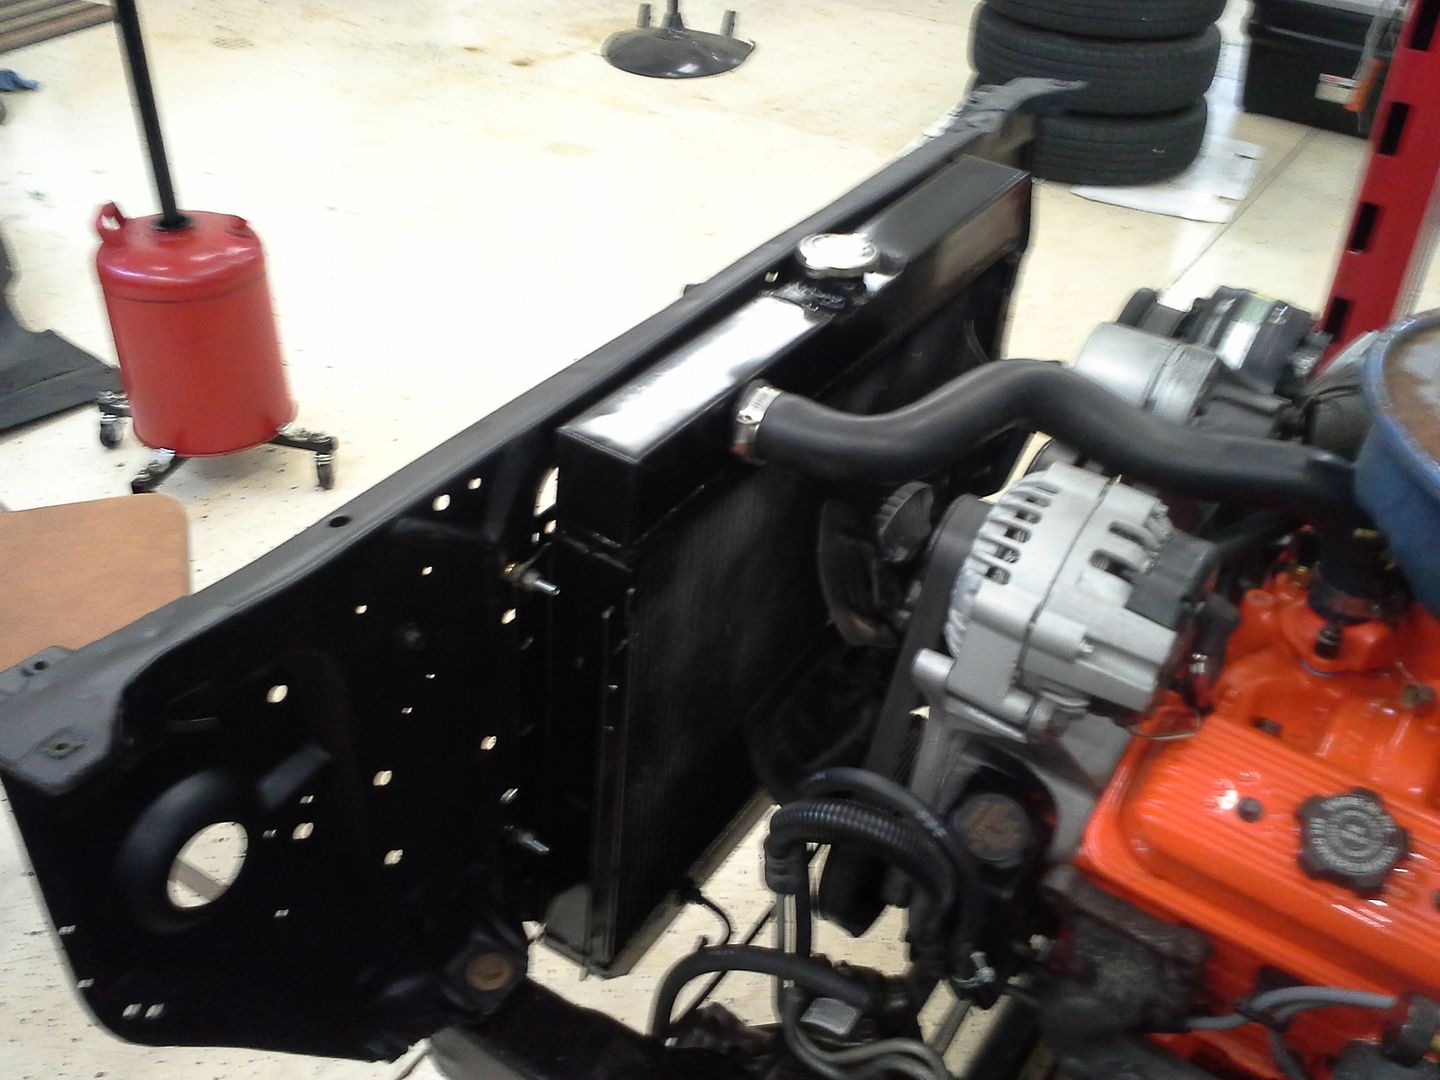 [/URL]
[URL=http://s54.photobucket.com/user/dusterbd13/media/1964%20elcamino/20141026_151727_zps32c4b81d.jpg.html]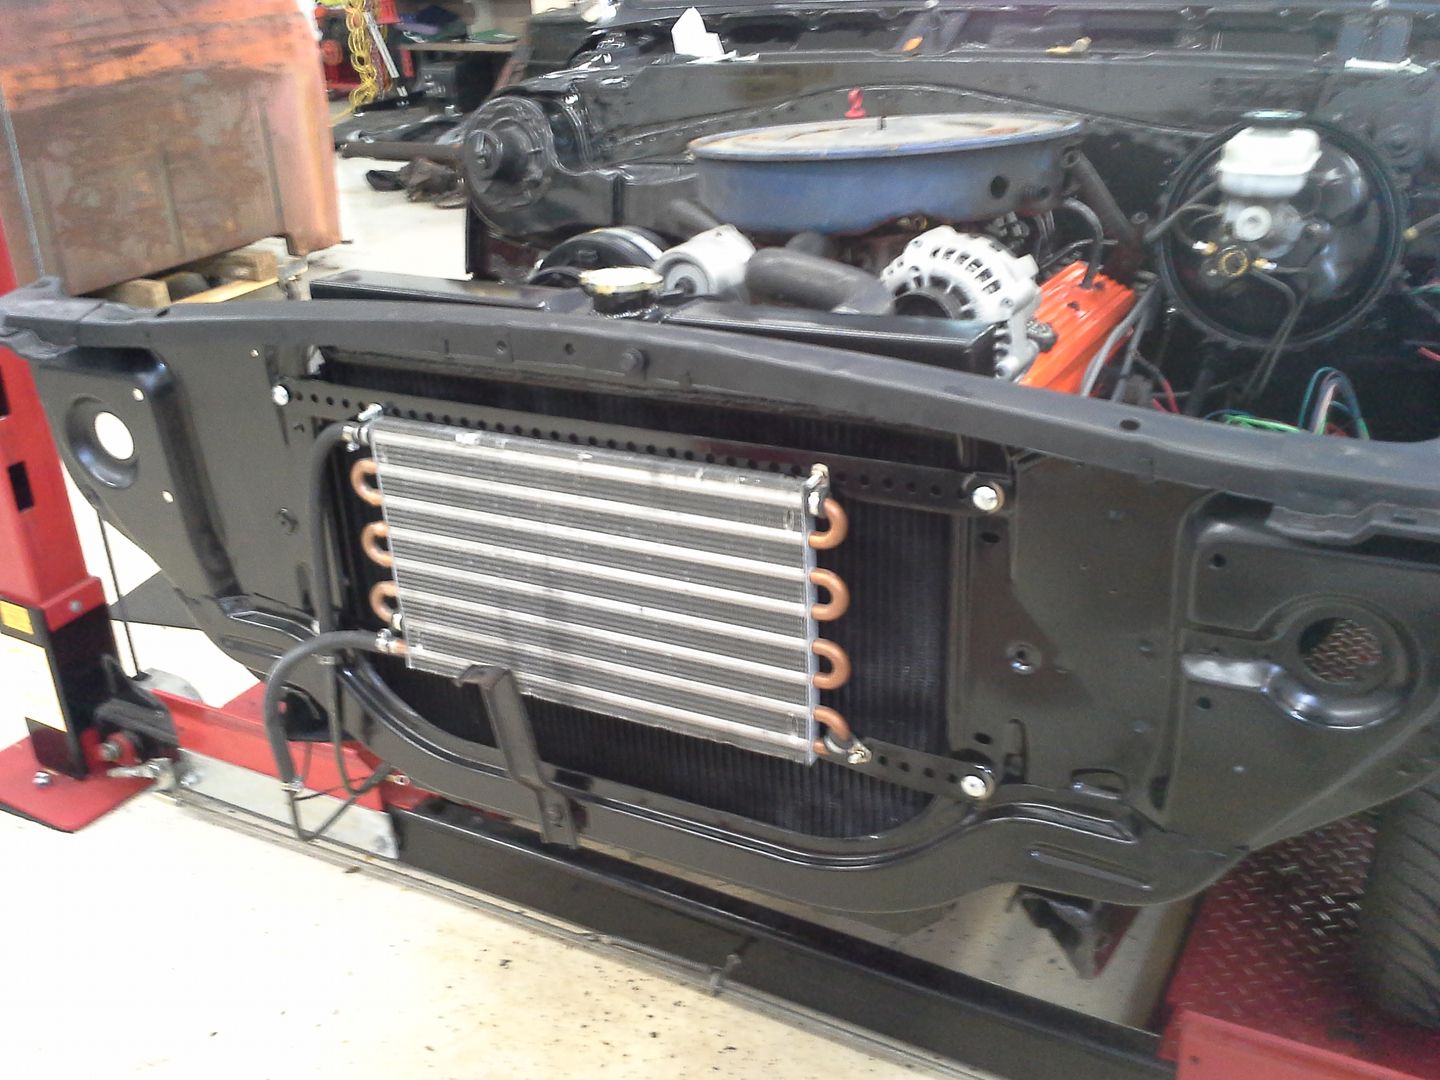 [/URL]
[URL=http://s54.photobucket.com/user/dusterbd13/media/1964%20elcamino/20141026_135841_zpsc07ad3ac.jpg.html]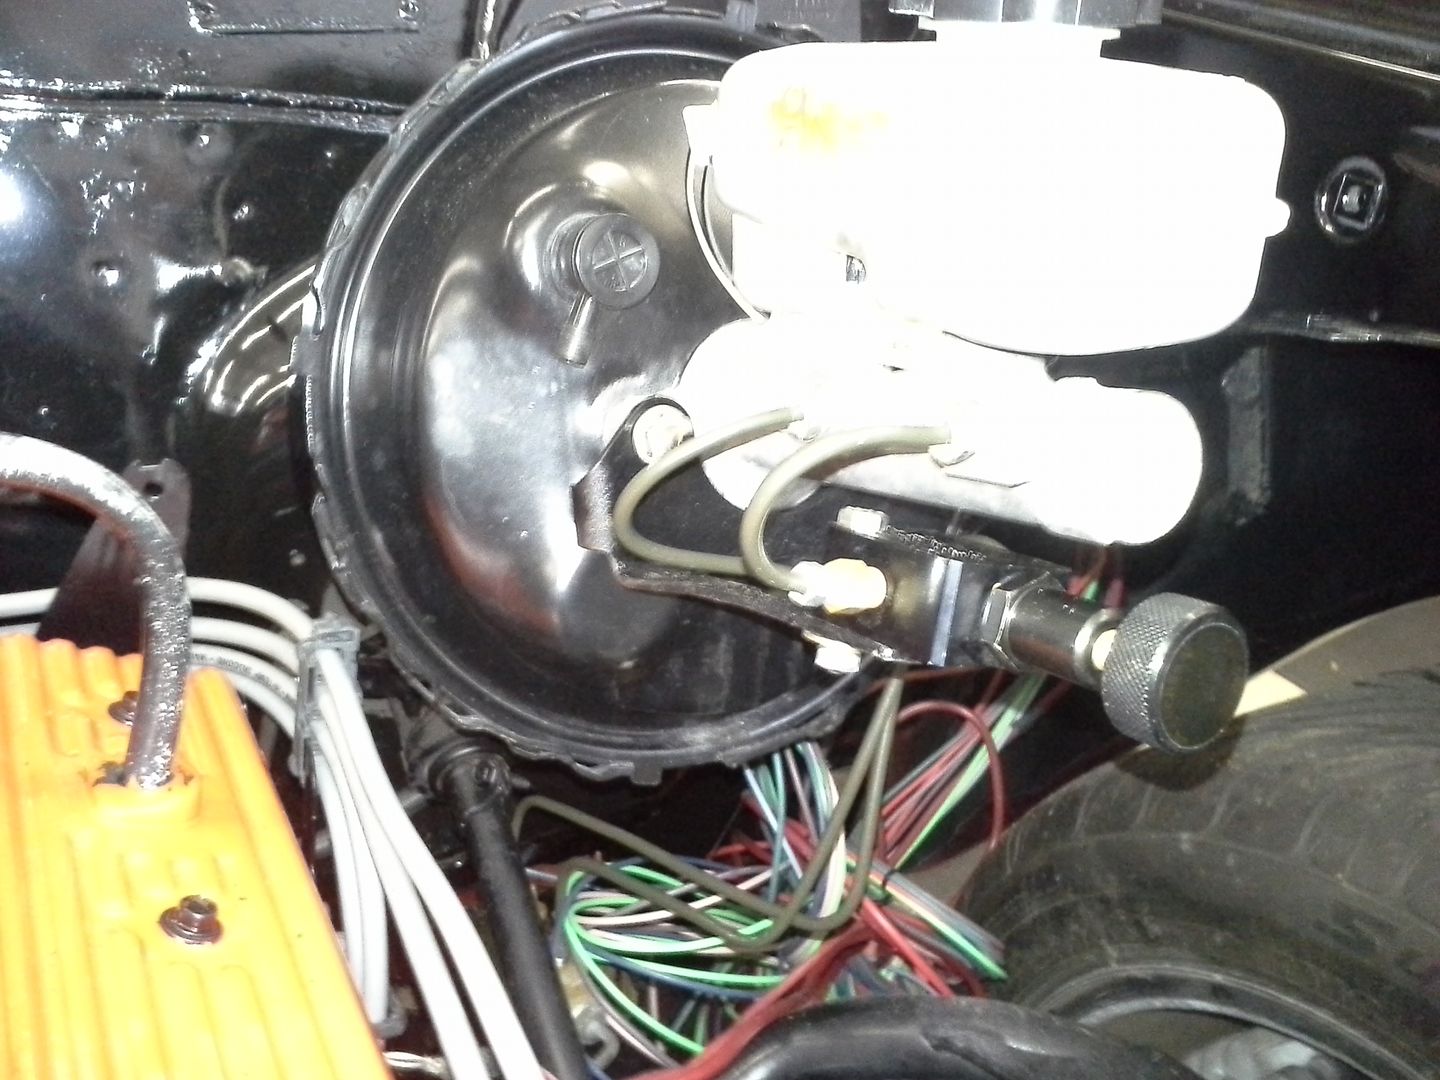 [/URL]
the tbi was mounted up and plumbed when I figured out that I forgot to adapt for the chevelle throttle rod. this was easily accomplished by grinding off the peened over head on the stud and driving it out with a hammer and drift. simple enough. I pressure tested the system, and fired it up for the first time. it came right to life. timing needed set (did by ear, as the timing light was dead). thermostat housing was leaking around the bolts. I had some plug wires on backwards (don’t ask). I hadn't fully seated the power steering pulley when I reinstalled it and shredded the belt. but it fired up on the first spin, idled great, and had 38psi cold oil pressure on 5/30 no name oil. at 500 rpm from where I forgot to plug in the iac. freaking sweet!!!
so now that I knew it runs, I went on to start hanging the front clip. I know its not ready yet, but I need to see it done for my head. the drivers side fell into place nice and easy. I spent the money on eBay for a whole new nut and bolt kit to do the front end. cheapest, easiest way to get everything I needed. the passengers side fought me. a lot. I wound up having to relocate some wiring, massage the wiring area with a 3 pound dead blow, and fight it into place. but its done now. mounted up the restored grille, and started on the headlights. had to think about what to do though, as the high beam bulb was hitting the core support. I could space the housings forward, but didn’t have enough adjustment, and would have to pull the assemblies to change the bulb. I could cut the core support, or space the housings back. had to play with it and figure it all out. what I wound up doing was hitting the easy button. the BMW high beams use a 9005 series bulb. this bulb is available in two configurations. the stock bmw configuration is having the socket at 90 degrees to the light element, and the other is with it straight out the back. the straight out the back configuration fit cleanly through the factory holes in the core support where the wiring would go through for the high beams originally. pretty simple fix there. I know I have said it before, and I will say it again: I have trouble seeing at night. there is no such thing as too much light for me. to that end, I pulled a pair of relays out of my magic boxes o' electrical crap for the headlights, which will be fed a steady diet of voltage and amps through 10 gauge feed wires from the drivers side distribution block. I also spent some money on a product I learned about from another guys build: Cree led switchback bulbs. these go in the factory front turn signal housings, and have 80 watts of led's built into them for the front placed under a projector style lens. these act as fog lights when the running light circuit is activated. when the turn signal is activated, the fog light turns off, and the side mounted amber led's turn on to act as the signal. these are coming straight from china, and are scheduled to arrive sometime between thanksgiving and the new year. I also ordered 80smd taillight led bulbs while I was at it. always wanted to try these two products, so I finally am. wont try it as an experiment with someone else's money, cause that just wouldn’t be right.
so anyway, brother Dustin and I got the front clip hung and mostly adjusted. hood on, trim on, emblems on, bumper, etc. everything but the hood latch, lower fender to rocker bolts (have to make some sort of mount, and the body man did not replace the missing captured nuts like I asked) and front end wiring is done. ready to go. and I have to say, the damn thing looks fantastic!!!
[URL=http://s54.photobucket.com/user/dusterbd13/media/1964%20elcamino/20141025_162526_zpsbb9ed63c.jpg.html]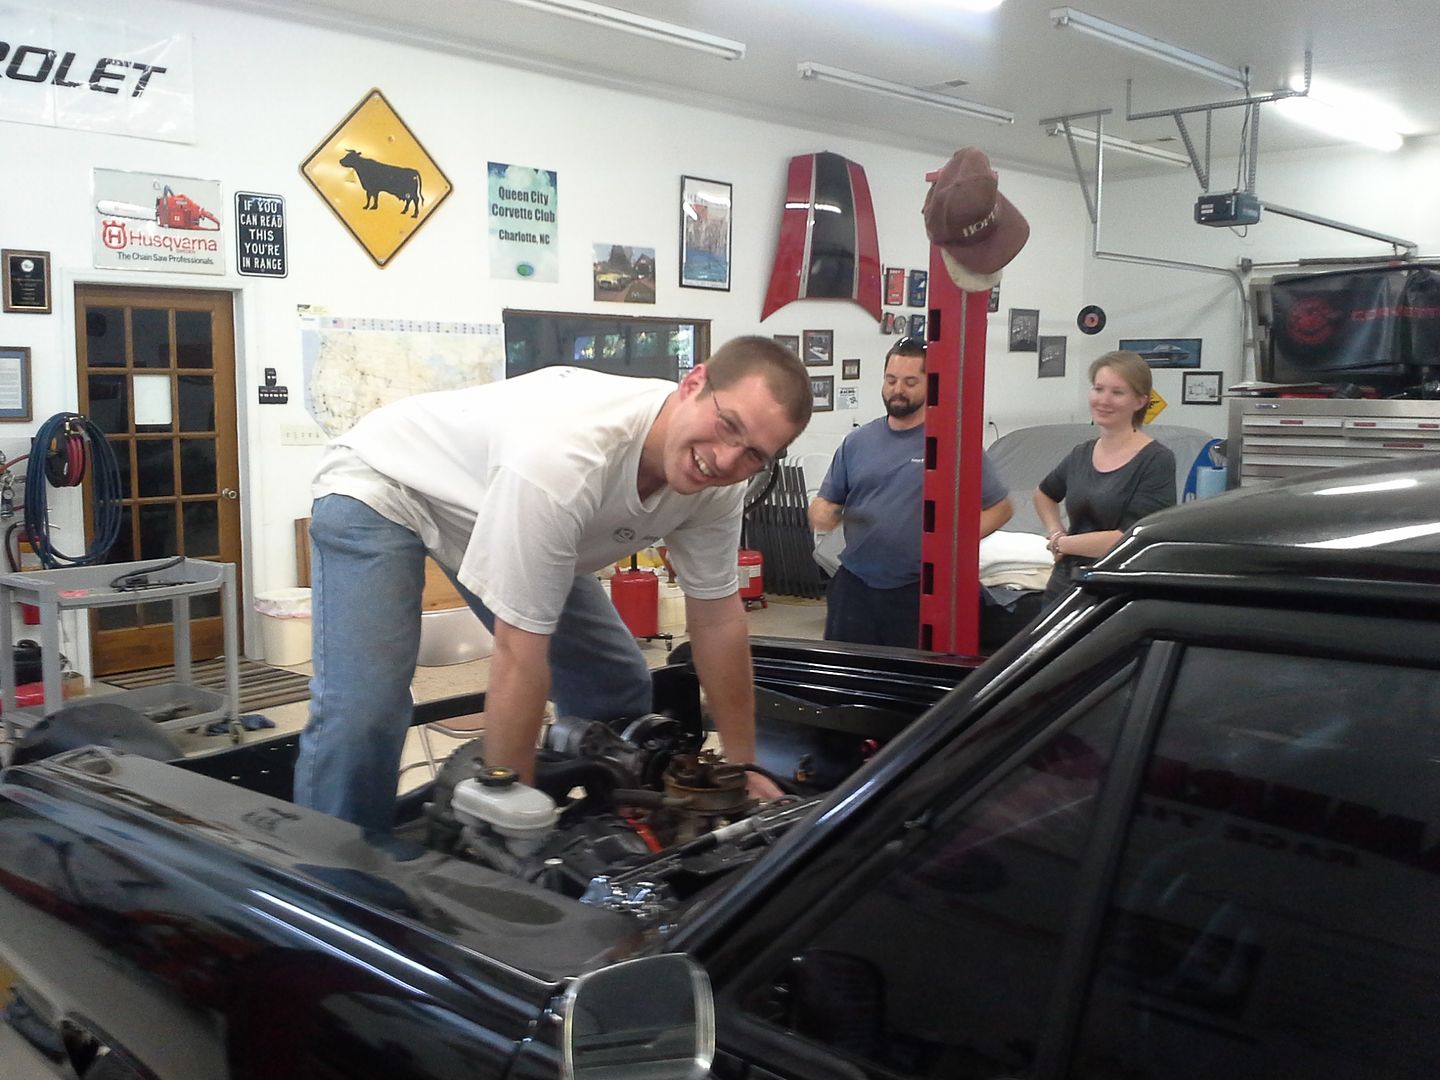 [/URL]
[URL=http://s54.photobucket.com/user/dusterbd13/media/1964%20elcamino/20141107_203952_zps40a25aff.jpg.html]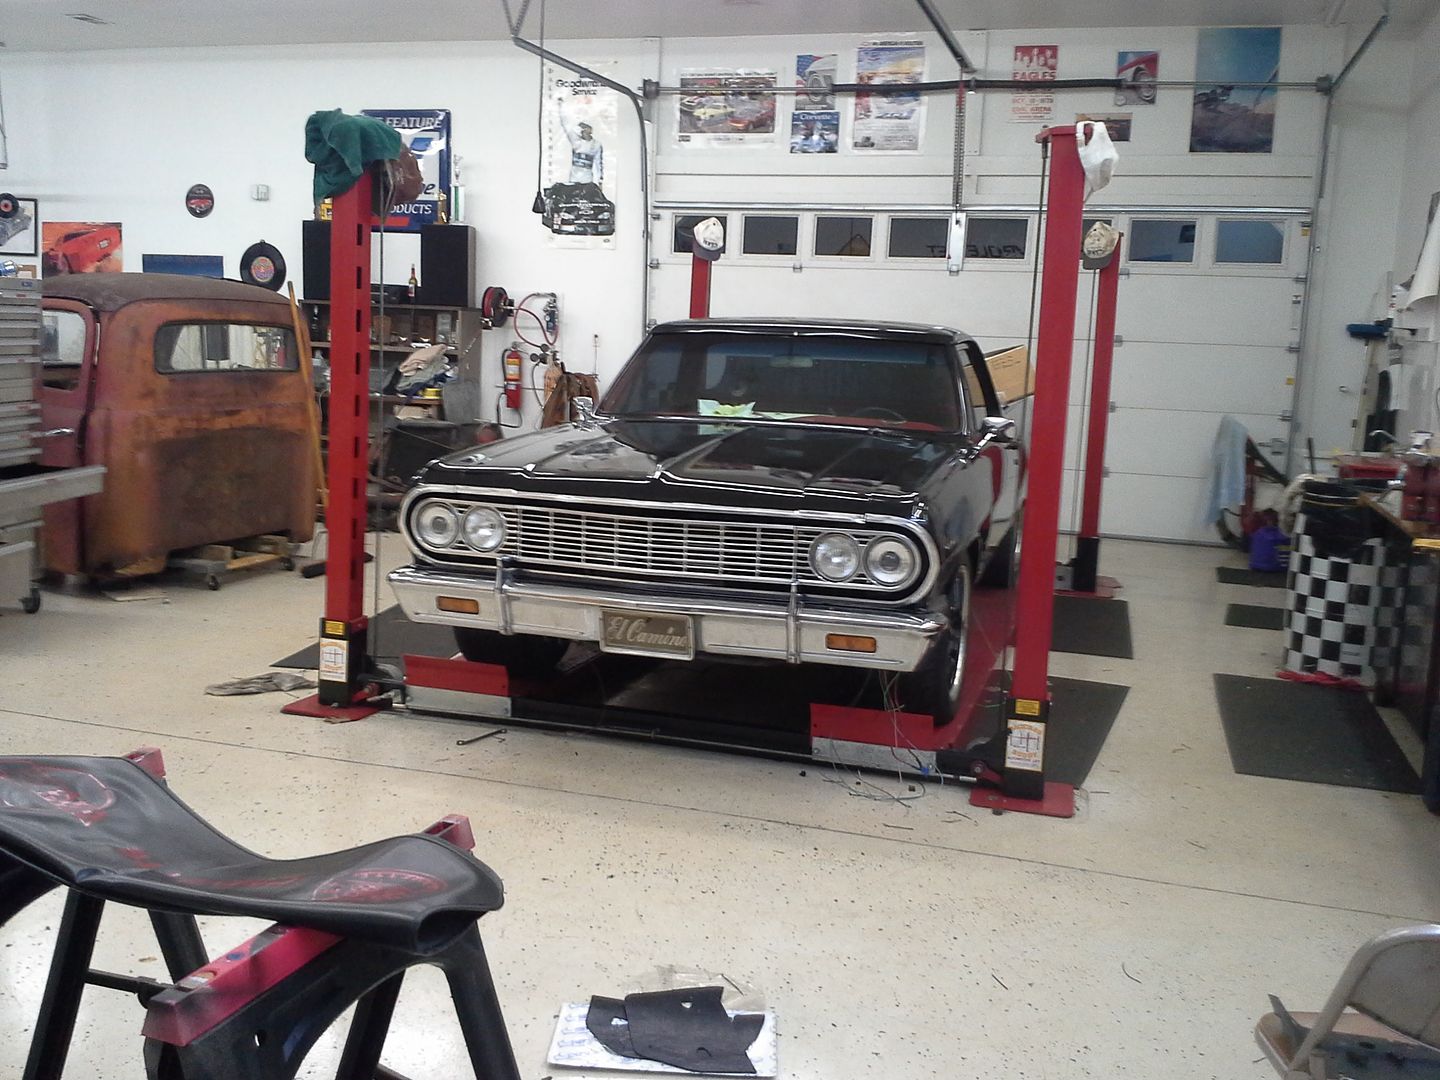 [/URL]
[URL=http://s54.photobucket.com/user/dusterbd13/media/1964%20elcamino/20141107_204022_zps97c3e44b.jpg.html]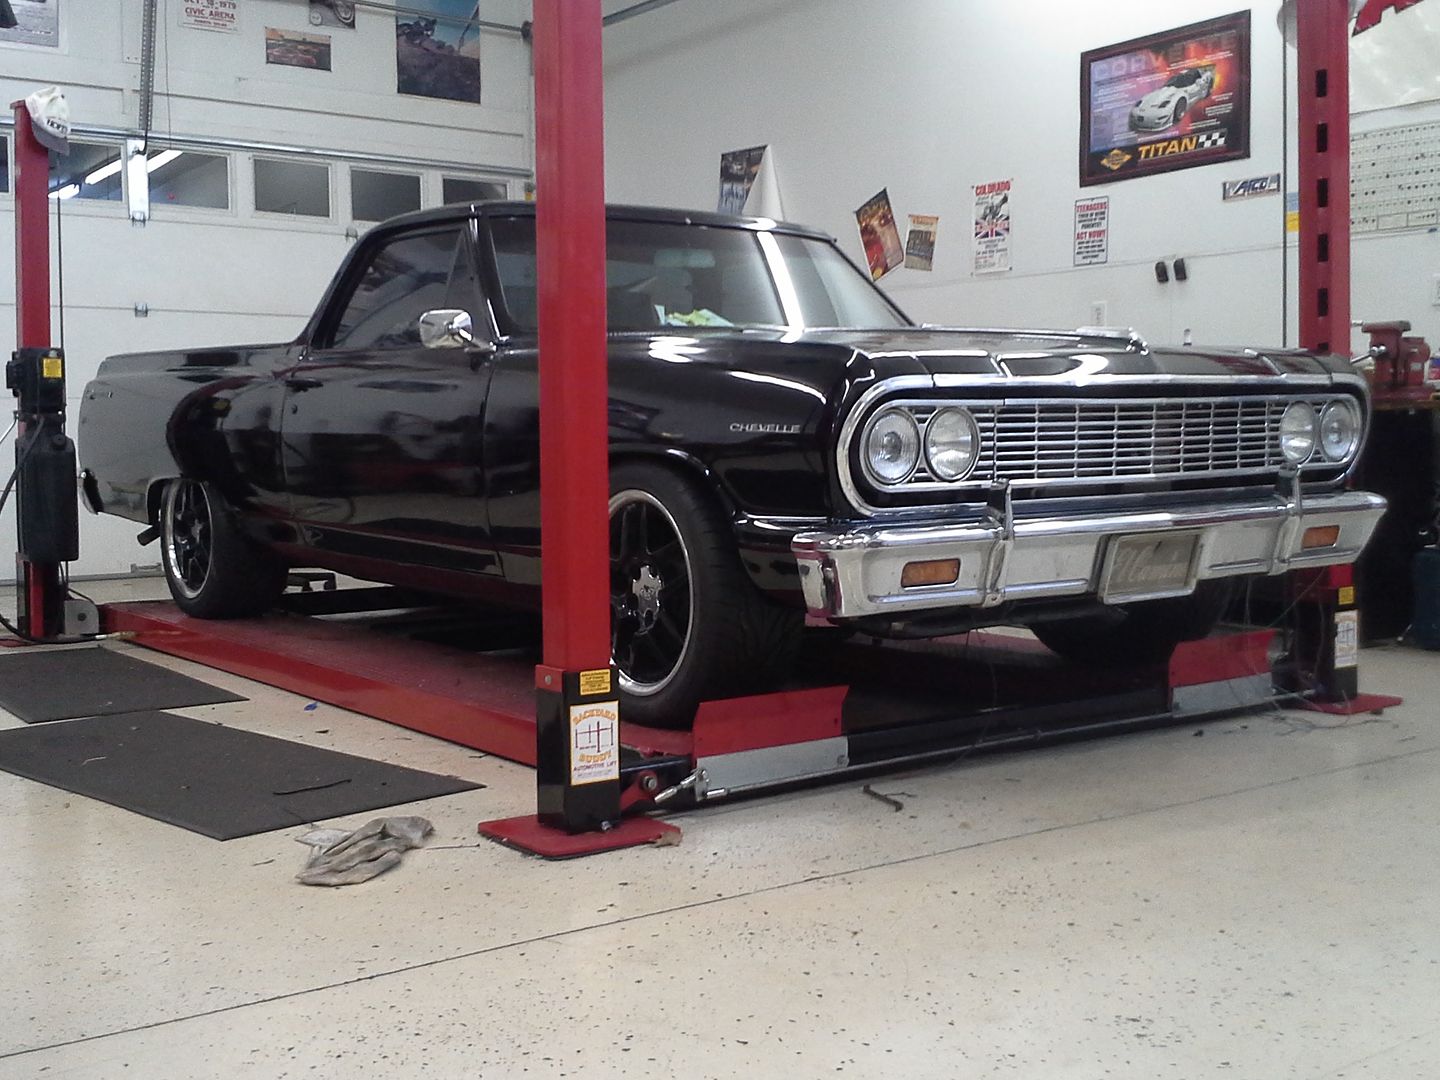 [/URL]
we proceeded to put the seat in it, fill the trans with fluid, and bleed the brakes. it moves and stops under its own power. I have now moved it into a storage bay at dads shop, and will be taking a break for a little while to catch up on some things around the house and do a quick customer car. then back to wiring. will have one more update as soon as I finish the instrument cluster up, and then ill be quiet on this thread for a month or two.
it felt great spinning the key, putting it in drive, and just moving it. no drama, no fuss, no trouble, just what I wanted. I love efi.
Michael
Looks great. Feel free to throw as much wiring talk at us as you can handle. It's probably the area of building cars that I'm most interested in and the one that is least talked about.
so, budget first:
previous total: 9775.20
money spent:
140 amp alternator, cruise switch, rotors and abutment brackets, pull-a-part: 69.88
two speed wiper motor: 25 city salvage
infinity reference 6.5 speakers: free!
eclipse 4 channel sound quality amp: 64 ebay
elemental designs 10 inch, shallow mount, sound quality sub: 30 craigslist
push button switch, city electric: 9.60
heater core, advance, 37.60
new total: 10,011.28
so its looking like I'm going to blow my 10k budget by about a grand when its all said and done. I had not foreseen another motor having to go in. so, that’s my excuse. still cheaper than most builds of this scope though.
anyway, were her to get you caught up on the project, not listen to me bellyache about "shoulda, woulda, coulda".
I said in my last update that I needed to cover my instrument cluster build. if you remember, I had gotten a smith tach from an MG, built a delay wiper switch, purchased a blem 65 bezel, and bought a can of stainless steel spray paint. also, I had added the price for the cheapest tach on eBay.
so I guess the first explanation is about the tach. the smith tach was a 60's model, which was unsuitable for conversion to read a v8. this is unfortunate, as it looked so cool. also, I found after I sanded the 97 coats of paint off the can that it friction fit in the instrument panel perfectly. so I was vested in using it. [URL=http://s54.photobucket.com/user/dusterbd13/media/1964%20elcamino/20141107_075410_zpsb2fe6842.jpg.html]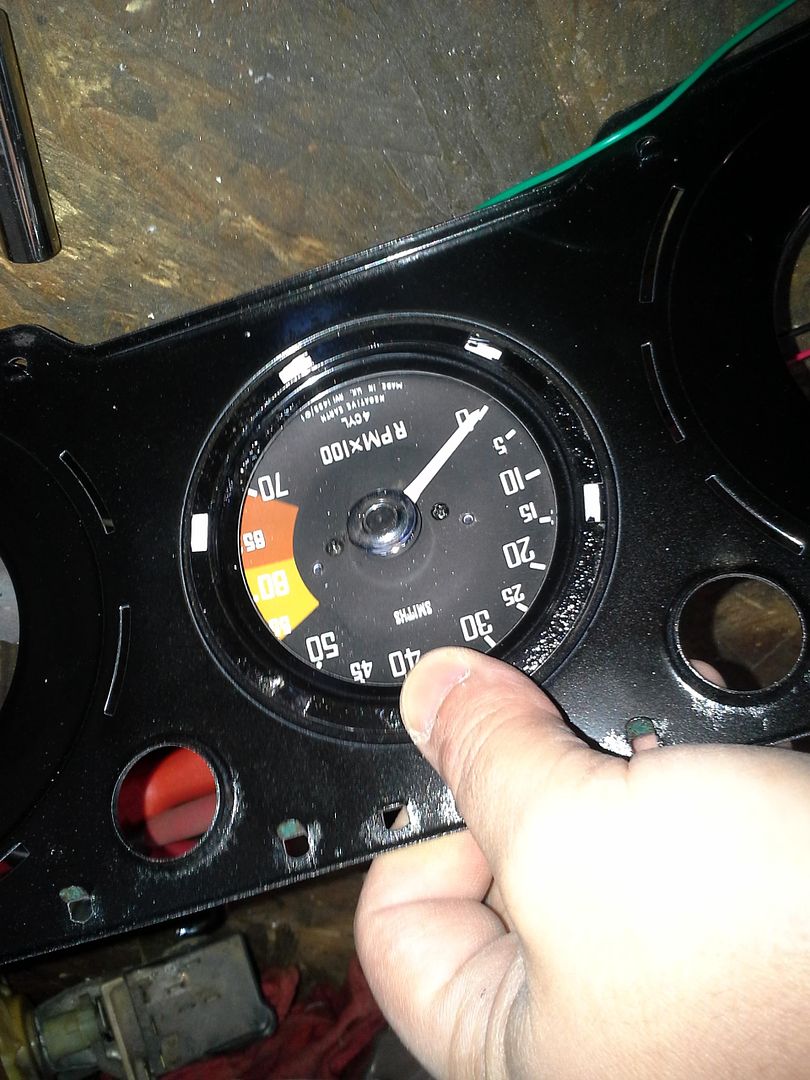 [/URL]
after doing some research, and asking some questions, I decided that the best way to proceed was with a guts swap. this is essentially scrapping everything but the face, needle, and can, and putting all new circuits and everything in it. this is my first time ever trying anything like this, so I didn’t want to throw a lot of money away on a crap shoot. found an 8k tach for a v8 on eBay for under 13 bucks shipped. now, to do this conversion accurately, you need a donor with the same range and sweep. if not, tach will not be accurate. my donor had the same sweep, and 1k more range. I split the difference by adjusting the needle clocking. tack wont be super accurate (within 3-500 rpm roughly), but it doesn’t have to be. its mostly for looks and to make sure that the trans is happy. anyway, this itty bitty super cheap tach came in looking like this:
[URL=http://s54.photobucket.com/user/dusterbd13/media/1964%20elcamino/20141106_180100_zps8e79d710.jpg.html]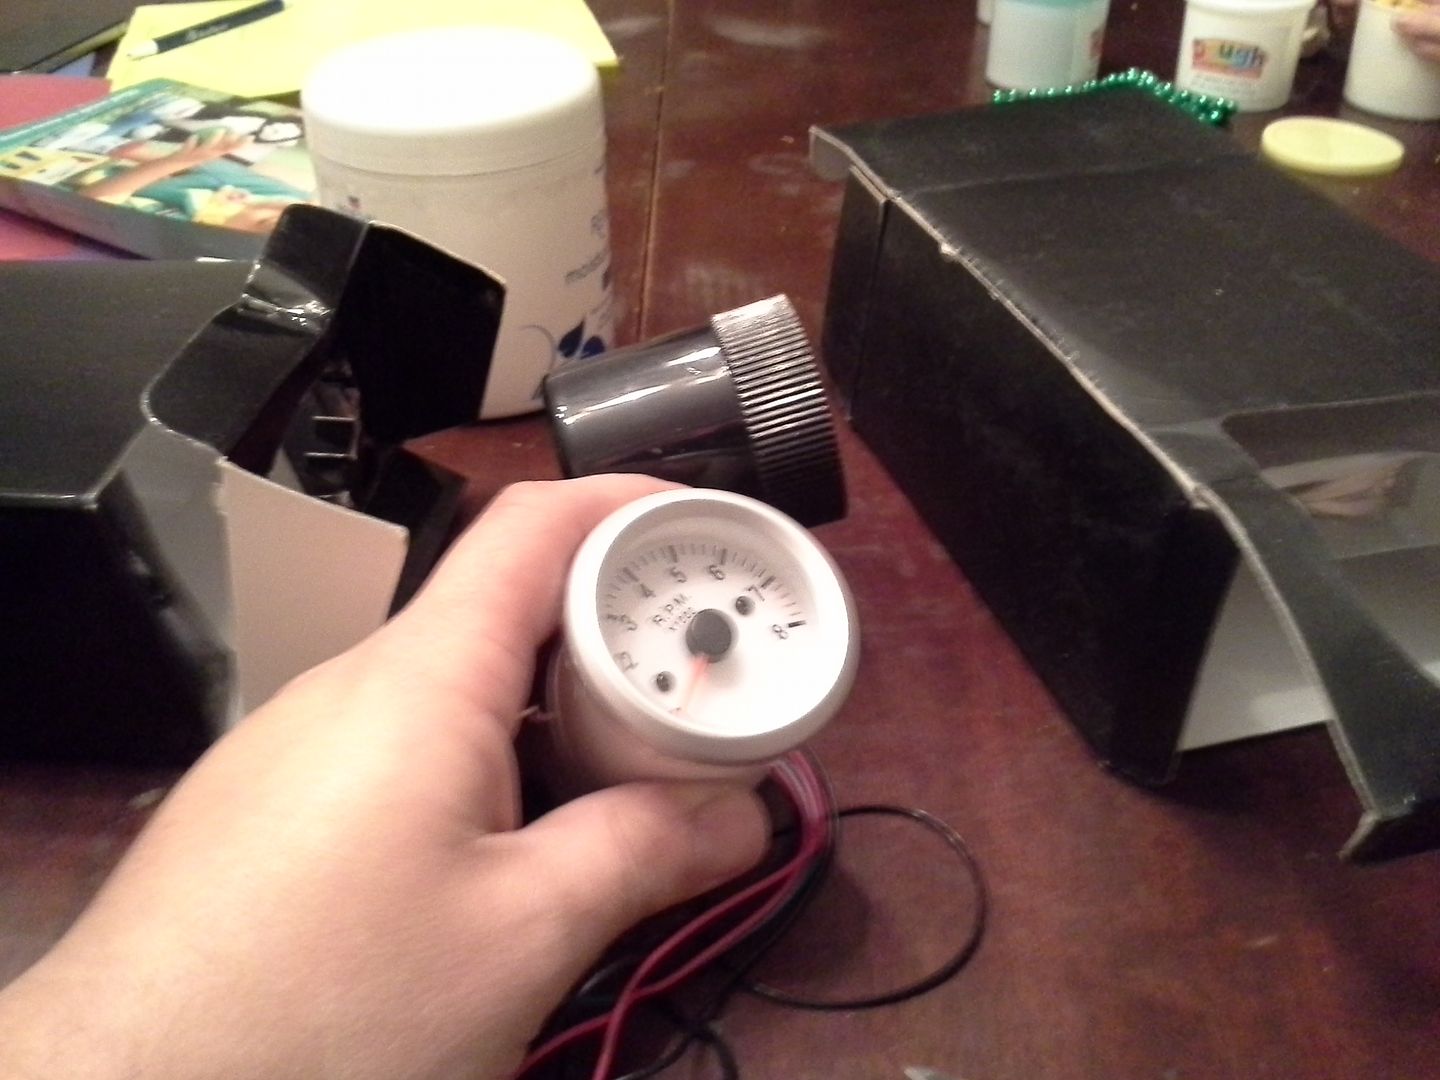 [/URL]
within 10 minutes while sitting at the dining room table (daughter coloring, wife cooking dinner, me tearing apart a brand new gauge)
[URL=http://s54.photobucket.com/user/dusterbd13/media/1964%20elcamino/20141106_180555_zps0fe9300d.jpg.html] [/URL]
I then went ahead and disassembled the smith tach. all I needed to save was the face, needle, and external pieces.
[URL=http://s54.photobucket.com/user/dusterbd13/media/1964%20elcamino/20141102_170924_zps310bd959.jpg.html]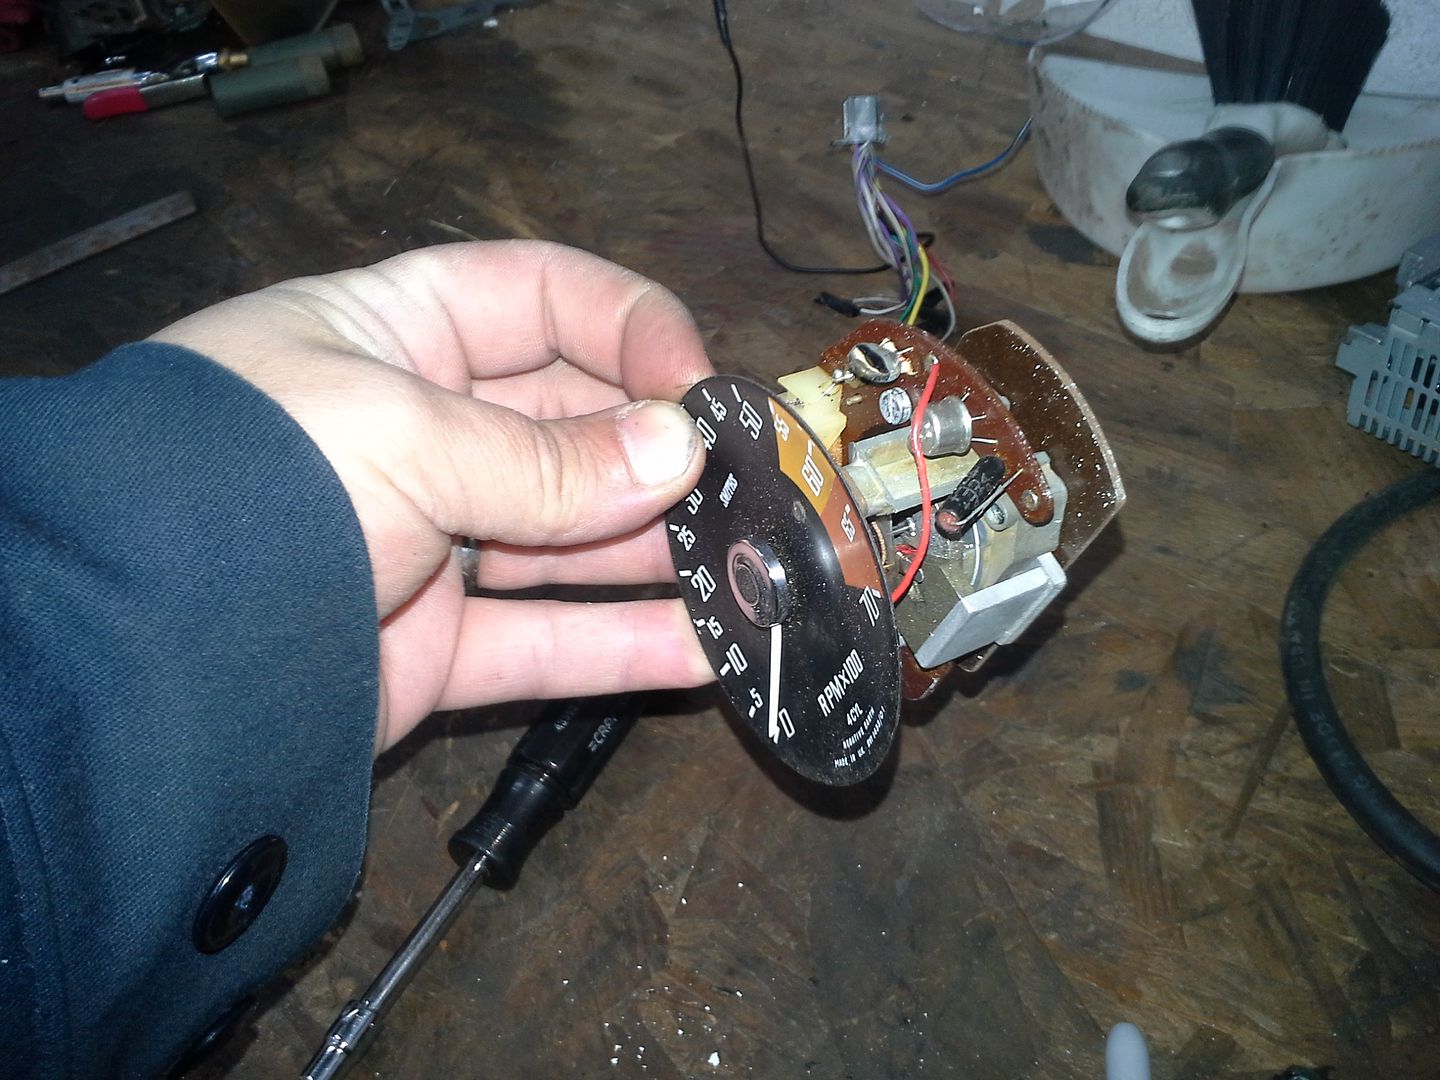 [/URL]
unfortunately, I didn’t take a whole lot of pictures of the next couple of steps. essentially what I did was cut the smith cup up to clear the eBay movements. I also enlarged the hole in the smith needle with a pin vise so I could press it on the eBay gauge shaft. lastly, I centered the smith face, drilled two new holes to mount the smith face to the stock locations on the bar piece. I also cut the wires out that went to the blue led's on the eBay tach. lastly, I made a plate out of scrap polycarbonate to mount everything up with.
[URL=http://s54.photobucket.com/user/dusterbd13/media/1964%20elcamino/20141107_075415_zpsb6110203.jpg.html]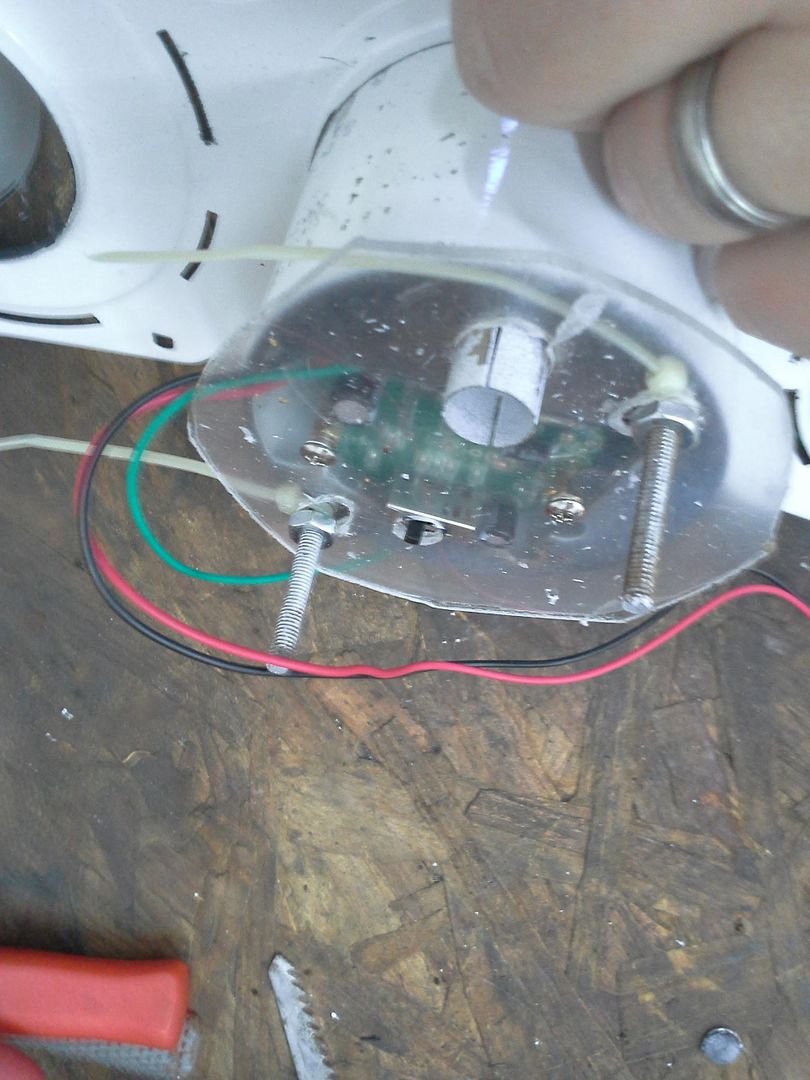 [/URL]
somewhere in here, I decided to refinish all the rest of the parts for the gauge bezel and cluster. the stock chevelle gauges were painted on the inside with some aqua kind of color, giving the gauge lights a greenish hue. I wanted the option to change dash lighting to match whatever radio I run (pet peeve of mine is when all the dash lights don’t match. most stereos are lit red or white these days). I sprayed all the insides where the light would reflect in gloss enamel white. white is the most reflective color you can do a light housing in. even brighter than chrome. lots of research went into this. I also shot the face of the panel with a fresh coat of semi-gloss krylon, re-polished the lens, and had my wife repaint all the needles.
[URL=http://s54.photobucket.com/user/dusterbd13/media/1964%20elcamino/20141102_170908_zpse11223b6.jpg.html]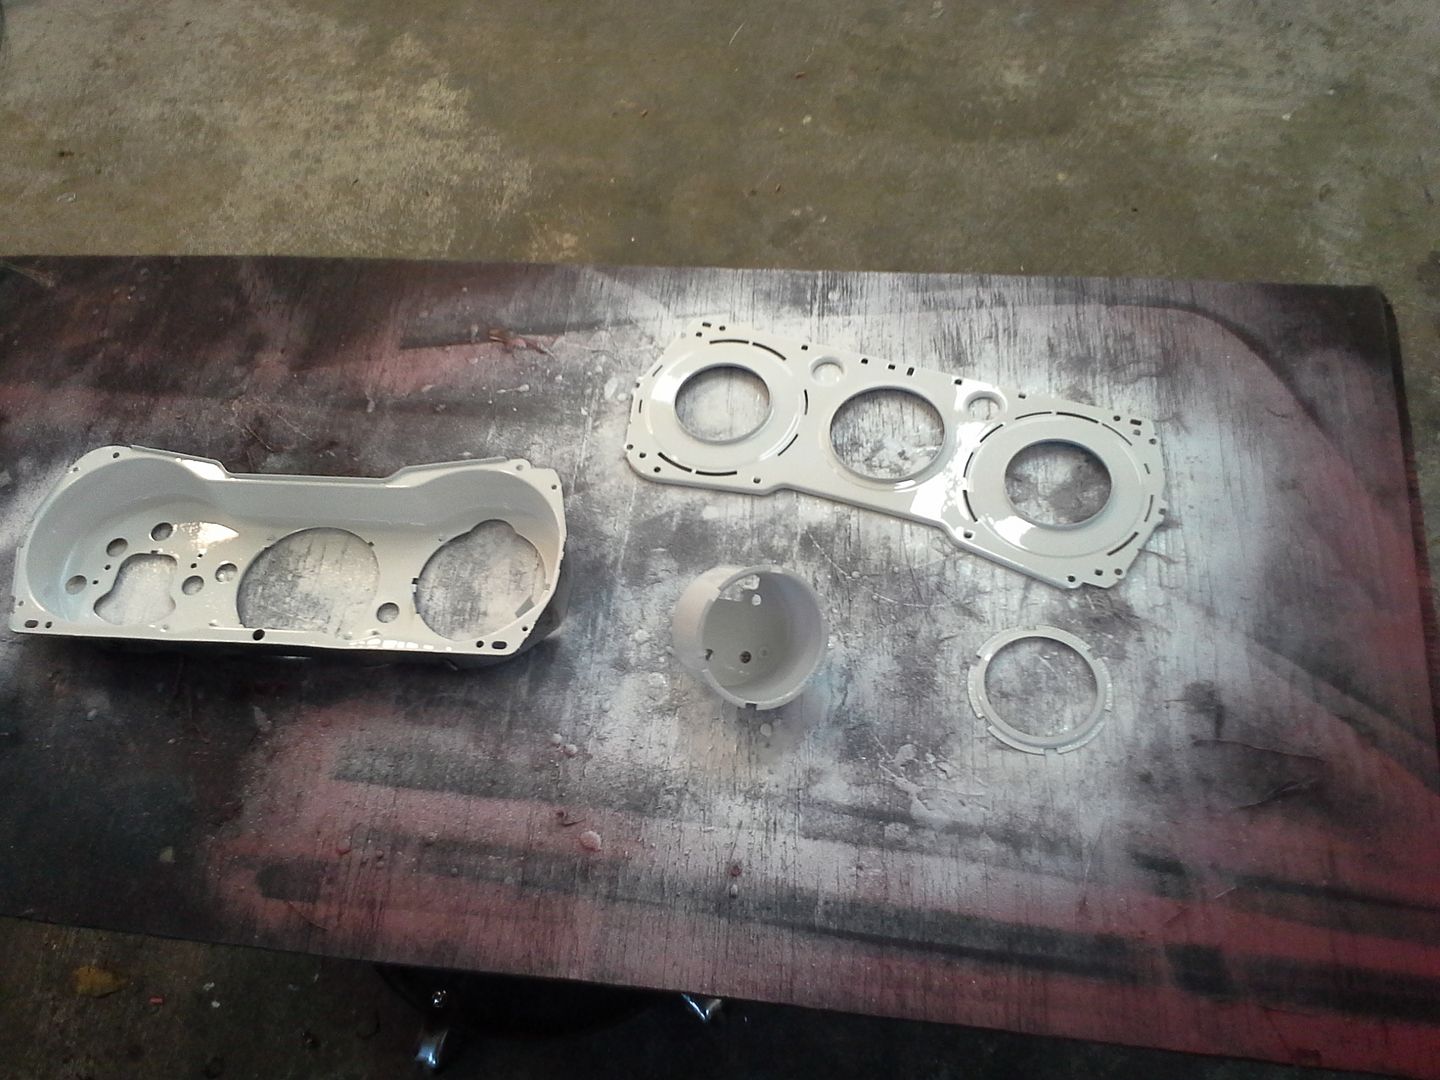 [/URL]
[URL=http://s54.photobucket.com/user/dusterbd13/media/1964%20elcamino/20141107_075420_zps4f633976.jpg.html]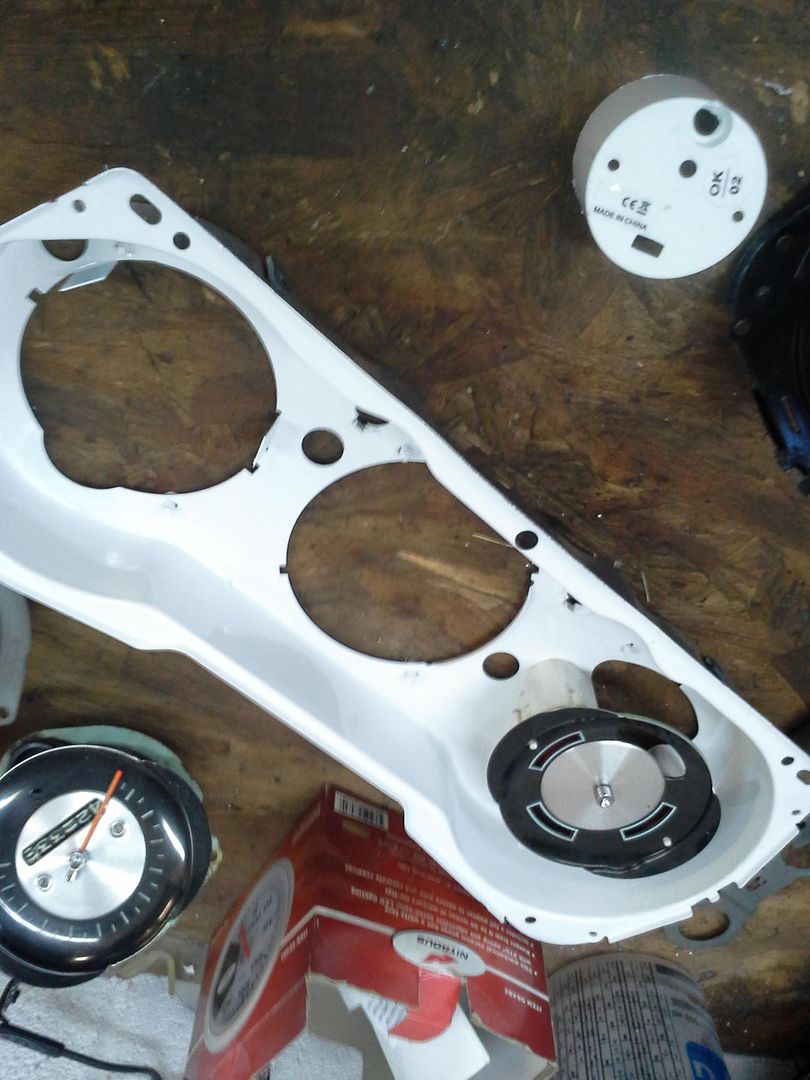 [/URL]
while this was all drying, I decided to pay some attention to that semi-shiny new blem bezel I picked up. it needed some attention, and some cutting up to clear a din size stereo. the spacers were again made from polycarbonate, and epoxied in place. just like the last bezel. some time with masking tape, krylon semigloss black, and that can of stainless steel, followed by using a sharpie on all the text and a couple of coats of clear gloss engine paint, and we have this:
[URL=http://s54.photobucket.com/user/dusterbd13/media/1964%20elcamino/20141107_075429_zps0895127d.jpg.html]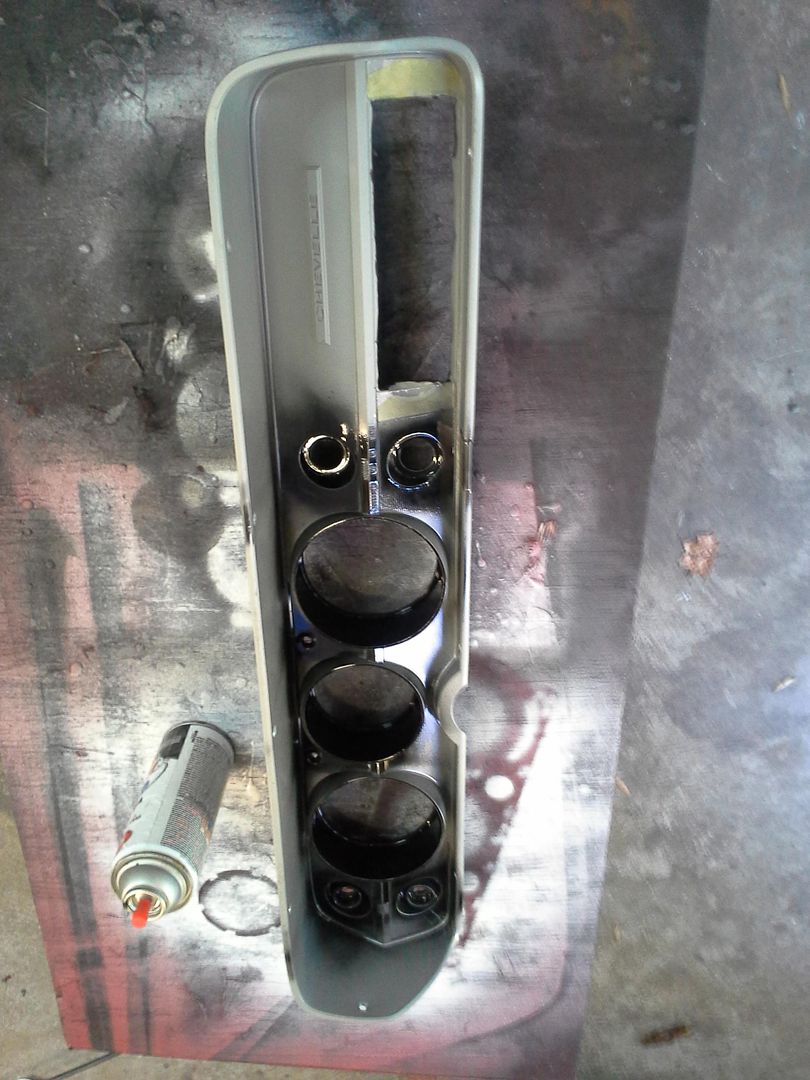 [/URL]
[URL=http://s54.photobucket.com/user/dusterbd13/media/1964%20elcamino/20141108_100354_zpsc3e7a318.jpg.html]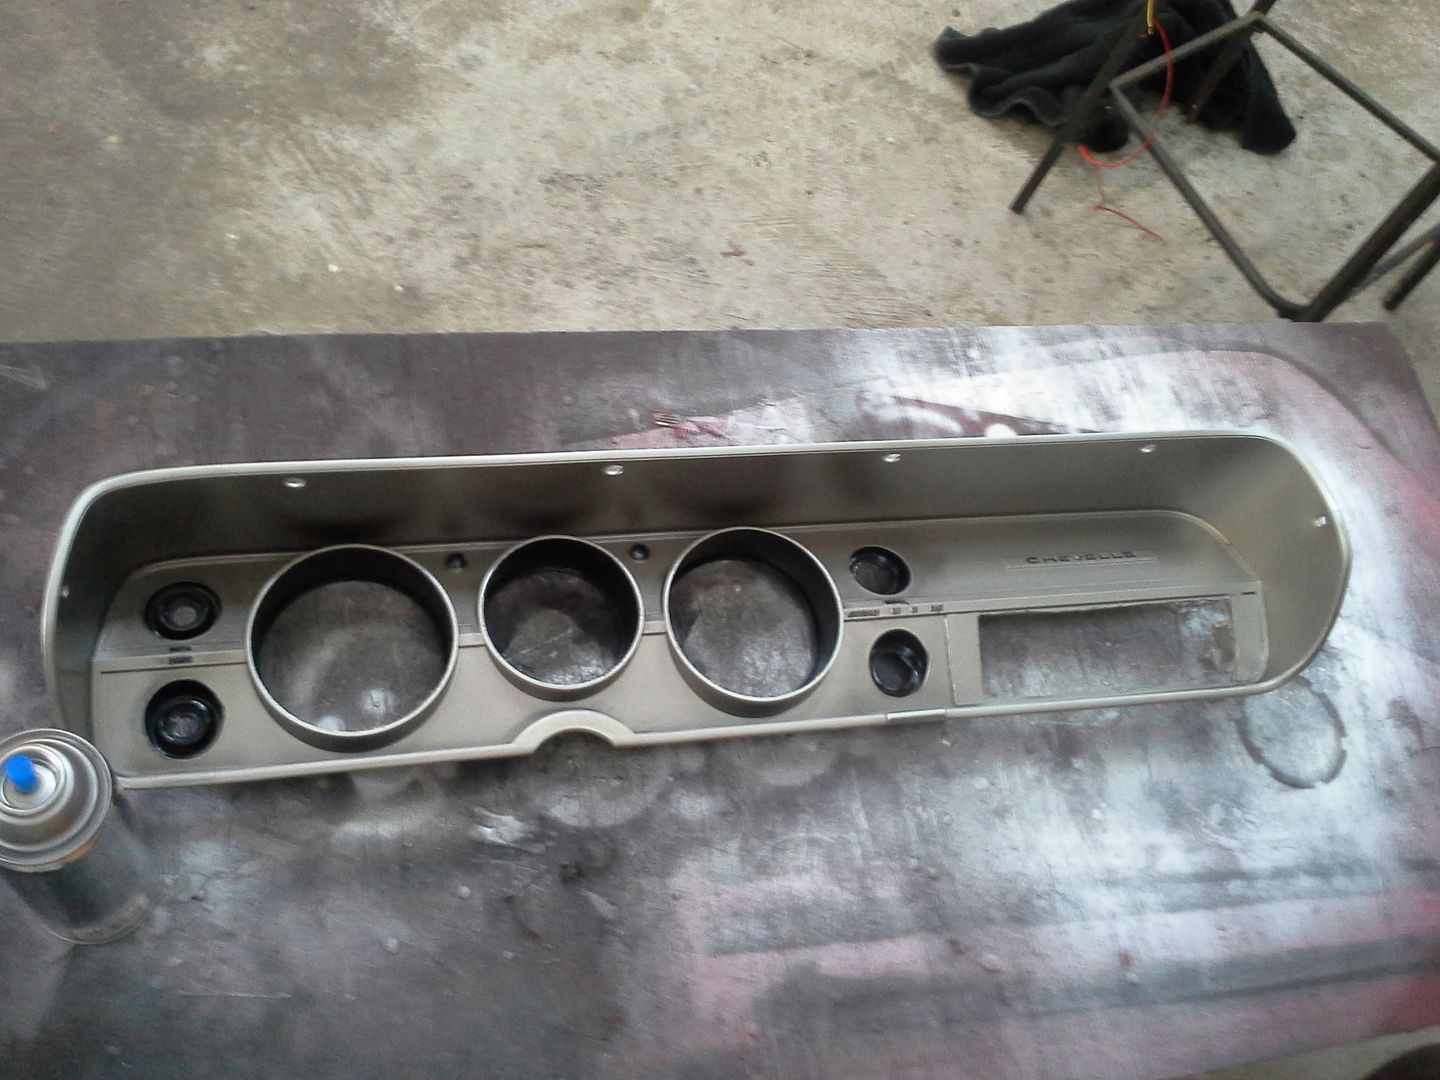 [/URL]
then, we put it all together and build a harness for the backside. you'll notice I placed a yellow led by the cigarette lighter for my check engine light, and a small chrome push button by the wiper switch. that’s for constant, high speed wiper operation as my delay switch only does delay.
we put some bulbs in, and check it out!
[URL=http://s54.photobucket.com/user/dusterbd13/media/1964%20elcamino/20141111_201544_zps41d9a04e.jpg.html]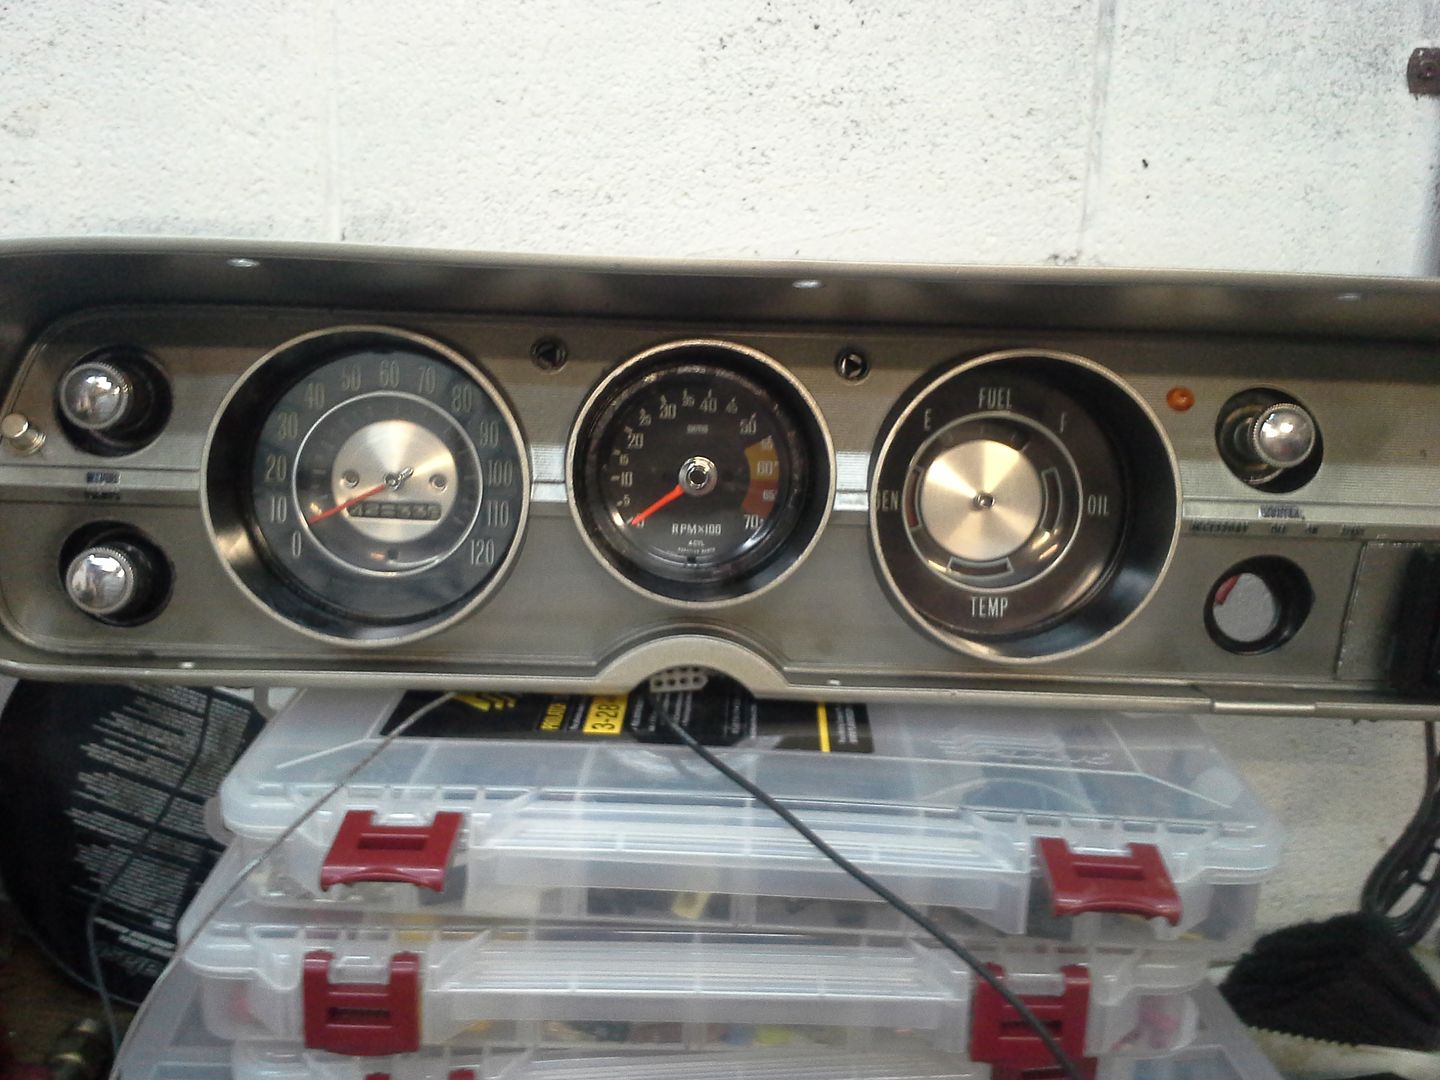 [/URL]
[URL=http://s54.photobucket.com/user/dusterbd13/media/1964%20elcamino/20141111_201416_zps3fbbcd11.jpg.html]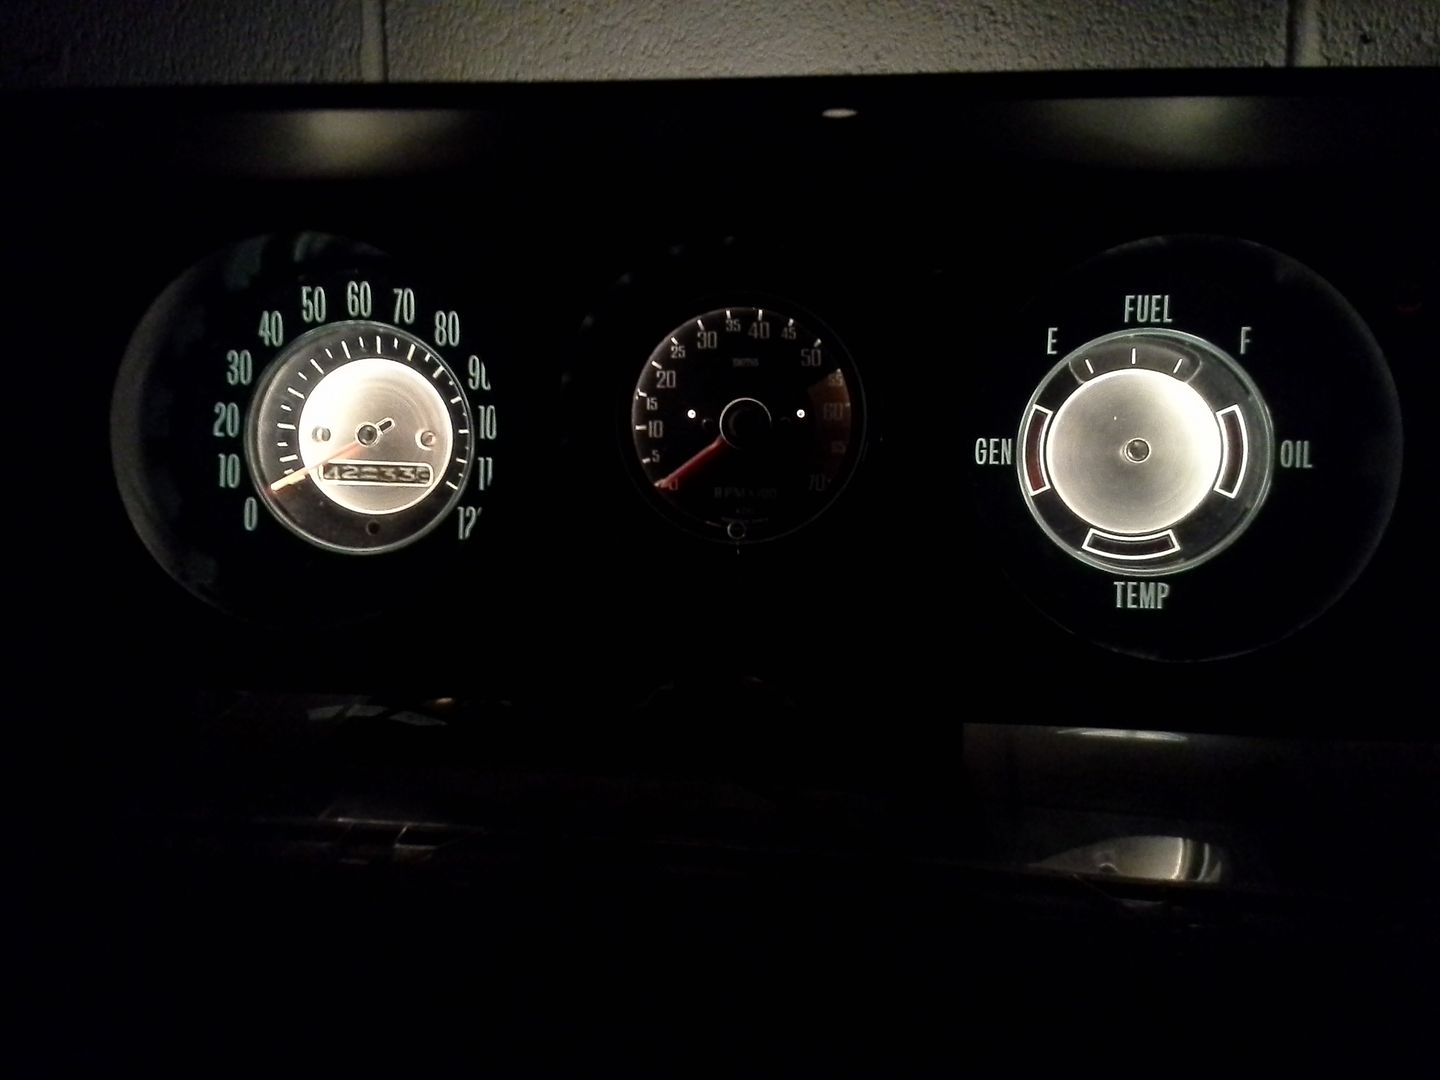 [/URL]
I spent some time getting it in, and all wired up. I've still got some wiring to button up, and a wiper motor to rebuild, but I'm getting close to a test drive. the cree led front switchback bulbs are stupid bright. I really like them. ill need to create some custom lenses to let them do their jobs, though. front headlights have been relayed, and the dimmer switch modified for 4-hi operation. also got the taillights installed, backup lights wired in, figured out my third brake light, etc. been busy.
[URL=http://s54.photobucket.com/user/dusterbd13/media/1964%20elcamino/20141116_143034_zps44e8a3c5.jpg.html]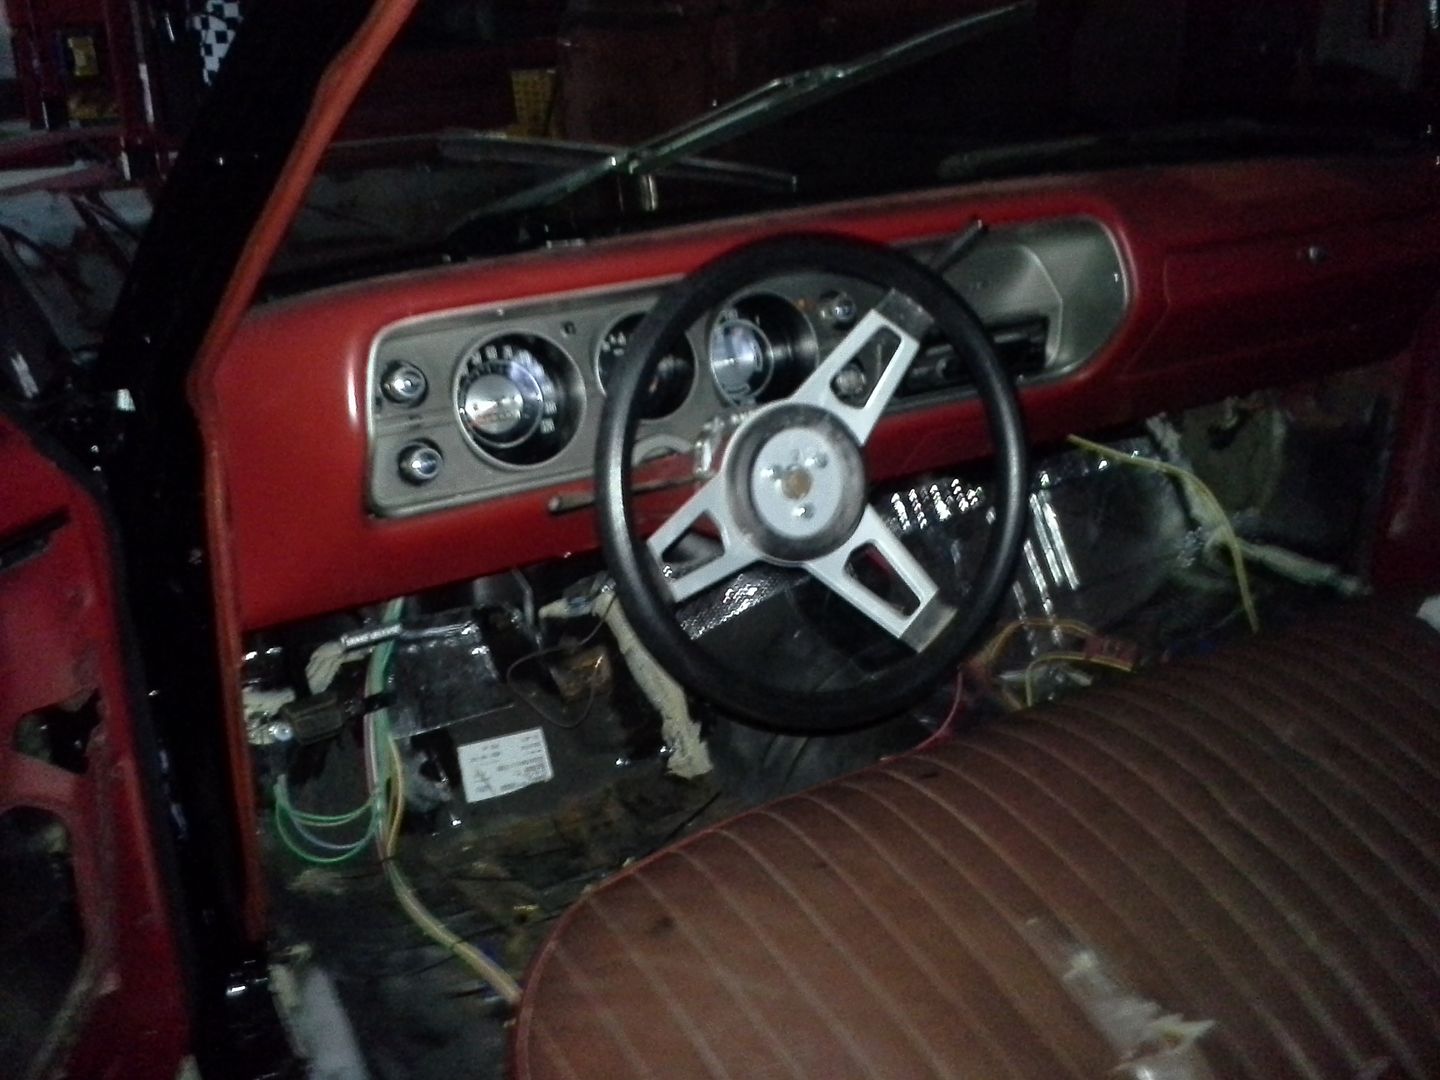 [/URL]
[URL=http://s54.photobucket.com/user/dusterbd13/media/1964%20elcamino/20141116_143153_zps14264743.jpg.html] [/URL]
[URL=http://s54.photobucket.com/user/dusterbd13/media/1964%20elcamino/20141116_142958_zps75d53096.jpg.html]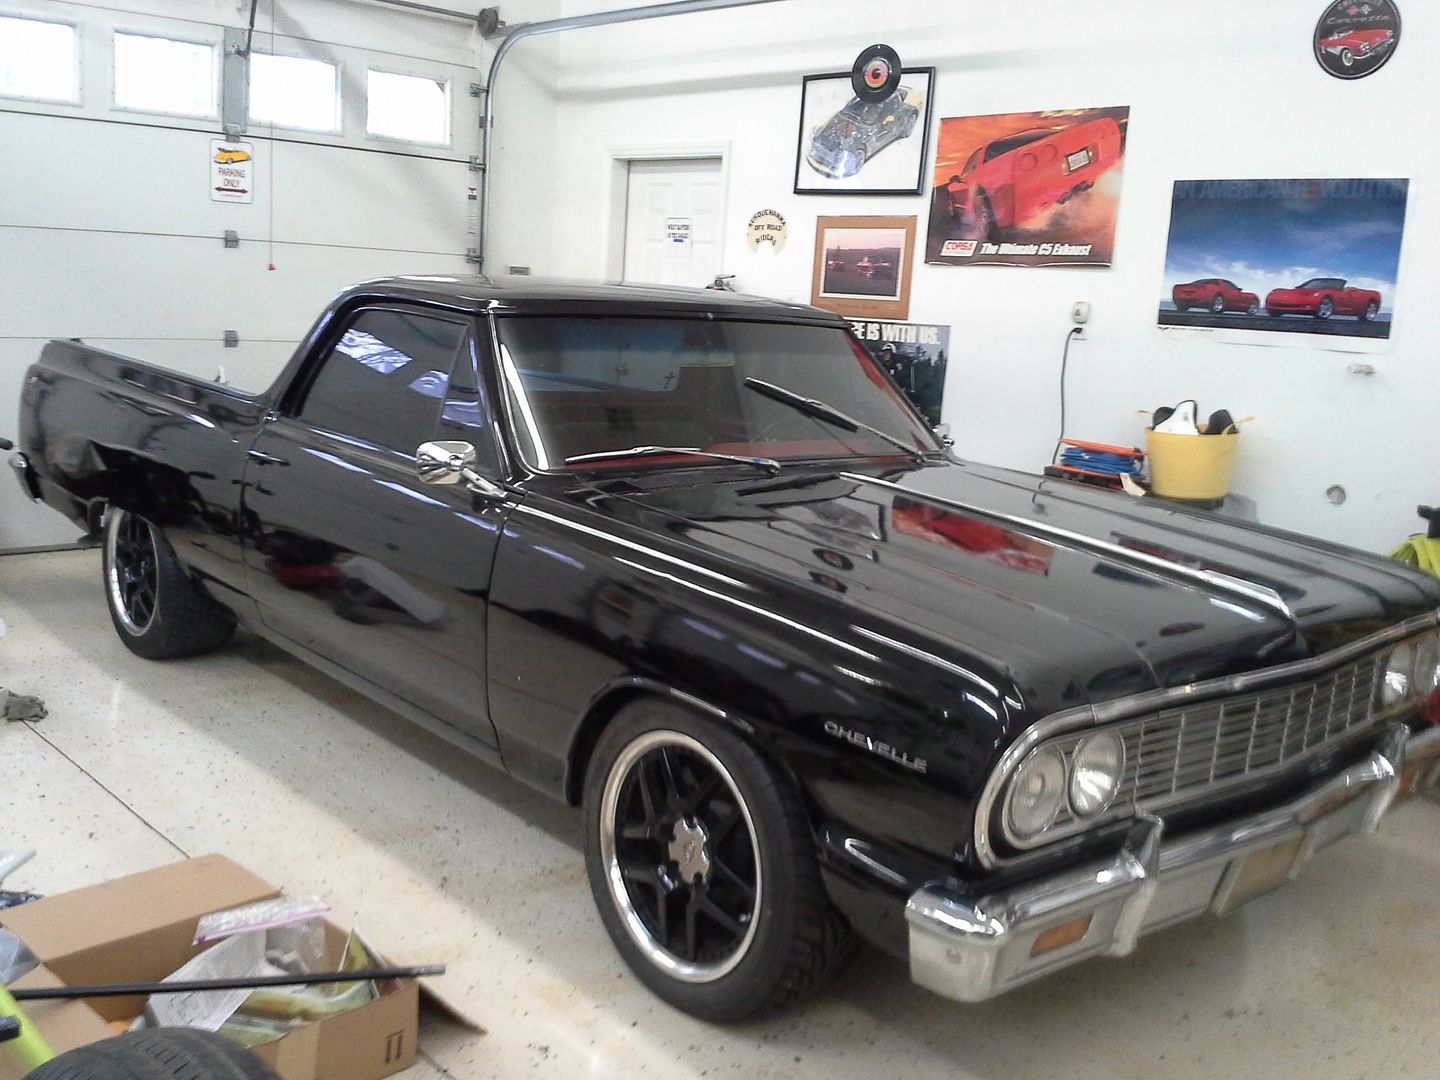 [/URL]
[URL=http://s54.photobucket.com/user/dusterbd13/media/1964%20elcamino/20141109_124233_zpsc37b791e.jpg.html]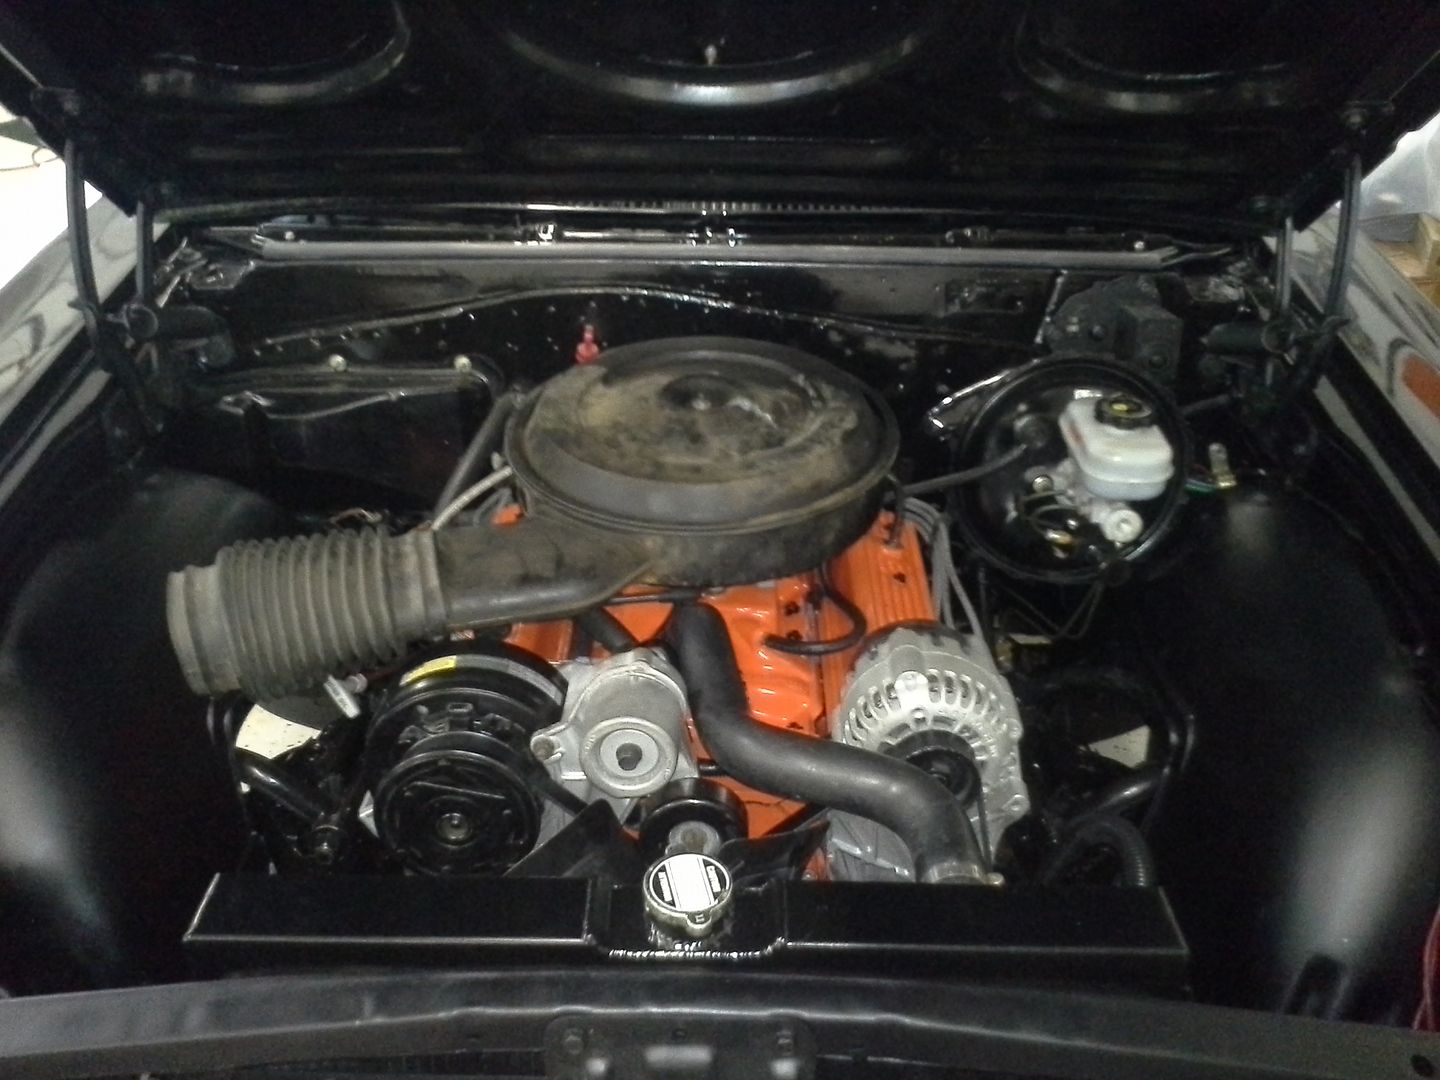 [/URL]
up next is replacing the dead alternator, fixing the intermittent ground issue on the passengers side taillight, fixing the wiper motor, nut and bolt check, speedometer cable re-lubrication and installation, gas gauge grounding, and getting it ready for its maiden voyage around the test loop. also, replacing the leaking heater core that apparently got frozen up at the same time the engine did. should only have a couple of days of legitimate work left till I can drive it home and park it outside while I do this 54 ford truck in my bay. dad wants it out of his shop sometime soon.
Bravo, man, that looks brilliant.
You make me glad that I don't keep close tabs on my budget, though.
That cluster looks better than anything GM put there.
I make me sad that I do. waw, this stuff is expensive. im going to lose my ass if I ever sell it.
You'll need to log in to post.


