


This is one of my favorite builds ever.

This is one of my favorite builds ever.

Definetely the cleanest Sylvia build I've seen. You could eat off of any surface of that beast. Wouldn't feel bad about 414hp in a 2870lb car at all.

s14blane wrote: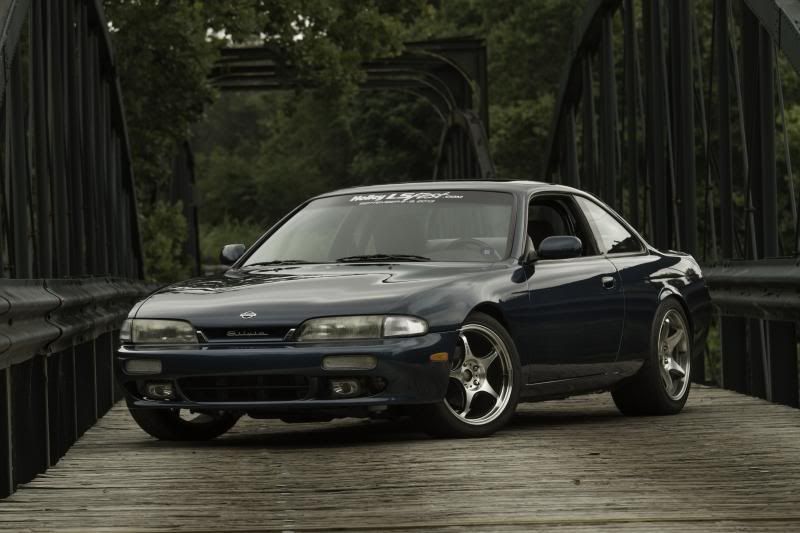
hnnnng! my body is ready.
fine work...i LOVE seeing a cleanly executed, detailed 240 performance build in this day of thrashed out S13/14 drift fodder and track beaters. please don't change a thing about the car unless it involves a snail or ITB's.

414 at the wheels is still pretty good. Overall weight isn't bad, but S14s were more 53/47 or 52/48 from most un-gutted 4-bangers I've seen. The power to weight on that thing ought to be FUN! Go to a 17x9 up front and it should handle even better.
Edit: video finally loaded, it sounds good, too!

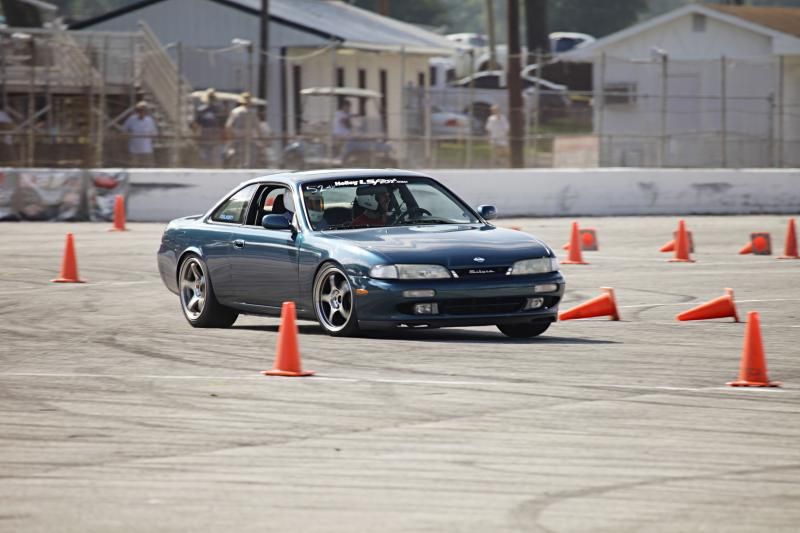
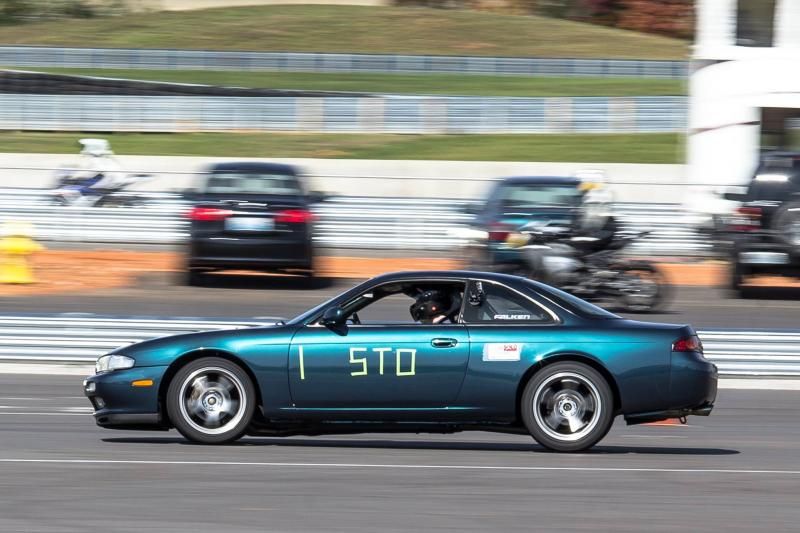
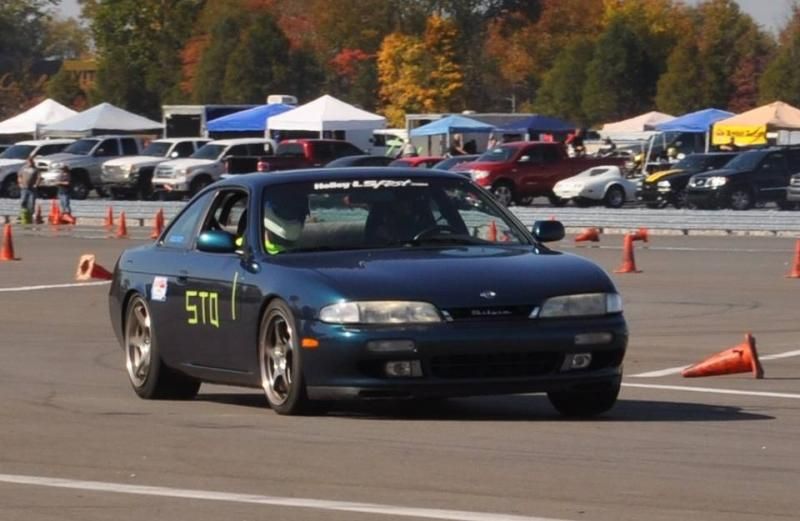
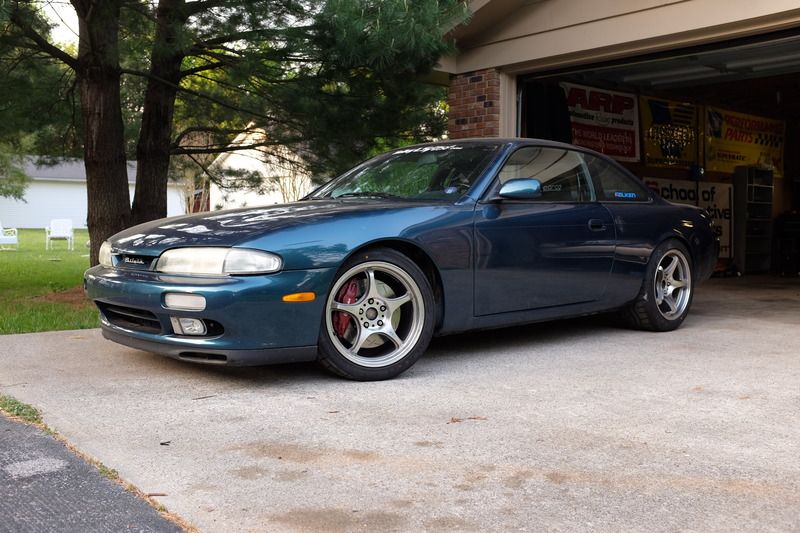
Favorite shot of the car from the autocross at LS Fest. Thanks to Robert McGaffin for your photography skills and being in the right place at the right time!

those big meats out back look great!
Some new parts are on the way for Project LS2 S14. It's been far too long for some of the items I'll be putting on. Now that the NCM Motorsports Park is open and in full swing, I've got the bug to make things happen.
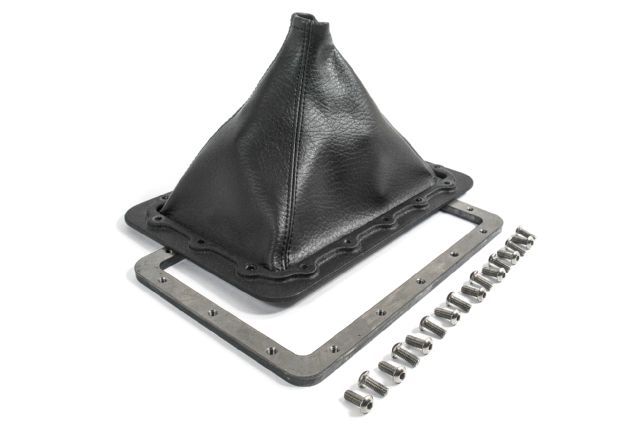
I've got the following shift boot solution on the way from Brian Finch at Finch Performance to remove heat and smells from the interior/cabin and give the interior a nice look:
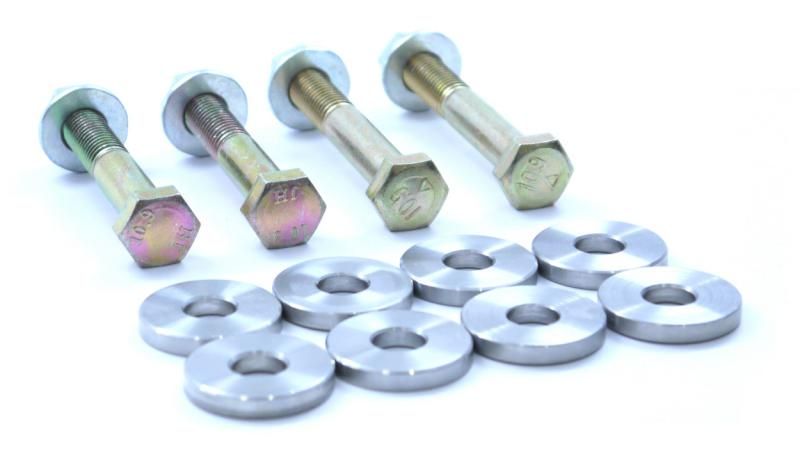
I also ordered up an eccentric lock-out kit for rear of the S14 to be installed prior to the event. Taken directly from the SPL website:
SPL Parts Eccentric Lockout Kit S14 240SX The stock eccentric bolts provided by Nissan for small camber/toe adjustments tend to slip under high cornering loads, causing changes to the rear alignment. SPL's eccentric lockout kit eliminate the stock eccentric bolts to keep your rear alignment where you set it. You must have adjustable control arms in order to adjust camber and toe after eliminating the stock eccentric bolts. Our lockout plates are CNC machined from stainless steel and supplied with CAD plated grade 10.9 hardware for absolutely zero-slip.
Also, I am in the market for a replacement gauge cluster, as I believe I shorted my speedo out when I initially started my car for the first time. Having already installed the Dakota Digital signal converters for the tach and the speedo, and double checking the installation against someone else's LS powered S14, it is strange that the speedo isn't working. Trying another one is hopefully going to produce successful results. I realize I won't be looking at my speed too much on the NCM course, but the car is light and powerful and I should probably be able to check on that as I am familiarizing myself with the car and the track at speed.
It is also time for a helmet. Anyone have any recommendations? I think I am looking into helmets from Simpson that come pre-drilled with the necessary connections to tie into a Hybrid Pro safety device.
Any input is appreciated.
SPL Parts makes good stuff!
I was originally looking for an HJC AR-10II, but I ended up with a Bell M4... a little higher price, but Bell's sizing was closer to my head diameter than the HJC. I'm pretty sure it comes pre-drilled, I can't remember and I'm not exactly near home right now to double-check ![]() But it feels reasonably comfortable and has a decent size eyeport.
But it feels reasonably comfortable and has a decent size eyeport.
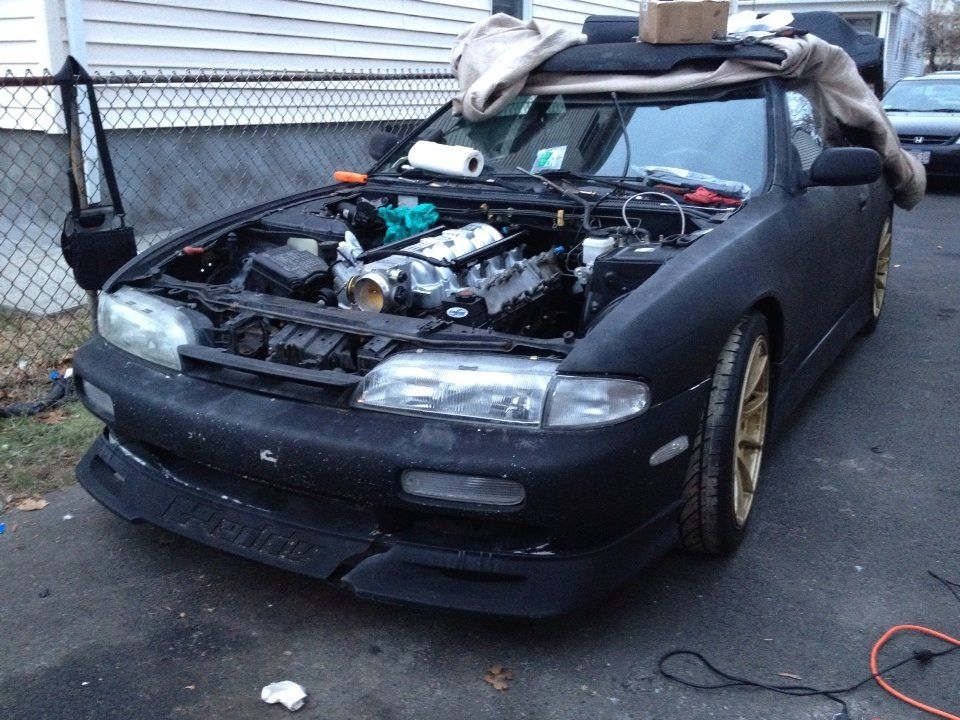
It's been a rough couple of weeks but I'm finally getting a spare moment to reflect on a few noteworthy Project LS2 S14 items.
On October 25th I had the opportunity to take the car out to it's first SCCA sanctioned autocross event. Until now I've only had the car at Holley LS Fest, and while that event is a blast, limited space at Beech Bend Raceway restricts the autocross course to a relatively tight configuration and I've been looking forward to putting the car through it's paces on a course that would allow it to stretch it's legs a bit (as much as you can in an autocross of course).
This event took place at the recently opened National Corvette Museum Motorsports Park. It is a brand new facility in my hometown of Bowling Green, Kenucky, and a Godsend. I'm not quite sure I'll ever move away from this town at this point. In it's longest configuration, the road course is a 3.15 mile stretch of asphalt.
Borrowed from the tracks website, here are some of the other specs of interest regarding the property:
The Track -Road Course: 3.15 miles in maximum configuration with 4 miles of overall pavement, which can be arranged into four different configurations. -22 Acre Autocross / Skid Pad Area / Paddock -Control Tower with Meeting Rooms, Administrative Offices, Classrooms -Pavilion with Concessions -Tech Inspection Station -Fueling Station -Commercial Business Park
For more information on why you should sign up for a track day or autocross event at this track other than reading about my personal experience, head on over to the NCM website at http://www.motorsportspark.org/.
While I didn't get to put Silvia on the road course that weekend (there was a vintage motorcycle race going on the same weekend), the Louisville chapter SCCA did a stellar job fashioning a course on the 22 acre, smooth-as-butter skidpad area.
The morning started off all wrong; waking up later than I set my alarm for, I tossed everything in the car and made off for the course, expecting a long line. Unbeknownst to me this was to be a Southwest Regional Finals event, meaning more than 190 cars were to be on site duking it out for podium finishes!
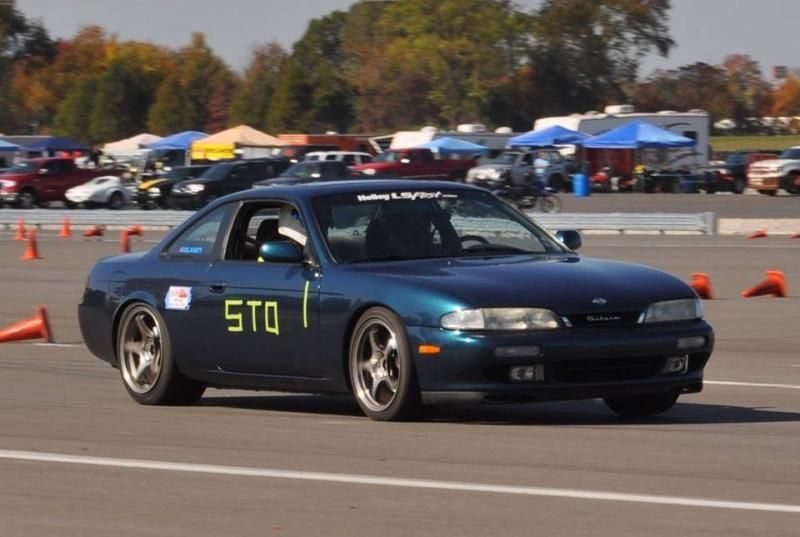
Thankfully the late start didn't result in too long of a line, and I was able to get inside the facility, register, tech the car, and pit by some friends from Louisville. I registered the car in the S.T.O. class (Street Tire Open), and found myself prepping for Run Heat 2, and Work group 4.
Street Tire Open seemed to be the most logical class for the car as it sets right now. The class allows for engine swaps, suspension mods, albeit street tires are a requirement. I am actively looking for a set of rules following the event, to find out the lowest treadwear that is allowed.
The way things broke down at this event, the entire field was lucky and we were all blessed to have four runs to set our fastest lap of the day.
Being a novice, I listened through the novice meeting, and then spent a good forty five minutes walking and re-walking the course. Then a friend and I peaced out to grab breakfast down the street since we weren't in the first run heat.
Returning to the track, I was told it would benefit me to see if I could catch a ride in a car running Heat 1 in order to better familiarize myself with the track at speed. The first car I hopped in was a V8 swapped Miata. Moving up through the staging lane, we were freed to engage a lap, and off we went! I couldn't believe how much of a go-kart this thing was. After the first turn I was immediately confused, as even though it was Miata, it seemed to be capable of braking and turning in so much later and could power out of corners so much quicker than I expected. Turns out the car had slicks, and that was throwing me off.
I made sure to hope in a couple of other cars with street tires before my heat came up in order to put myself in the right perspective.
I uploaded the laps that I filmed to Youtube and have linked them below. I'm open to constructive criticism as I am always looking to improve my skills with the equipment I've got.
Run 1: http://youtu.be/ABzmA1xF0Ok
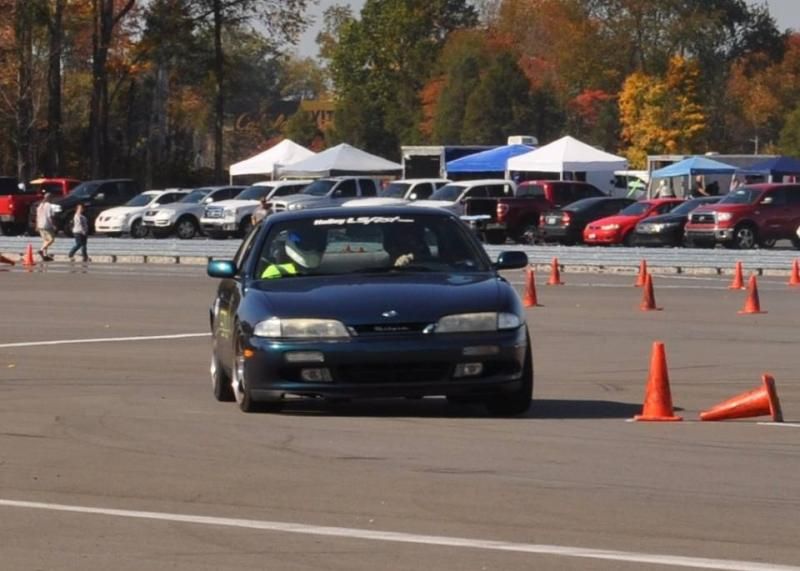
On my first run I took things pretty slowly. Trying to familiarize myself with the course while in my own car was the name of the game and I'm glad that's how I handled this lap. It was apparent to me after the first large right corner that the car was pushing quite a bit. 235 section width tires are going to have to come off and larger ones fitted before long.
Run 2: I spaced and forgot to hit record on the second run. Apologies.
Run 3: http://youtu.be/MKibyMCFkKk
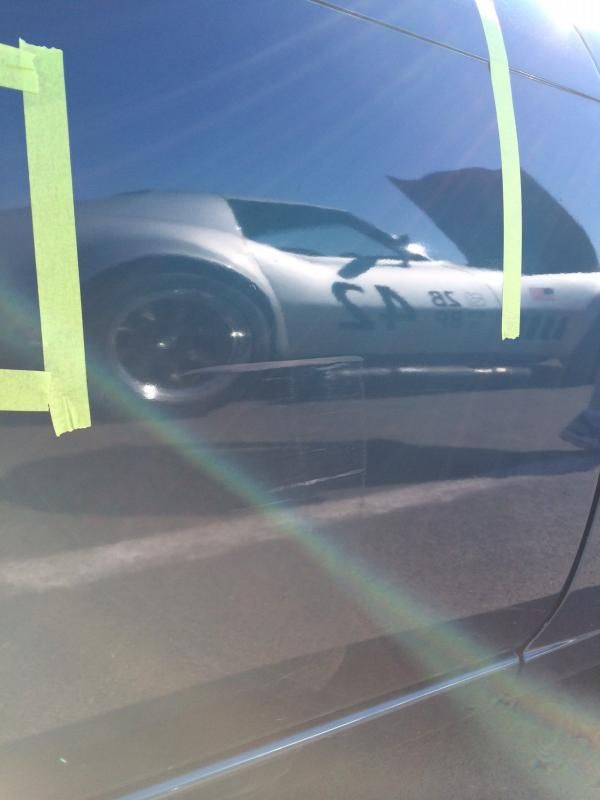
Everything had been going MUCH smoother during this run, until about half way through when I applied too much throttle and immediately sense it, but when I came off the throttle abruptly, the car shifted too much weight onto the already overburdened front tires. That resulted in the following battle scar on the passenger door, which I estimate will polish or buff right out. Lesson learned. There will be many more to learn I'm sure.
Run 4: http://youtu.be/8rBv9iXqonE
Slowest time of the day. I suppose I wasn't too interested in achieving the same result as I did on run three.
Other pics of the car from some of photographers:

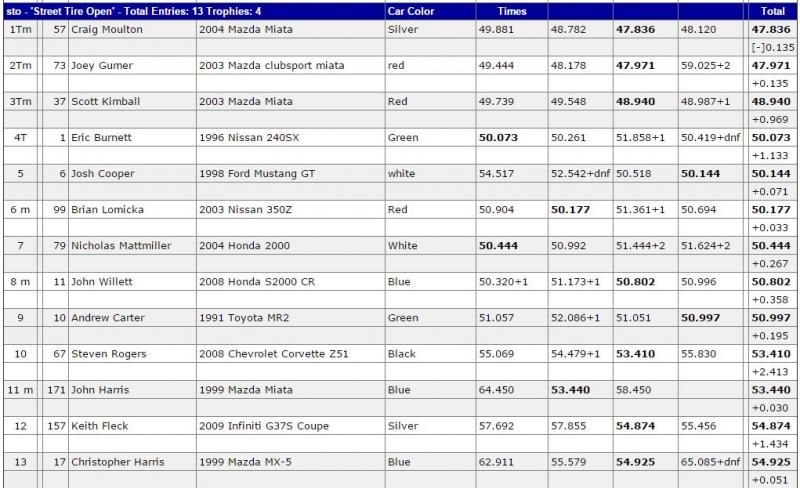
Final status: The old adage that "slower is faster" held true for me Sunday, as my first lap was actually my fastest of the four. Apparently that was fast enough to put me in the 4th spot in STO by the time all of the results were tallied up at the end of the day. I was shocked, as there were thirteen other cars registered in the class, and this was a regional finals event!

Who did I lose to? Much more experienced, and much more prepped cars than mine. Miatas even. No shame here!
Take-aways:
1: Autocross is an absolute blast! Everyone should have a go at it! It's relatively inexpensive and you are bound to learn a lot your first time.
2: Silvia could stand to benefit from some wider wheels and rubber in the front to combat the massive amounts of understeer that was prevelant. The massive difference in tire size from front to rear doesn't help and getting more of a square setup would aid the cars handling abilities and personality immensely.
3: When you can't put wider tires on the front of the car and all you have are tools, just disconnect the front sway bar and see what happens from there. Perhaps I could have benefited from taking a bit of air out of the front tires as well to help them bite. A thicker rear sway bar will get ordered should the first two options fail to accomplish the goal.
4: I need to get some chairs and a pop-up and a dedicated tool bag that I can just throw in the car when these events come up.
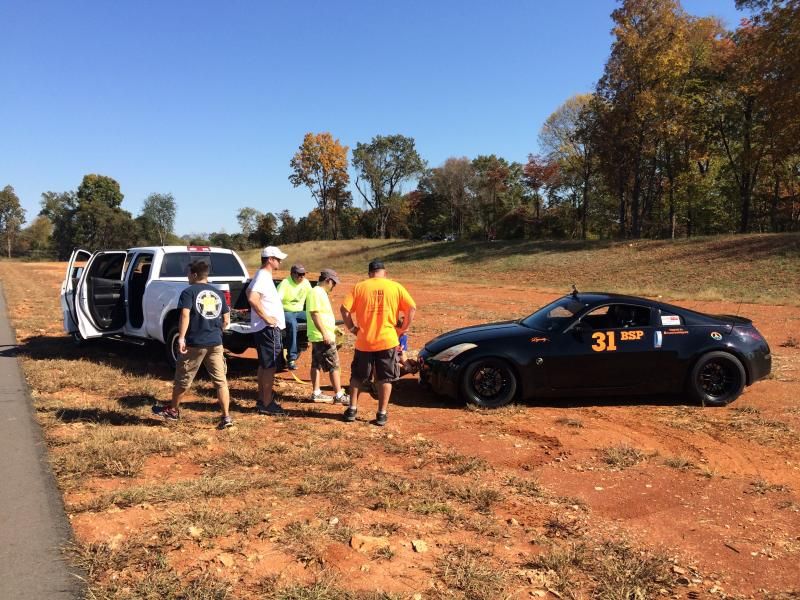
During the last run heat, when I was out on corner five, some carnage ensued.... I imagine this is pretty rare for an autocross event. A 350Z was out on track and when it came around the large high speed corner to the left close to the end of the track, the engine let go. We ended up picking up several pieces of the piston and ring that decided to create a escape hole in the VQ35 and drop a fair amount of oil all over the course. After about a 45 minute to 1 hour break to spread oil dry and blow it off the track.
Below are a couple of photos of that unfortunate occurrence. Good luck to the father/son team that are going to be scrambling to get that car back together for future events!

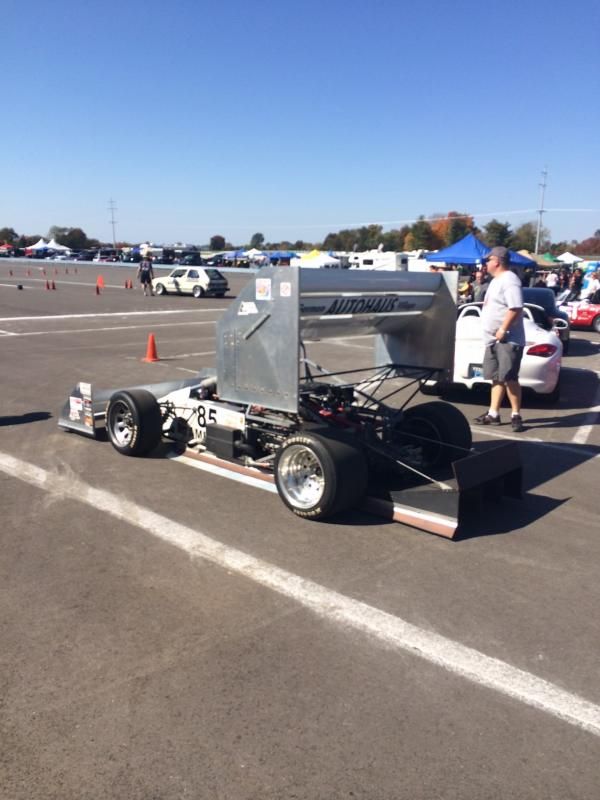
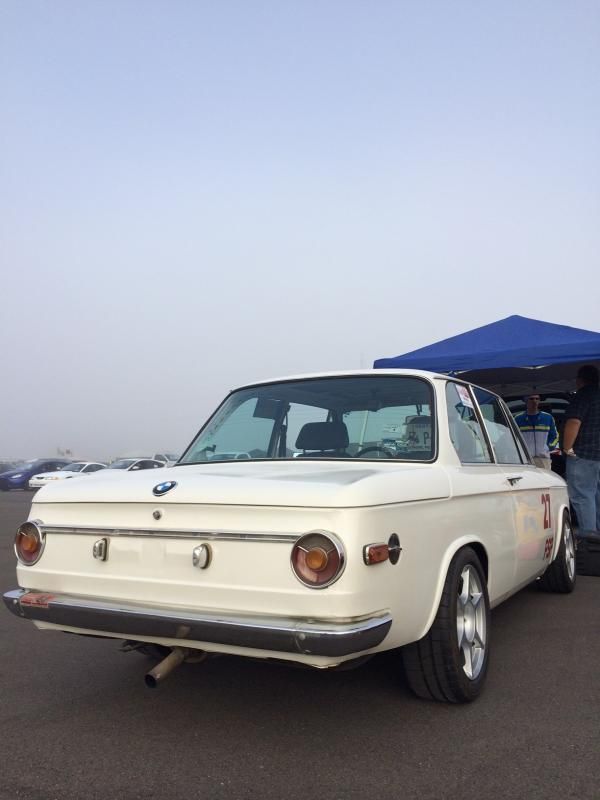
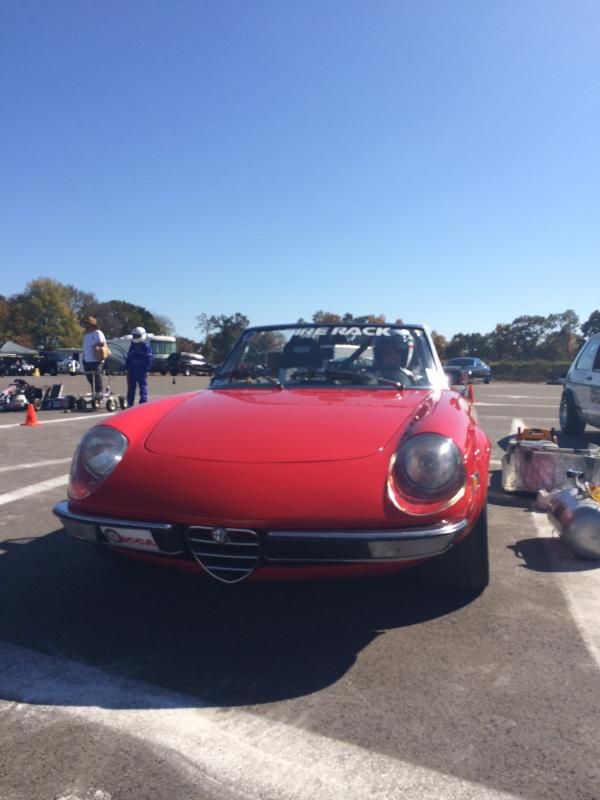
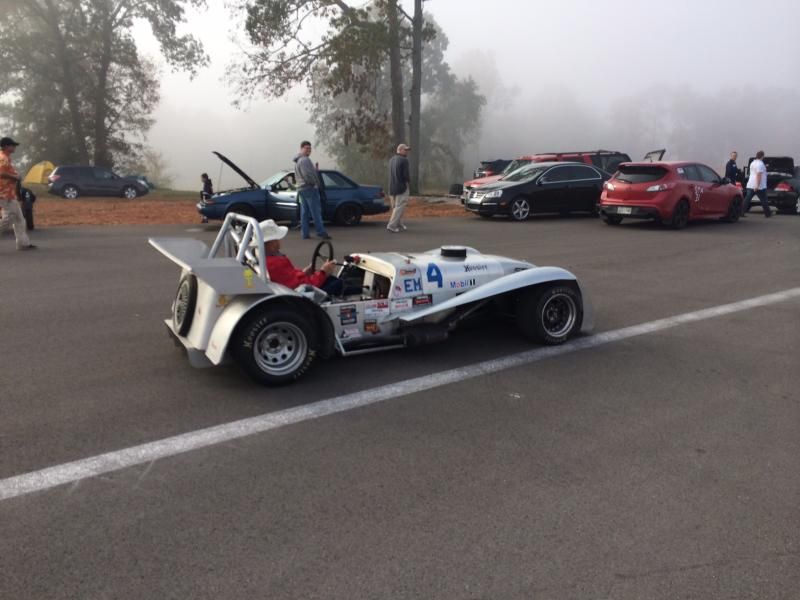
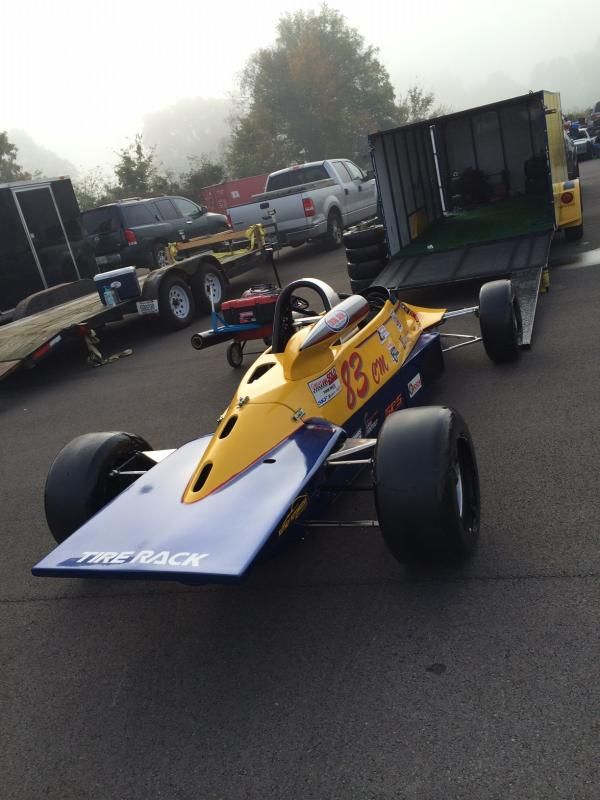
Other photos of cool cars from the event:

The S13/S14 4-banger guys typically run a square setup under 300wHP and no more than 20mm wider in the rear above that. You should be able to fit a 255 on a 9" under the front of an S14 without too much work, but it's been a while since I've done S-chassis things so your mileage may vary :D
There is a guy on www.nissanroadracing.com who has a 17''x9'' +15 offset and rolled/pulled front fenders, and he has massaged 275mm front tires under the front. I'd be lucky to get 265's I imagine, as he using a Hoosier slick.
I know it has been a while since you updated this thread of yours but you can tell someone at Hooker that your build thread sold me on buying the kit. Right now my own S14 is on standbye due to a baby and well winter. Just wanted to say thank you for sharing your build and giving me a good swift kick in the arse to get it going.
Oh I also bought a few other items per your build thread.
In reply to s14blane:You have inspired me to do a build. I am currently looking for a GTO LS2 but am having no luck. Found an LS1 and trans combo for $2000 but its an auto trans. I have no experience with modding cars but with your ever so detailed forum and some of my friends help who know what they're doing I hope I will be okay. I live in Chicago currently and will definitely check out that shop in Marion if I need help. Hopefully will get this build started soon saving up money is hard while in paramedic school though haha.
I better post my SR20 S14 soon to cool down the mullet love here!!
They're a great investment because they pull a premium before race wars, too.
monkey92 wrote: In reply to s14blane:You have inspired me to do a build. I am currently looking for a GTO LS2 but am having no luck. Found an LS1 and trans combo for $2000 but its an auto trans. I have no experience with modding cars but with your ever so detailed forum and some of my friends help who know what they're doing I hope I will be okay. I live in Chicago currently and will definitely check out that shop in Marion if I need help. Hopefully will get this build started soon saving up money is hard while in paramedic school though haha.
Good to hear my build has inspired another one there @monkey92 ! You'll have to share some pictures on the thread so I can check it out!
Update coming! So recently I took the liberty of participating in one of Ten Tenths Motorsports track days out at our new local track (NCM Motorsports Park). This was different from my last Track X day where we run a modified version of the short course layout. This time we were running the Grand Full course, which was just over 3 miles and is blistering fast in numerous places. After the event I came away with several items I need to address on the car for it to excel in events like these.
Basic Goal: Be able to run a multi-day track event where the car is setup and durable enough to run five thirty minute track sessions a day.
List of items needing attention:
-Replace shifter plate to trans gasket. It blew out and was creating some smoke in the cabin of the car and enough that a corner worker flagged me, cutting a run short. Probably for the better. I went back to work and a friend helped make a temporary one and I was back in the game and enjoyed the rest of the day smoke free. -Brakes need a lot of attention. I will admit my own negligence here. The rotors on the front of the car have been on it since I did the Z32 front brake swap like five years ago. The hawk pads are a couple years old. I assumed they would be fine since I've only driven autocross events sparingly and performed normal street driving. The rear rotors are stock S14 units and haven't been changed since I've owned the car, which is surprisingly around 6-7 years now. The pads I put on the back recently were Advanced Auto units to hold me over for a while. The fluid hasn't been flushed in the car since I did the front brake swap five or so years ago and all of this is my fault.
All around, my braking experience was just BAD. It wasn't that the pedal went to the floor or that my rotors got warped.... it was just that the cars braking performance was consistently horrible. I would find myself braking way early for turns and using engine braking to assist my efforts to slow the car. I vowed to never have this situation plague my ability to be safe on track and enjoy myself again.
Sooooo... at the moment I'm in the middle of working through an upgrade that has cost me the most I've spent on the car in quite some time. I'm in the process of putting Evo 8/9 rotors on the front of the car, which will definitely allow me to reduce high speeds to a crawl repeatedly on track. In comparison to the Z32 rotors, the EVO 8/9 rotor has both a larger diameter and width, and the caliper is an aluminum factory Brembo item.
In the back of the car I'm ditching the S14 brake setup and going with Subaru STI rear calipers and Z32 rotors in an effort to allow me to retain an emergency brake (to stay both legal and safe). If you're wondering why I didn't go with Z32 rear calipers, it's because I'm an idiot and already purchased these. Therefore I will make them work.
On to the swap. First things first you want to make sure you have everything you need to do the swap so you can save yourself time and money going back to the parts store, or waiting for more stuff to come in from the interwebs (can you tell I'm talking from experience here?).
Here is the parts breakdown:
Front:
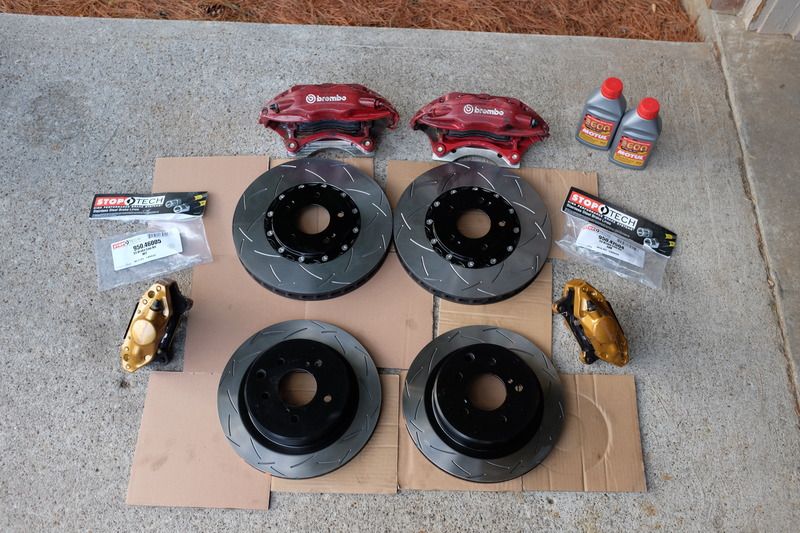
-Evo 8/9 Brembo calipers -DBA T3 5000 two piece slotted rotors -2005 (any year model from the 8/9 generation Evo will work here) Evo Stoptech stainless brake lines. -Touge Factory offset brackets (which allow the bolting of these awesome calipers to your factory S14 knuckle) -Hawk Pads for Evo 8/9.
Rear:
STi calipers
S14 stainless brake lines from Stoptech.
DBA T3 4000 Series one piece slotted rotors
-NA Z32 Ebrake drum assembly (TT car setup doesn't bolt in as there is a difference in spacing with the Ebrake "King -Nut" so be advised you'll have to use a spacer to make that work if you get a TT setup).
-R33 Skyline parking brake cables.
-Pads (still working on this at time of intial draft).
Brake fluid: I bought some Prestone DOT 3 fluid so I can get these all bled and setup and will be swapping to Motul RBF600 before the car's next event.
Tools required: -Tin snips (required to "delete" the dust shields that will need to make way for the massive new rotors. -Jack Stands or lift if you're fancy like that. -My car had 19mm head bolts holding the 300zx caliper on. The TF factory brackets come supplied with new mounting hardeware for the calipers to be bolted onto the knuckle and those are 19mm as well. -17mm ratcheting wrench I found to work best removing the S14 calipers in the rear. -10mm to remove the ebrake cables from under the car, along with pliers. -12mm, 14mm, (will add to this later when I have some more time to think clearly).
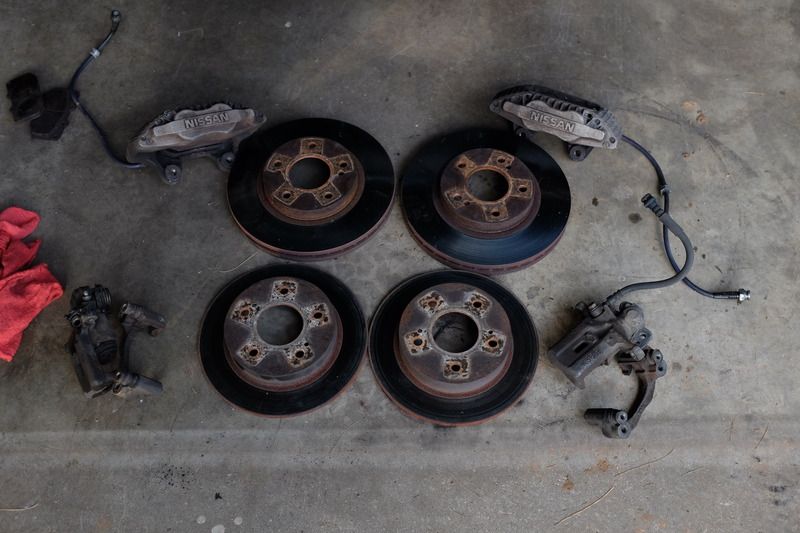
Out with the old:
In with the new:
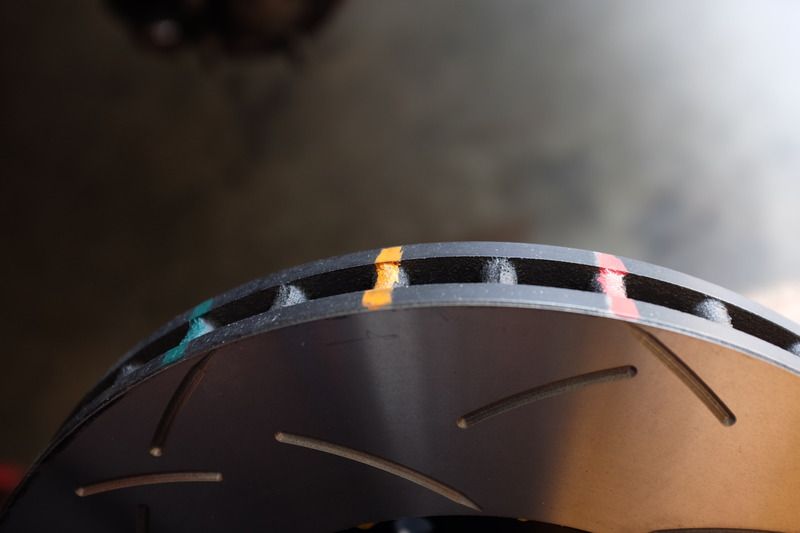
One of the many cool features of the new DBA rotors I chose to go with is that they have a "heat paint" system on the rotors which allow you to establish how hot you're getting the rotors during a race/event. When they reach a certain temperature they turn a different color letting you know a certain temperature has been achieved. The color chart is included in the instructions that come with the rotors.
Taking care of the fronts:
Jack vehicle up and make sure it is secure. Stick something else under the car that will catch the car and save your body in the event that the jack stands fail.
Use an impact to remove the lugnuts from the wheels (or crack those loose before jacking the car up and then remove when car is suspended.
Now you have access to your front brake system. Remove the brake lines and make sure you have thought ahead to have something on hand to catch the old fluid. You will obviously not be reusing this.
once you have the hard line disconnected from the soft line that goes to the caliper, you can start unbolting the caliper from the knuckle. It was two 19mm bolts on my car. Once those are removed you should be able to remove the caliper itself. Now nothing should be holding your rotor on and it can say goodbye to your Nissan at this point as well.
Take your new rotors, and clean them all off with brake cleaner in order to ensure all oils and contaminants have been removed that could ruin the contact between the rotor and the new pads. Install the rotor onto the hub.
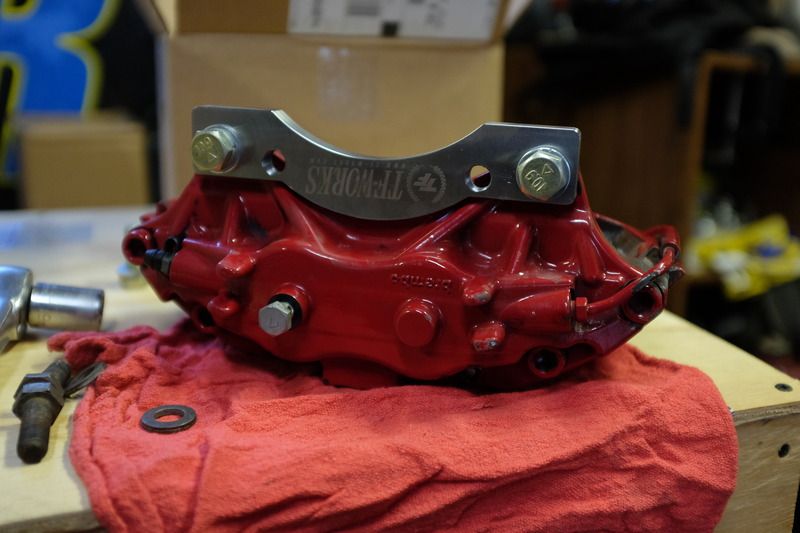
Take the Touge Factory brackets and install them on the Evo caliper as shown in the pictures (there were no instructions included in the kit). Then bolt them in the same place as the old caliper. Torque them to spec. Previous to this step I had test fit the TF factory bracket on the knuckle and found I needed to trim my dust shield even further to accept the larger Brembo caliper.
Connect your front brake line to the caliper using new crush washers on both sides of the banjo bolt and then connect the other end to the hardline. Tighten and then install brake line bracket fastener at the hardline and in the middle of the stainless brake line to fasten it to to the strut/coilover in order to keep it from coming in contact with a foreign object and severing.
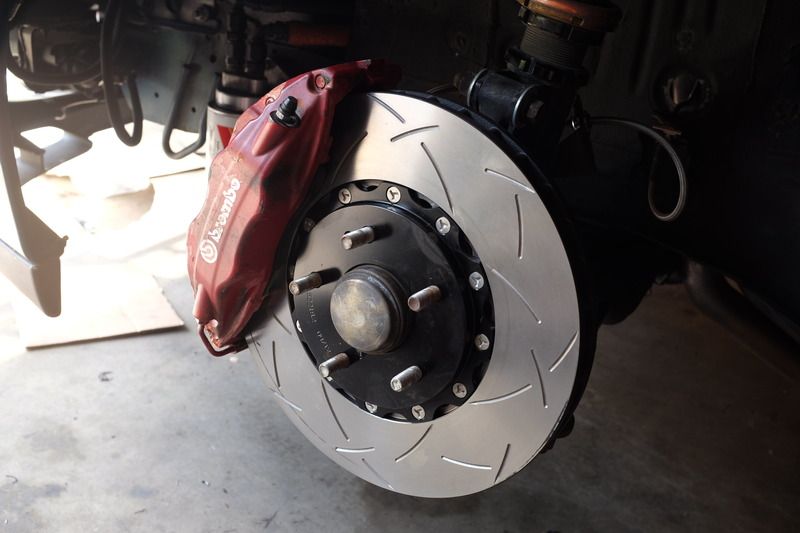
Repeat for other side and then step back in both wonderment at how awesome your car looks with these on it and fear because you're not quite sure that your wheels will fit with these brakes. Note on that: I'm quite sure I have close to the smallest wheel anyone has ever run with these brakes. I am still plagued with 17''x 8'' +25 offset Five Zigen FN01RC wheels in the front with 235/40/17 Falken Azenis RT-615K on them and they fit just fine. WARNING: just because you may have the same dimension wheel as I do doesn't mean it will fit for sure, because spoke design can play a part in this as well.

Moving on to the rear:
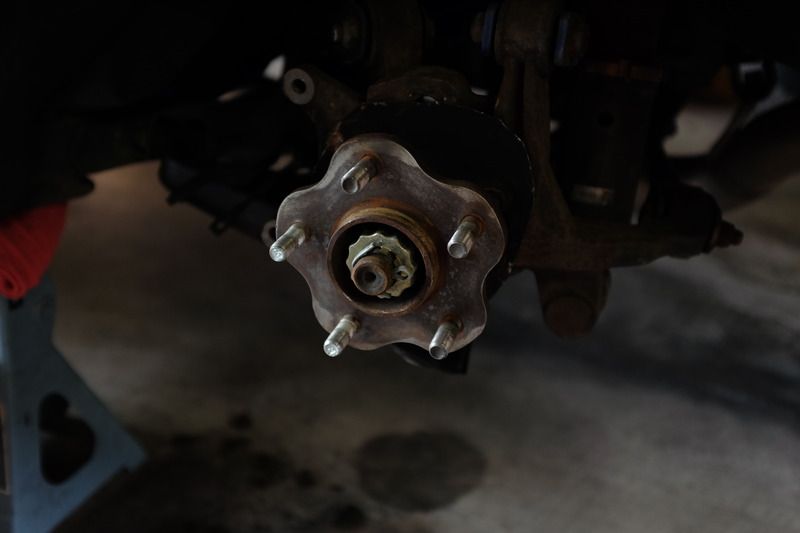
To get the rear Z32 rotors to fit you're going to have to do some modification to the rear dust shields as well. Pretty much cut them all off as close to the hub as you can with some sharp tin snips. Or if you're really anal about it, take the whole rear assembly off the axle and press the hub out of the knuckle and remove it that way.
What you start with:
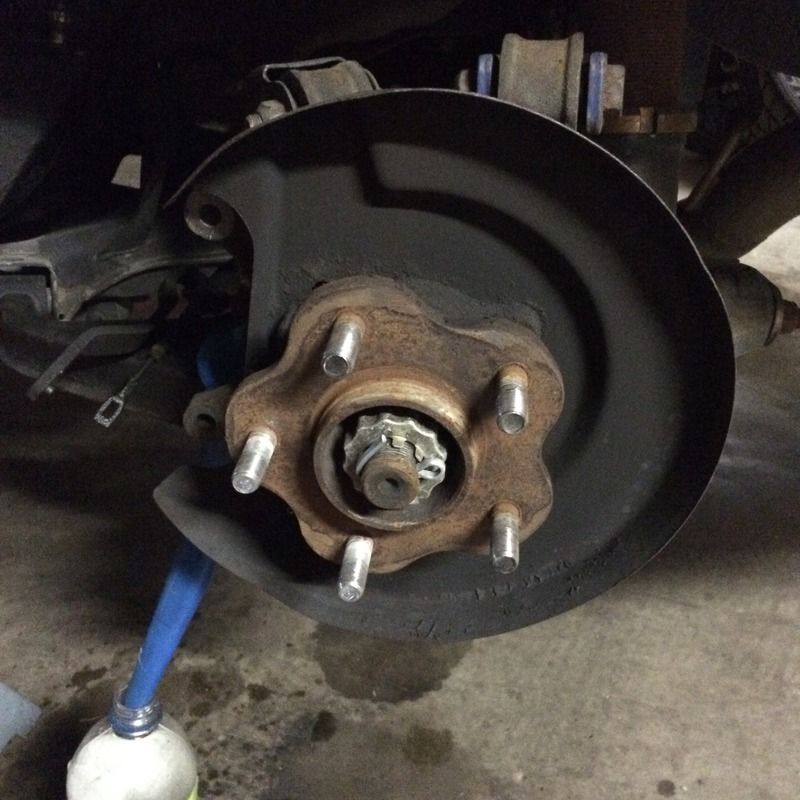 What you end up with:
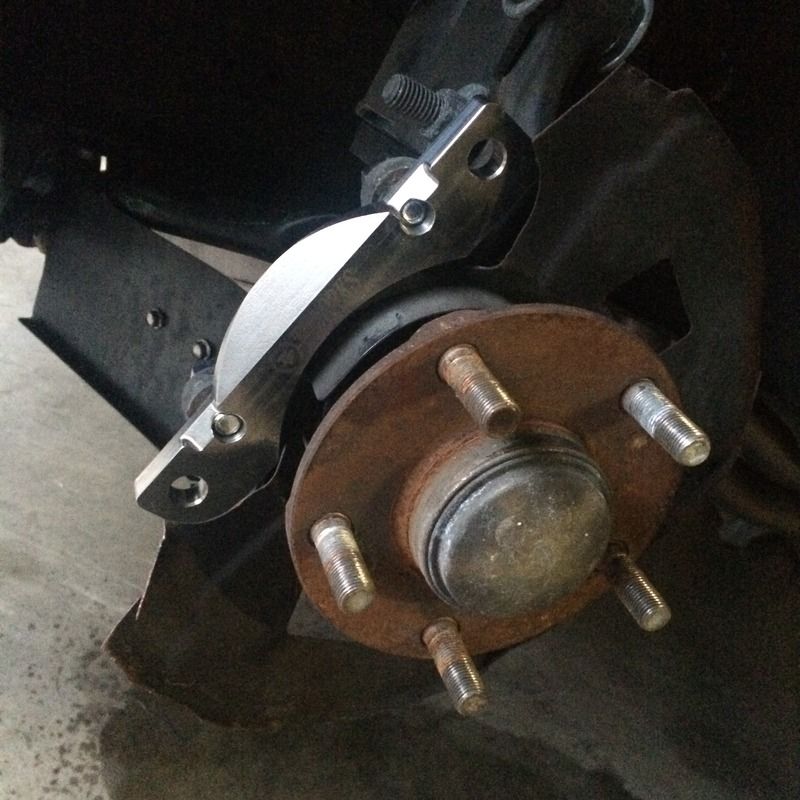
The STI caliper is marketed as a great option online on Zilvia and other stupid websites like superstreetonline, and importtuner.com because it simply bolts into the same place as the s14 caliper with no adapter brackets or anything of the sort. What they don't really cover all that well is that evidently you run into a rotor to caliper offset issue when using these. They conflict, saying you need a 3mm spacer, a five mm spacer, or no spacer at all. What I can tell you is this: Using a Sti caliper on an S14 five lug hub with a Z32 one piece rotor creates the problem you can see in the image below. You can see that the caliper in its mounted location is to far to the drivers side, so the pads won't be contacting the rotor at the same time if I left things as they are. In case you are wondering whether I have the rotor snugged up to the hub appropriately, I snugged it up with three open ended lugnuts just to be sure.
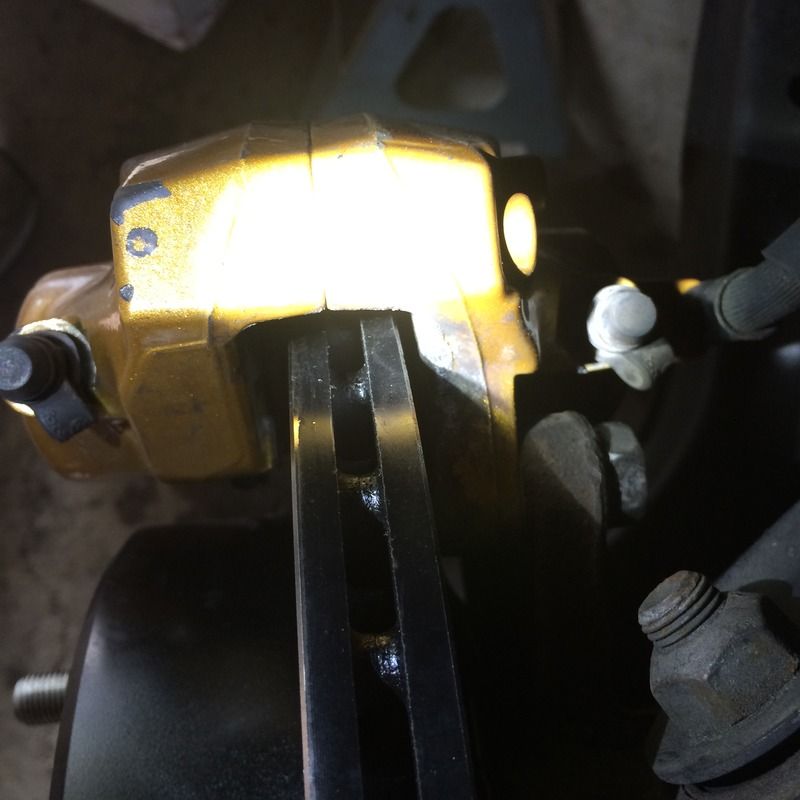
Potential solutions are:
1.Stick something in between the rotor and the hug to help achieve the correct relationship between the caliper and the rotor. Ill-advised at best.
2.Mill the appropriate amount of material off of the caliper ear to achieve the " ". Most likely the best choice.
3. Fill me in on this one as I'm lost as to a better option.
I ended up getting a good friend of mine to take the calipers with him to work one night and mill three mm off of each caliper ear so that they would mount up over the caliper in the appropriate position.
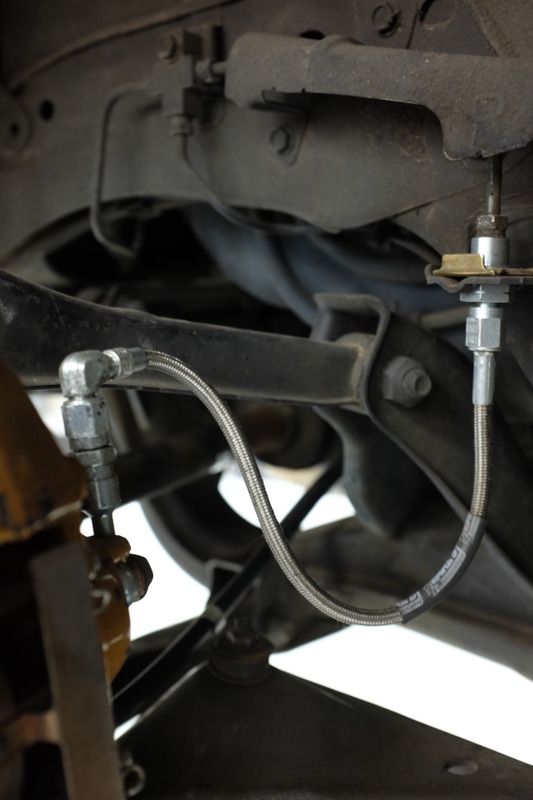
That being said it was time to move on to the brake lines for the rear. I had ordered stainless rear STI brake lines but when they arrived I discovered they were much too long for using on an S14, despite the fact that they bolted up fine. I then turned to Earl's Performance Plumbing, which is another company owned by Holley. I was able to get some good pics of the lines being made and will add them when I get them off the camera, but in the meantime, here is how I ended up running the Earl's lines in the back of the car. They tuck nicely to the inside of the knuckle, away from inside of the wheel and have proved safe for the amount of time I've driven the car, including the bedding process, and numerous hard stops from speed.
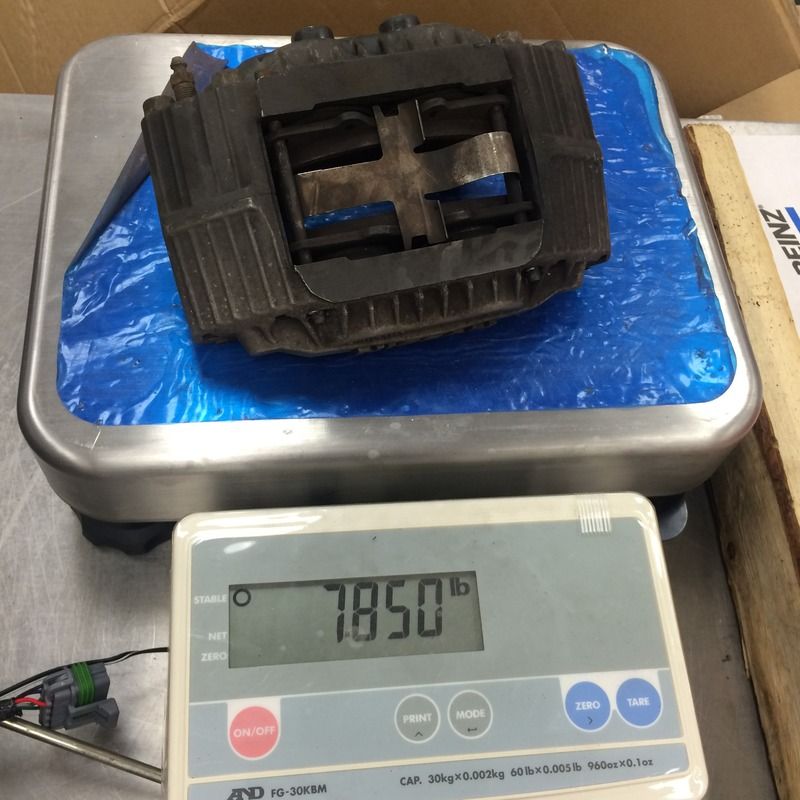
So Blane, you might say, how much weight am I adding to each side of the car just for bigger brakes, and is the increased braking performance worth the gain?
Glad you asked, as I took the liberty of weighing every new part I put on the car for your benefit!
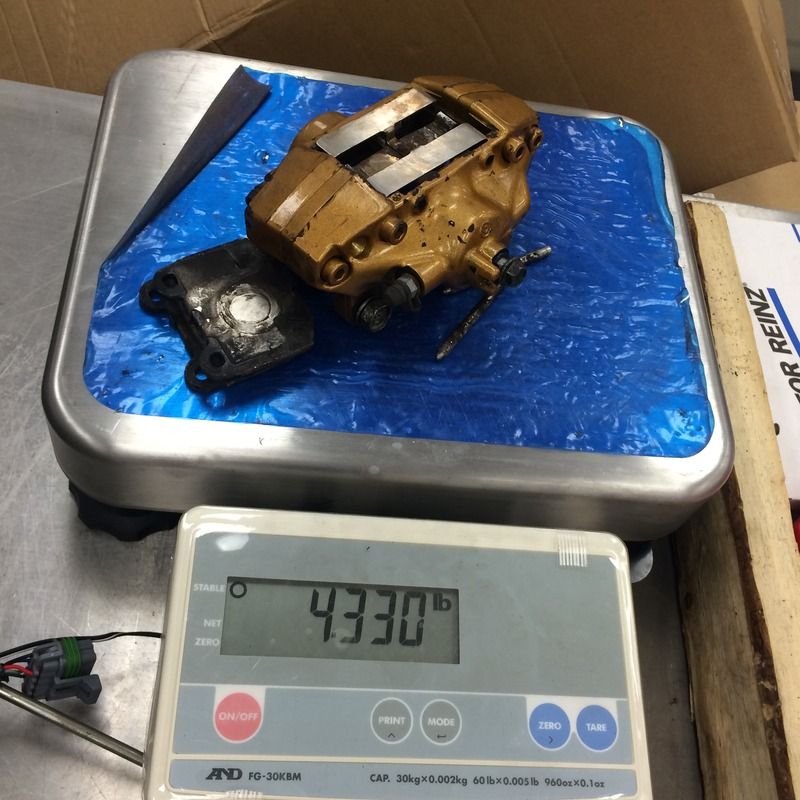
Old Z32 caliper with used pads still installed:
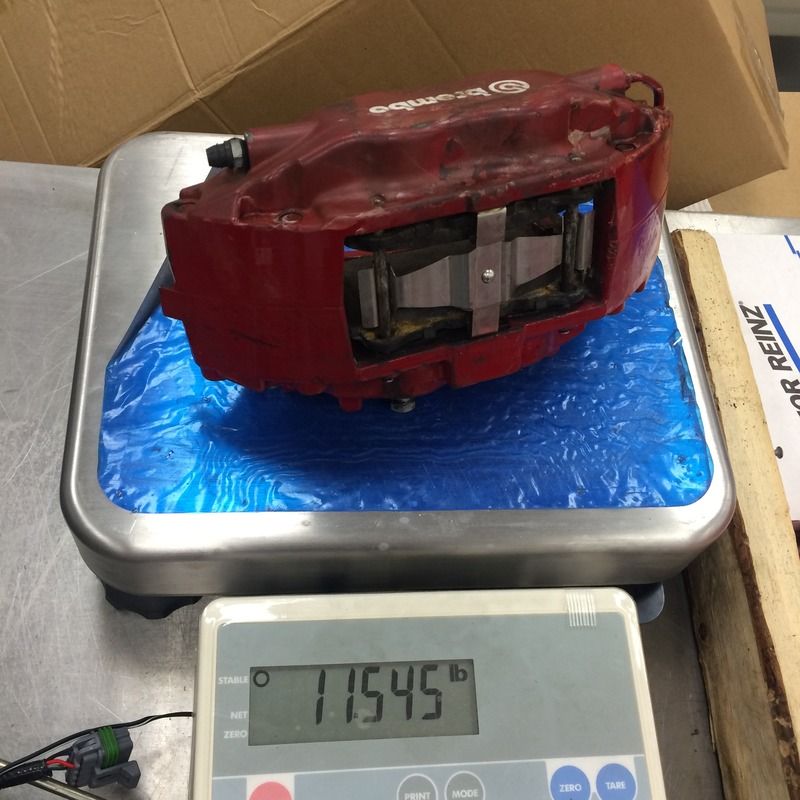
 Evo Brembo caliper with TF Factory bracket and old pads installed:
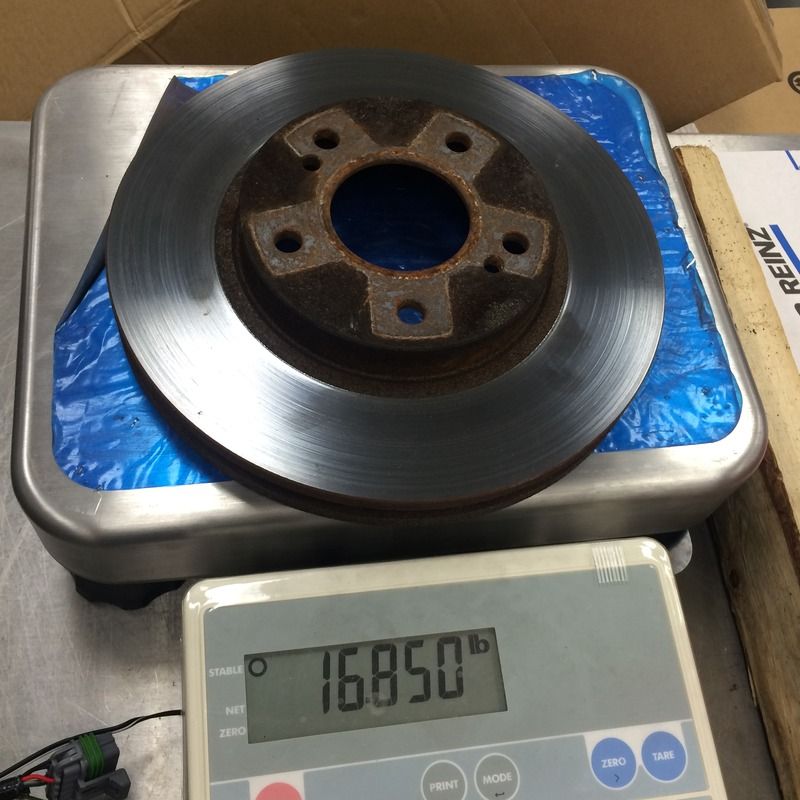
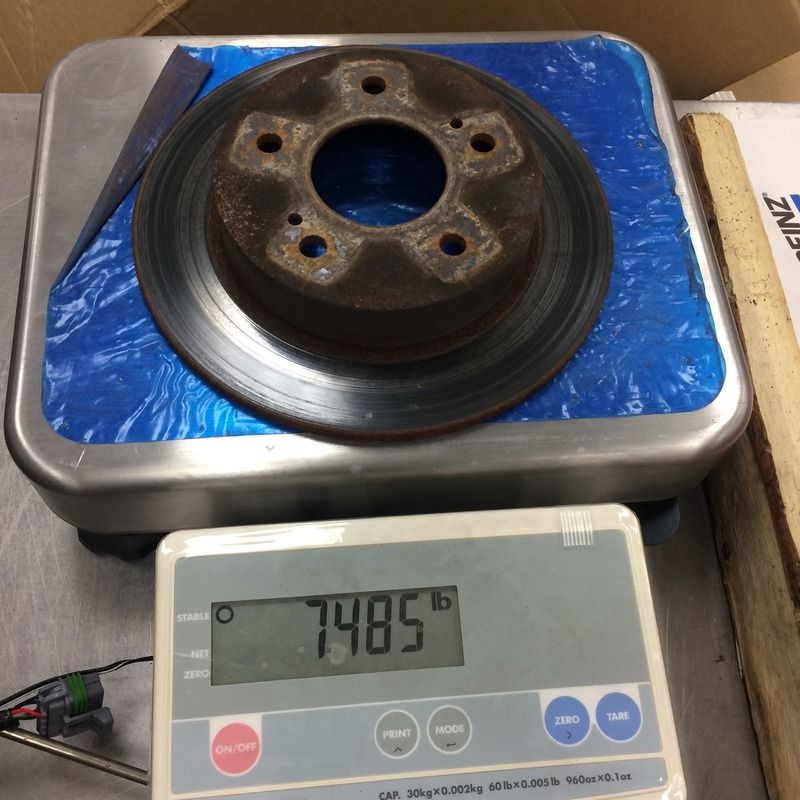
Old Z32 front rotor with about 5 years of use:
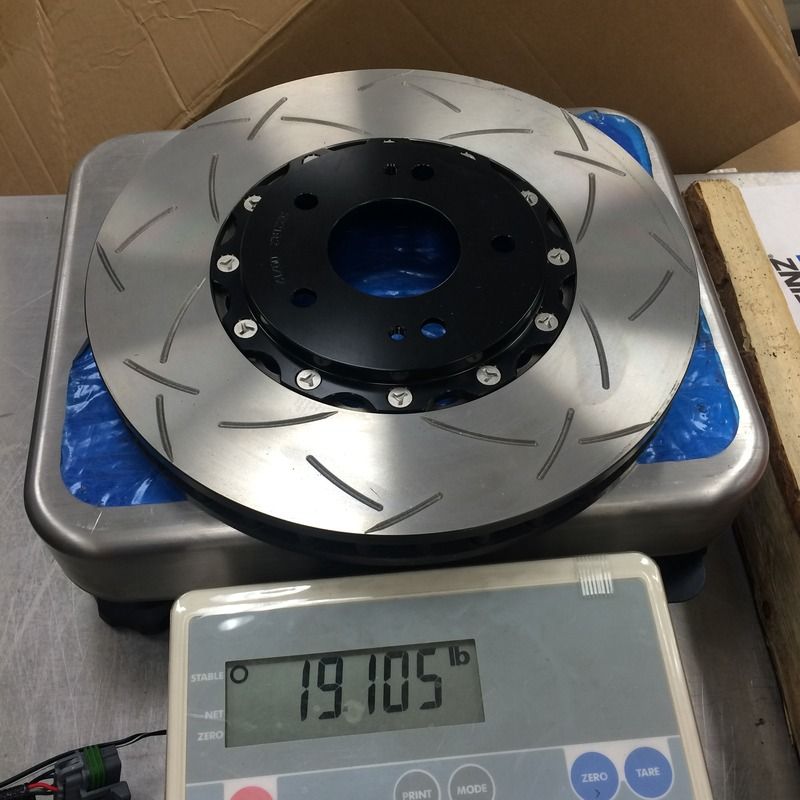
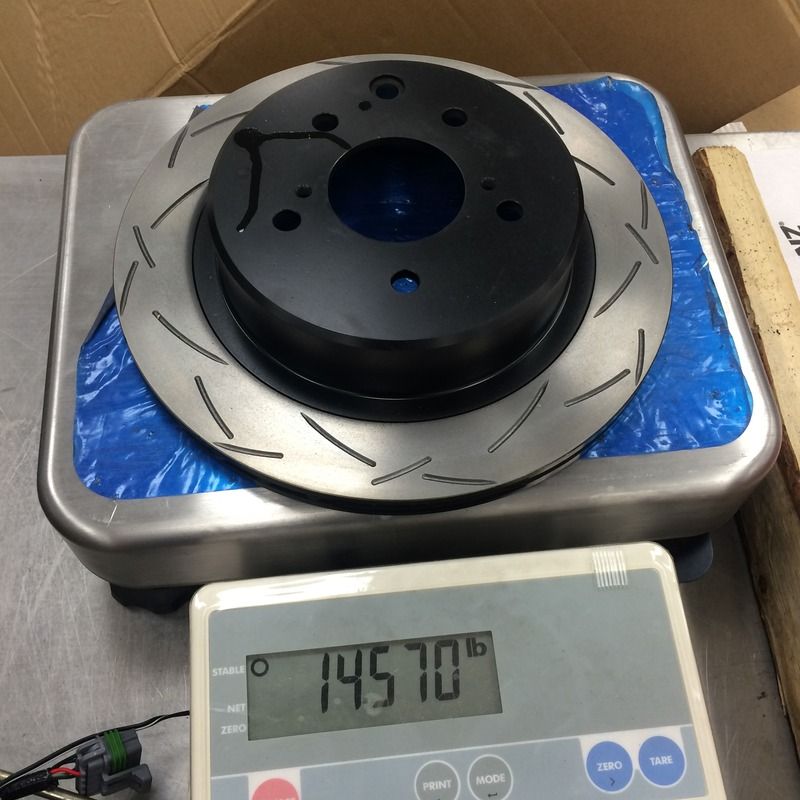
 New 2-piece DBA slotted Evo rotor:
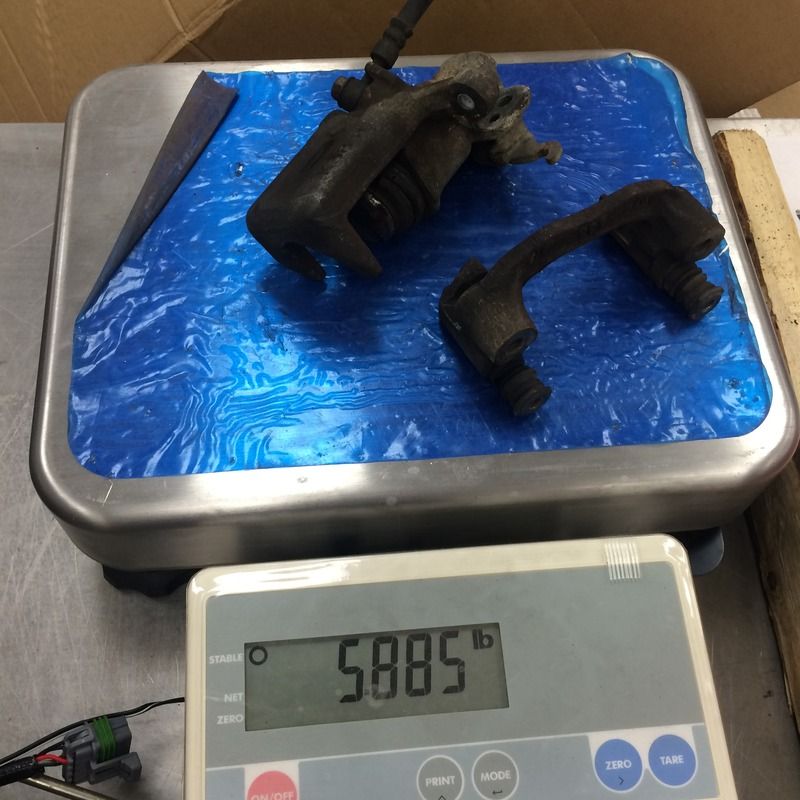
Rear S14 caliper without old pads because I forgot to take them with me:
 Sti caliper complete with old pads:
Rear S14 rotor which is severely depleted (haven't replaced in the seven years I've owned the car):
 New Z32 rear rotor:
Here is how everything looked when everything was installed and bled:
Now I just need to do the opposite of assembly, tear down the calipers, have them powdercoated, installed new seals with rebuild kits, reassemble calipers, install, and rebleed. I feel like I'm not even at the halfway point yet....
This is clearly not complete and I'll be making it so here in the near future. I just thought I'd post what I had so it would motivate me to finish it sooner than later.

Couple of notes....
If your pads are not really any different than what you ran before, I wouldn't expect much different brake performance.
The new fluid and lines will probably be the biggest difference.
If new pads fit in that rear caliper without rubbing on the rotor, I see no issue with the offset.
The pistons should push out and touch the rotor evenly the first time you pump the brakes.
Make sure that the pistons can't fall out of the caliper with a worn brake pad on the large opening side of the caliper.
Rob R.
wvumtnbkr wrote: Couple of notes.... If your pads are not really any different than what you ran before, I wouldn't expect much different brake performance. The new fluid and lines will probably be the biggest difference. If new pads fit in that rear caliper without rubbing on the rotor, I see no issue with the offset. The pistons should push out and touch the rotor evenly the first time you pump the brakes. Make sure that the pistons can't fall out of the caliper with a worn brake pad on the large opening side of the caliper. Rob R.
Hey there Rob, I admit to not knowing much about brake design and performance here, so I'm definitely not going to play like I'm an authority on the subject. Thank you very much for your input. I agree that the more aggressive pads are going to be the main differences that I'll see from the outset. I do imagine however that the upgrade in rotor size and design will allow for the car to stand up to more abuse on the track with a longer amount of time before adverse braking performance sets in. Thoughts?
I can see your point about the offset in it's current position as long as the pistons aren't going to fall out on the side with more ground to cover for the pads before contact with the rotors are made.
A friend came over today and took some measurements with a set of calipers. It appears that around 3mm is all that will be needed to shore them up to center, which I am fine with doing since I'm a bit O.C.D.
What is going to help the brakes last longer on track is nothing more than heat management.
If you can keep your brakes cool, rotor size or thickness doesn't really matter.
The increased diameter of the rotor will help keep it cool.
Make sure your brake pads are made to stand up to the temps you are going to see. Hawk has a pretty cool chart for picking brake pads vs brake temps. YOu can get brake temps from temperature paint or some fancy sticker thingys.
The brake fluid will help by degrading less when it does get hot.
In other words, make sure you have good brake fluid (which you have covered) and make sure you can keep your brakes cool (I would probably remove the dust shields if they do not have any cooling channels or scoops built in to them).
R33 ebrake cables and Z32 drum ebrake assembly arrive today. Finally gonna get this car back on the road!

wvumtnbkr wrote: Couple of notes.... If your pads are not really any different than what you ran before, I wouldn't expect much different brake performance. The new fluid and lines will probably be the biggest difference. Rob R.
I definitely agree with this. I put performance 2 piston brake calipers on my 91 Camaro in the front to replace the below average single piston brake calipers, and I didn't notice a performance gain at all, mostly because the pads that came with them are garbage.
Man, you did this the hard way ![]()
There are "big brake" kits out there that are essentially just a pair of brackets and a part number for rotors, and you reuse the Z32 caliper (I want to say 3000GT rotor equivalent, e.g. so you can pick OE rotor for budget or if you want two-piece you can get one off-the-shelf); depending on who made the bracket you may have to grind out a sliver of material at the edges of the rotor channel. I.e. whether you don't alter the caliper and seat it slightly farther from center (which I don't like) or shave the channel to make the channel's radius match the new rotor radius (which I'd be willing to do). I know the Brembo calipers are physically bigger (and have staggered piston size to counteract the pad wedging effect) but I can't remember if the actual piston area is actually much different. I think the Z32 caliper has about as much piston area as Porsche "Big Blacks" (928) but I don't know how those compare to STI/EVO Brembos... and I'm too lazy to take the calipers off my '05 STi to compare them with the Z32 brakes on my S13 ![]() The rotors are DEFINITELY bigger, though, and the diameter increase to me would really be the main benefit (greater brake torque from same pad and line pressure).
The rotors are DEFINITELY bigger, though, and the diameter increase to me would really be the main benefit (greater brake torque from same pad and line pressure).
For the rears... Again I don't know the exact specs, but I don't think the piston sizes are much different from a Z32 rear caliper to an STi/Evo rear caliper, and the Z32 caliper has no alignment issues. It may have been easier to sell the calipers to an STi or Evo guy and grab a set of Z32 rear calipers. You could also have swapped the entire rear upright assembly... you get an aluminum upright that's about 7 lbs lighter but this requires a different lower shock mount. The S13/14 shock has a bushing at the end of the shock, Z32 has a clevis... on coilovers you can just spin off the lower mount and spin on the new one.
Honestly, I think you probably wouldn't have had any problems with fresh rotors/pads/fluid. Most of the S13 guys with ~350wHP that track their cars could get by with Z32 brakes and track pads, but they're also a few hundred pounds lighter. I can't remember where it's mentioned, but were you using the 28mm or 32mm Z brakes and did you swap to a Z-car master cylinder?
Very, Very, Vary jealous, I thought of doing this but didnt wanna take the time. Makes me miss my S13 hatch. My advice if you wanna beat the Miatas is run the smallest, lightest wheels with the best tires. My advice if you can fit them over the brakes is a 15x7.5 with Hoosier R7 275/50/15 rear and 245/50/15x7 front. Sidewall flex is not only good for launches, it also helps you stay glued in the turns, especially with a lot of torque on tap. As far as brakes go, if NASCAR can use 15s for those heavy cars, then I'm sure we can too, never went for the big brake, big wheel hype. Have fun.
You could check out the Wilwood kits from Defsport on nissanroadracing.com, uses really affordable rotor rings and pads for reduced running costs. Way lighter too. The costs for Evo/STI pads and rotors are cray.
svxsti wrote: Very, Very, Vary jealous, I thought of doing this but didnt wanna take the time. Makes me miss my S13 hatch. My advice if you wanna beat the Miatas is run the smallest, lightest wheels with the best tires. My advice if you can fit them over the brakes is a 15x7.5 with Hoosier R7 275/50/15 rear and 245/50/15x7 front. Sidewall flex is not only good for launches, it also helps you stay glued in the turns, especially with a lot of torque on tap. As far as brakes go, if NASCAR can use 15s for those heavy cars, then I'm sure we can too, never went for the big brake, big wheel hype. Have fun.
Thanks for the tips/advice svxsti, but I think the glaring problem with that is that I'm not going to be able to fit 15'' wheels over my recent brake upgrade.
You'll need to log in to post.


