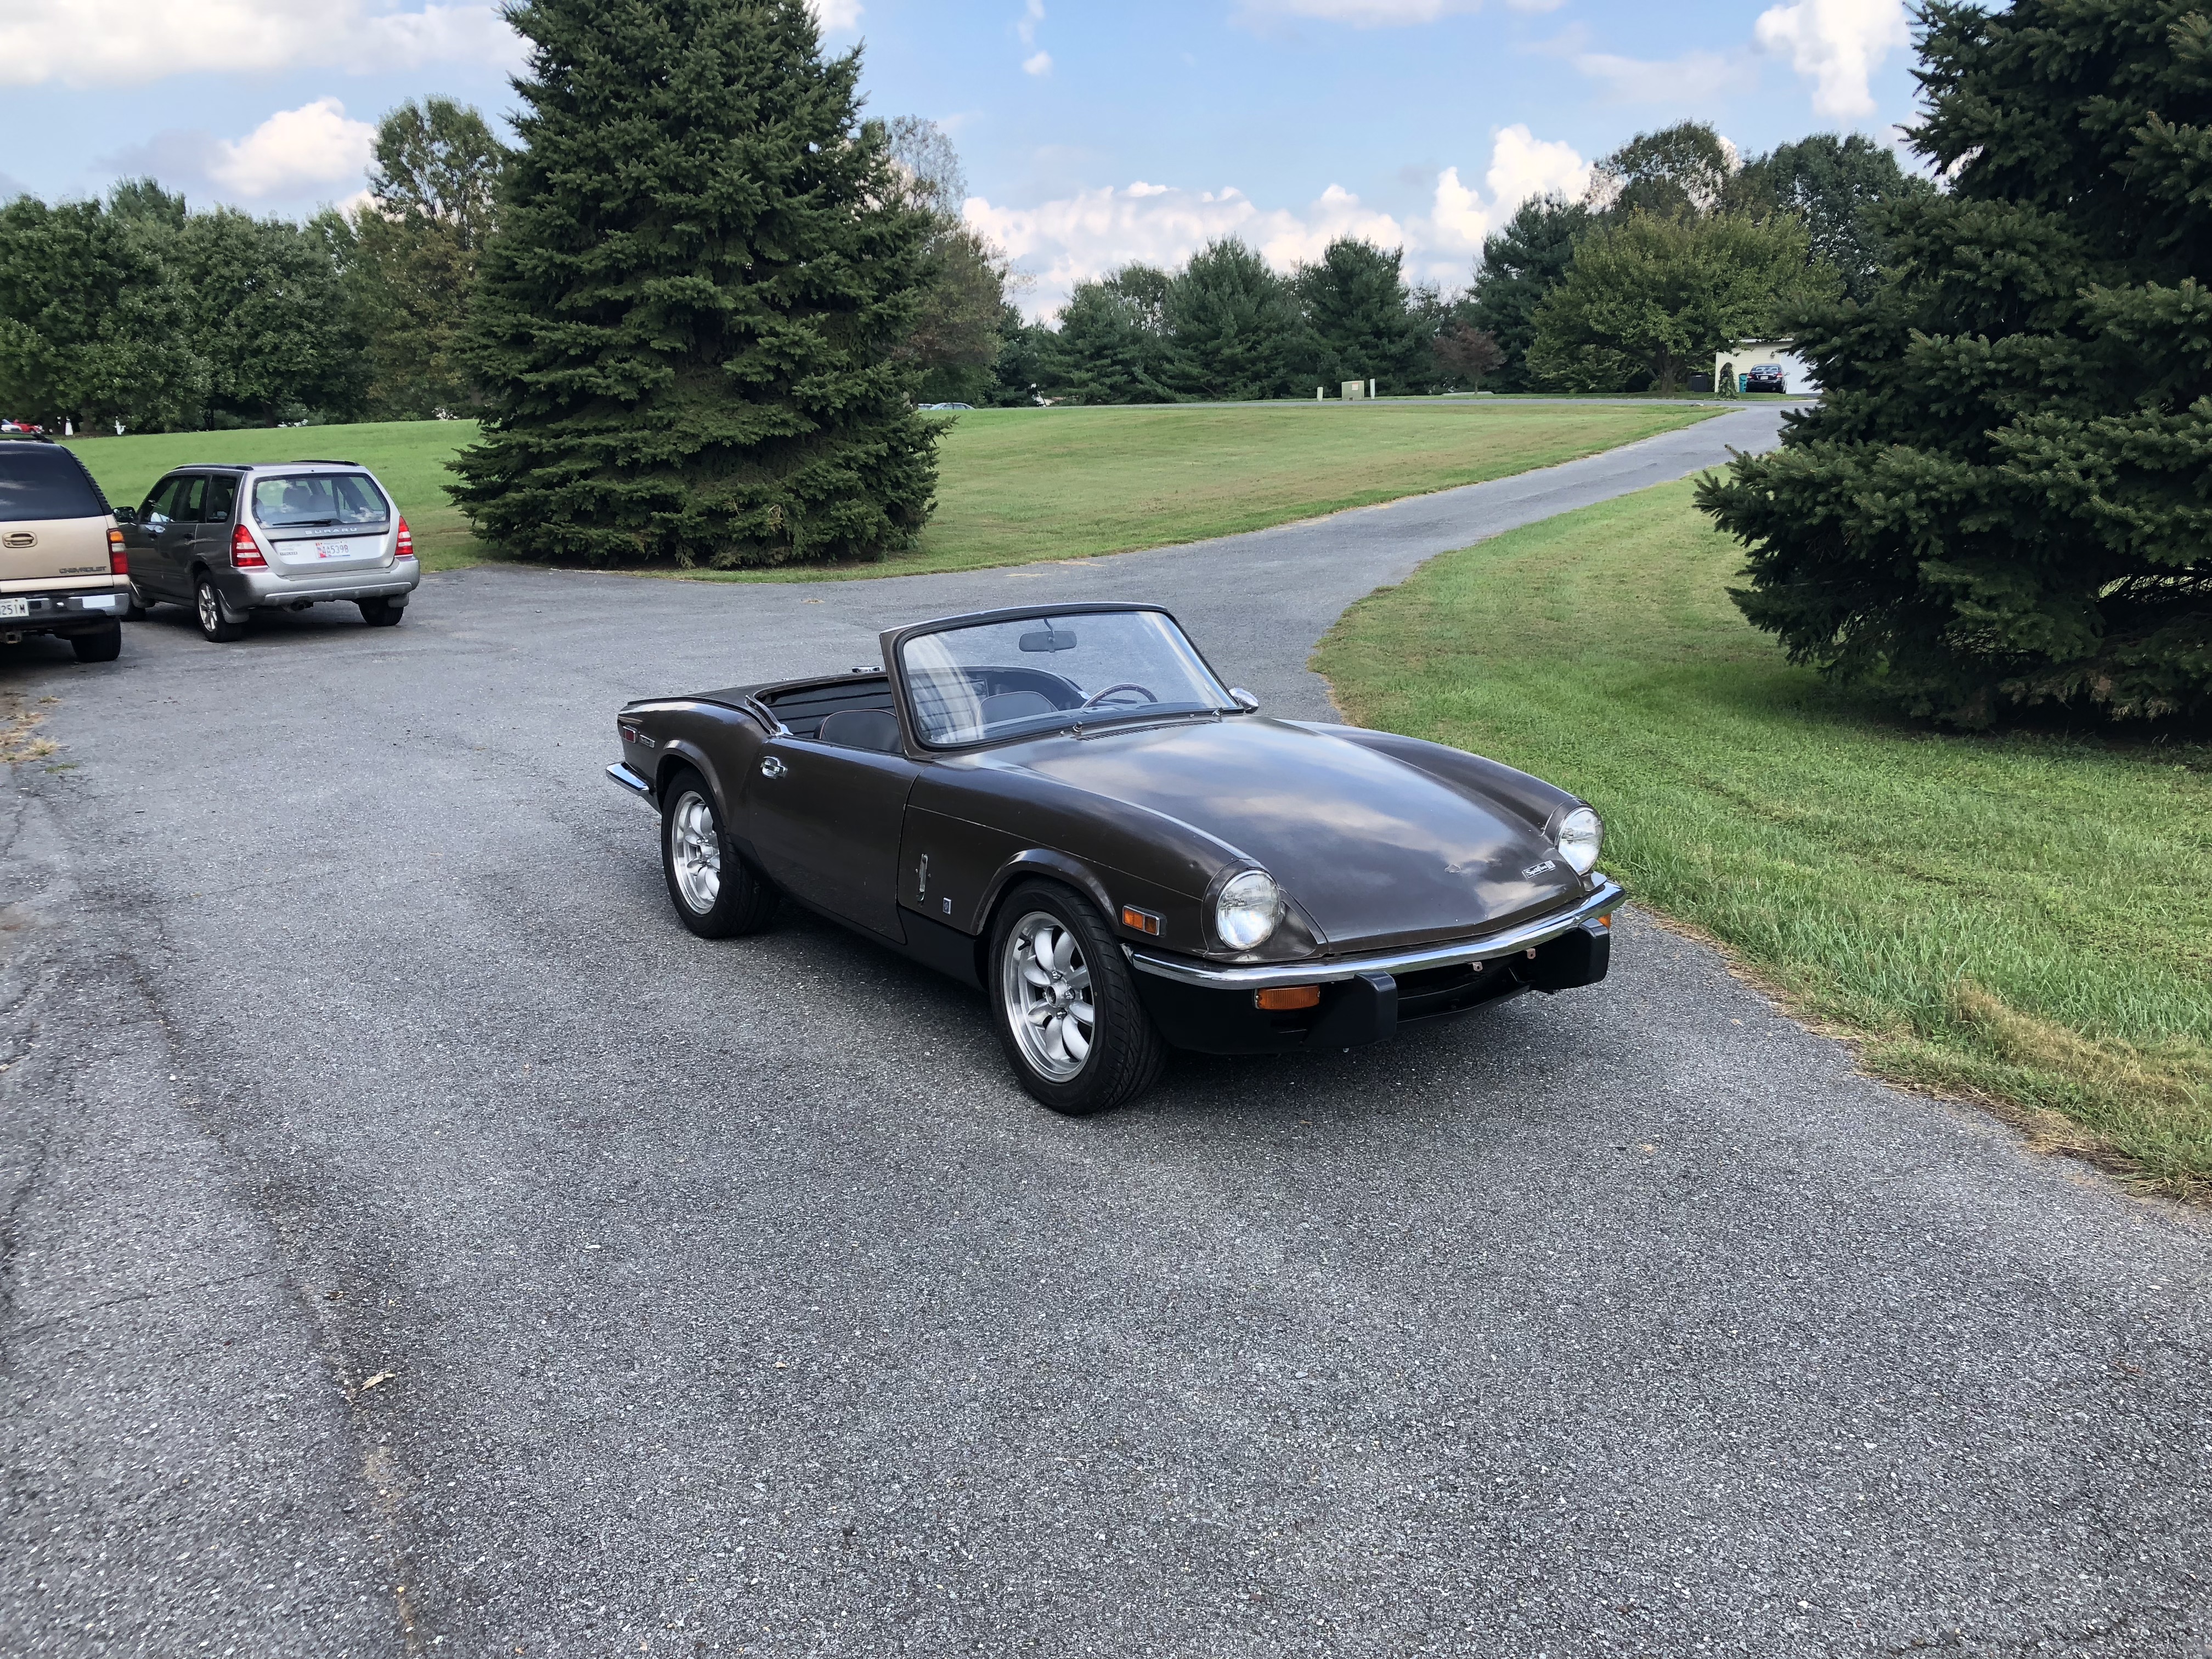
I have the typical lowering front springs (pretty sure these were from Moss) so 330 pound that typically lower the car about 1 inch. So shooting for 1 degree of negative camber in front. I have the adjustable bracket for the lower wishbone for the rear, so it has three camber settings, so again, shooting for 1 degree of negative rear camber. I have it currently bolted to the lowest possible setting so that gives the static suspension the most negative camper, but will measure it when the rear wheels are sitting on the alignment stands.
Started the alignment with the rear toe and camber. Love the Paco alignment stands (thanks Andrew!)
First thing I discovered is I have about 2 inches of toe out :-) that would have made for an interesting first test drive....... I'll get this set to 1/16 toe in and then check my camber before moving to the front.
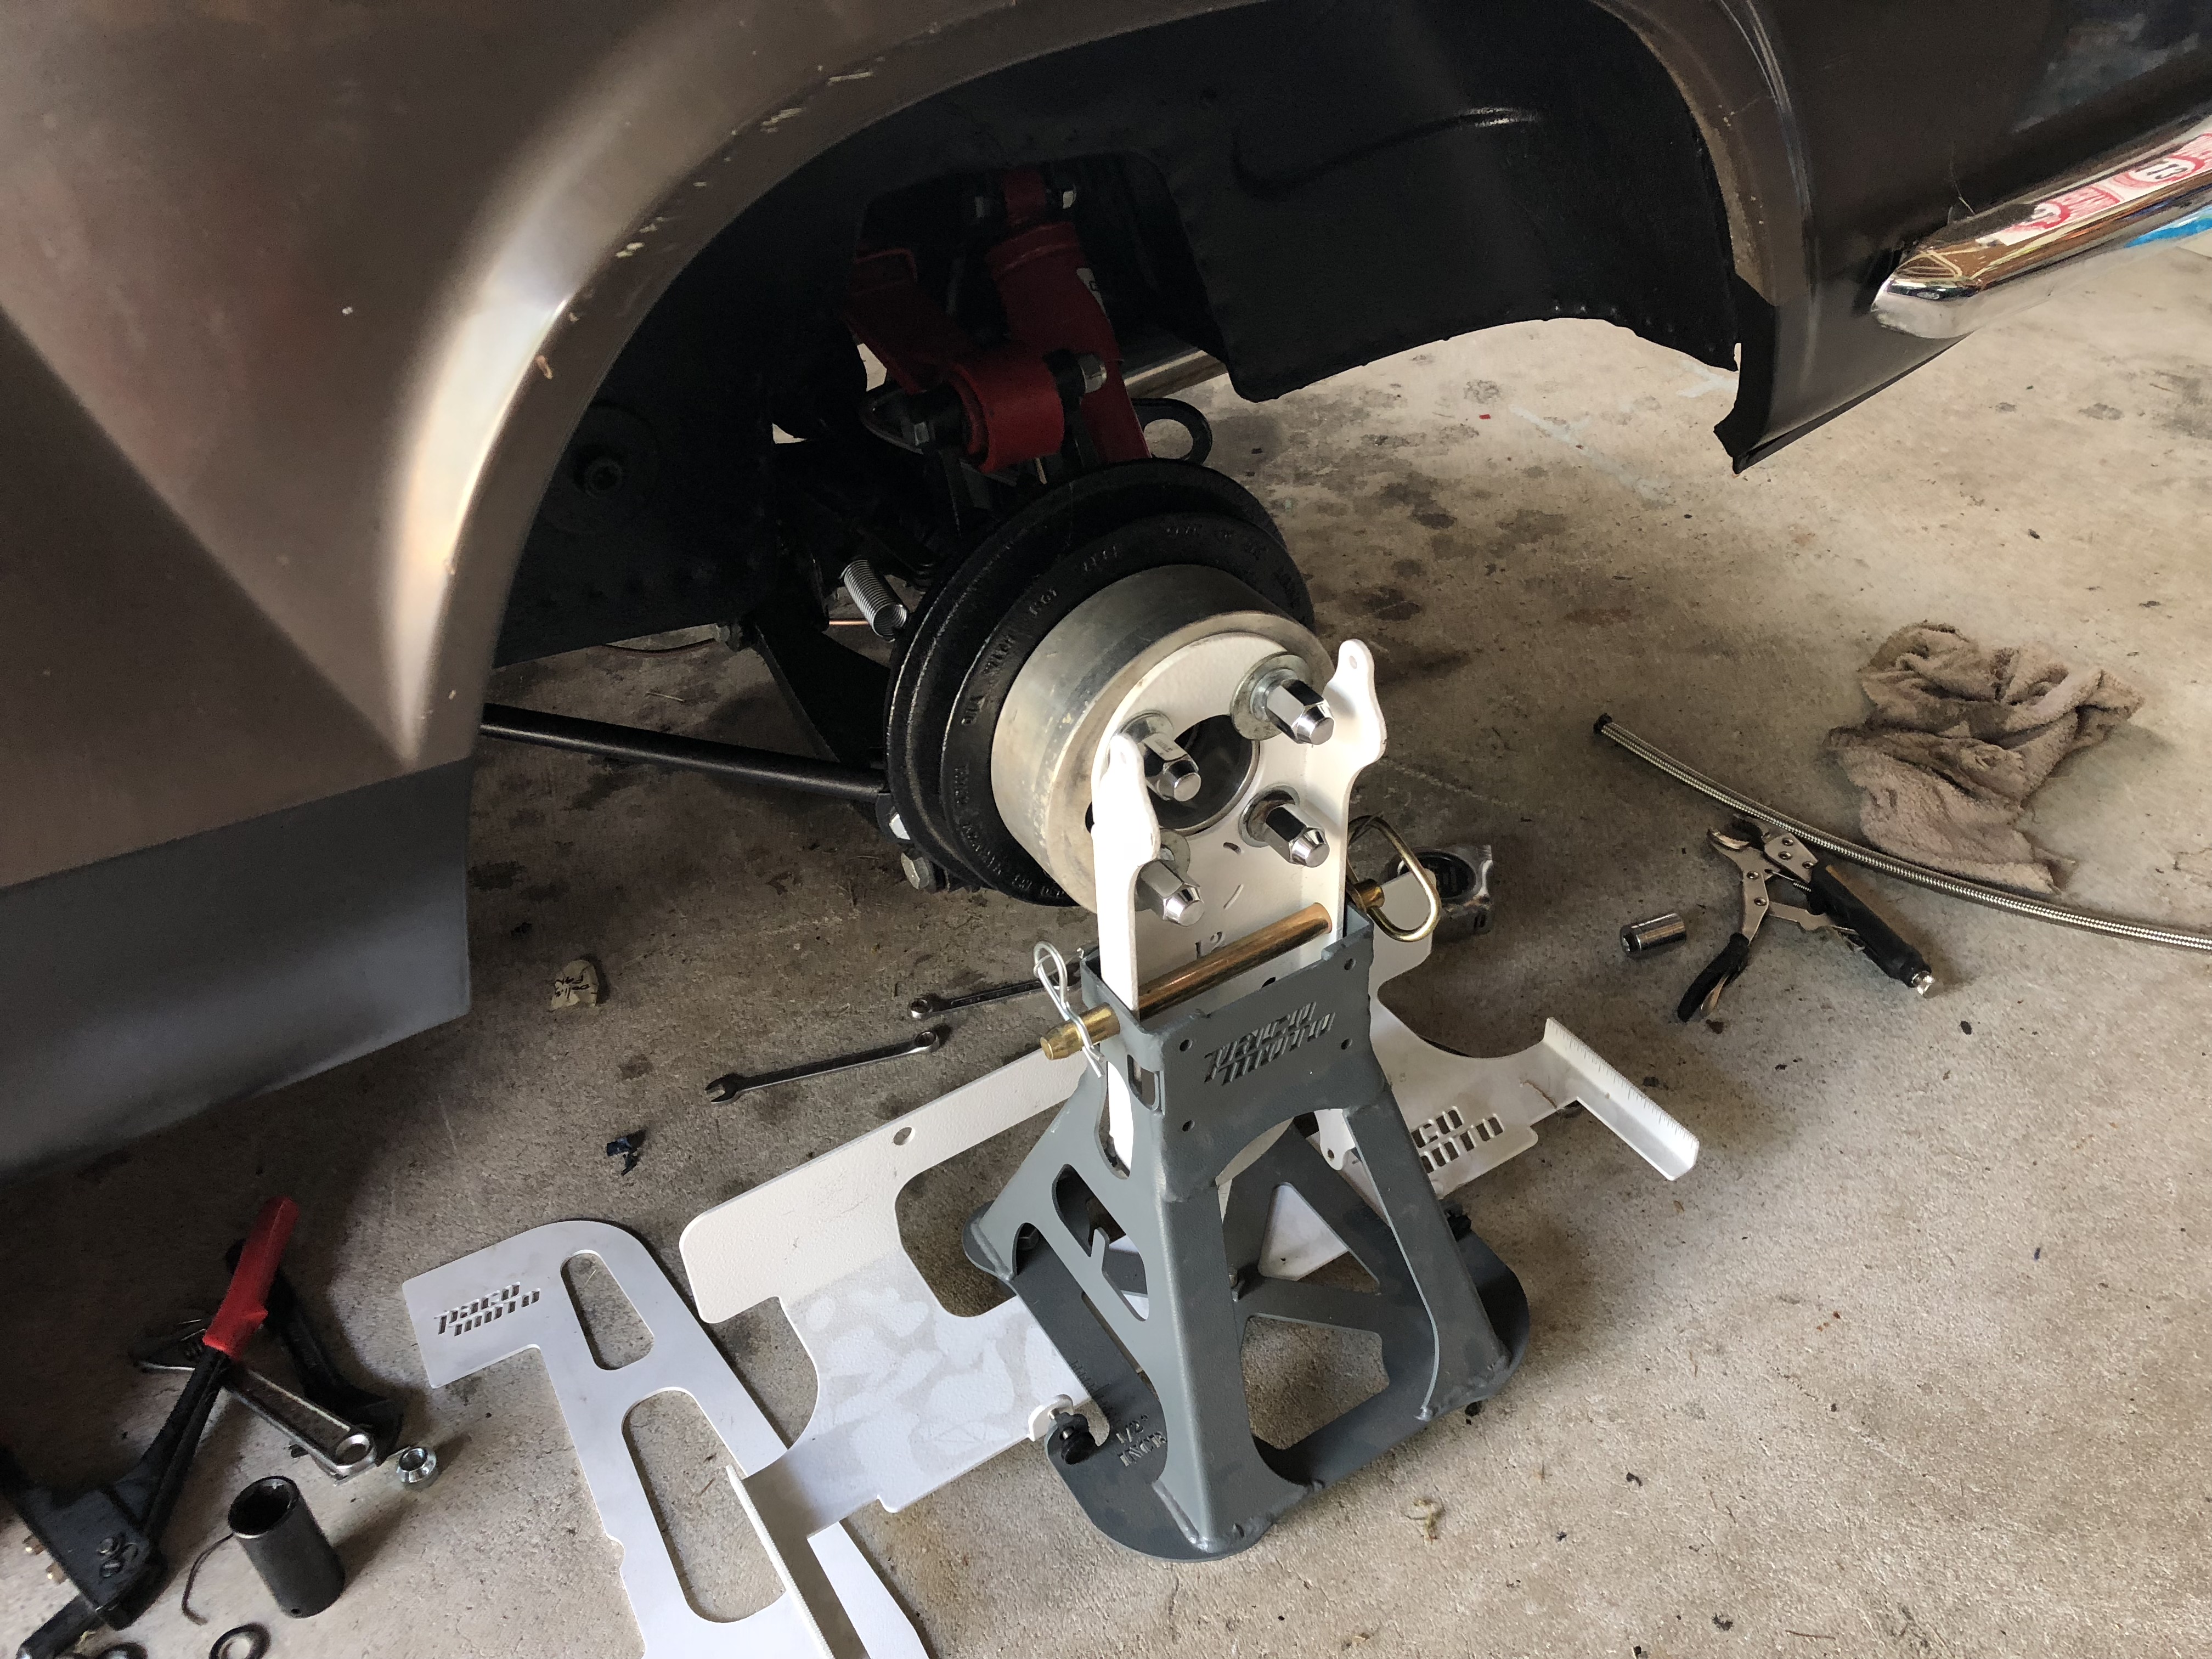
Got the toe set to 1/16 inch of toe-in. Camber is showing 1 degree negative on both sides so no adjustments needed, so I'll tight the lock nuts and start on the front.

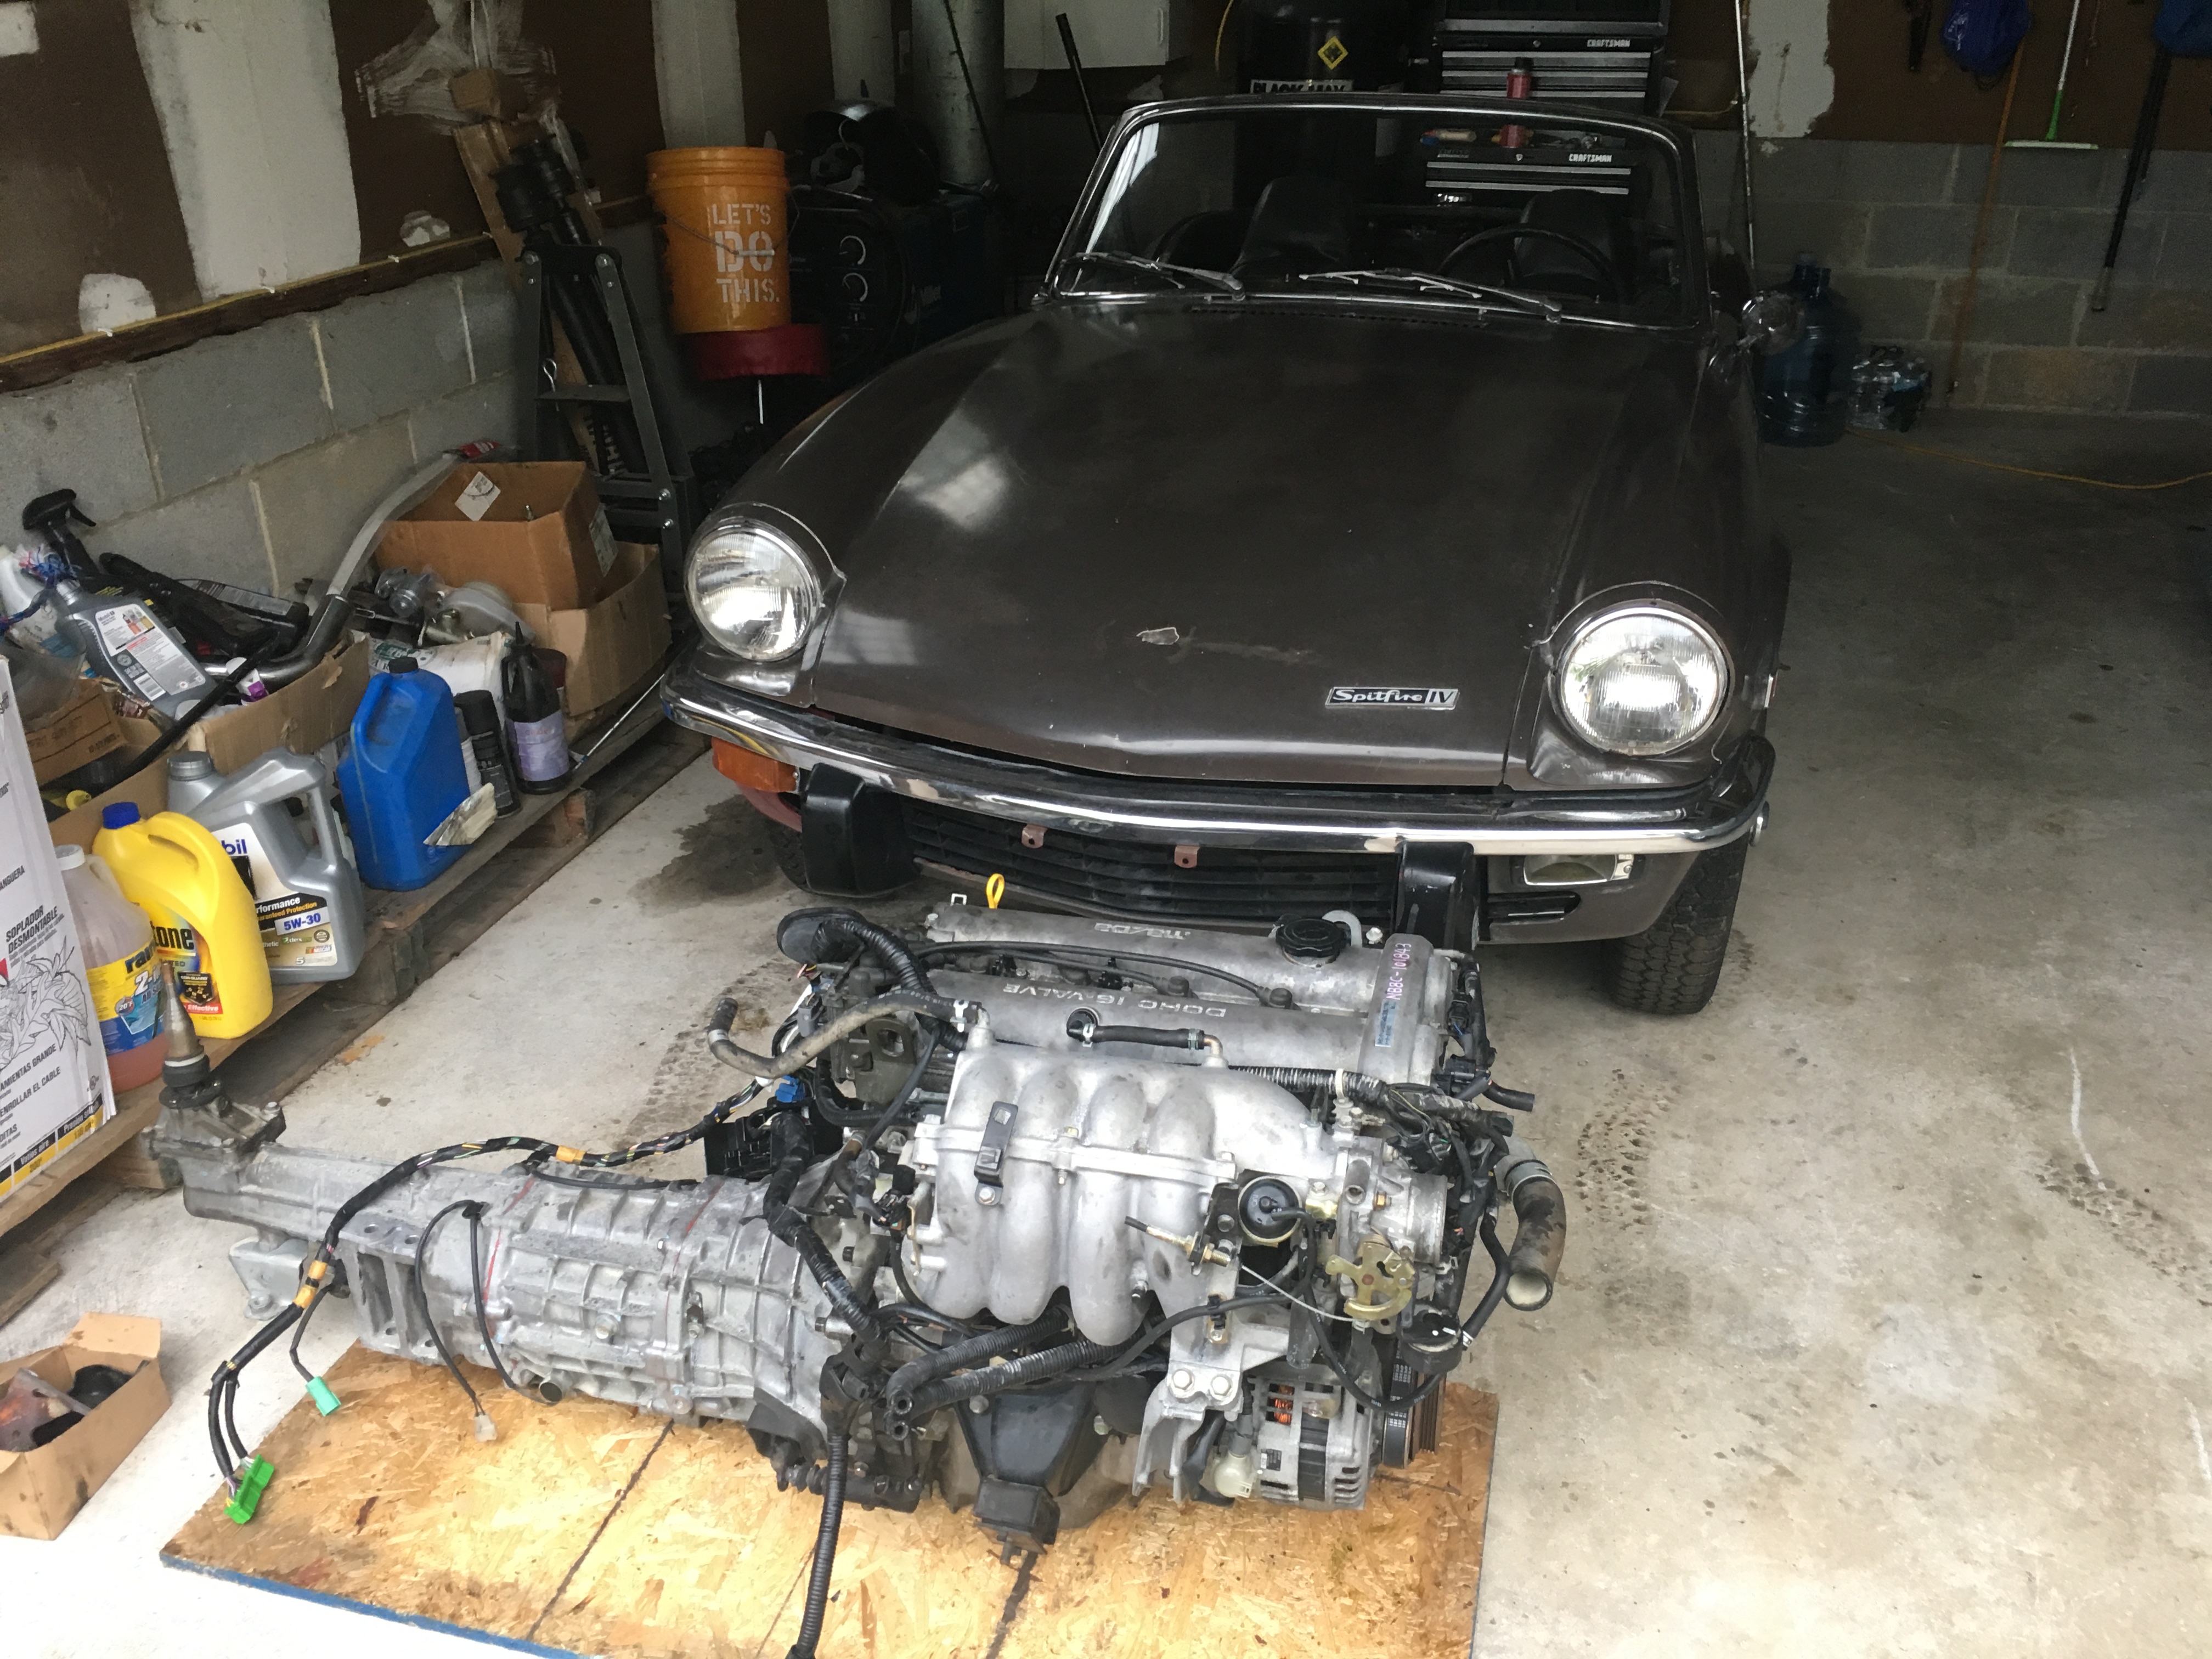
So one year ago, I sold my Thunderbird-Spitfire challenge car and started on my street version. I am happy to say a year later, it is almost ready to drive. It is now in the final "sorting" stages and I am trying to do this right and take my time now that the summer is winding down. While it did not make it to Carlisle or TRF this year, it has come together quite nicely and I am very pleased with the results. Lots of tuning, adjusting and improvements to make along the way, but this car has come a long way in a year!
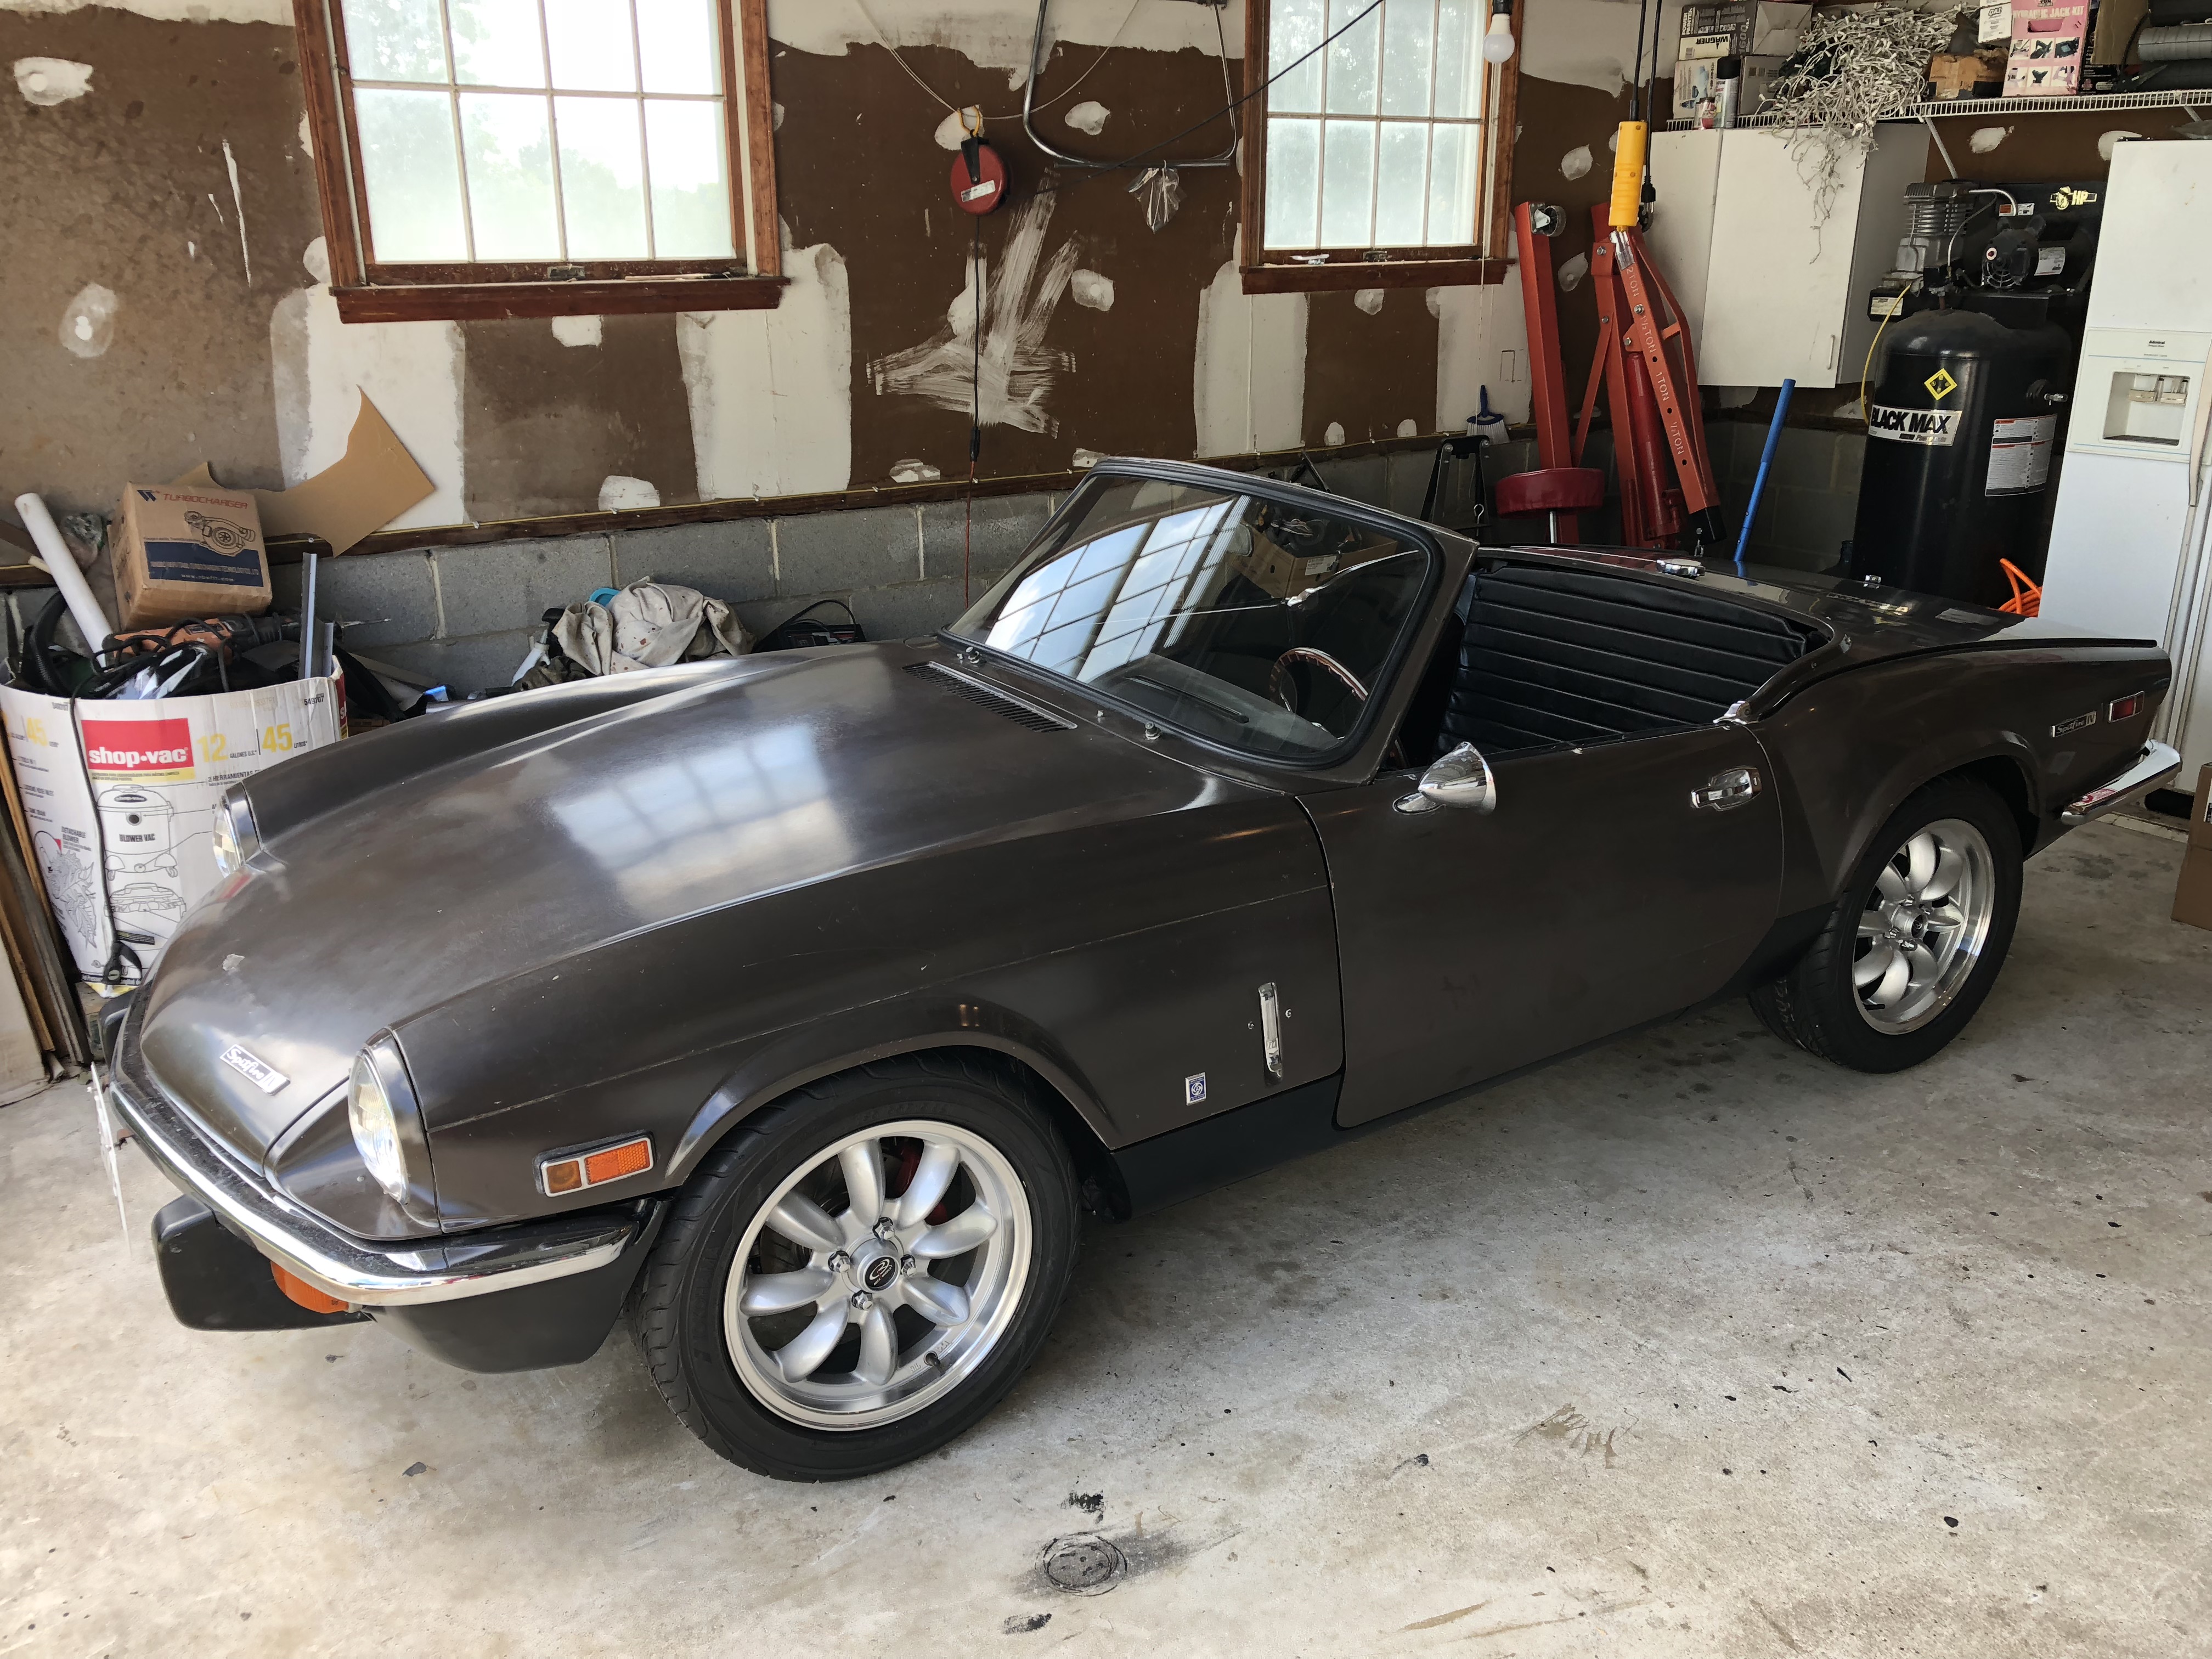
It looks like I will need to roll the top of the front fender edges (have 3 degrees of negative camber in the front, and will need to bent the front valance edge outward, but wheels fit fine otherwise. I am also going to paint the lower portion of both doors black so that the black paint is a straight line from front to back valances. I will likely also paint a stripe or two in black on the hood and trunk lids or just paint the center of the hood black as the brown paint is weakest on the hood center section. Next steps before driving are to finish the brakes and fit the seats and center tunnel.
Nice! That thing sits very "right" on those wheels and tires.
In reply to dherr :
Instead of a paint stripe on the hood, consider some quality vinyl. That way you can still return to the patina' paint if you want. And vinyl's cheap in 1'x5' rolls. Just a thought.

NOHOME
UltimaDork
9/5/18 7:00 a.m.
Greg Smith said:
In reply to dherr :
Instead of a paint stripe on the hood, consider some quality vinyl. That way you can still return to the patina' paint if you want. And vinyl's cheap in 1'x5' rolls. Just a thought.
This was the first thought that jumped into my mind. Also, the vinyl offers some stone protection.
Pete
NOHOME said:
Greg Smith said:
In reply to dherr :
Instead of a paint stripe on the hood, consider some quality vinyl. That way you can still return to the patina' paint if you want. And vinyl's cheap in 1'x5' rolls. Just a thought.
This was the first thought that jumped into my mind. Also, the vinyl offers some stone protection.
Pete
Agreed. Remember the title of this build thread is "Rat Rod ..... Spitfire....."
But I will definitely admit iI' biased. I love "survivor" paint cars.
Don't worry, no plans to paint the car in the coming years, just trying to preserve what is there. I also like the patina of the survivor paint and even all the dings and dents that tell the story of this car from 1972 until it's current form and return to the road in 2018.
The car has had all the rust cut out and I intended to keep it that way. So the bottom of the car was painted with rust inhibitor, bed liner and the bad parts cut out and welded with new metal. The only remaining rust is some small pits in the nose under the bonnet which I'll treat with rust inhibitor. But on the center of the bonnet, there is evidence of body work and lifting of a small piece of Bondo on the nose. That is where I would like to fix it and then paint a black stripe or center of the good in semi-gloss black, which like the rockers were painted after doing the required body work. The paint on the hood is crazed in the middle and this is the weakest paint on the car. I think the result will be keeping with the survivor look and last for many years in this form since the car will be in my garage.
Fixing my brake lines this week, so I can put in the rest of the interior and take it for it's first drive later this month!
So as is usually the case, cheap tools do a poor job and better tools do a much better job...... So after suffering through having all my bubble flairs leaking on my Spitfire, I decided that the cheap auto parts tool for making flairs was fine for the end points with a single flare, but I needed a much better tool. Summit to the rescue, proper tool arrived in two days.
https://www.summitracing.com/parts/urr-hft50
I removed all the hard lines except for the main lines from the master cylinder front and rear and was able to add the bubble flares on the lines on the car. The rest were removed and the bubble flares were added easily. Highly recommend this tool if you need to run custom brake lines and need a quality flaring tool.
Bled the brakes, guess what.... no leaks!
So now that I have a running car with brakes, clutch, steering, alignment, lights, etc... guess that test drive is coming very soon. I am resisting the urge to just drop the car back down and take it for a quick spin as there are a few more things that really need to happen first. So I'll get the tunnel installed, carpet down and seats installed and cleanup a few more things and it should be on it's first trip under it's own power before the end of the month.
Awesome! Considering how wound up I am for the initial drive report, well... Nice work on buckling down on the details!

manana
New Reader
9/11/18 7:01 p.m.
Totally hear ya Dave, nice purchase. I think I was even more frustrated and ended up with Eastwood's version; also very happy with it..... https://www.eastwood.com/professional-brake-tubing-flaring-tool.html
Wrt getting everything buttoned up before that first ride..... maybe I'm just a little more paranoid than you, but at very least I'd leave the tunnel cover off for a bit, just to have a peak at all that stuff you did while it's moving. When I did mine I didn't have to make any changes, but was nice to see clearances etc. and if something did bugger up, at least you don't have to pull that apart again.
Plus, much like banging one's head against a wall, when you install the tunnel cover and that superheated air that rolled over your header/turbo before hitting your right leg stops, it'll feel good! :)
It has run on the stands, shifted gears so I know everything has clearance so feeling pretty confident in that department. Also feeling pretty good about the heat, the turbo downpipe is wrapped down to the transmission and the firewall is also protected. I might end up covering the tunnel with heat tape as well, not sure yet. There will be steel cover over the tail of the transmission as well, with the original boot from the old cardboard tunnel installed . Still things to work out but also anxious for that first drive as you can probably imagine.
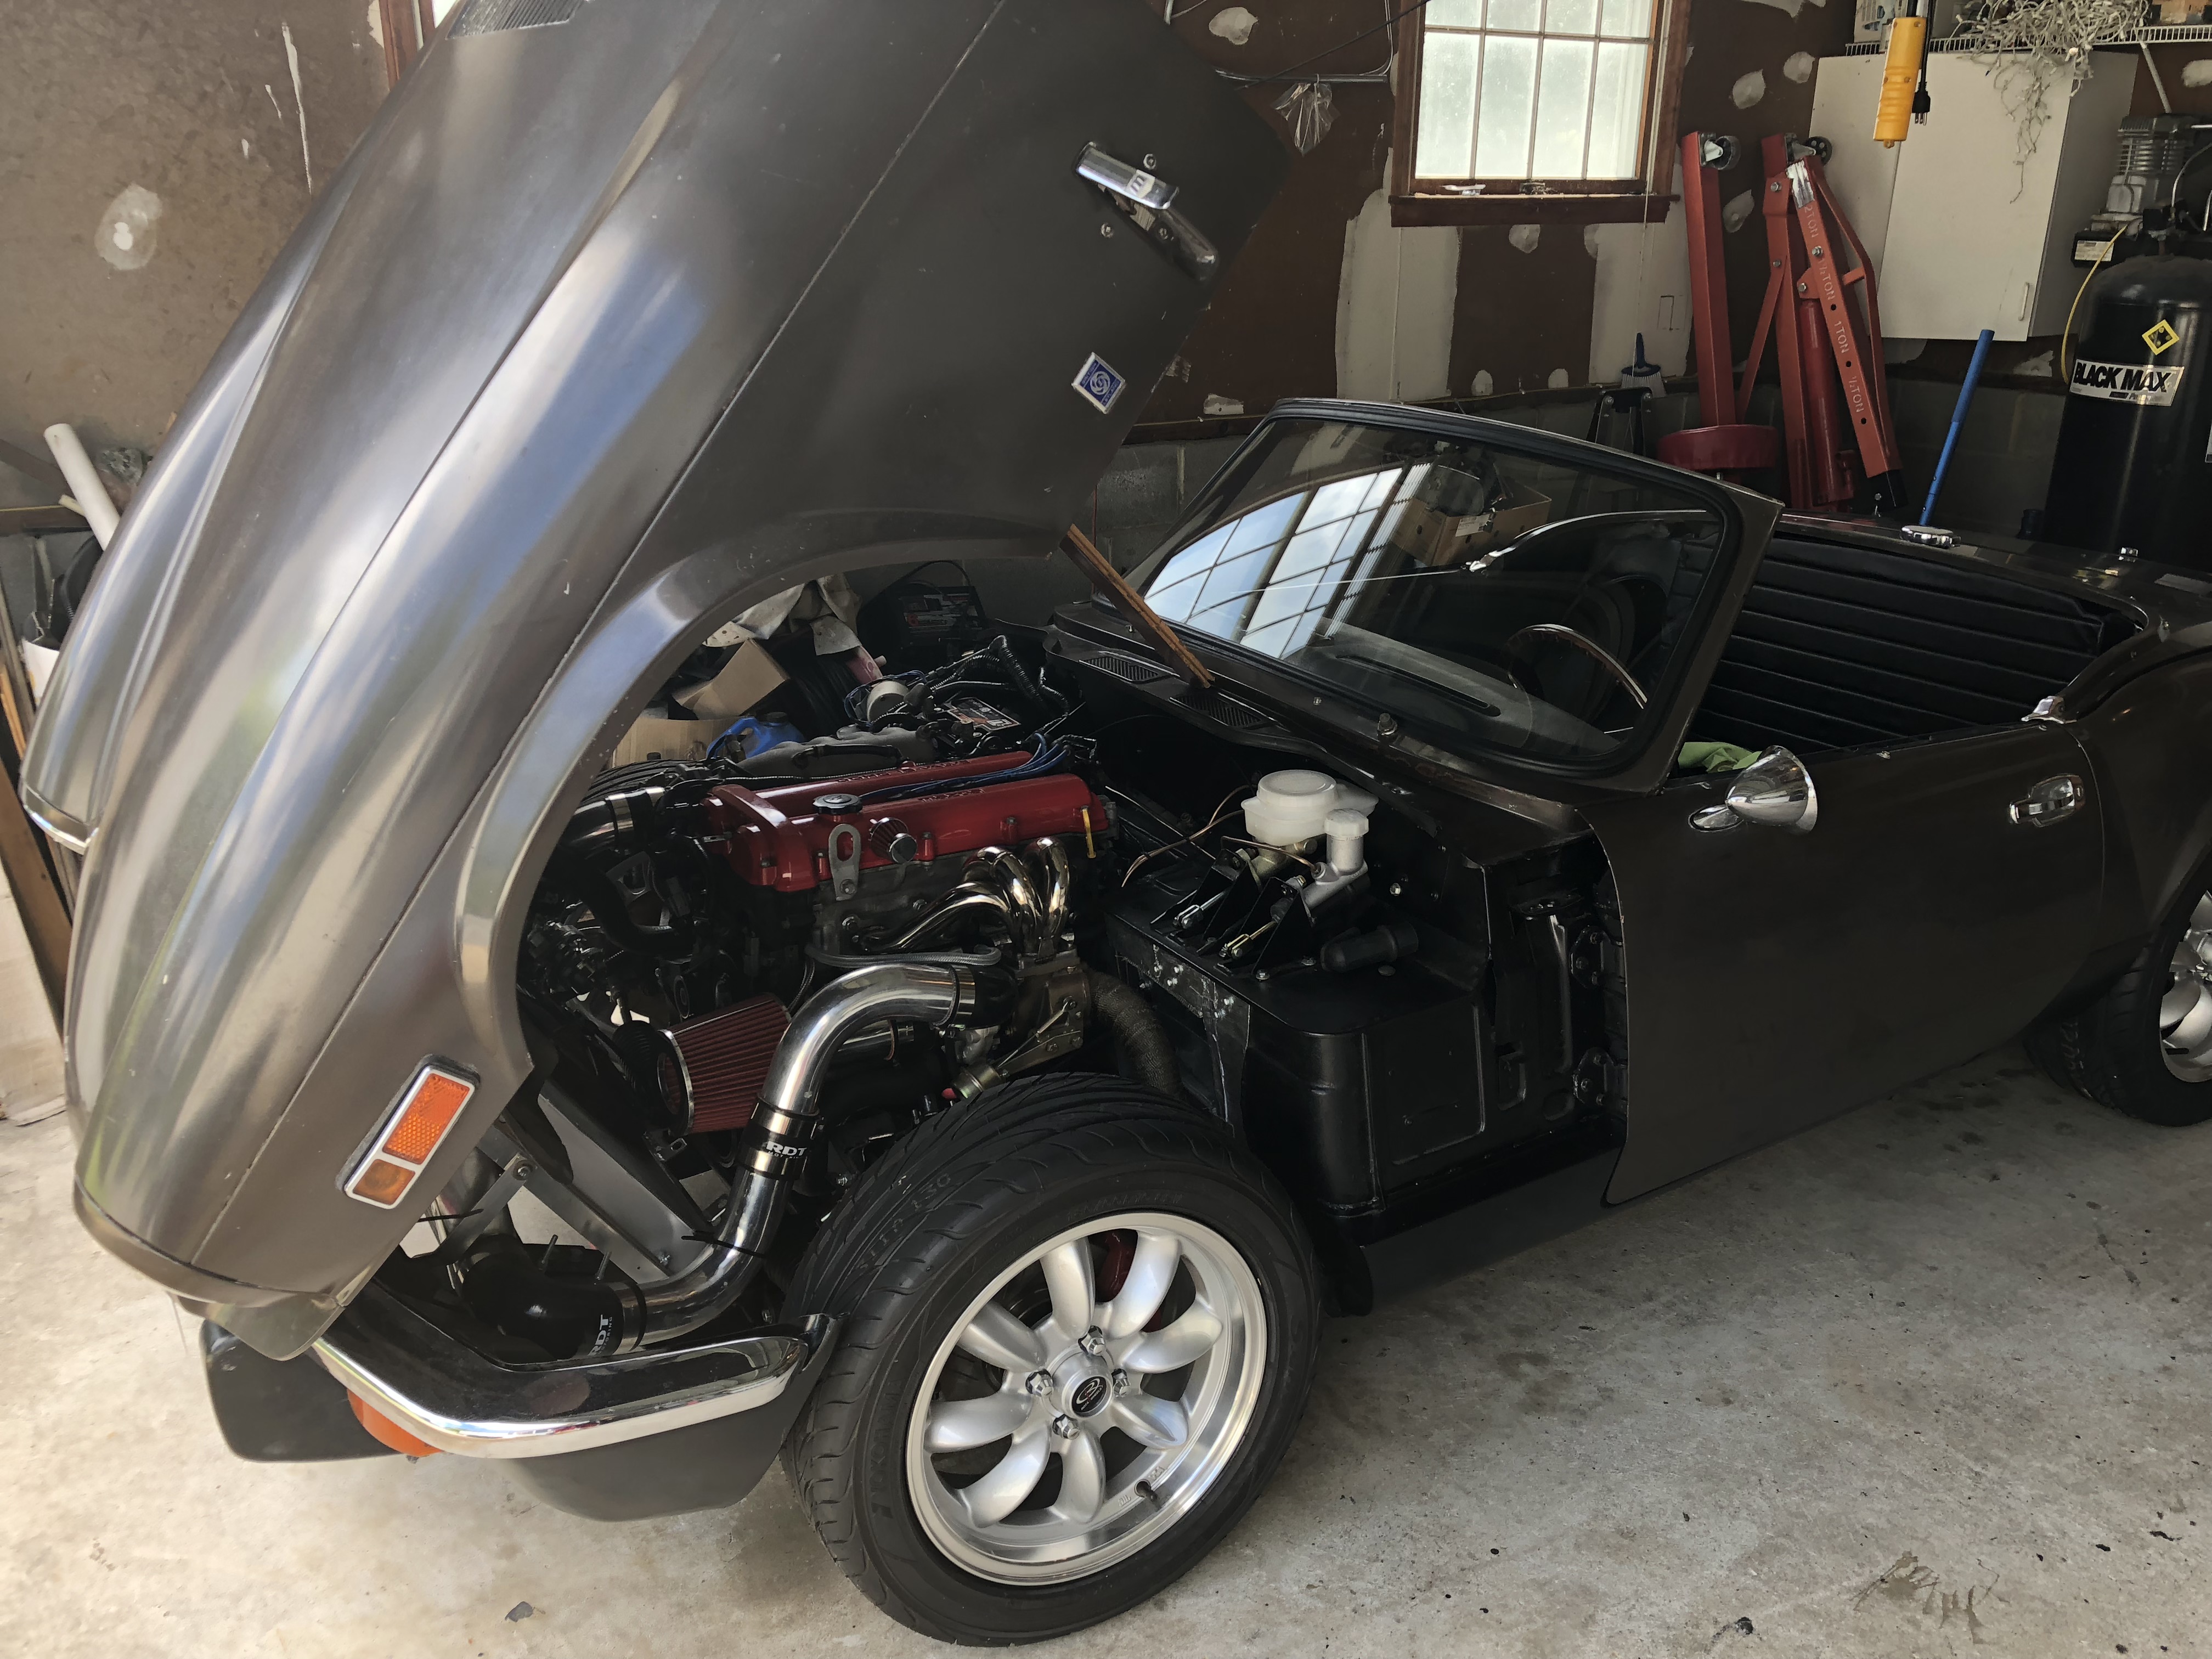
Yes, Exotruck, it does indeed have a turbo! Small but should spool up quickly and give me a nice power and torque increase over the 140 HP of the stock engine. Fully programable ECU will let me tune it as needed, will be running 8-10 pounds of boost max.
In reply to dherr :
i'm going to be (kinda) in your neighborhood the weekend of Oct 13-14. visiting family in Rohrersville with a side trip to Silver Spring. any chance i can see this beast in person?
That would be great, I'll send you an IM with my cell number, we may be at the Maryland game on the 13th but home after the game and the 14th would be fine.
Love what you've done with it.
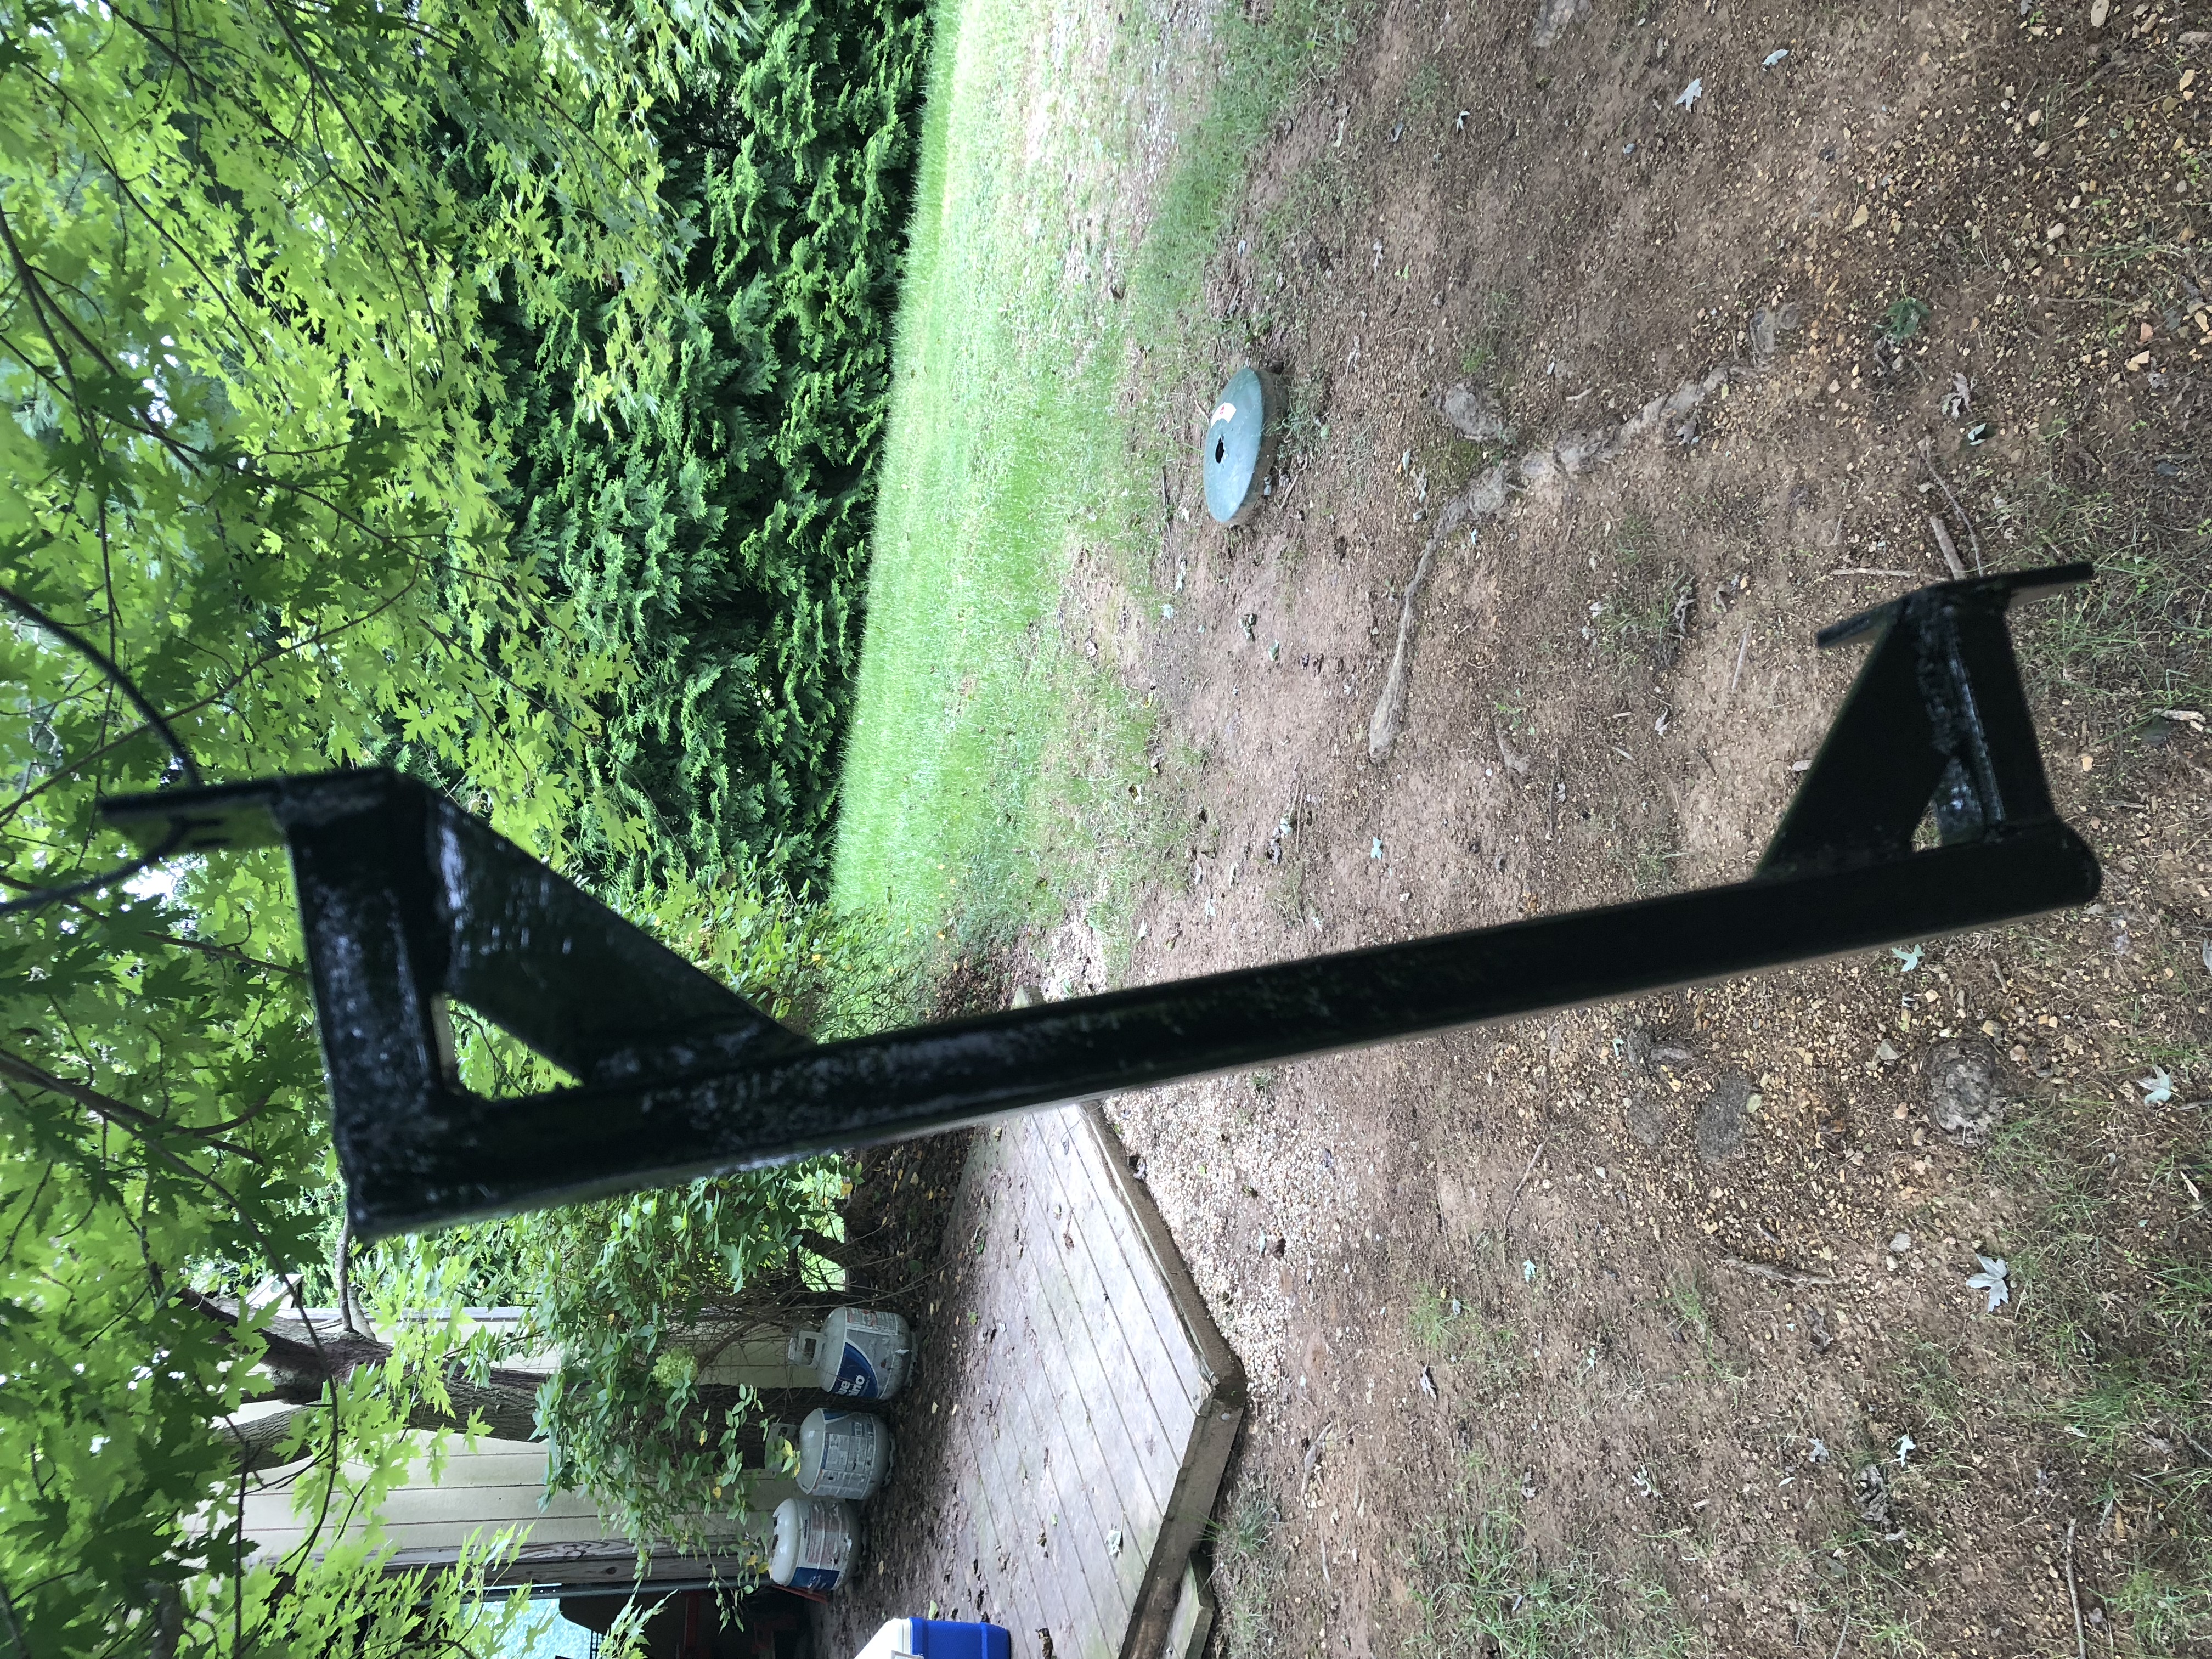
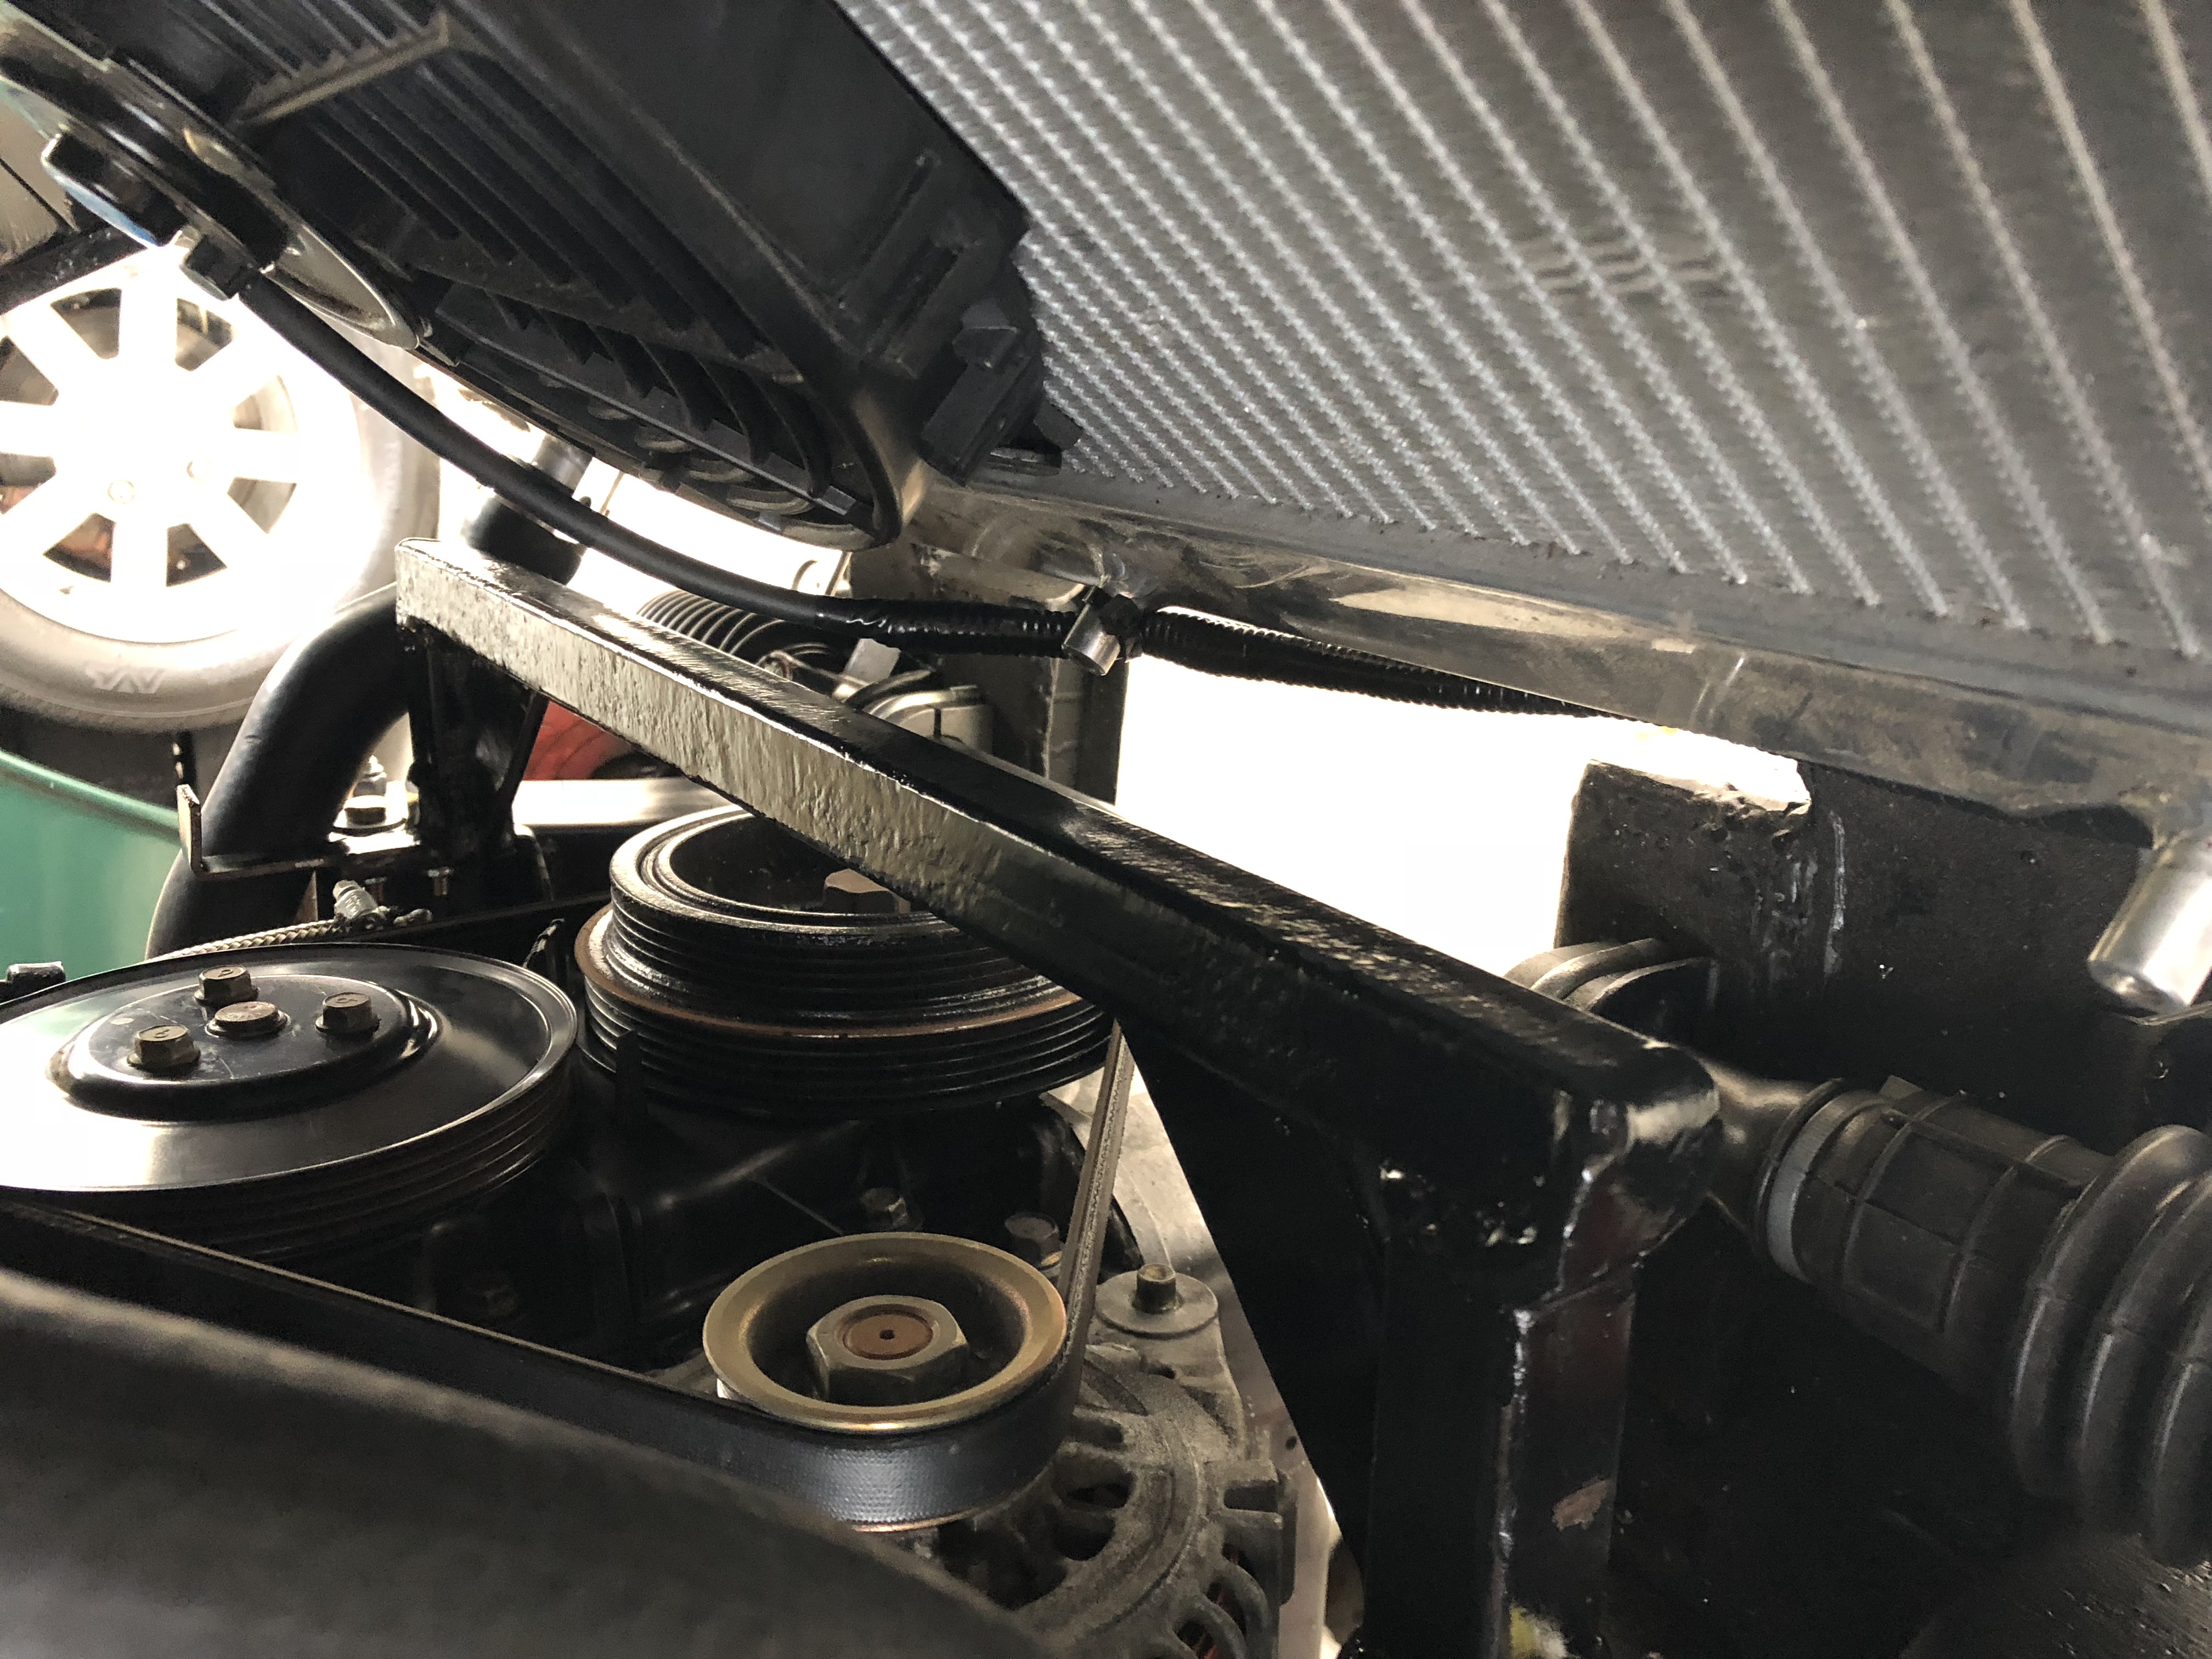
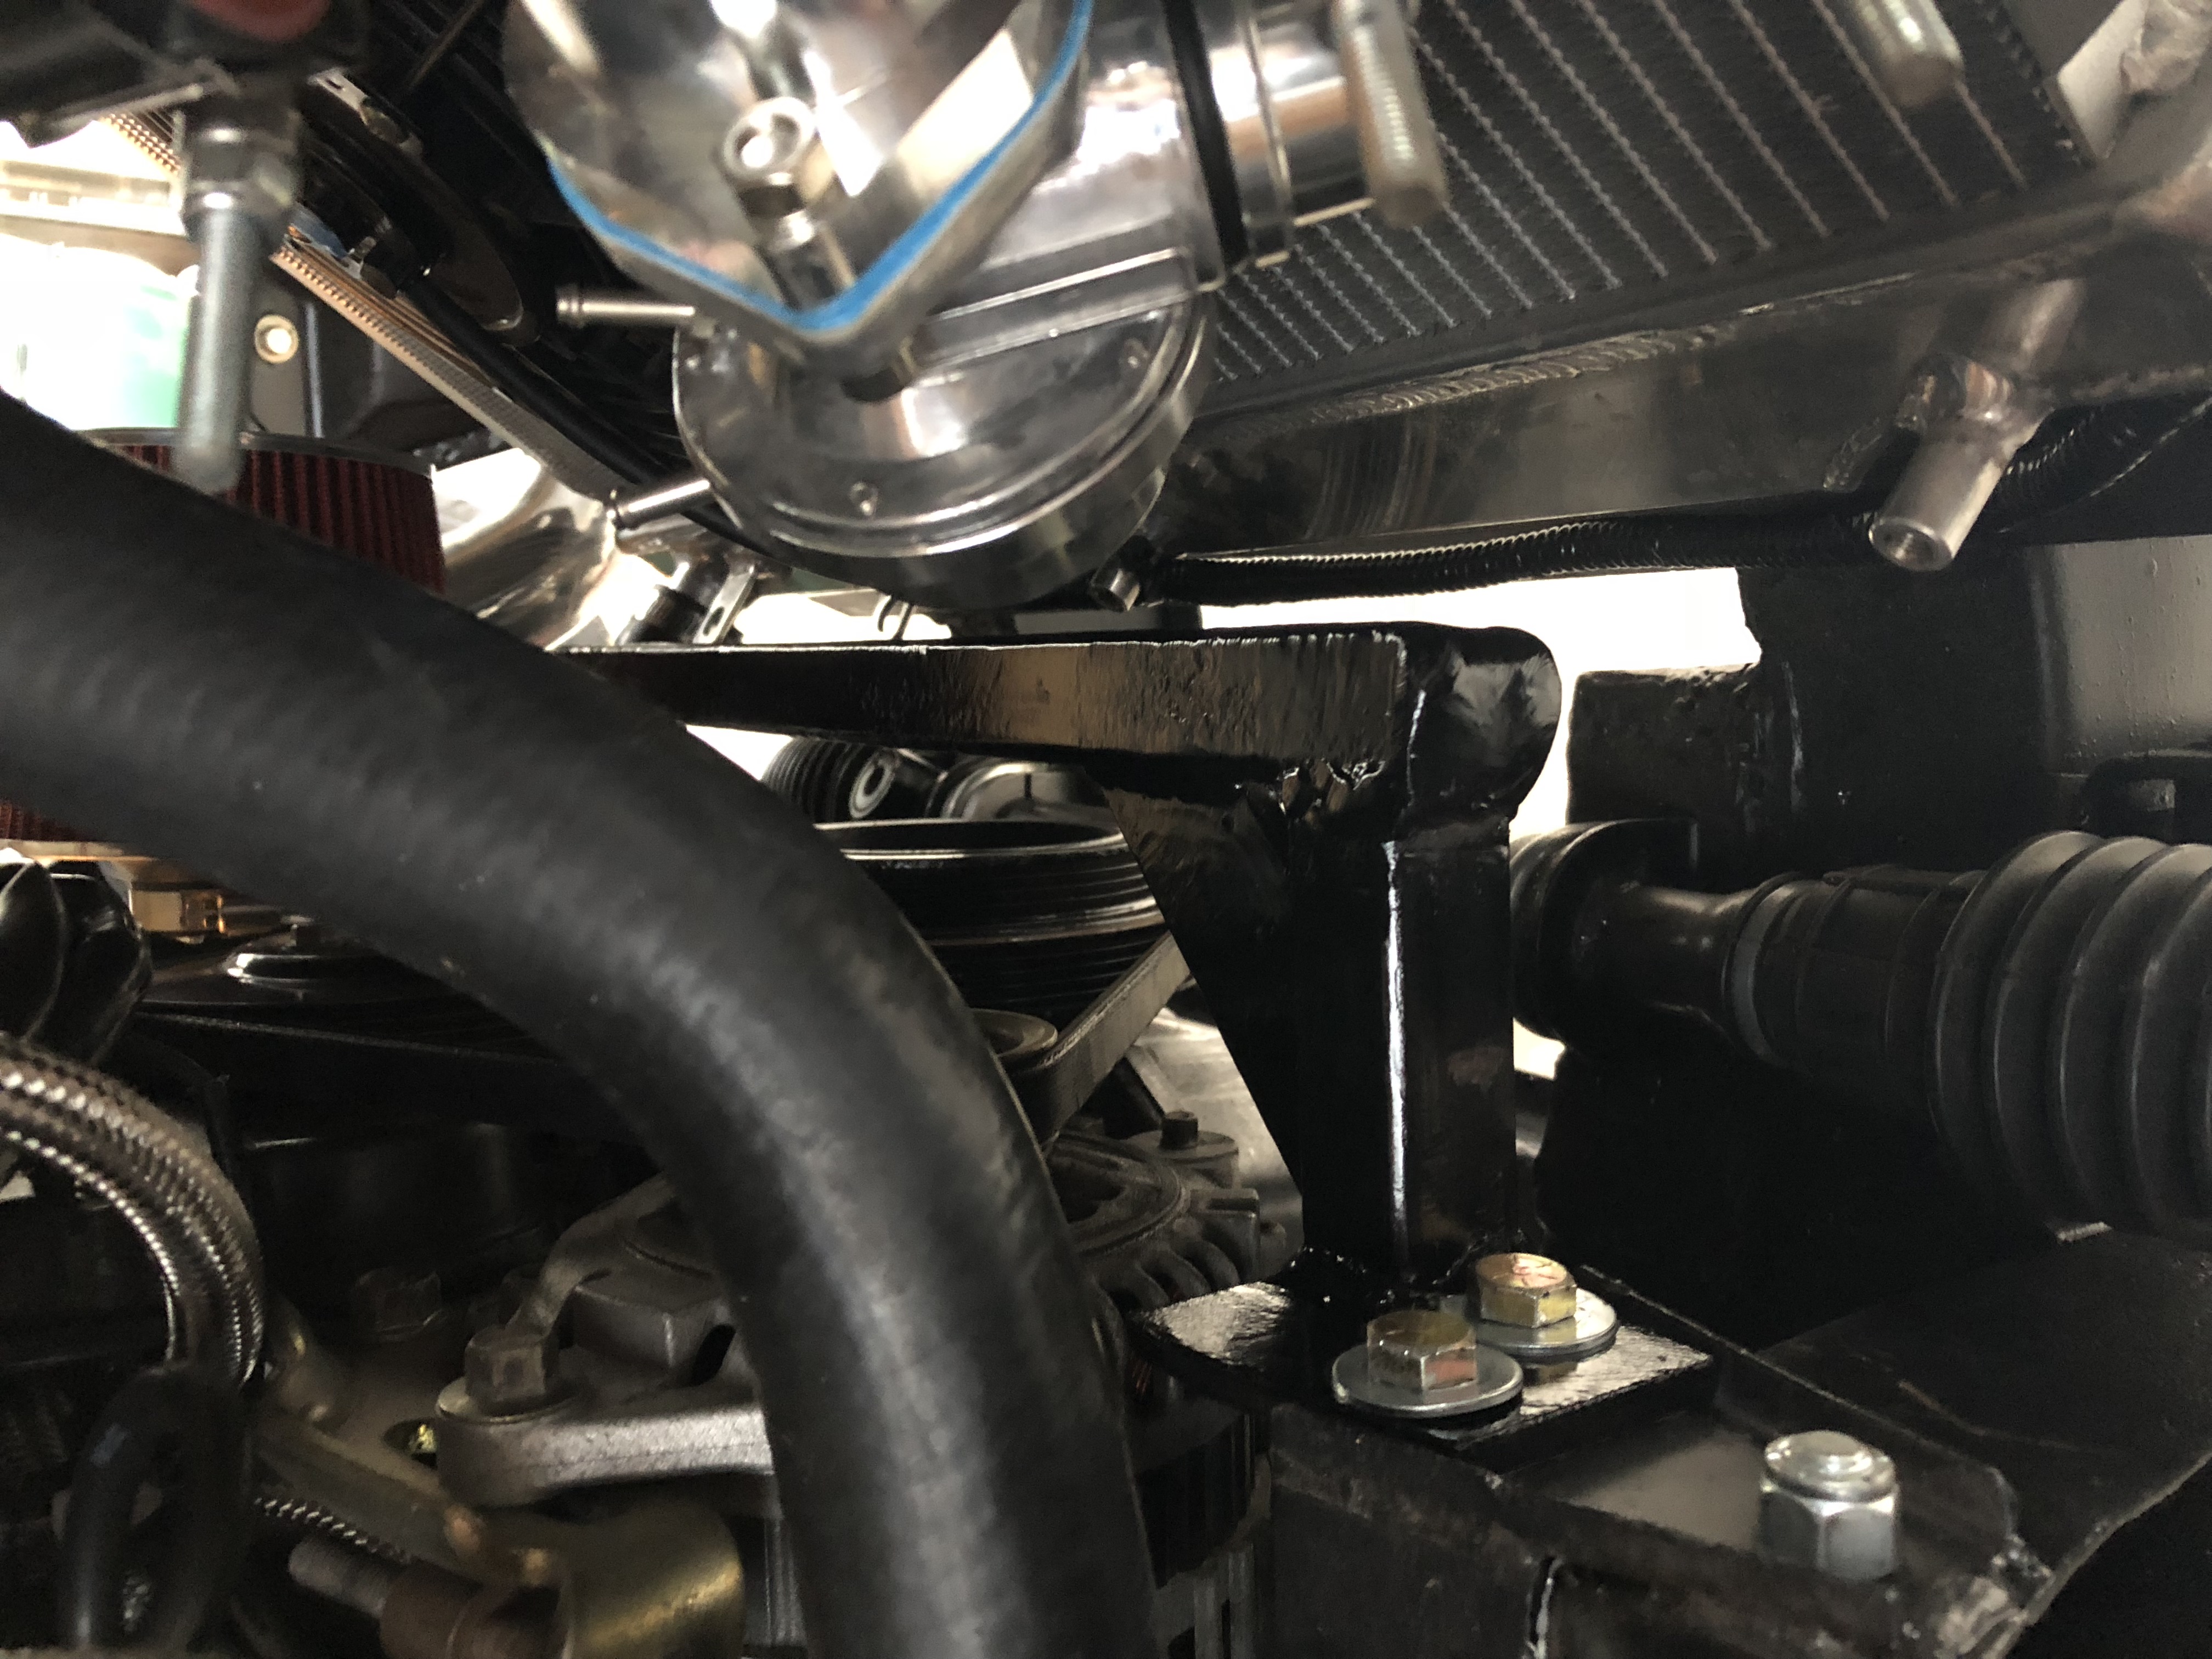
Continue the progress to complete the car and finish all the "loose ends" . So one of those loose ends is to tie the shock towers together. A stock Triumph Spitfire has the engine mounts tied to the shock towers. I am not 100% convinced that the rubber engine mounts really support the shock towers but in an effort to ensure they are supported, I decided to build a shock tower support off of the original engine mount locations. Had to triangulate it and probably over built by 200% but it will work fine and and also gave me a place to put a support for the air cleaner. I used 1/8 thick square tube and 1/4 plate and braces so it is not going to flex......
manana
New Reader
9/22/18 8:45 a.m.
Well that'll work, and then some. :)
I can't make out how you attached that to the turrets? any chance of an image of that?
I had cut the original turrets when I made the mods to fit the Miata engine and did the same modification you did to clear the alternator. So I had to drill two new holes to bolt it on. The turrets are double thick where the motor mounts are, so it was the strongest place to mount the brace. I did not take the bracket all the way to the suspension bolt but confident that this will do the job.
manana
New Reader
9/23/18 7:50 a.m.
Awesome thanks Dave.
That'll work great, I've seen a few who didn't even bother with the brace at all.
I think it's a smart thing to do; seems the first thing the books say about improving handling is to stiffen the chassis. What you've done will be even stiffer than stock (no rubber engine mounts) so well done.
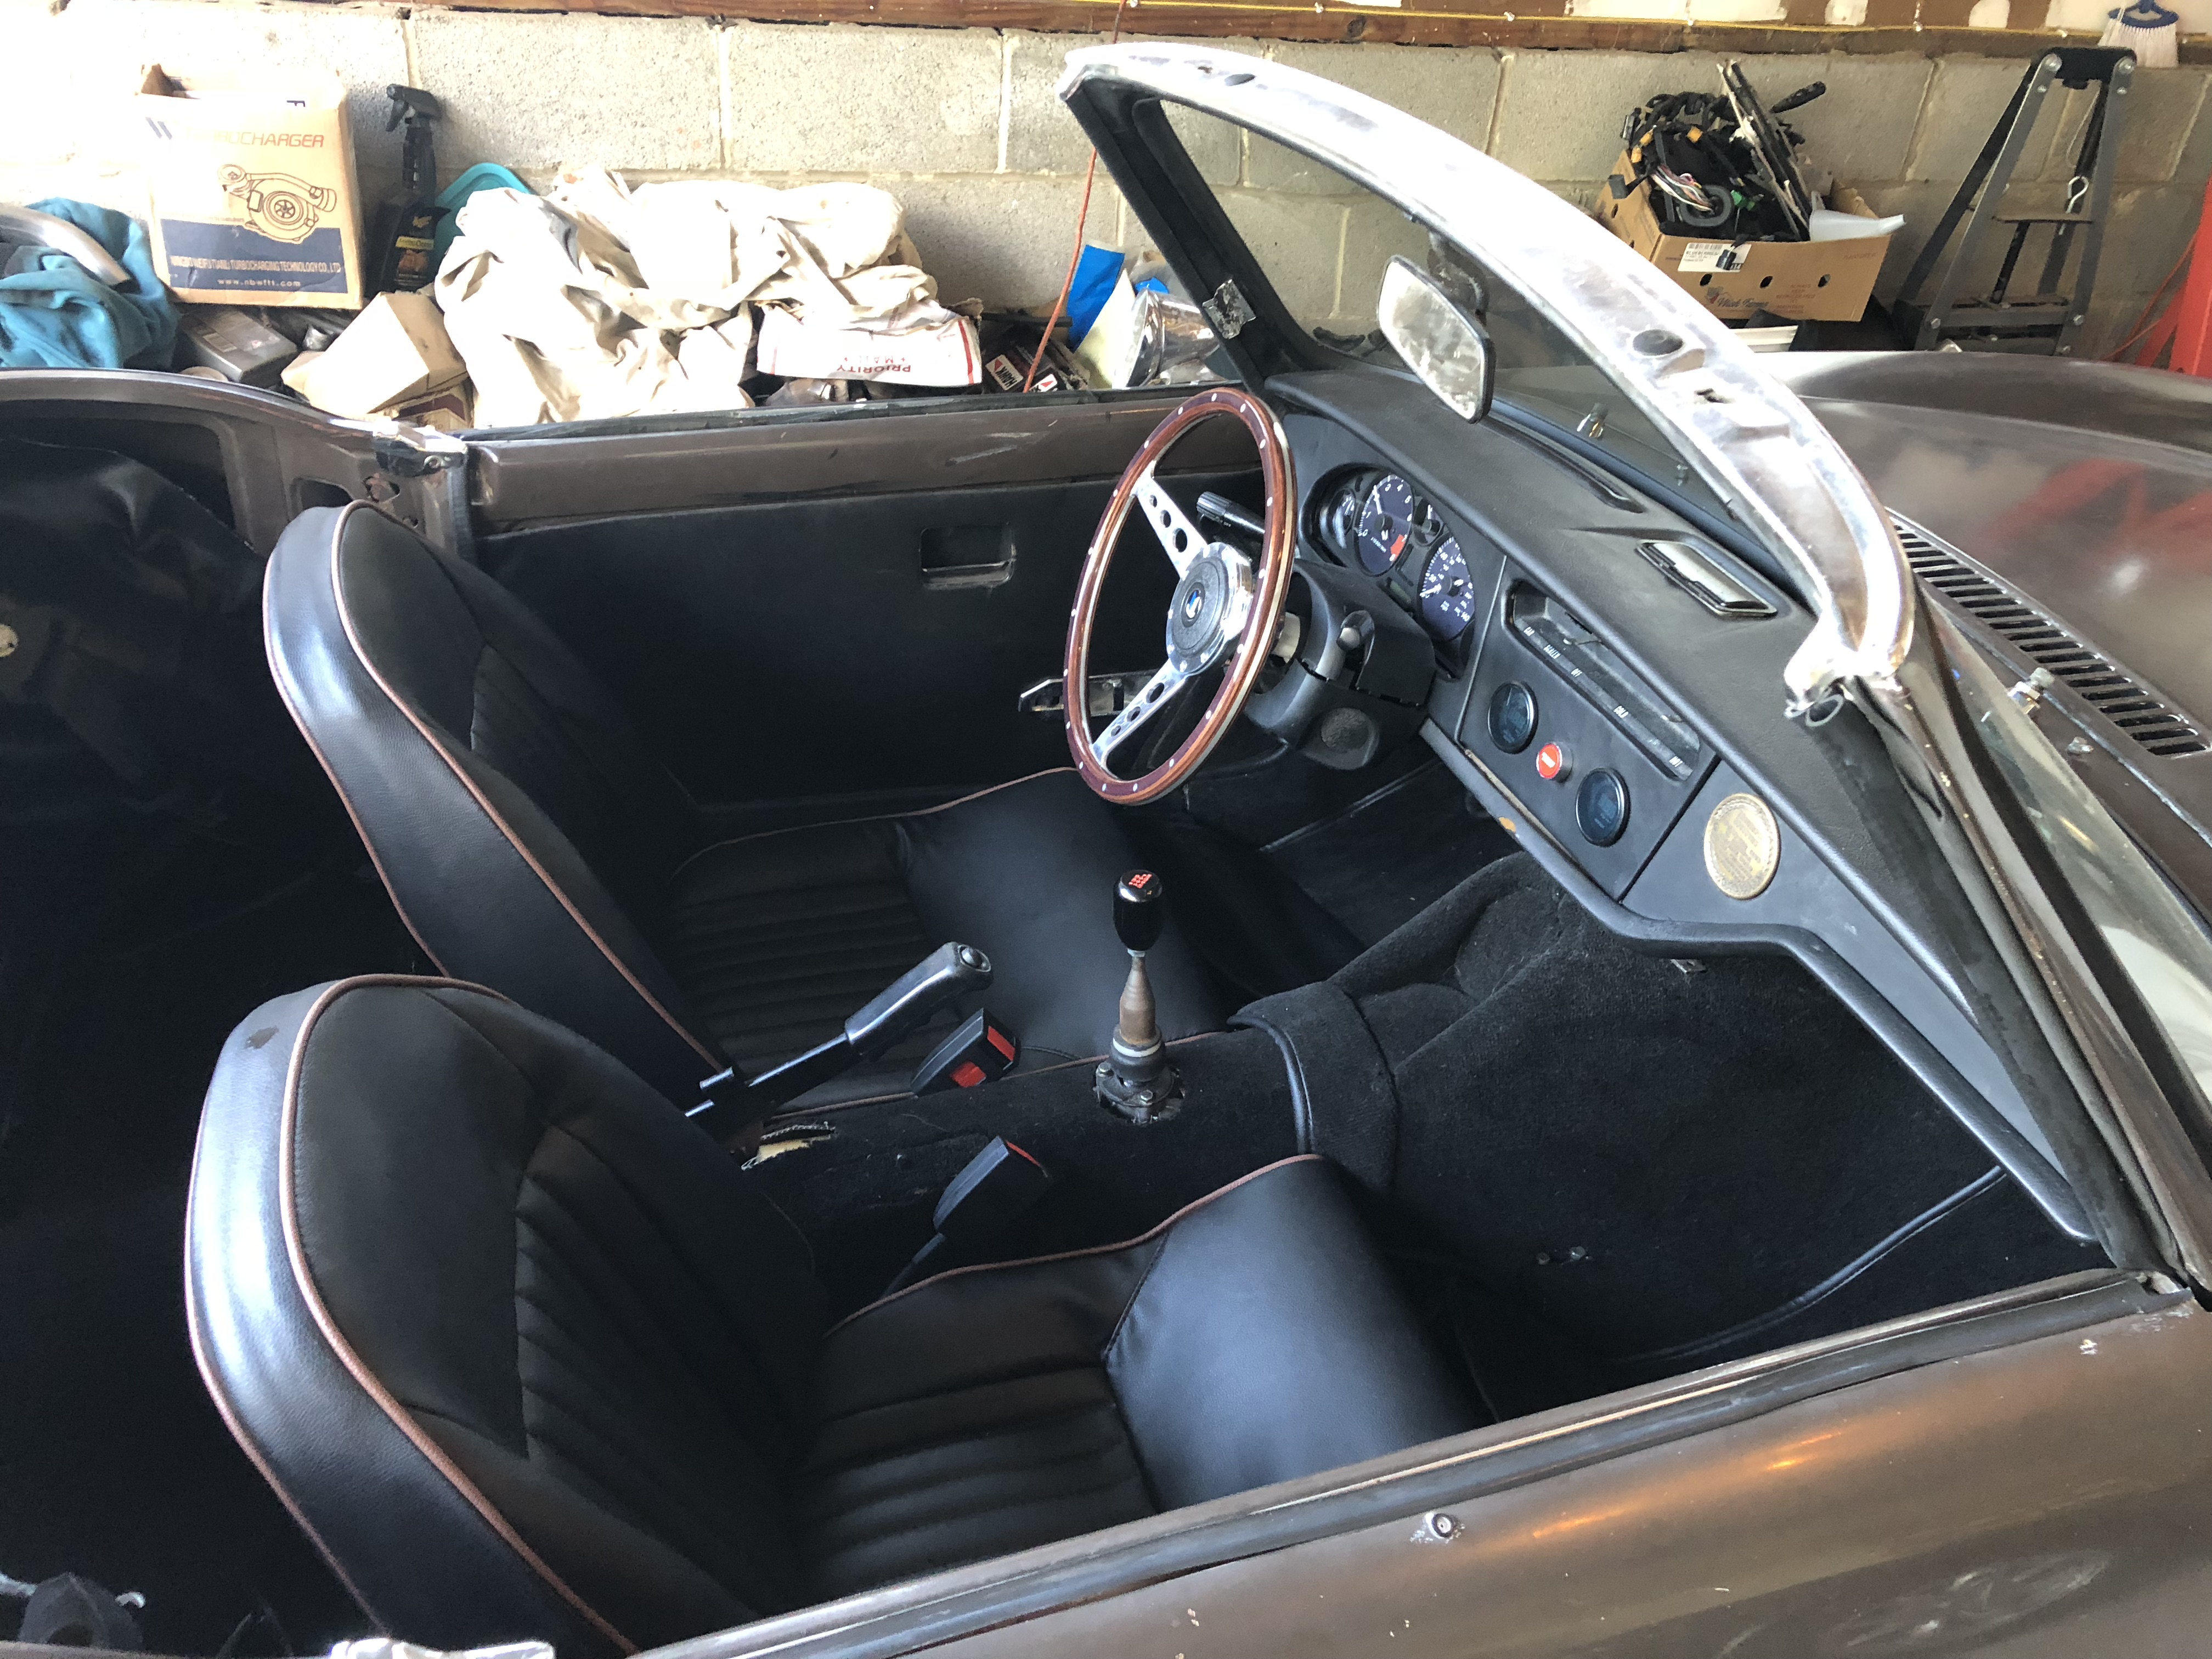
Took advantage of having Columbus day off today and worked on getting my interior and seats installed. Ran into trouble in one of the seat belt captive nuts, so ran a chaser through all the threads for the seat belts and seat tracks and used new bolts for all of it, so no other problems other than it was quite a hot day in the garage today. I was going to finish the interior by installing the center console, but needed to get bolts for it. I decided it was time to take this thing for a test drive instead, so I put the front wheels back on it, and did a final check of every thing. The interior will be a work in progress, but as you can see, if you are familiar with Spitfires, the center tunnel normally has a high section for the shifter. I cut this down and riveted aluminum over the holes and wrapped it all up in aluminum tape. I used an 1 inch wide weatherstrip seal for the bottom of the transmission tunnel and built a steel center tunnel for the end of the shifter. I have a boot and 5" chrome ring to screw to the tunnel when it comes in to cover the shifter. I sewed some scrap carpet into the original hole for the shifter and it is now a pocket for storage. I think it came put pretty good. The shifter location is really nice for driving.
So fired it up and ran out of the garage, no rattles, no rubbing, drives pretty nice for first time under it's own power in 30+ years! Steering is nice and tight, clutch and brakes are good, shifter is excellent. I ran down to the end my street and around the cul-de-sac and it promptly stalled out. I restarted it and drove it back to the driveway. Was low on gas, so I poured some in from the can and drive it again. Stalled again, same spot and had to wait for it to restart. Car is still running rich, so next steps will be to start working in the tuning.
Really happy that much of the normal "issues" seem to have been worked out. I took a lot of time to try to ensure that everything was correct, had proper clearances, etc... and that appears to have paid off. So now I need to work on the tuning, not sure if my throttle position sensor is good, so will be troubleshooting that next.
I want to +infinity this post
Woohoo! Congratulations! Running and driving!!!


