


In reply to Patrick :


In reply to Patrick :

Boxes have arrived. I don't like the way the one box looks.
Did some space making, swept a bunch, and got down to business on the 12A. Today's episode brought to you by instrumental hardbass because I got the hearing back in my left ear, mostly.
The engine is not quite an Amazing Pile of Junk but it is far from good.
First, we bring on the heat. Because I am not in a constant state of financial worry right now, I decadently cranked it up to high, which engages BOTH heater elements.

Just for reference before I start disassembly...

Step 1 is removing the front cover. Ugh. Oil pump drive chain is wasted, and oil pump has a TON of endplay. The front counterweight size indicates that the engine has '79-82 rotors. The flywheel is an '81-82 unit (lightest production 12A flywheel) but savvy race engine builders limited to OE parts used to use the lightweight '83-85 rotors and rebalance a '81-82 flywheel to suit. I am somewhat pleased that this is not the case, makes life easier.

Also, the wrong O-ring was used.

Oil pump looked like debris had gone through it. At least I have a large collection of 12A oil pumps and drive chains now...
All of the tension bolts popped loose like they had only been finger tight. All except for the one marked 11, it wouldn't budge. So I put down the 3/8" impact gun, grabbed the 1/2" impact gun, and it still wouldn't budge. A breaker bar took it loose no problem. I think the threads were binding and the 18" long 10mm bolt was just springing that much. Ever since an incident I had a long ways back, I chase the threads in the front end housing, so I'm not THAT concerned... but I'm glad already that I didn't just pop the engine in.

I don't know what it was assembled with, but it turned into brown gunk. All corner seals were stuck down in their bores. At least the side seal gaps look decent.

What does not look decent are the rotor slots. Look at how much gap there is in there!

Pulled the apex seals out so I could remove the rotor housing. They're used seals, and used springs. I trust used 3mm seals about as far as I can throw them. If they were ever taken over 8500rpm they are time bombs. So, into the scrap bin these will go. I might have to go with Goopy oversized apex seals to save the rotors, which I'd really rather not do because I have heard they are not very housing friendly.
The dowels didn't want to come out. Need a dowel pin removal tool. Turned 180 degrees and looked down.... found one!

And so:

Rotor housings have a great deal of chrome flake, probably scrap pile worthy in 1996, probably worth $800 each on eBay in 2020. Like Danny DeVito said to Rhea Perlman, "it's this or nobody!" Didn't get good pictures because they are covered in weird brown sludge. And at this point my gloves were covered in the goop and I didn't want to get it all over my tablet.
Side housings are servicable. Intermediate actually looks really good, although it has a rust blob on the front rotor side of it. Front end housing looks like it had been rusted and cleaned up. Both end housings have some vertical wear to the side seal area, but no "delta wear" that crosses the oil control ring track.
I still need to do all the tedious boring work like measuring the side seal heights, and the side seal end clearances, and the rotor gear protrusion,, but so far it just looks like I'll need to clean and blast the paint off of the housings, or just paint over the barfy looking paint with a bunch of aluminum-colored engine paint. Dig up a good 12A oil pump chain, and an oil pump to blueprint. Pick up some gasketry, a set of new apex seals, a set of new corner seal springs, and it should all go back together.

Looking at the one apex seal, ouch. Is that as wedge shaped as it looks in the pic?
What are you going to do with that?
A friend swears they make 4 mm apex seals for turbo applications, I haven't found them. I figure if its true it was a one off job, then blew up. I do know many rotors could be saved with a 4 mm slot milled into them.
Thinking about it, 4 mm +/-.001 Blanchard ground cast iron would machine pretty easy, cast iron has good lubrication properties. It would be flat side to side. Hmmmm.
In reply to Bent-Valve :
The OE apex seals are chill hardened cast iron.
The Goopy oversize seals are .003" thicker than OE. The acceptable slot clearance is .0025-.004" and to be honest, I wouldn't go any larger than .0025". The more clearance there is, the more gases can easily escape from behind the seal. Like piston rings, apex seals are mainly held in place by gas pressure on the backside. High clearance not only means they can get flappy, but with the reduced gas pressure they can bounce, which is bad for the chrome. It's also bad for the seals.
I don't know that anyone makes 4mm apex seals. If they did, they're not very bright. The best seals for turbo engines are still 2mm seals. 3mm seals are too heavy to be useful in a performance application, and detonation is orders of magnitude more destructive than any thickness seal can tolerate.
This has been bugging me for a while, and I saw that FCP Euro still had A pillar trim in stock for the P2s, so...


Good, vs bad.

I popped the new trims in, then drove to the deli for lunch.
The saggy fabric bugged me, true, but mainly because anal retentive wanting to keep a car well-maintained. However, even I can't believe how much nicer it is to drive now. It seems like the view out the windshield is clearer, somehow, which makes no sense because the fabric wasn't blocking things to any degree.
Shoulda done them sooner!
Now for the next question... $1300 OEM cat or $500 Magnaflow. The OEM cat should last another 200k miles, aftermarket cats are usually nowhere near as good. BUT, if the engine starts burning oil or coolant, that will kill the nice new expensive cat I bought. Maybe I should buy both? ![]()
Messing with scatter plots with TunerStudio, since I never messed with them before. This is a datalog from 2015, so this is the bridge ported 4-port with a Holley 750 as the throttle body.

Two interesting things are immediately apparent.
For one, you can clearly see the curve at lower left defining the maximum vacuum the engine will pull at a given RPM. There are no datapoints below that curve because that is all the engine can pull against a shut throttle.
For the other, you can also clearly see that either the throttle body or the air filter are posing a restriction! Manifold pressure drops by 4kpa between low RPM and redline.
I guess I can justify a pair of 45mm DCOE type throttles when it comes time to put that engine back together.
Remembered to bring my tablet, so I can get these photos, along with some others that aren't relevant to the thread YET.
Ports on the 2-piece manifold are GIGANTIC compared to the one piece manifold, even after extensive porting! (And brazing, because it was cracked... they are all cracked)

Just to show it isn't an optical illusion brought about by other casting differences, here's a closer pic with exhaust gaskets laid over for reference. The 2-piece manifold's ports are actually larger than the gasket, although still contacting the fire ring.

The turbo side outlet is also significantly larger. I spent a lot of time porting this on the one piece manifold, the 2pc is as-cast. And still larger. (The wastegate outlet looks so close as to be not pictureworthy)


On to the RX-7.... rear rotor of the 12A. Yup, the rotor's dead. The seal thickness is .115, max slot thickness is .118...

I don't like the way this looks either.

Knurled. said:In reply to Bent-Valve :
The OE apex seals are chill hardened cast iron.
The Goopy oversize seals are .003" thicker than OE. The acceptable slot clearance is .0025-.004" and to be honest, I wouldn't go any larger than .0025". The more clearance there is, the more gases can easily escape from behind the seal. Like piston rings, apex seals are mainly held in place by gas pressure on the backside. High clearance not only means they can get flappy, but with the reduced gas pressure they can bounce, which is bad for the chrome. It's also bad for the seals.
I don't know that anyone makes 4mm apex seals. If they did, they're not very bright. The best seals for turbo engines are still 2mm seals. 3mm seals are too heavy to be useful in a performance application, and detonation is orders of magnitude more destructive than any thickness seal can tolerate.
I wondered if he was full of ...... Anyway, I can stop looking from time to time.
I figured the rotor was dead, bummer.
That 2 piece does have some large ports. It may be an optical illusion but the turbo side looks like it is more open and would flow better also. The one piece looks like it has an obstruction just inside, the 2 piece has a similar bulge, but not as large.
Today at work, fished these rotors off the shelves. One was still rusted so heavily in its rotor housing that I had to beat it out with a BFH and a block of wood. (I was so disgusted with the engine that I'd left it that way. Duct tape does not weather seal anything)

Couldn't get good photos of the faces because of the way the lighting is in the building. They put the ass in nasty. A bit of quality time in the heated parts washer and they look remarkably not awful:

Still rusty as all heck, though, and all the seals are still lodged firmly in their grooves.
Enter this stuff:

No idea why the pic is sideways. Anyway, let's see...

One gallon not enough to cover them. I'll have to rotate them.
They went into the solution at 1pm. It is now 5pm. Let's check in to see how it is doing...

Yowza. The waterline on the right is where the rotor was sitting for 4 hours. The one on the left is where it was sitting for 15 minutes.

Gonna call these done. I can start to wiggle the seals loose.
Once again, the Law of Conservation of Mechanical Entropy rears its head. Need to pass emissions by early March, which means eliminating that pesky P0420.
: You have purchased IPD 3" DOWNPIPE
(the next day)
: Congratulations! You have unlocked CRACKED ENGINE BLOCK

New cat should be here sometime next week.
In reply to Knurled. :
Can you feel that line with your fingernail? I have heard about Metal Rescue but I have not seen the results.
I wondered if you put the rotor face down if it would continue to build the surface on each side of the line or if they would equalize somewhat.

Just FYI, on those rotors being dead because of the apex seal grooves. I knew a guy who built bunches of race 12A's, and he told me because the rotors were made out of nodular iron, you could use a hammer and a block of wood to close up the apex seal groove, also said you could open up the grooves if necessary if you made a wedge that was the right dimension. Never tried it myself, just passing along the info.
And as far as the metal rescue on the good rotors, does it eat the bearing surfaces? Are you planning to replace the bearings? When I soak rotors in purple power, I keep the level below the bearings, otherwise they come out looking way different - maybe doesn't matter, but I never wanted to risk it.
Cool to see you doing a 12A build, maybe it'll motivate me to finish the one that is sitting in pieces, taking up space in my garage.
In reply to sevenracer :
The Metal Rescue didn't hurt the bearings, which is part of the reason I used it instead of just using hydrochloric acid. If it did hurt the bearings, I do have a bearing press tool that I made out of a front hub, so I wasn't that concerned. The bearings themselves look a bit ugly so I may replace them anyway if they don't clean up very well with Scotch-Brite.
I'd contemplated hammering the slots back down, but getting it done evenly and without damaging the corner seal pocket are high on my list of worries. I've broken corner seals before.

In reply to Knurled. :
Watching. Continue to learn to tips and tricks.
The other thing I think about sometimes is, because the rotors are made of a weldable grade of iron, fill the slots with weld and have them machined to 2mm, then machine 13B apex seals down to 70mm long. Getting a spring would be the trick. And finding 12A rotor housings that were not destroyed.

What exactly is going on with the Volvo? Where is the block cracked? How do you know it's not a head?
Cant watch video, so I kinda missed this part.
In reply to wvumtnbkr :
Volvo 83mm bore blocks have ONE WEAKNESS.
Stairs.
(axelf.mid)
Err, 15 year old memes aside, the blocks are weak at the top of the bore. This happens.

This usually happened around 80k miles, or if you cranked the power up to the 400hp+ level. Focus RS tuners (previous gen used this exact engine) would jam shims in the relief slot between the bores to shore the block up.
I just ordered a '09 2.4l turbo engine. It has the stronger 81mm bores, but it has the forged crank, reinforced 147mm connecting rods, steel reinforced pistons, and dual VVT head with revised cooling passages that the S60R has. So it's an S60R block that trades a tiny bit of displacement for a lot of extra blam-proofing.
Well, this was unexpected. Bought this on eBay yesterday afternoon. It showed up just now, from Kentucky. Logistics is mind bogglingly effective in this country.

This is pretty hokey, the case is crap and the cam alignment tools look primitive at best (I have a MUCH better one) but the star of the show is those funky threaded torture device things.
The whiteblock valve cover is also the cam caps. This makes it "fun" to remove and replace. So, you need tools like this:
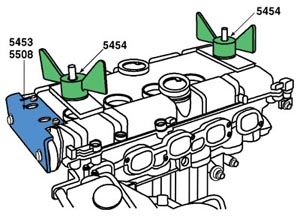
They thread into the spark plug holes and compress the valve springs equally-ish while you remove or install the bolts.
By the way, a S60R with the boost solenoid unplugged for cylinder pressure:cooling system pressure conservation is realy slow. Like, it might be making 200hp on a good day (#firstworldproblems).
But it occurs to me that I will shortly be having a spare whiteblock kicking around, and I am deeply curious what transmissions it might be adapted to, and Darton makes MID sleeves for the whiteblock as has been mentioned before, if I felt like dumping $2k in parts and $1k in machining on a Volvo engine...
In reply to Knurled. :
Dump $3k into a 12A or a Renesis, you will be much happier even if its the Renesis.

In reply to Knurled. :
whiteblock swap one of the rx7's
I am thinking something mid engined.
You'll need to log in to post.


