


Well done!

Well done!

Took the NA for an extended test drive today with the 6 speed. Warning... ***wonky track math in this post*** ![]()
The speedo now reads about 10% high. Definitely pulls harder gear for gear than the 5 speed... that was expected. What that translates to in real world acceleration, who knows?
What it should do is get me out of the slower corners on track a lot harder. Looking back at my data, there are several corners on our local tracks where the NA maintains 40-45mph. At those speeds, it's pulling from as low as 3400 rpm with the stock 5 speed and 4.30s, but a downshift to 2nd puts it at 5000 rpm and adds two shifts in quick succession. The 6 speed in third with the 4.30 at that speed is pulling from 4100 rpm. Looking back at my dyno sheet shows that with the 6 speed, the engine will be applying an additional ~30 hp coming out of those slow corners. That is a significant improvement.
Of course, I'll end up paying for that with an additional up shift on straights that exceed ~90mph, but 5th is now the same ratio as 4th previously (1.000), so I'm hoping for a break even with the increased acceleration in (new) 4th.
We'll see how this all sorts out in February, hopefully.
Unless I muddy the waters by doing some aero work on the car... ![]()

I've read this whole thread over the last few days and been steadily sending photos to my wife of places we need to now visit. Thank you for the stories!
I was Miata shopping a few months ago and bought a Boxster instead. Now I want a Miata again...
In reply to spandak :
You're welcome! I've tried to make it a little more than just a 'build' thread. ![]()
It's hard to beat a Miata for (reasonably) cheap fun!
No work on cars this weekend, but did a little work on the garage.
Shortly after we bought the house, I got some fluorescent fixtures from a friend that worked at a local college. They were remodeling and trashing all the old fixtures, so I got them for free. For the price, they did a good job for a long time. I've been meaning to upgrade to LEDs for a couple of years, having already converted most of the rest of the house, and I was tired of dealing with dodgy ballasts.
Before:


After:


Fixtures are the Barrina T5 4ft 6500k from Amazon. Dirt cheap at $56 for 8. I bought an 8 pack, and I may just buy another 6pk... I have room for a few more sticks.
The lights come with plug in or hard wire options, and can be daisy chained up to 8 lights. I have two hard wired strings, so adding a couple more will be pretty easy. I also put one over my small bench, on a plug in switch. That one is not turned on in the pics.

Yes, plus one for the Amazon lights. Exact same set up I have in the garage and wow what a bargain for what you get.
Although I had old 75 Watt incandescent bulbs so it was a bit more drastic. Looks great!

I put in a ton of flourescent fixtures in my garage when we bought the house 12 years ago. I think I need to swap them all over to LED now. That's a ton brighter!
In reply to docwyte :
It really did make a noticeable difference.
I was just getting ready to write another post about it:
I was in the garage for a while this morning working at my big workbench, which was directly under one of the fluorescent fixtures, and is now directly under the LED. Even having been directly under the fluorescent, there was a huge difference in light. I often used small LED worklights in the past to supplement for detailed work, and they're now unnecessary!
I'm very pleased with the improvement. Especially for ~$60!
I bought 3 of the 8 packs just because when I find something I like, it usually disappears shortly after
Heck I use one on a chain to hang under hood as a droplight, works great lol
Well, the holidays are behind us, so it's time to start ramping up for the track season...
Today was a minor mod to the NA. Since it's almost exclusively a track car at this point, I'd been meaning to dump the side windows, tracks and regulators for a while now. I finally ordered up a set of brackets from Advanced Autosports that allow the windows to be mounted for transport/storage and easily removed for the track, and they arrived yesterday. I got rollin' with the project and forgot to take pics, but here's what came out of the doors:

Including the windows, 22lbs total removed from the car. Not a lot, but every little bit counts.
When I cage the car (hopefully this summer), I'll gut the doors. That and the door panels may be worth another 3-4lbs.
Another batch of parts coming this week for the NA, and some stuff for the ZL1 as well.
Stay tuned... ![]()
Sometimes you need to get out of the garage and just go for a drive. So today I went out and had some fun with a couple other heavy hitters... ![]()


I've lurked here for a long time and this thread was one of the first where I started from the beginning and read the whole thing. Very entertaining and I love the variety in your cars.
In reply to neverendingprojectgarage :
Thanks!
And welcome to GRM!
After the last, failed attempt at a modifying the ZL1 exhaust for 95dB track days, I started from scratch and fabbed up a new 'noise abatement' strategy today.
I cut off the stock tip, and welded on V-band flanges to re-mount it, then made a second 3" extended tip with a 90* turn for each side to re-direct the sound.


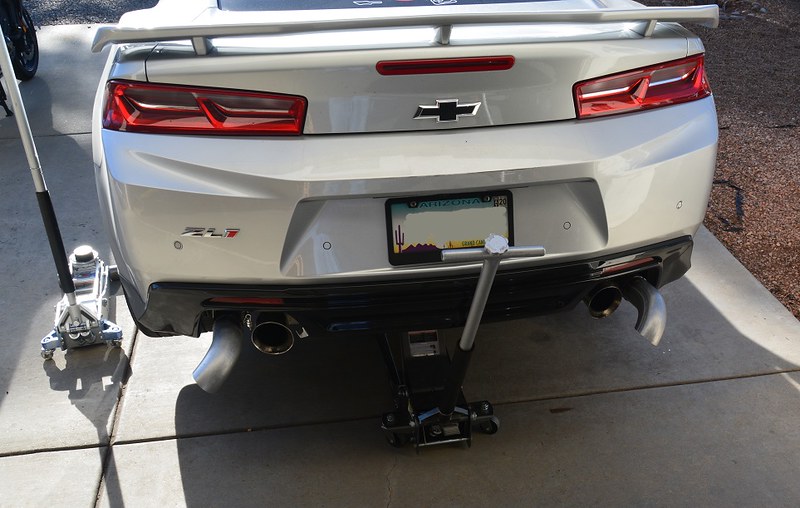
Easy to swap, and they can be rotated to change direction for different tracks.
I only bothered with the outboard tips, because that's where the exhaust goes (bypassing the muffler) in 'track mode', when the valve is opened up. Any gasses going through the muffler will be quiet enough that I'm not worried about the inboard tips.
Interestingly, the size of the actual stock exhaust at that point is 2 1/4"... my turnouts are 3".
I may shoot them with a coat of high-temp black paint, but I'll wait to see if they pass sound first.
More fabrication to come... some Miata stuff coming this week.
Back when I installed the seats in the NA, I used fixed brackets. This resulted in a 'compromise' seat position that I could tolerate, and my wife could drive, with a 3" foam pad in the seat. It wasn't ideal for either of us, and I'm tired of it, so it's time to install a dropped floor so we can get sliders in there, and still come in under the roll bar.
One thing I don't have is a brake/shear for sheet metal fab, so I started looking at the various kits on the market. During that process, I lucked into a new kit that is just becoming available. I may even be the first or second customer... beta tester, probably! I'll post info on the kit when I'm done with the install.
Anyway, the kit arrived, so it's time to get started...

Kit includes pre-cut and pre-bent sheet metal, seat brackets, and hardware. Sliders are not included, Sparco are recommended and I picked up a set through Summit.
I had to do a little Garage Tetris to make room for the NA, and be able to leave both doors open and still move around it.

Poor FJ-9 got stuck in the corner...

Poorer ZL1 got stuck outside. ![]()
This morning I started work on the drop floor in the NA.
I was very happy I decided to move an old computer into the garage... now I can stream the Daytona Rolex 24... ![]()

I started with removing the seats, exhaust midpipe, heat shield, and the frame rail support from the driver's side. Before getting into the floorpan, I decided to check out how the brackets and sliders went together on the seats. And found my first problem... the side mount brackets had slots which did not match up with the holes on the Sparco sliders recommended by the vendor. I looked back at his photos, and his sliders are different, with multiple mounting holes. Not a huge deal, but I had to cut another slot in the side mounts to make them work. Eventually, I got everything bolted onto the seats.

One thing I really like with these side mounts is the ability to adjust the seat height and angle by just loosening the mounting bolts. Often getting those bolts out is impossible without removing the seat from the car.
Next, I started on the floorpan. First up was removing the rear 'bumps' for the stock seat mounts, which are spot welded to the floor. If you don't have a spot weld cutter bit set, they're worth their weight for this stuff, and made quick work of it.

And now, I'm stuck.... I'm waiting for some measurements from the vendor before I start cutting, since the instructions are still being writen. One of the hazards of being an early adopter, I guess...
At least I've got racing to watch... ![]()
Just got the rest of the necessary info from the vendor. Kudos for working on the weekend!
Unfortunately, it turns out they used Corbeau sliders designing this, so I'm going to have to make another modification for the Sparco sliders, but it's minor, fortunately.
More to come...
Whelp... there's no turning back now... ![]()

I was conservative with the first cut, so there's still a bit of cutting to do. I wanted to be able to drop the base in and then evaluate the other measurements before making the cuts on the trans tunnel.
1st test fit...
That's what I need to do in order to fit into a miata. I just didn't have the heart to do it to the super nice, survivor, FM turbo'd miata I bought last winter
This is a very well put together kit. I'm not sure how it would play out with carpet and interior, though.
Today, I started by cutting a bigger hole...

... so I could get everything fit up properly.

Once it fit, I got everything tacked up with the sliders in place to keep everything aligned.

Next was welding just enough to support everything for a test fit of the seat.

[
All is good, and my wife and I can both find comfortable positions. ![]()
Tomorrow, I'm going to try to finish the welding.
In between everything else today, the new Camaro 'quiet' tips got shot with some high-temp black paint.

Making progress... slowly...
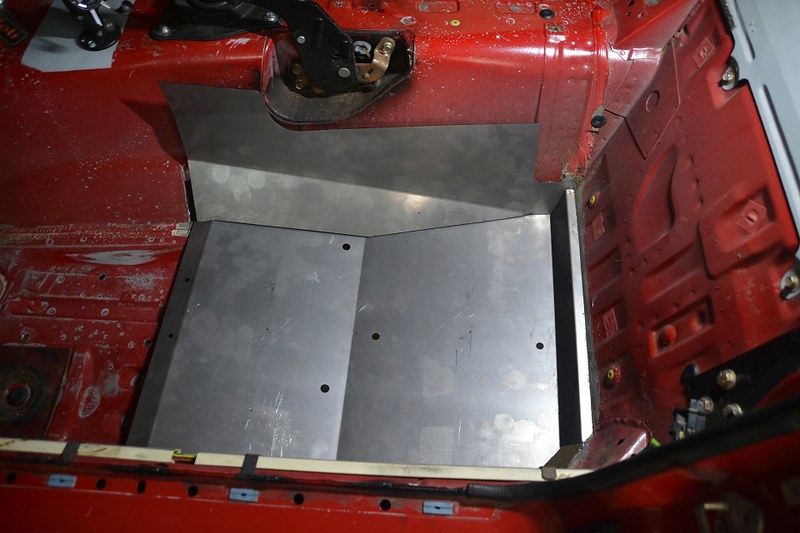
A shot of the underside, showing how the 'frame rail' support ties into the lowered floor box. It's just bolted in at the moment.

Have most of the welding done on the inside at this point. This has taken a lot longer than anticipated... hopefully I can finish it up tomorrow.
Made good progress today and finished up the fabrication.
Final welding done:

Seam sealer applied:


And primed:


Shot the underside with some black paint, but left the interior in primer. It will eventually get painted when the car gets caged.
For now, it's ready to install the seat and harness.

Here's the under side finished...

Today I got the seats back in, and the new harness on the driver's side installed.
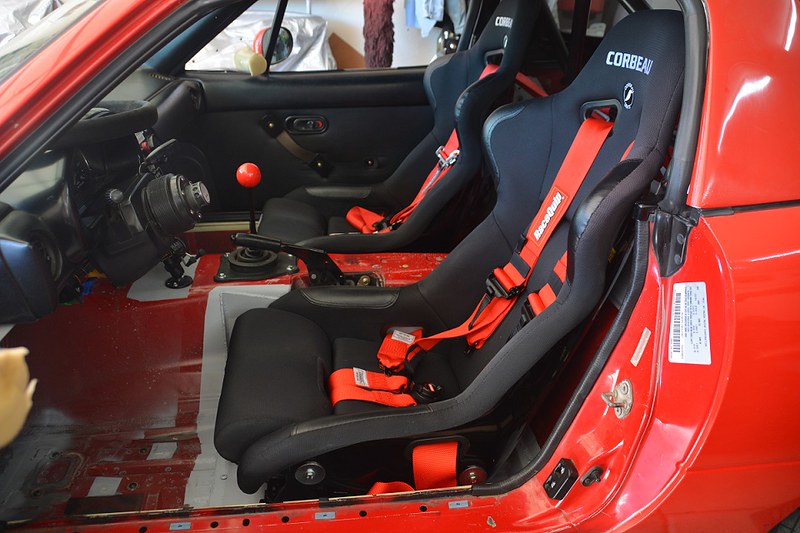
Even with the sliders, the seat ended up ~ 1" lower than the previous fixed mount... nice bonus. I also installed a Miata Roadster shifter for the 6 speed, which definitely eliminated a lot of slop.
First event for the year in two weeks... I think we're ready. ![]()
Got everything loaded up for trackday tomorrow... unfortunately, it's going to be wet. Like, flash flood warning wet... so I probably won't get to quantify any improvements from the transmission swap. This will actually be the first time the NA has ever run in the wet, which I'm kind of looking forward to... it's a great skill builder.
We're not going to run the ZL1, but we are going to take it for the sound check so I installed the 'laguna tips'.

They do make a noticeable difference standing behind the car at startup, so I have my fingers crossed. I'm concerned that the conditions may effect the outcome, however... one, I'm worried I won't be able to get full throttle past the sound check location in the wet, and two, that the conditions will skew the effectiveness of the modded tips. High humidity can facilitate the passage of sound waves through the air, but rain will definitely dampen noise...? I guess I'll find out.
You'll need to log in to post.


