1 2 3 4 5 ... 12
egoman
egoman Reader
2/8/21 6:38 p.m.

Woke up Saturday morning to a temp of -50F. 
My water was frozen and the cars wouldn't start, well almost all the cars!
My dependable Pontiac Wave (A Dae-Woo In disguise) fired right up. It didn't like it but it ran. If you had to guess which one I got running next I don't think you would have come up with my diesel yard tractor. That's right, after less than 20 minutes of being plugged in it fired right up! Of course it has 3 full size batteries on the front of it for weight to balance the snow blower and they are all wired in. Then the wives car needed to be plugged in for 2 hours and get a new battery. The old battery was slightly larger than it was supposed to be at this point. Then after surveying the water problem at home I called a local plumber to fix it. That's correct the plumber called a plumber! Don't worry it gets funnier. My nephews wife called me with a plumbing emergency of her own, so off I went to help her. That's correct, I was doing a plumbing job for free while I paid for someone to do my work.
These are the reasons that a lot of Canadians wait to start posting their build threads because a lot of time is spent staring out the window at ice fog and snowstorms.
I knew that would be the case when I started posting and I have a library of posts to come yet. That's right I endure these winters just for you guys, LOL
Those of you in the great white north, stay warm! Those of you in the south, well the heck with you EH!


egoman
egoman Reader
2/11/21 5:44 p.m.

I told you this build was about to get serious. We are talking a full frame build and this is the first domino to fall. I am a modular style of builder and the rear section will be completed and a roller before we start on say, OH I don’t know, “The front section”?

There are 1x2, 2x2, 2x3, and 2x4 sections in this frame section. Because most of the rules call for a roll cage of 1-3/4 .120 wall I have chosen for the frame to be .125 wall as well. Obviously a chromoly cage would be lighter but many ruling bodies discourage, or don’t allow a lighter wall tubing for the 4130 cages. Extra expense with no weight advantage. NO THANKS!

With a layout table we build the first side. PEOPLE, that’s really easy! The hard part is when you have to make the second side match. Just use the first side as a pattern. That’s the easy way, LOL.

I know I mention this a lot but squares levels and tape measures are a staple of the pipe fitting trades and I am well versed in using them to keep it all straight. I kinda like using a piece of string once in a while also.

egoman
egoman Reader
2/12/21 8:51 p.m.

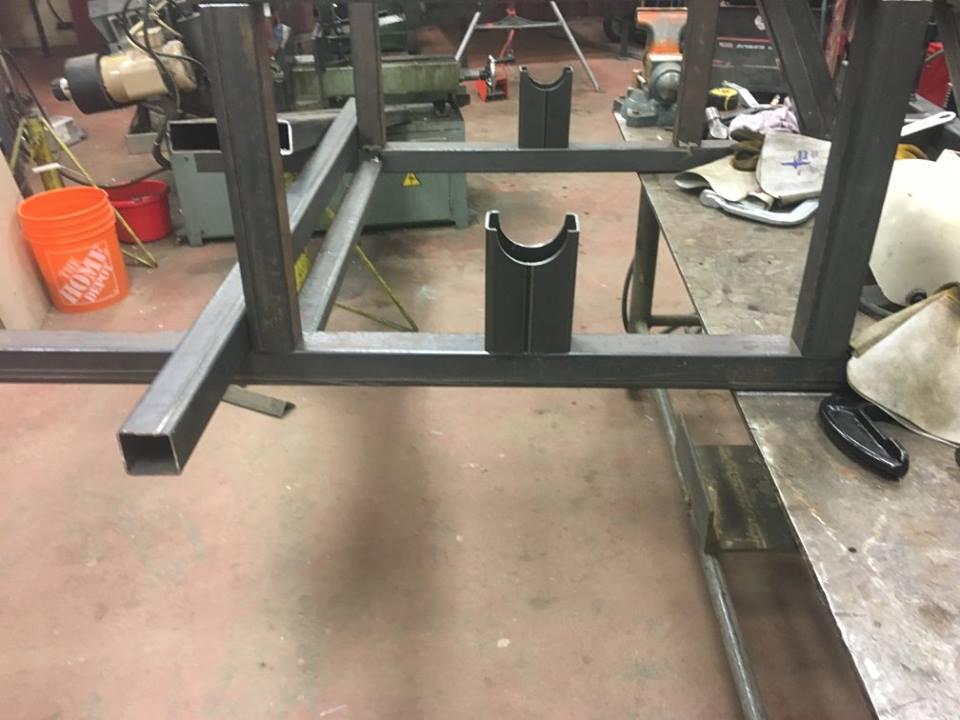
While there isn’t much to see here, this is vital! 
These pieces will hold the rear end exactly where it needs to be for the foreseeable future. 
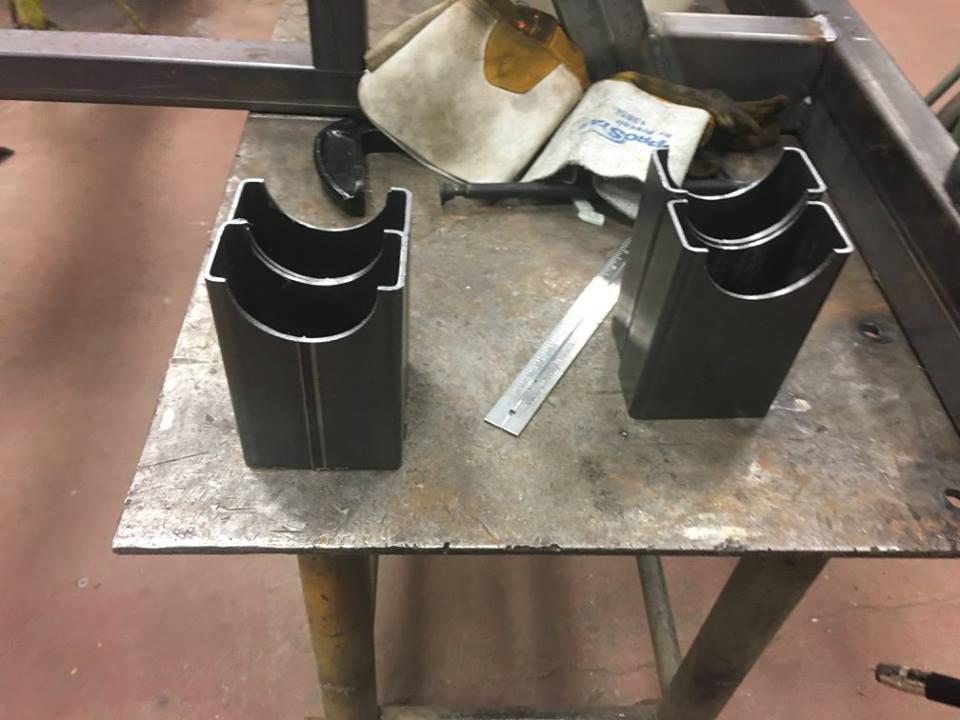
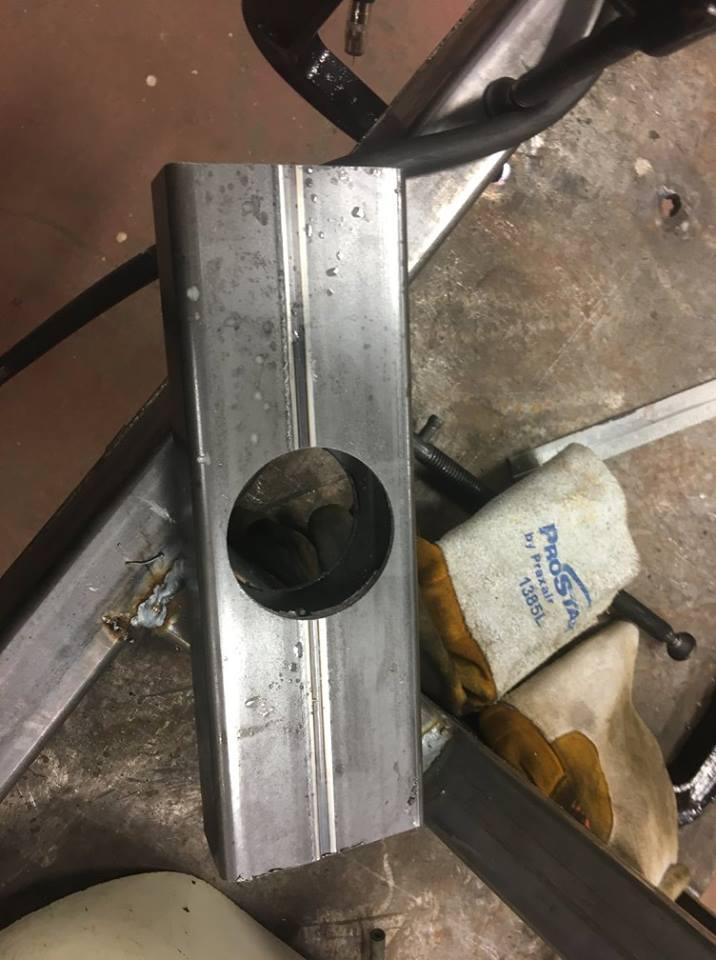
Nothing more than some 2x4 tubing with a 3 inch hole saw drilled through and then cut in ½ and cut to length. This locates the rear not only laterally but also at ride height. That’s why I have the tape measure picture of the tire and wheel diameter. By the way there was no trust in the cut at the bottom. All measurements were taken from the 3 inch DOM tubing set on top. Overthought for sure but if there are no variances to chase down later then we can concentrate on other stuff later? 
This will not be the last time you see me do this to center pieces exactly where they will end up later.

egoman
egoman Reader
2/14/21 11:36 a.m.

While you have heard me go on and on about the garage not being an excuse for the project, well!

My dad and I built this garage when I was 17. It was built from the lumber that we salvaged from a 100+ year old barn that was at my auntie’s place.

The fact that it was built almost 45 years ago from 100 year old lumber isn’t even the real issue. We also didn’t have a clue what we were doing. It is amazing it has been upright this long.

The south wall is bulged out about a foot at the top. The ends are rotted out and let in more daylight than the windows. They also let the wind and cold in and that stops a project when the overnight low in Rosser Manitoba was -50F. Frequently it is warmer outside if the sun is shining.

Americans already think we live in igloos and ride moose to work. An igloo would be significantly warmer. And a moose wouldn’t have a frozen battery!

The steel beams are probably the only reason the roof hasn’t dropped and combined with the chassis jig is probably why I feel the car is safe in there.

The insulated side has a hole that extends from the roof right through to the ceiling. It also is so rotted that the door spring isn’t attached to anything. The entire door is lifted only because I am quite strong. There is no mechanical advantage to take care of me.

There is also an Easter egg here for those that read the text and carefully look at the pics.

egoman
egoman Reader
2/17/21 8:34 p.m.

SOOOO somewhere along the line it was suggested that you couldn’t use the Corvette parking brakes on a 9 inch floater. Well, maybe you can’t? Undeterred I forged forward with my Schreiner spindles and the brakes and stuff that I received from the Corvette supplier.

Naturally you missed me putting the spindle ends in the 3” .188 DOM tubing. HMMM I thought I had pics of that? This portion of the build had me running to my friend Doug’s place about 14 times a day to use his lathe and have him plasma stuff for me. I can actually be kind of a pain in the arse apparently.

The measurements are not for your use and I recommend that you don’t do what I do. That people, is a “DISCLAIMER”.

https://www.google.com/maps/place/Doucette+Enterprises+Ltd/@49.8954364,-97.0866855,17z/data=!3m1!4b1!4m5!3m4!1s0x52ea70da42018ed3:0x3f722c8b69d49fd0!8m2!3d49.8954364!4d-97.0844968

You got a big truck project or something that need to be straightened after a BOO BOO! This is the guy to do that for you. I actually worked for him for a few years and we went to school together.

egoman
egoman Reader
2/21/21 10:38 a.m.

Corvette independent rear end brakes fitting on a 9 inch floater rear with working parking brakes! I was told it couldn’t be done, but I get told that a lot. My plans and measurements say that THEY are wrong! More lathe work come Monday. There is a guy who charges about $4000 to do what I am going to (hopefully) accomplish for several hundred. It actually turns out to be just a few dollars more than the parts.

By the way soap and water doesn’t touch brake grime at all!

Also if you can’t figure out what I am doing with the old spindle, they are going to become spacers and the brackets for mounting the brakes on the rear end. Nifty, huh?

egoman
egoman Reader
2/28/21 7:35 p.m.

In reply to egoman :

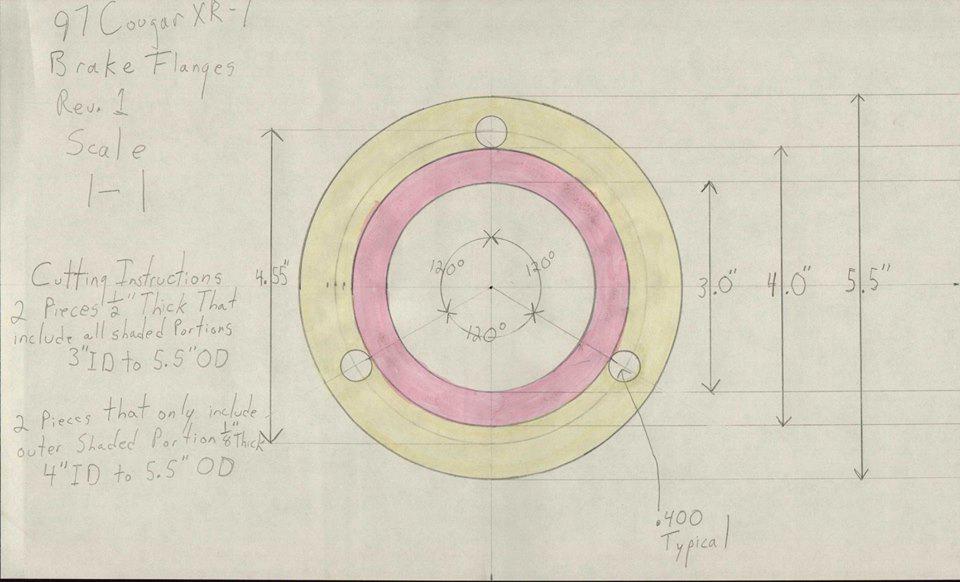
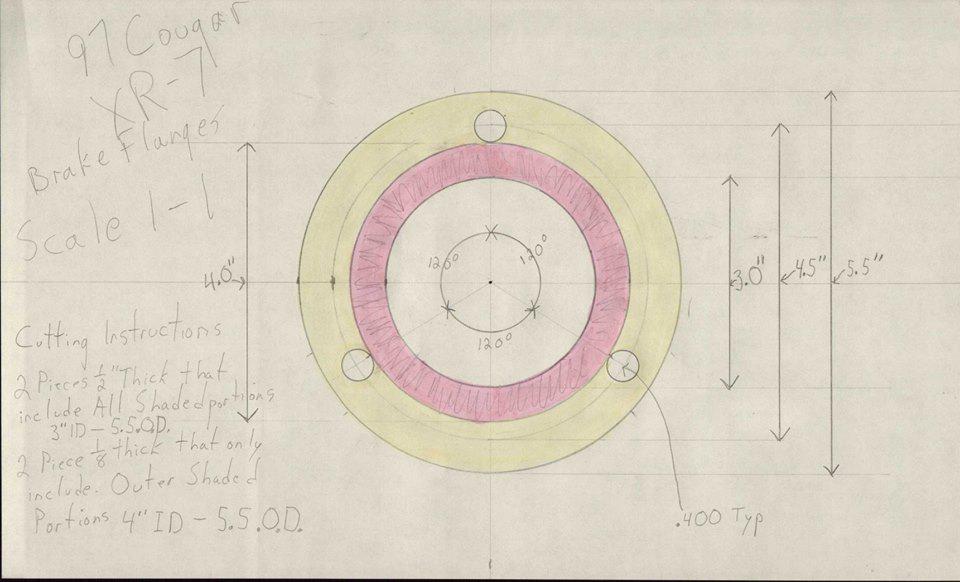
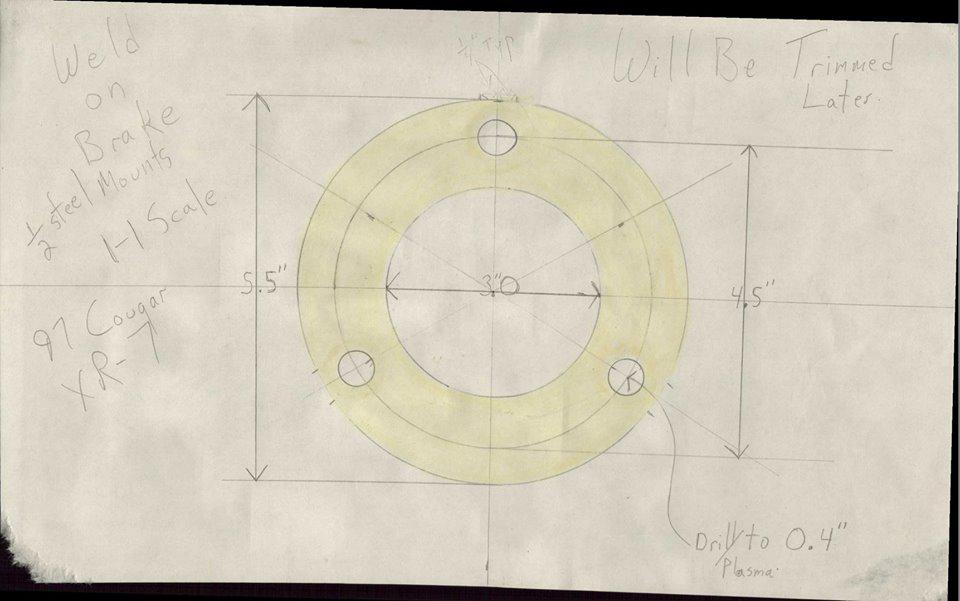
These should be the last brackets that will allow me to use the Corvette C6 ZO6 brakes and E-Brakes on the 9 inch floater for the Cougar! Going to get them cut probably next week with all the other brackets for the rear suspension.
I cheated and made it so one drawing allows for the cutting of two different brackets. You can see what I did in the cutting instructions in the lower left corner. The double shaded drawing is the revision...... kind of. Both will need hand trimming.


So just minutes after posting that I had it all figured out I double checked the measurements.
Yesterday this stuff was so hot that it burnt my hands just to carry it in the building. (That was just from sitting in my truck not even in direct sunlight!)
Now that the calipers and the bracket have cooled down. My measurements didn’t remain the same. Double and triple checking still won’t prevent all mistakes but should help reduce the overall number a bit!


egoman
egoman Reader
3/6/21 2:51 p.m.


You can find anything you might need on the internet.

egoman
egoman Reader
3/7/21 7:08 p.m.

Not a lot to explain but a lot of pictures nonetheless. I am getting closer to having the corvette brakes along with the parking brakes mounted to my floater rear end. Anyone else having a problem pasting text here lately?


egoman
egoman Reader
3/8/21 10:24 p.m.

I manage to score a piece of 2024 t351 billet for a damn good price. 1-1/2 x6 and 12 feet long for 50 dollars, Oh and I GOT 2! This stuff drills like steel though, it’s tough! Thank you Air Canada for deleting old stock. 
If those cuts look crooked, it’s not your eyes. A dull blade in the band saw resulted in that. We are cutting the spindles down and making the rocker for the watts linkage. I just printed out my drawing and taped it to the block. Cut and sand, cut and sand. 
The larger squares that I cut out will be explained later. Some may figure this out, and well ……… some may not? I mean they have lines on them how hard could it be?

Shavarsh
Shavarsh Reader
3/9/21 1:24 a.m.

This thread delivers! Stoked on the chassis fab and looking forward to seeing the finished brake solution. Good idea cutting down the spindles.

egoman
egoman Reader
3/9/21 8:43 p.m.

In reply to Shavarsh :

Its just getting started. Thank you for following along!

egoman
egoman Reader
3/10/21 7:13 p.m.

I told you a while ago that I was going to use my methods of using hole saws for creating holders and jigs. This stuff is for welding the axle tubes to the housing. There were about ten thousand measurements taken at this point and I hoped that was enough to get it close to right. The welds you see on the jig were placed there to get the jig to pull to straight. 1 super-hot weld and some water and the jig pulls back to straight. The 3 inch DOM is straight so let’s align the jig to that right?
While you don’t see it in these pics I actually screwed this up the first time. Being steel it’s easy to fix though! That drawing didn’t allow for enough room for the reclaimed center section. I also built the whole rear end as a long piece on the DOM first so I could get the outside of sidewall to outside of sidewall correctly positioned. Not a good place to guess and the reason that a few posts ago I had the 69-1/2 measurement on the tape measure posted. 
Please notice that the brake brackets are not mounted yet.

egoman
egoman Reader
3/10/21 7:25 p.m.

I seem to maybe add too many pictures but I just don't want to leave anything out. I promised a lot of pictures and I hope that everyone has a story behind it.  There was a ton of agony related to cutting the rear end tubes so the width would be right on! It turned out within a few fractions of an inch. Tire sidewalls are a very loose measurement in the first place, LOL.

egoman
egoman Reader
3/13/21 7:51 p.m.

Nothing like when you see some positive results. 
The rear end with the tires and rims attached just plain looks cool.
We tacked it all together and then checked for straightness. Then we welded a quarter at a time and switched to opposite sides and checked for straightness. If it couldn’t roll cleanly in the jig we moved the welding around until it did. While I don’t do it here we did a roll test later and the tape measure never moved at all. VICTORY is mine, BOW BEFORE ME! 
Ok I got a little out of hand……………………..
All welding to this point was done with a Lincoln SST machine at my Union hall. Nice to have the big power machine when welding this stuff. Thanks to my friend Brent Johnston for telling me the good settings for that machine. These are not your Harbor Freight welders, you actually have to know what you are doing to set them. That will seem funnier much later, believe me.

egoman
egoman Reader
3/17/21 4:35 p.m.

More going on here that it appears. Now I could have borrowed my buddy David’s belt sander and effed it up royally or I could go on KIJIJI and see if anyone has one for sale. Yes a quick check found on for 60 bucks and it had a few belts with it. I learned years ago from watching a sprint car builder named Jerry Frantzen that sanding aluminum looks good and gets rid of weight. I actually raced one of his sprint cars for a few years when I was a hero in the division. Well at least as far as drinking beer and telling stories makes you a hero.

Those 4 drill bits and that tap was the best part of $200. If you look at my parts and my drawings you will also see what I said earlier about sometimes the part only uses the drawing as a suggestion. Also I went with a thicker piece for the watts rocker and switched to a double shear design to capture the ½ inch rod ends.

If anyone is wondering about the ¾ rod coupling bolted to the rocker, I may tell you later and I may not. I mean honestly I actually drew it out for you, sorta?

egoman
egoman Reader
3/17/21 4:45 p.m.

Always more pics than should go in one post. So here are the rest!

egoman
egoman Reader
3/21/21 11:35 a.m.

Here you can see how I am reducing the spindles to their simplest form to use as a bracket for the floater.

I also got into the CAD work for my watts link brackets for the rear end. (Cardboard aided design)

A lot of this stuff is my first real attempts at using a lathe accurately.

I also had my buddy Doug do some more plasma work for me. Then the boring job of sanding it all down had to be done.

Shavarsh
Shavarsh Reader
3/23/21 11:38 a.m.

I love that this will all end up in a cougar.

slowbird
slowbird UltraDork
3/23/21 9:03 p.m.

In reply to Shavarsh :

Same, I need this kind of custom suspension on mine! 

egoman
egoman Reader
3/24/21 7:17 p.m.

In reply to Shavarsh :

Honestly when this all started it was supposed to be a Thunderbird SC. A good deal turned it into a Cougar.

egoman
egoman Reader
3/25/21 7:13 p.m.

Those brackets from the other day are deburred and sanded smooth. Brainless but tedious work. The bars that have all the holes in them are just suspension stiffeners and are for, well suspension stiffening! Don’t exactly know why I had to say more there HMMM?

You can also see that I have machined the watts rocker so it works in double shear. I used that ¾ rod coupling that I mentioned before as a mandrel to chuck it all in the lathe. Oh by the way it’s actually a 7/8ths rod coupling and I trusted my memory again when I really shouldn’t have.

egoman
egoman Reader
3/25/21 7:24 p.m.

Here you can start to see that the spacers and the spindle and the steel bracket are coming together to make a complete braking system. At this point I have made a huge miscalculation, but I don’t know it yet?

I also bolted the aluminum spacer to the original spindle to bore it out and then turned it again to face it smooth and parallel.

Certain things require small clearancing, like the E-brake adjuster and some other stuff.

I have also placed the suspension brackets on the rear end so I don’t forget them later. I actually don’t forget them later too. That’s kind of nice isn’t it?

egoman
egoman Reader
3/25/21 7:41 p.m.

For the longest time I was having problems with how I was going to run the E-brake cables??

Then I looked at a picture of a C5 and I had that AH HA moment. The calipers are front mounted not rear DOH! That cleared that up now didn’t it?

With the calipers roughly placed in the right spot the rear end looks really good together.

You can also see the retaining plate that sandwiches all the brake components together. That is grade 5 all thread to help it all stay in one place. I just buzzed that together with the MIG and called it a day. Damn I am good aint I?  Pride goeth before the fall……………

egoman
egoman Reader
3/27/21 9:49 p.m.

When I started this thread I wanted to have enough material so that I would finish the car with the people who follow along. I have also indicated that I have a lot of material for you to peruse. 
Well seeing as I have become a school teacher and am now taking spring break it is nice to be getting some more work done. Honestly this is the first progress on the car for several very cold months.
But the storage vault can keep us going for a few years at least. I did state that we would have progress to show even when I am not busy.
And again I am welcome to field comments and suggestions from the people that follow us.
Of course as always have a nice day!

1 2 3 4 5 ... 12

You'll need to log in to post.

Our Preferred Partners
cb7e8Ec1r9aJY3OwqPGkW6hk4IvL9vhA9JgswCrYLgt8r1Ts1lEQ6JLB4FJ2z7m8