1 ... 3 4 5 6 7 ... 16
subtle_driver
subtle_driver New Reader
8/4/09 3:29 p.m.
jj wrote:

Too bad the challenge doesn't have a burnout contest. EV in forward + gas engine in reverse = one sweet burnout! The car would rotate in place

sorry off topic: where did you get that image of the kid running from the rally car? I want to see the full size image. lol!

DILYSI Dave
DILYSI Dave SuperDork
8/4/09 5:03 p.m.

Everybody has to install a clutch backwards once.

Tyler H
Tyler H GRM+ Memberand Dork
8/4/09 5:07 p.m.
jj wrote: Great project! I had a thought come to mind though. How are you going to launch the car if both throttles are linked? You won't be able to bring the revs up enough to launch at the drags without moving the car.

How about using the clutch interlock switch and a circuit to interrupt the EV electronic throttle, if the clutch is depressed fully and the vehicle speed is zero? That way the EV engine is idle at launch until you come off the clutch, but can continue to pull through gear changes.

Nashco
Nashco SuperDork
8/6/09 4:19 a.m.

Progress has been good for the last couple of days. I wasn't feeling too hot on Monday or Tuesday, but the last couple of days I've been feeling a lot better and things have been moving along much better.

Earlier in the week I was fooling around with the front anti-roll bar. Until this week, I hadn't even tried to see if I could fit a bar in there. This was one of the project aspects that I've just been wingin', as I assumed I could figure something custom out later and the front bar was a pretty low priority. As luck would have it, the stock bar just BARELY fits. I had to relocate my cooling fan, and the lower radiator support will need some new modifications, but otherwise things are pretty close to stock. This was GREAT news, as I could reuse the stock mounts and bar.

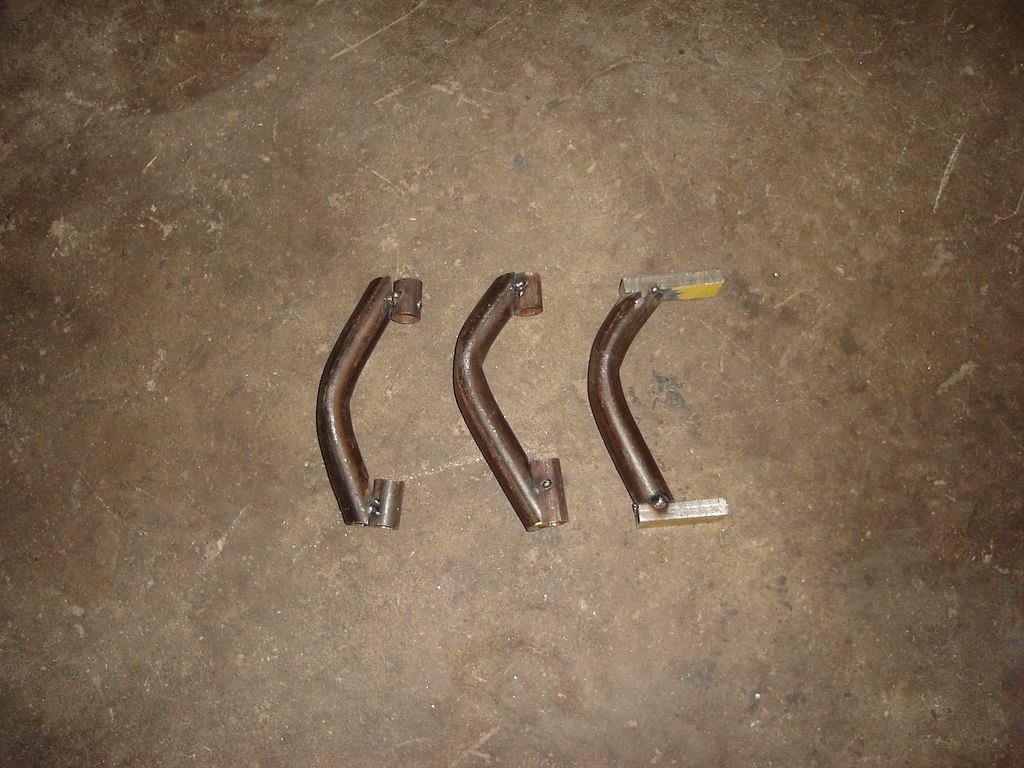
Unfortunately, it wasn't quite a slam dunk. The stock end links in the stock attachment point would have to go right through the front axle boot. I tried a few different ways to do an end link before I finally figured out something that fit and I was satisfied with. Here are my three different tries, first on the left, last on the right:

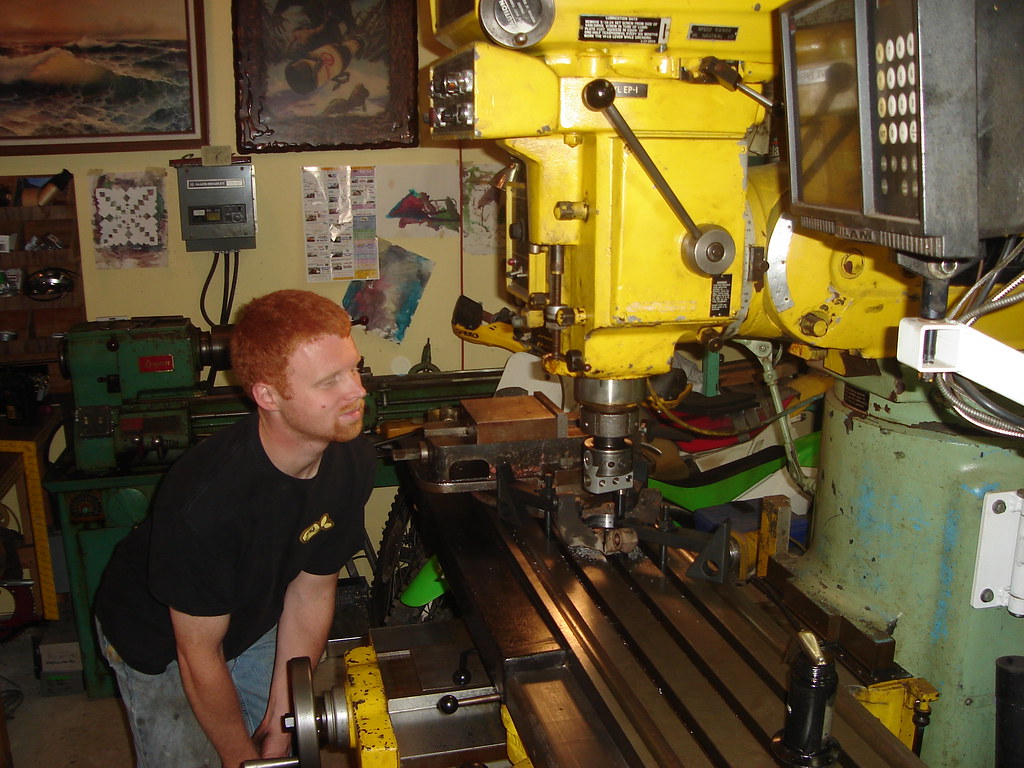
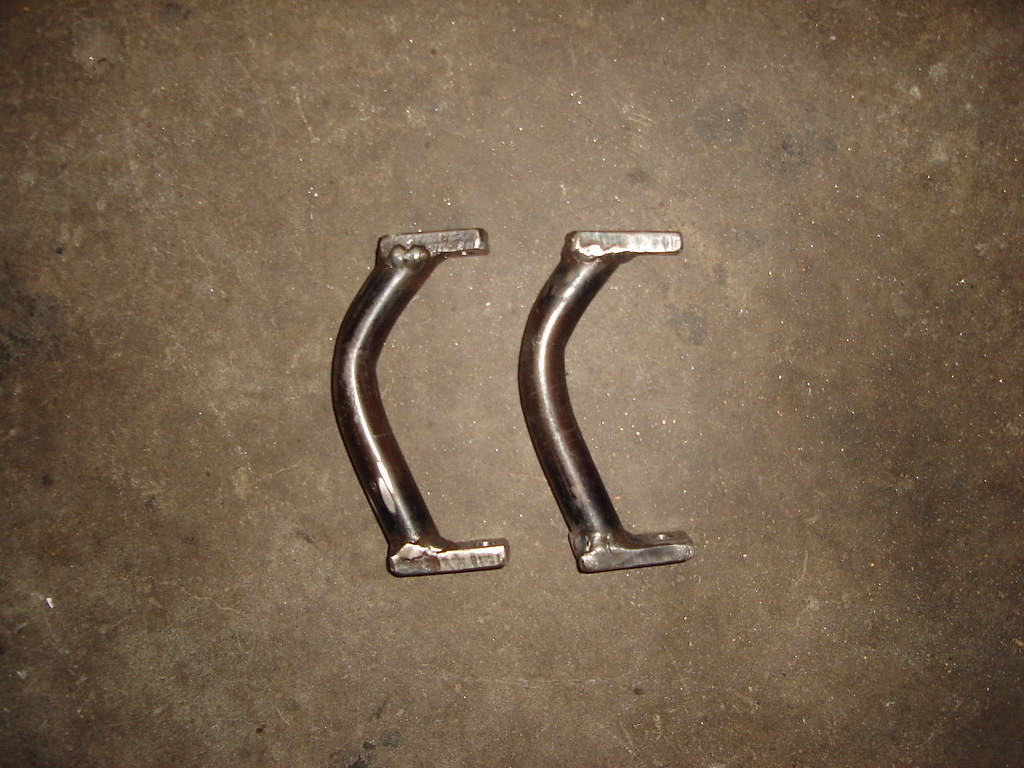
They aren't pretty looking, but I think they'll work fine. I was actually surprised how close the final pair ended up being, considering I was working with a bunch of very rough tools and hunks of scrap metal:

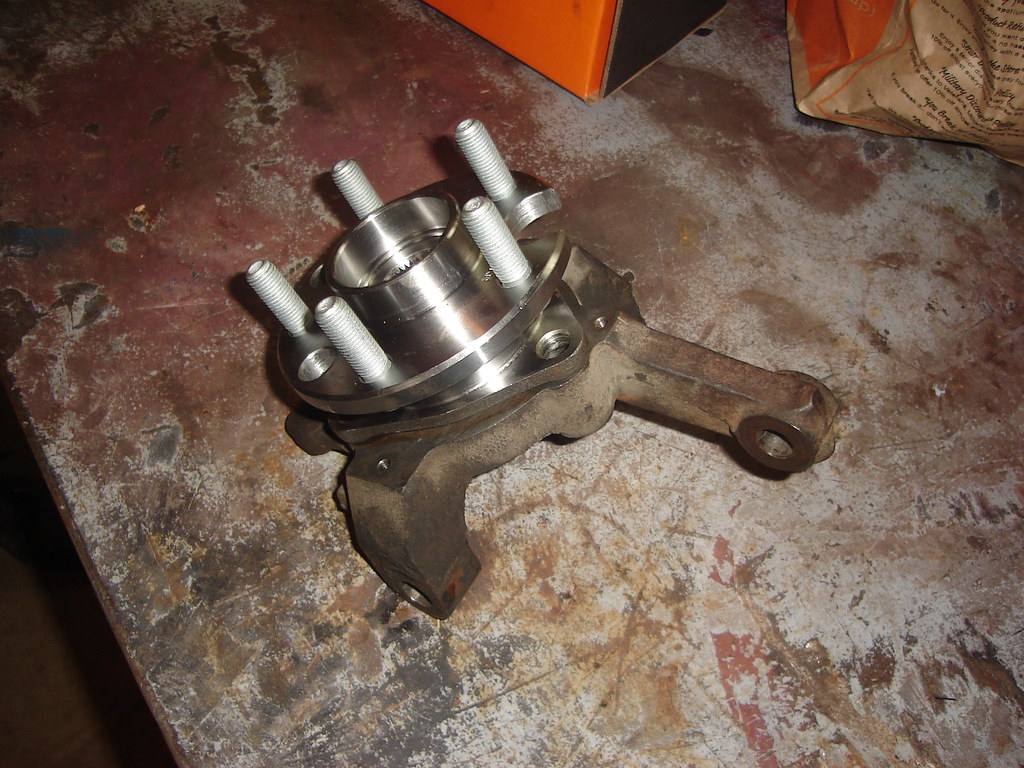
To give you an idea of how tight things are, here are two shots showing the knuckle turned in each direction. In the first one you can see how close the axle boot gets to the end link, and in the second you can see how close the tie rod/knuckle gets to the end link.


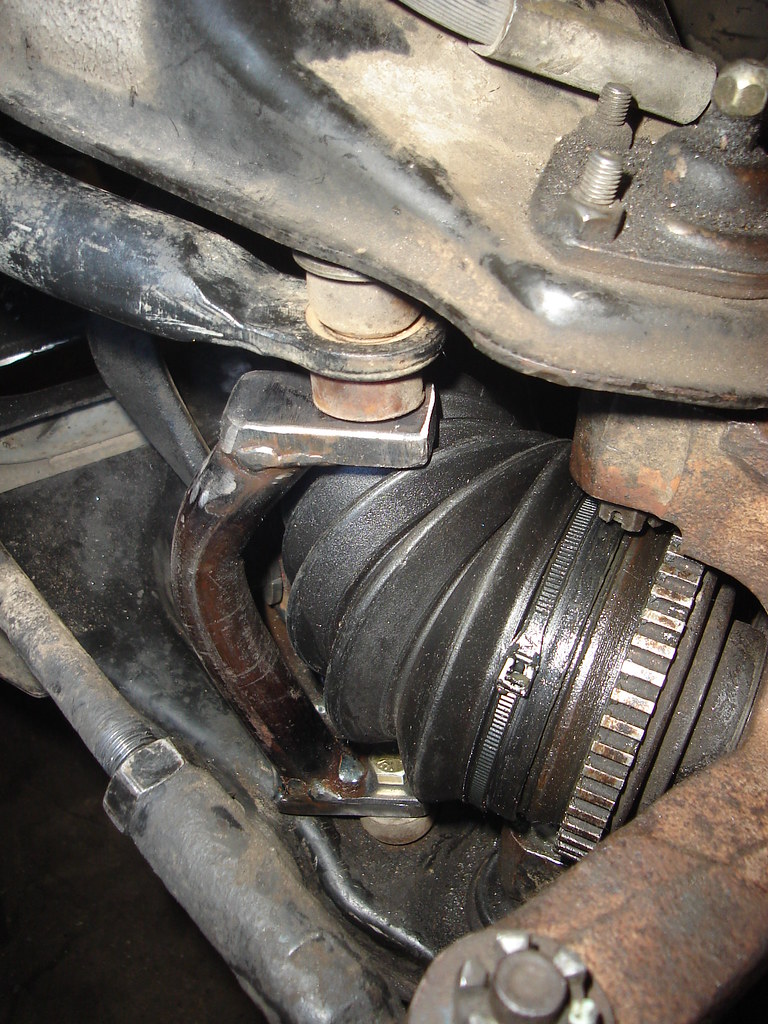
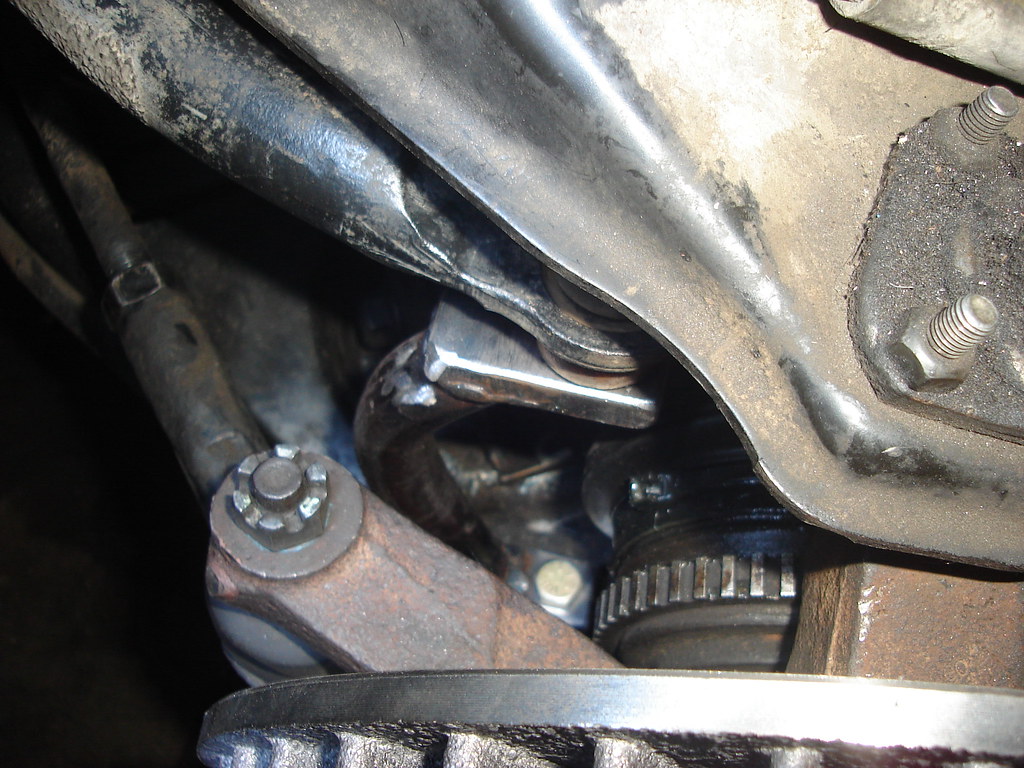
Note that I still need to add some type of standoff to keep the end link from rotating. Like I said, not pretty, but it will get the job done. I think this setup is worth the hassle since it allows me to use the stock bar, end link bushings, control arm mounting location, etc.

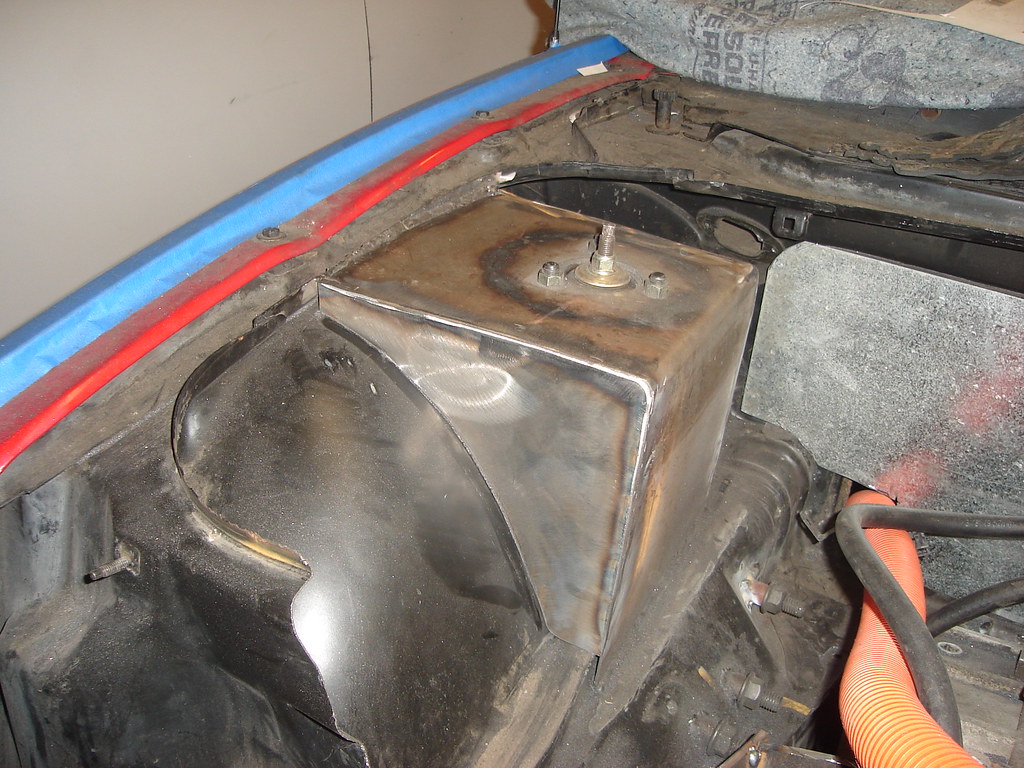
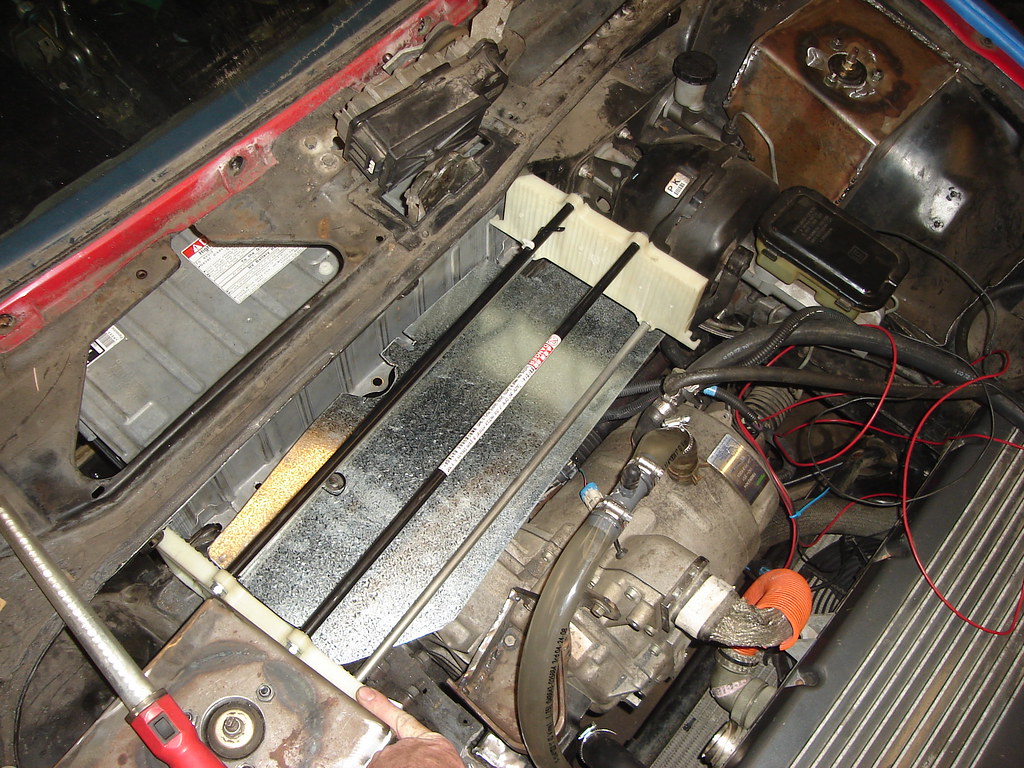
So, with the bar installed, here's a shot showing how tight things are with the cooling package. I thought things were getting pretty close before, but with the bar in there it's REALLY tight.

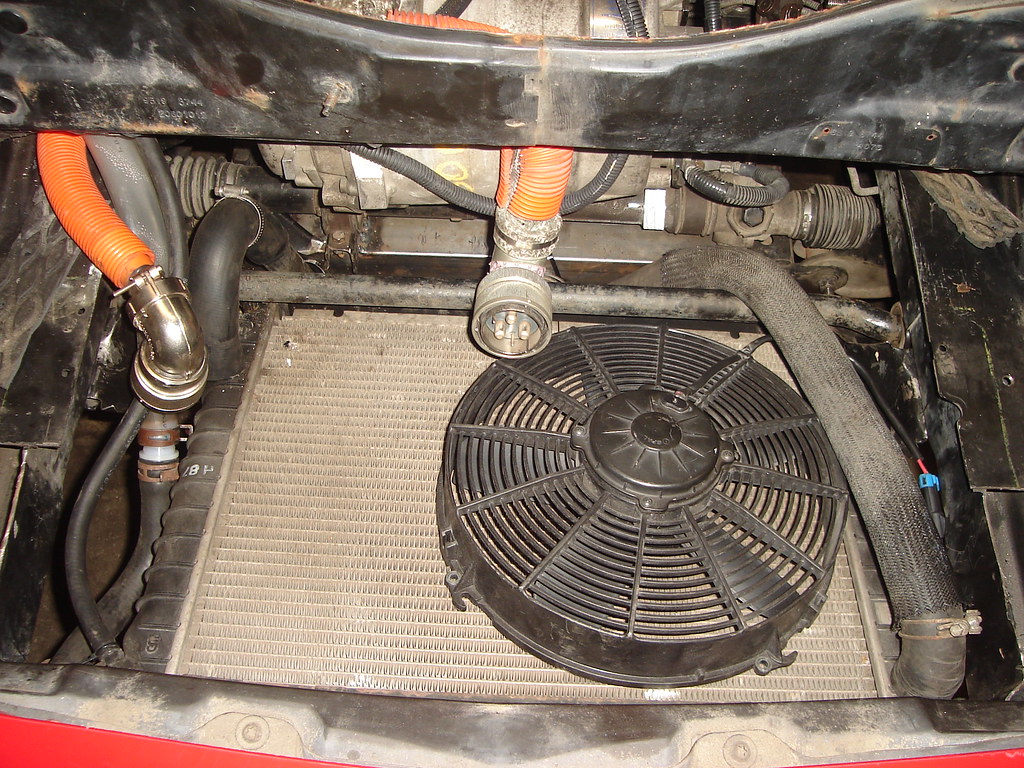
The radiator is about an inch away and both of the large cooling hoses wrap around the bar and then shoot straight down. The electric fan sits on top of the radiator just forward of the sway bar and when the inverter sits in place it fits about 1/2" above the electric fan. Like I said, tight squeeze!

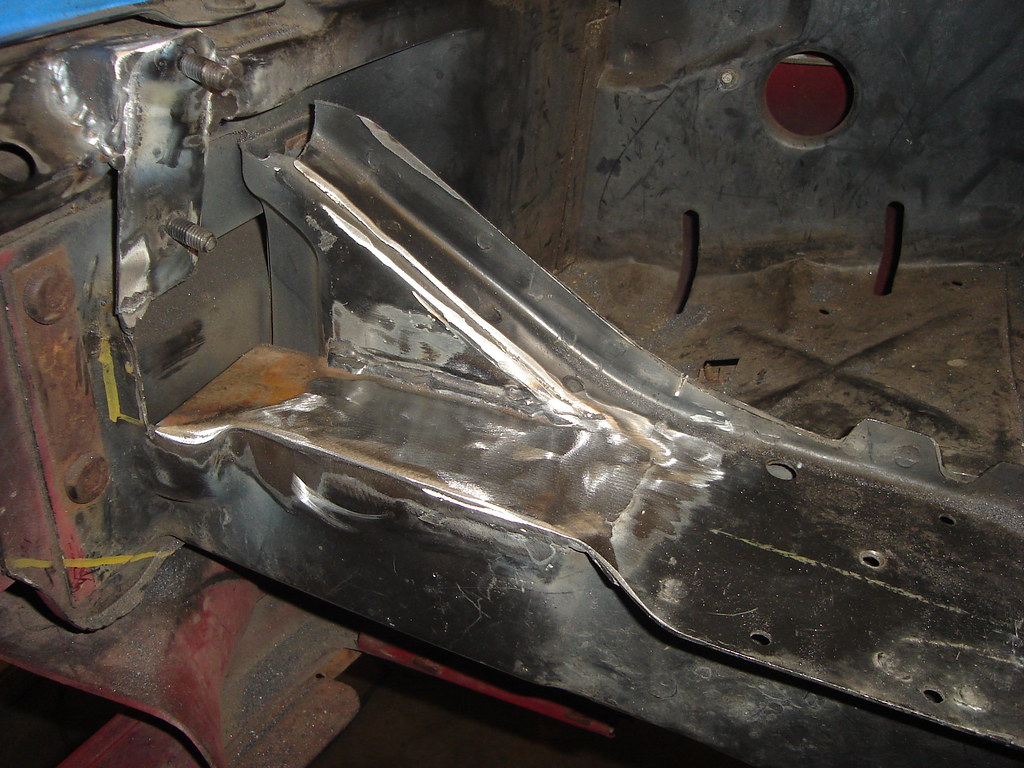
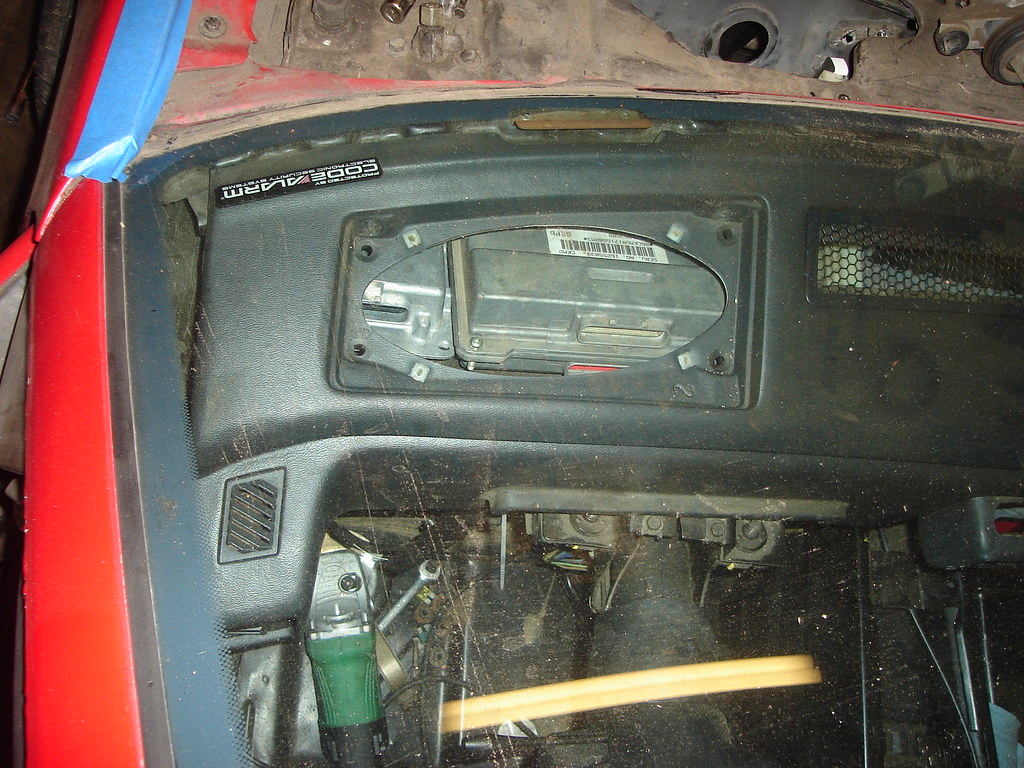
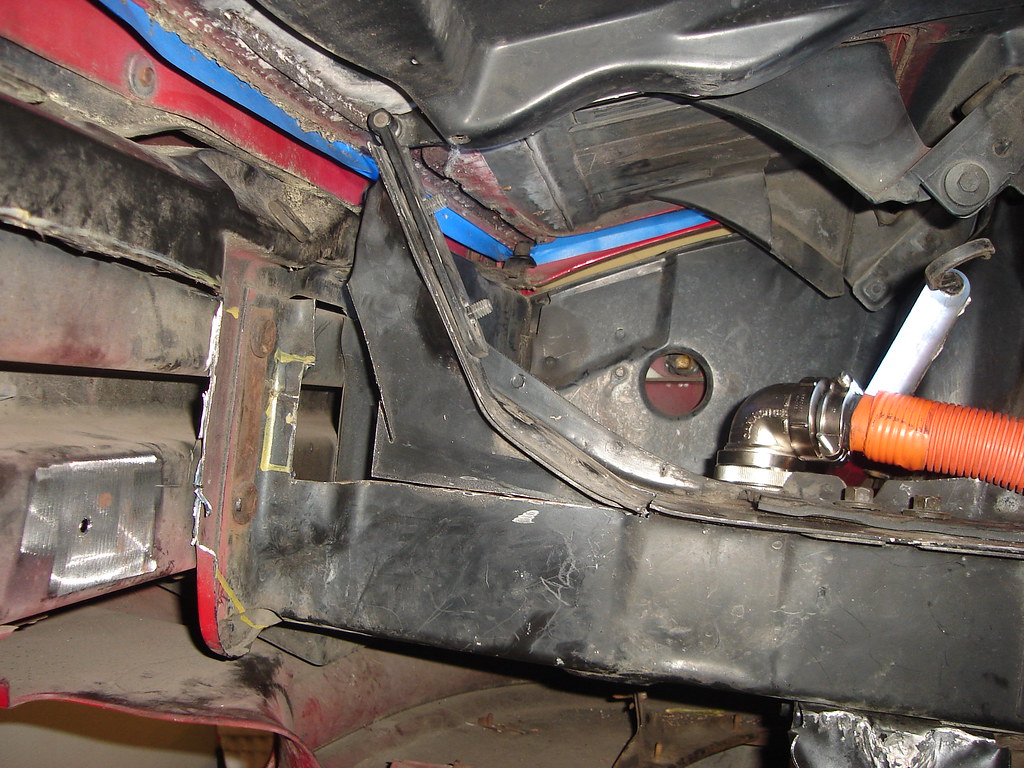
Once the sway bar stuff was finished up, then I moved on to the hood mounts. This is a shot from where the radiator would normally be. You can see the hood on top, and the hinge leads down to some sheet metal that I cut out. I had to cut this out to fit the inverter between the bumper and the motor without modifying the hood.

I seperated the original stud plate that the hood hinge mounted to and trimmed it to be very small. Then, with the hood in place and the hinges bolted to the hood so the pivot would be in the proper spot, I tack welded the stud plate to the chassis. This is where it ended up:

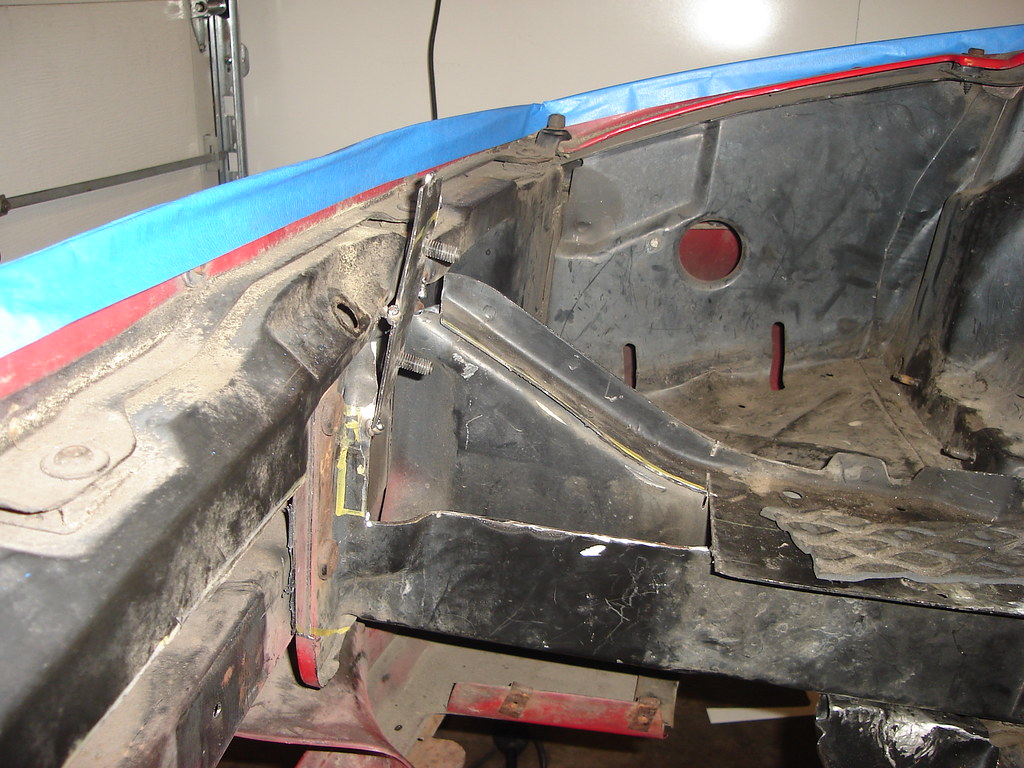
This allows me to use the stock hood, hinges, latch, release, and even have the same adjustability as the stock setup. Tomorrow I'll add some reinforcement to the new stud plate setup and finish weld it, box in the area that I had to cut out for inverter clearance, and reinstall the inverter for a test fit with the new metal in place.

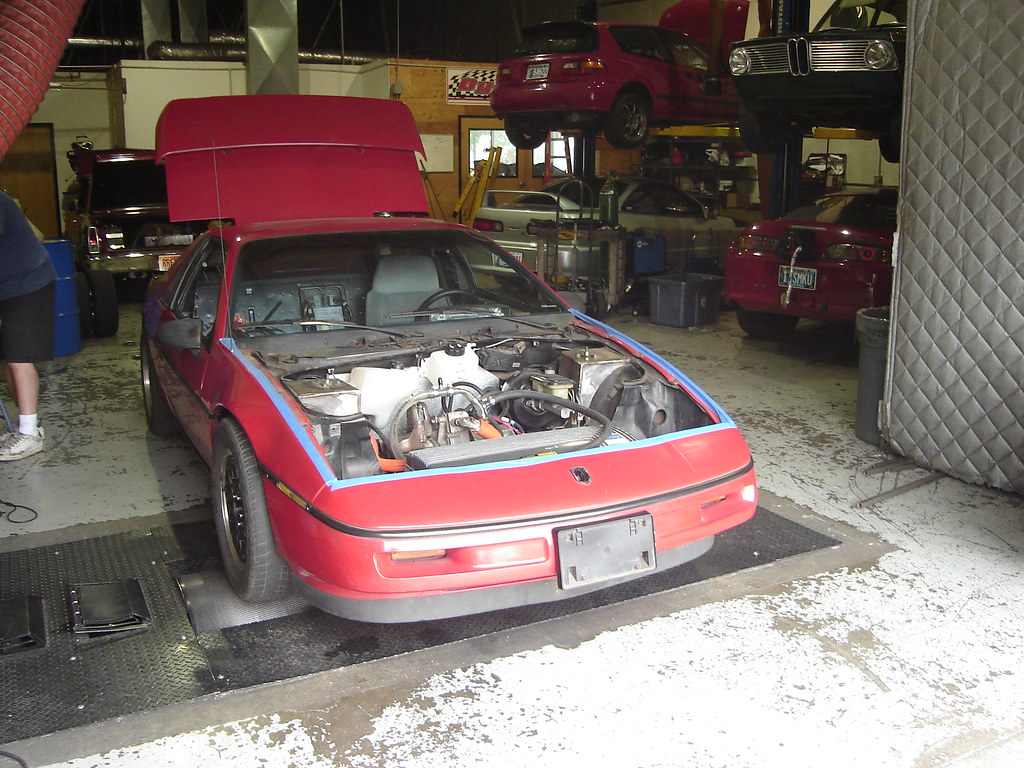
I'm pretty happy with how things are shaping up. I was thinking I should show how some of this stuff goes together because once it's all finally assembled, it will be nearly impossible to see everything that's going on. Of course, in the name of making it look factory, I guess that's a good thing.

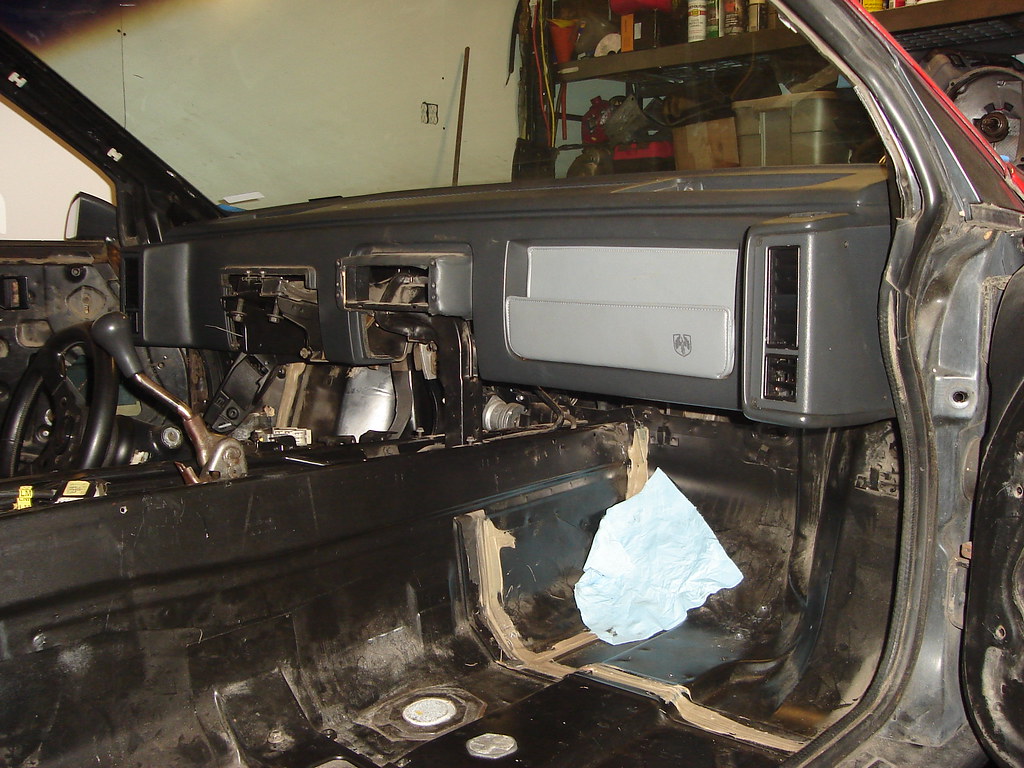
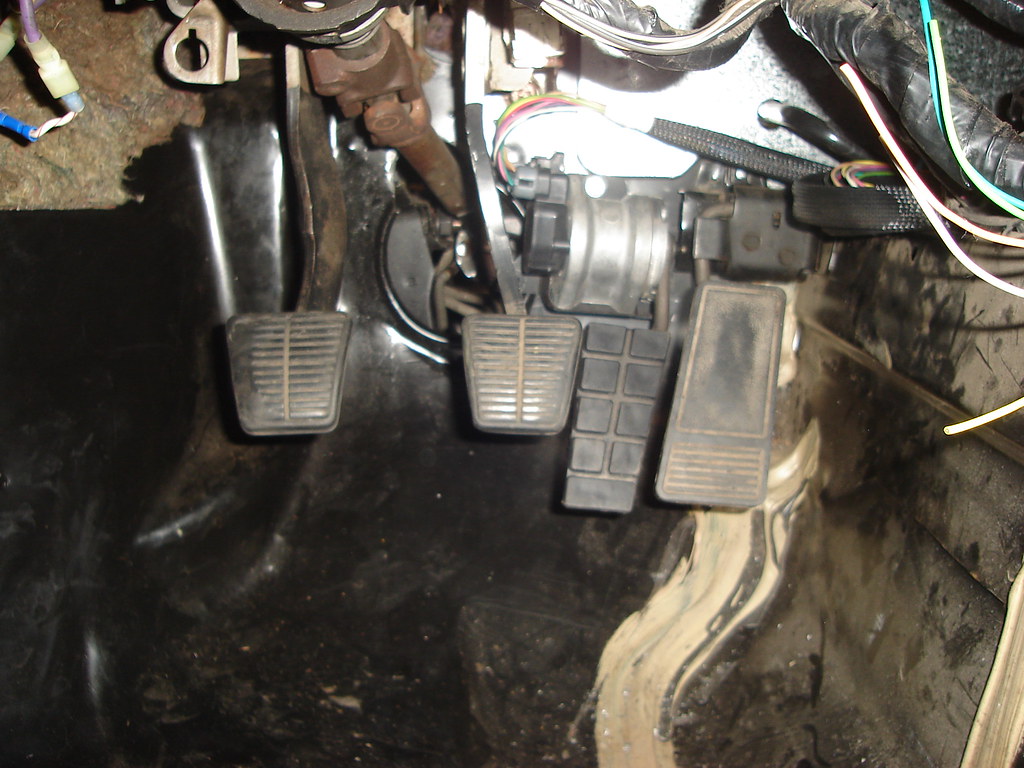
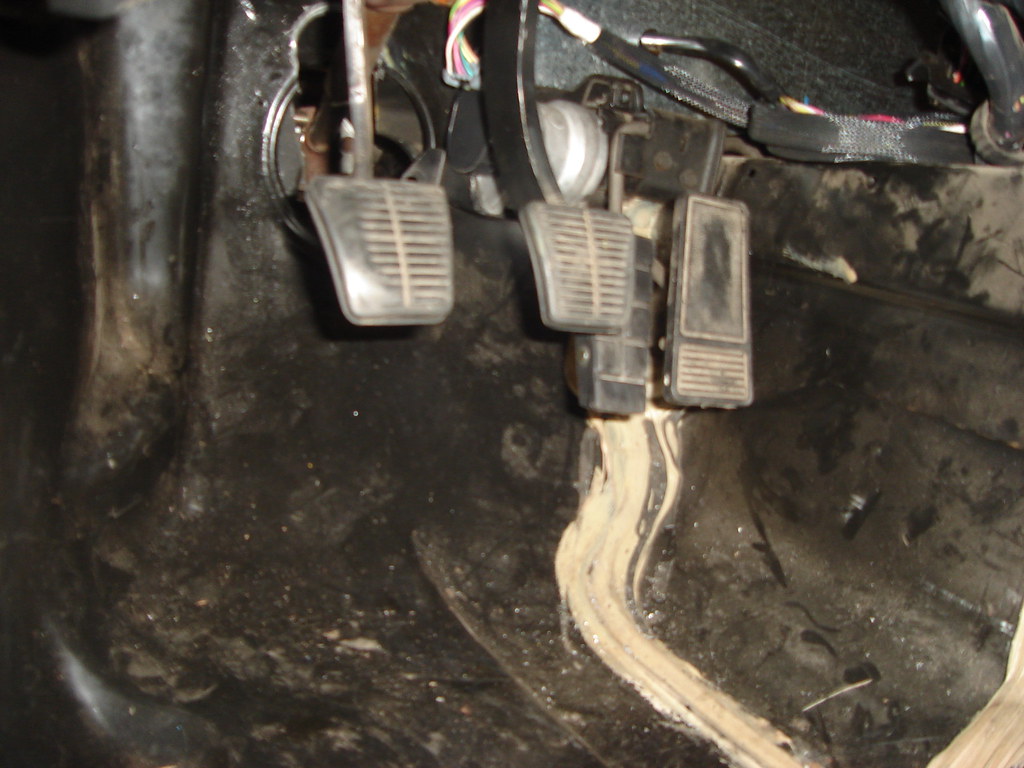
Oh yeah, one more thing. I said I would take pictures of the current throttle pedal setup. Here's how it looks currently, it's been really handy having the pedals independent while I do test drives (sorry for the blurry pictures).

Bryce

Nashco
Nashco SuperDork
8/6/09 4:28 a.m.
Tyler H wrote: How about using the clutch interlock switch and a circuit to interrupt the EV electronic throttle, if the clutch is depressed fully and the vehicle speed is zero? That way the EV engine is idle at launch until you come off the clutch, but can continue to pull through gear changes.

This is possible, with a good enough circuit, but a little more complex to execute than simple switches. There are three throttle pedal sensors, all different, and if they change out of sync with each other or too fast (such as a basic circuit interrupt would do) then the computer says no and disables propulsion. The three sensors are no biggie when you use the GM electric pedal...but when you try to get sly the computer doesn't like it. Like I said, with a clever bit of electrical work it could be done, but I won't have time to do anything that fancy before the challenge. Unless you're volunteering, in which case I'll take any help I can get.

subtle_driver wrote: that is an amazing build! You are going to the west coast 2009 challenge in Barona am i right? I can't wait to see this car!

Yup, if all goes well I'll see you at Barona.

Bryce

Nashco
Nashco SuperDork
8/7/09 12:15 a.m.
jj wrote: You know, based on those pictures of the throttles, it looks like you could bring up the revs with the outside of your foot rolled to one side. Then just flatten them when you launch. Might take practice, but it would be easier than trying to wire some fancy stuff.

That's what I've been doing so far. Like I said, it's been pretty handy. This setup definitely has its merits, but I wouldn't dare say Joe Public could hop in the car and know what to do with four pedals.

Bryce

Nashco
Nashco SuperDork
8/7/09 3:52 a.m.

Almost done with the metal fab work under the hood, which will be a great milestone for me. Aaron came over again today and helped, having a helping hand really helps progress move along quickly. The strut towers are now fully boxed and ready for a coat of paint:

The hood hinge attachment stud plates have been welded in, and the cutout for the old hinge support has been filled in. After things are painted and everything is fully assembled, you'd never know we were here (if I didn't show you). This picture isn't the greatest, since shiny metal and low light don't work out, but you get the idea if you compare to the shot above.

Lots of cardboard templates, cutting, grinding, welding, grinding, welding, and grinding, but it's really starting to shape up under the hood. It's not rocket science...actually, now that I've had plenty of practice, this stuff is now becoming a pretty simple task, just tedious. Tomorrow everything has to be reassembled and some new high voltage wiring needs to be installed so I can add the third battery pack to the car for testing on Saturday morning.

Bryce

Nashco
Nashco SuperDork
8/8/09 9:30 p.m.

Today I put the front end of the Fiero on a chassis dyno thanks to my buddy Brian. Long story short, it looks like I'll have to use all three of the battery packs I have to put this motor up front to good use. The torque curve with these thoroughly abused packs on the electric motor is pretty funny looking...it looks like a playground slide. Gobs of torque almost immediately, then power slowly drops off (as the battery voltage sags).

After running it on the dyno, I drove it around a bit with the three packs instead of two. It's even more fun.

Bryce

MrJoshua
MrJoshua SuperDork
8/8/09 9:34 p.m.

arent those batts something like 6.5ah with a peak of arounf 125A?

Nashco
Nashco SuperDork
8/8/09 9:42 p.m.
MrJoshua wrote: arent those batts something like 6.5ah with a peak of arounf 125A?

Yeah, something like that.

Nashco
Nashco SuperDork
8/10/09 4:48 a.m.

So yesterday after the dyno testing, it became obvious that I needed all three Prius batteries that I've got. I was hoping I could get away with just two, oh well. Here's a picture of the Fiero on Brian's dyno...the idea of putting the Fiero's front wheels on the rollers still makes me giggle a little bit:

So, for a sense of perspective, here's how much battery needs to fit in the already crowded Fiero:

First things first, I gutted the wiring out of the interior. A heck of a lot of it won't be used anymore and some will be added for the EV stuff, so I pulled the interior wiring out. I'm always shocked at how heavy wiring harnesses are, but of course it is a LOT of copper. I reinstalled the dash pad, since we're required to keep the stock dash pad, and started measuring to see how the batteries might fit in behind them. Here's what I started with:

After a bit of eyeballing, it looked like I could fit a pair of battery packs behind the dash. However, like everything with this project, it wasn't going to be quite that easy. I had to cut out the drip tray. This is really thin sheet metal that is used for the HVAC inlet duct. There are two holes in the cowl that allow air in, a drain port on each side to let water out, and an air outlet port in the center that led to the HVAC fan inlet. Since I've ditched the HVAC, I was able to cut this out. I'll make some patch panels to fill the air inlet and water drain ports later so that the interior is completely closed off. I also had to hack out the steering column support that goes to the middle of the chassis. I'll rebuild the column support later with one that doesn't hit the batteries. This is what the stock metal looked like:

One down, two to go:

A second pack would almost fit on top of the first, but the right side wiper linkage was in the way. Easy fix, race cars only need a wiper on the left side anyway, right? Two down, one to go:

...and the moment of truth, the dash fit over the pair like a glove!

I was very happy to see how nicely those two will fit, but I still have a third battery to find a home for. I am currently debating two different locations. It would be really easy to stick the third behind the passenger seat, but of course that won't look factory and it will give the passenger a lot less leg room. I might be able to squeeze a pack under the hood, but it will definitely take a custom battery box (rather than re-using the Prius box). I really didn't think I could pack much more under the hood, but it sure would be slick if I could get this third battery pack under the hood. Here's the battery frame sans batteries:

The batteries themselves will fit, but I still have to figure out how I'll support the batteries, build a case, find a place to route cables, etc. I'm hoping to have battery packaging done by Tuesday night.

Bryce

HIDGolf
HIDGolf New Reader
8/10/09 9:46 a.m.

Wow, I'm always impressed how much room there is in the interior of a fiero!

Nashco
Nashco SuperDork
8/12/09 12:02 p.m.

Who decided days should only have 24 hours anyway? I could use some 36 hour days!

Yesterday I went to Jesse's house and got to be jealous of his cool machines. He's got a monster mill and he said he'd help me out with my project. When I started the project, I had a local machine shop machine my front knuckles but it cost me about $150. I planned on getting a membership at a local DIY machine shop called TechShop, but I've just been too dang busy. Jesse said he accepted GRM standard currency (beer!) in exchange for some time on his mill, so I brought another pair of knuckles to his place. He made me a heck of a deal, too...he didn't even want fancy beer:

Jesse helped set the stuff up on the mill, since I'm a bit of a rookie when it comes to machine work. Once everything was set up and all that was left was grunt work, he let me take over. I'm pretty sure this is the biggest machine I've ever operated.

...and the final product came out just like the expensive machine shop units. Jesse's beer was a massive $17, so in the end he helped me shave over $130 out of the budget. Sweet!

After getting back from Jesse's I got back at the battery packaging. Yesterday I did a bit more trimming on the drip tray and found a way to cram even more batteries behind the dash. The concept was sound and things measured out alright, so I had to start building up the battery packs to fill the spot I had cut out of the drip tray. The Prius packs have some compression rods that are used to keep the packs compressed when they heat up, so any time you change the pack size with this style of battery you have to change the compression rod length to match. This means I got to chop up a set of compression rods from one of the packs so that I could add them to the other two packs...lots of cutting, tapping, loctite, and assembly from here. This picture shows me assembling the big pack. You can get an idea of how big each NiMH module is, that's a 7.2V module in my hand. Each module is technically 6 1.2V cells, but like a 12V lead acid battery, they package them together in a group of 6. The module ends up being about the same size as a VHS cassette...remember those?

Once the modules are all stacked, they interlock with some guide pins to keep them properly aligned. Then the end plate goes on and the end bolts are run down and it compresses the whole pack. This keeps the plastic cases from flexing when the battery heats up, which would allow the plastic housing to crack and cause all sorts of bad stuff to happen. This is how big the "big" pack is..this is one and a half second gen Prius packs (42 modules) stacked on their end. That's one big pack! You can also see the color change on the rods where they meet (and are joined together with studs).

Once I built up the packs according to what my measurements and mock-up told me, I lifted those heavy pigs into the car to see how reality stacked up against theory. It all fits inside the passenger compartment!

Of course, I still have to have the dash board fit. In this shot you can see that I had a jackstand and a paper towel roll holding the battery packs up. The passenger seat will have full leg room, something I really didn't want to sacrifice. Here's 210 pounds of batteries all fit behind the dash board!

The last thing I did last night was try to figure out where I would put the EV controllers. I wanted to keep these close to the battery packs to minimize the wire runs, keep them inside the passenger compartment to keep them out of the elements, and of course still keep the leg room. After a little fooling around, I found that they'd tuck nicely between the steering column support and the left hand side of the car in close proximity to the battery packs.

Here's a shot from above showing how well the computers fit inside the dash, just below where the speaker used to be. Very cool!

Today I need to do a bunch of sheet metal work to get the batteries completely enclosed in metal boxes, which will be done mostly by reusing and modifying the Prius cases. Unfortunately, I only have two top sections for my three batteries because one was destroyed by the dufus who removed the pack from the wrecked Prius...so I'll probably have to do some pounding on some leftover HVAC duct material I got a hold of. Then there's mounting brackets for the packs to bolt to, a case for the contactors and pre-charge resistors, cutting all the high voltage wiring to length, redoing the low voltage wiring, etc. etc. etc. A hell of a lot of work still, and less than a week before I leave for San Diego.

Bryce

MrJoshua
MrJoshua SuperDork
8/12/09 12:11 p.m.

Go Bryce Go!

DILYSI Dave
DILYSI Dave SuperDork
8/12/09 12:29 p.m.

Holy E36 M3 dude. You're an animal.

blizazer
blizazer New Reader
8/12/09 12:39 p.m.
DILYSI Dave wrote: Holy E36 M3 dude. You're an animal.

x2. Amazing pace.

donalson
donalson SuperDork
8/12/09 12:44 p.m.

I hope you get some serious video when this is done :)

Nashco
Nashco SuperDork
8/12/09 3:26 p.m.
DILYSI Dave wrote: Holy E36 M3 dude. You're an animal.

Yes, a very, very tired animal. Like blizazer said, the pace has been incredible, it's been less than three months since I started. Jessica and I have been burning the 4 am oil lately and it's starting to take its toll. Fortunately a few friends have been helping out here and there, but I'm running out of steam and our deadline is rapidly approaching.

If any of you local guys are following this and had any interest in actually showing up and helping, now is the time to volunteer. There's some stuff that I could really use some grunt work to help out with. If you volunteer, then you get invited to the kegger I'm having this weekend to give the car a going away party. I'm not above using my beer and barbecue as a bribe.

Bryce

Nashco
Nashco SuperDork
8/19/09 6:40 p.m.

Haven't had time for updates. The good news is that we've made it to California and the car is still moving under its own power. We hope to be in San Diego tomorrow.

Bryce

P71
P71 GRM+ Memberand SuperDork
8/19/09 7:44 p.m.

Good luck Bryce!

Nashco
Nashco SuperDork
8/20/09 11:59 p.m.

Well, Jessica and I made it to San Diego in the Fiero under its own power...a feat in itself! Over all, the trip was quite uneventful. Unfortunately, we left late enough that we didn't have time to take the Pacific Coast Highway and instead stuck to I-5...I still have hopes that I might get some PCH under my belt on the way back. We took it pretty easy this afternoon after getting checked into our hotel...got a few parts for the last remaining touches before the drags tomorrow, got some food in our bellies, relaxed in the hot tub, and are now going to sleep EARLY for the first time in many, many weeks. The plan is to get up early, tackle our last remaining safety items, and continue detailing the car before the drags.

Bryce

MrJoshua
MrJoshua SuperDork
8/21/09 6:35 a.m.

You drove your challenge car to the event? I am even more impressed.

EricM
EricM HalfDork
8/21/09 8:20 a.m.

If this care doesn't win a ton of awards at the event I will have lost faith in all things GRM.

good work, I am seriously impressed!

Nashco
Nashco SuperDork
8/21/09 4:17 p.m.
MrJoshua wrote: You drove your challenge car to the event? I am even more impressed.

I don't build trailer queens! It sure does make it more difficult...

Bryce

MrJoshua
MrJoshua SuperDork
8/21/09 4:21 p.m.
Nashco wrote:
MrJoshua wrote: You drove your challenge car to the event? I am even more impressed.
I don't build trailer queens! It sure does make it more difficult... Bryce

Im just impressed that you modified that many things that recently and aren't having at least some minor issues.

1 ... 3 4 5 6 7 ... 16

You'll need to log in to post.

Our Preferred Partners
HKmAoYkhdO8xB9nq1QxtYgeO4Gy8BWX5bBi4MxWRBYuMeH63fDzfFwODGh0JBcbO