volvoclearinghouse
volvoclearinghouse UltimaDork
2/2/23 9:47 a.m.

In which after Christmas, I decided to learn the Art of SU Carburetor Overhaul.  I have an abundance of cores, all I had to do was wander out into the night, armed with my trusty red rechargeable LED light, a handful of spanners, pliers, and sockets, and open the hood of a parts car.  This irretrievably-weathered-looking set of HS6's was mounted on a seized engine.  They were complete, though, and unbolted easily.  So, back to the workshop they came.

NOHOME
NOHOME MegaDork
2/2/23 10:33 a.m.

As you may or may not know, throttle shaft wear is the bane of SU rebuilds. Any wiggle-movement is too much movement and will make it impossible to set up a proper idle and idle mixture.

Another good practice when dealing with SU carbs to to checks every mating flange on the carb body and manifold to make sure they are flat. Do the exhaust manifold while you are at it.

hobiercr
hobiercr GRM+ Memberand UltraDork
2/2/23 11:06 a.m.

Following! I just bought a couple of SU rebuilding books off of FBM as I need to do the same thing. These are the 2 I got.

SU book 1

SU book 2

Seller also had this one and I bought, too, even though I may already have it somewhere.

Haynes manual

I'm not getting to my builds anytime soon so if any of these would be helpful, LMK and I'd be happy to loan them out.

volvoclearinghouse
volvoclearinghouse UltimaDork
2/2/23 11:21 a.m.

In reply to NOHOME :

Good tips, thank you.  The first SU carburetor I ever encountered was about 21 years ago, when I bought my first 122 (which I nicknamed "The Green Turtle").  Since then I've played around with them a bit, piecing together knowledge both tribal and written.  I've seen throttle shafts worn to toothpicks at the bushes in the main body.  I haven't come across too many warpage issues on the hard parts, though from related experience on Holley carburetors that's something that's always possibly an issue with any thin section pot metal/ aluminum parts.  

Fortunately, the master SU kits I have include new throttle shafts and bushes.  

The reliability of the SU, paradoxically, has sort of been it's problem, in terms of really trying to learn it.  They just sort of always work, even if not optimally, so whenever I've had an issue usually just replacing/ recentering the jets and cleaning up the float bowl arrangement makes a roadworthy car again.  Since we're back to racing a Volvo 122 in LeMons again, though, I have a renewed interest in really putting together a well-tuned engine now.

To the carburettors now under examination, removal of the dry-rotted air cleaners revealed weathered, but complete, internals.  The pistons did not move, however, so some time in the de-gunking bath would be needed.

wspohn
wspohn SuperDork
2/2/23 12:03 p.m.

There is lots of SU knowledge out there, probably on Volvo boards and certainly on MG and Triumph boards so ask before doing anything dubious.

I owned a pair of these - would look good on the right engine.


NOHOME
NOHOME MegaDork
2/2/23 12:27 p.m.

The books are good. However, the parts we get are not always so. Floats and needle/seat assemblies have been problematic.

I have had Burlen needles that do not drop to allow more fuel into the bowl. Very hard to figure out.


This is a manifold flange after checking for flat. The carb body was worse.

As mentioned, the SU will run passably well with a lot of little stuff out of spec. They are a great carb if you can get the details sorted. 

Since I don't trust the parts in the floatbowl to be right, I always check the fuel level by pulling the choke all the way on and looking down the jet to make sure the fuel is just over the top of the retracted jet. ( done with the bell and piston removed)


I recently installed a wideband O2 sensor in the Molvo to help with tuning the Holley. I should have adopted this tool 30 years ago since it takes all the guesswork out of the game.

volvoclearinghouse
volvoclearinghouse UltimaDork
2/2/23 1:01 p.m.

In reply to NOHOME :

I've had sticky float valves, too.  Usually diagnosed by removing the float cover off after shutting down the engine and finding a dry bowl.  I like the Grosse float valves, they seem to work better and don't develop a ridge around the ball seat.

I've used a wideband in the past, and just invested in a new one.  We discussed it (as well as lots of other SU geekiness) here:

https://grassrootsmotorsports.com/forum/grm/wideband-oxygen-sensor-mounting/237734/page1/

I'll be trying out the nytrophyl floats in this SU overhaul.  Supposedly they cure a lot of the known issues with some of the older floats.  And they're not terribly pricey.  Moss motors carries a good selection of HS6 parts.  As for manuals, I have an old Haynes manual (written in the King's English) for the 122 that goes into strikingly good detail on the carburettors - including a good blow up drawing, tests, setting, etc.  I cheat a little too- as mentioned I have quite a few HS6's on hand, so I keep an assembled unit nearby for reference.  

I also only break down one carb (of the set of two) at a time, to prevent mixing up parts.  Some parts are RH / LH, while others (like the piston and it's pot) are non-interchangeable.


volvoclearinghouse
volvoclearinghouse UltimaDork
2/3/23 8:28 a.m.

There is order in chaos, I promise.

NOHOME
NOHOME MegaDork
2/3/23 9:48 a.m.

The way I find fuel level issues is to remove the bell and piston, and then use a small diameter tube to blow a puff of air directly into the jet. Just a quick puff right down the middle.

If there is fuel in the system, and it is adjusted correctly, the fuel will bob back up and juuuuuusssttt overflow into the carb throat. I do this with the pump running and the jet adjusted 12 flats down.

If fuel gushes into the carb throat the bowl is too high and if nothing comes out then you have an empty bowl  ( stuck needle) or very low fuel level in the bowl

At this point, I also do the check where with the choke pulled down the fuel level is just over the top of the retracted jet.. different way of doing the same check but since I am there anyways.


Another thing to be aware of is that the book method of testing for fuel mixture by raising the piston and listening for an RPM rise and/or fall does not seem to work consistently with today's fuels.  Hence the O2 sensor.

The other thing I have started doing with all my fueling systems is to use a smoke machine to look for leaks before I go down the rabbit hole. Not specific to SU carbs, but has saved my bacon a couple of times where I was at wits end trying to make something run smooth at idle.


SU carbs have really low fuel pressure requirements ( 2-3 psi?) and don't really like much above. A good fuel pressure gauge that can read low values is a good tool to have for this game. Not that easy to find.

Another fun thing to do is to check that both pistons drop at the same rate. John twist has a video in doing the piston-drop test.  Be aware that pistons are not interchangable side to side or carb to carb, or at least not cassually.


As for balancing duals, I find that the small tube and listening to each carb is as good as any other method.  If ambitious, you can make rods that go in the oil ports and verify that balance is maintained over the rpm range. 

volvoclearinghouse
volvoclearinghouse UltimaDork
2/5/23 10:28 p.m.

Before installing a freshly overhauled set of carbs, I decided to pop in the AFR gauge and get a baseline for what the old carbs were doing. I welded in the bung into the X pipe as discussed, mounted the gauge, and wired it all up. The gauge powered up and after going through a quick initializing sequence showed "--" with the engine off, with the little colored band pegged in the lean position. Which makes sense. 

After firing the engine up, though, and letting it idle for a minute, the gauge still read "--".  I wasn't sure what was going on, but blipping the throttle got it to read something, so I figured maybe the idle was just super lean. I wound out the mixture screws and finally got a reading out of the gauge. 

Blipping the throttle made it go richer, in the 14-15 region (this is just sitting still, in neutral). After a few minutes, though, the gauge started to read "--" again, and wouldn't change no matter what I did. I shut the engine off, checked all the connections, checked the sensor, etc. Everything looked fine. 

Here's the bung and sensor. 

And the gauge. 

I read the manual through several times, checked everything, nada. I even tried backing out the mixture nuts on the carbs until it was clearly running very rich, but the gauge stayed pegged at the lean mark. 

???

NOHOME
NOHOME MegaDork
2/5/23 10:53 p.m.

I learned the hard way when being abused by the Fitech that O2 sensors do not tolerate any exhaust leaks ahead of the sensor. To the point where I would pressurize the exhaust with the shop vac and do a bubble test of the header and flanges. 

volvoclearinghouse
volvoclearinghouse UltimaDork
2/6/23 8:57 a.m.

In reply to NOHOME :

I understand that, but that doesn't seem to explain why it worked at first (worked as in, it showed readings when revved, and I was able to richen up the idle to get it to show something) and then stopped.  

NOHOME
NOHOME MegaDork
2/6/23 9:08 a.m.

In reply to volvoclearinghouse :

Was reading extremly lean at 17:1. Dont see where an engine would run that lean. It did respond by going richer when accelerating so that means it is doing its job and so is the carb. 

It might be that with enough air leaking in it goes off scale?


volvoclearinghouse
volvoclearinghouse UltimaDork
2/6/23 9:18 a.m.
NOHOME said:

In reply to volvoclearinghouse :

Was reading extremly lean at 17:1. Dont see where an engine would run that lean. It did respond by going richer when accelerating so that means it is doing its job and so is the carb. 

It might be that with enough air leaking in it goes off scale?


But then it stopped going richer when accelerating, no matter what I tried (Even with pushing the carb pistons up to enrich the mixture).  The exhaust is pretty tight, all welded joints except where the X-pipe is clamped to the input pipes, and the manifold-head was freshly cleaned and re-gasketted (with copper hi-temp gasket sealant) within the past year.    

I'm going to pull the sensor tonight, and check the connections.  I've read they're pretty sensitive to being properly grounded, though I did give it its own dedicated grounding lug on the firewall and all the battery cables are fresh.  

volvoclearinghouse
volvoclearinghouse UltimaDork
2/6/23 7:36 p.m.

Pulled the O2 sensor this afternoon:

Looks fine, didn't see any damage.  I wiped the carbon deposits off with a dry paper towel and screwed it back in. 

Here's the part numbers on the sensor cable:

Checked all the connections again. Hard wired in a new ground direct to the battery. Tightened the battery cable. 

Checked the exhaust. No leaks that I could see.  I checked every weld, and every bolted joint, and the two clamps. Not a trace of carbon deposits or anything that would indicate a leak. 

Fired the engine up, and the gauge still didn't display anything besides "--".

So...I'm still stumped. I always hate to blame a defect in the part, but that's about all I can think of. I emailed AEM tech support, we'll see if they have any suggestions  

volvoclearinghouse
volvoclearinghouse UltimaDork
2/7/23 11:22 a.m.

Well, bouncing off the AFR Gauge till we get that sorted out...let's see how the SU carb overhaul is progressing.

I found having multiple Dremel tools is very handy.  One is chucked with a large brass brush, for cleaning aluminum, one has steel brush for cleaning steel parts, and one has a long flexible extension with a small brash brush, for cleaning tiny areas - such as the cavities at the bottom of the float bowl - and inside threads and holes.

Everything is shining up quite nicely.

And, I have paid my Skinner's Union dues.

volvoclearinghouse
volvoclearinghouse UltimaDork
2/10/23 12:11 p.m.

After some conversations with AEM, it looks like I have a bad O2 sensor.  The rep said it's not a common failure (at least, not as common as the internets make it sound) but they have been seeing about a 2% failure rate on these.  Which still seems abominably high...but, I guess that's modern low-bidder electornics.  Even from Bosch.  

He asked that I "destroy" the sensor as such, send them a picture, and they'd post me out a new one.

Back to more RELIABLE components...I completed the overhaul on the set of SU's.  Pretty happy with how these turned out.  I completely disassembled them and cleaned all the hard parts.  I checked the pistons and dashpots for fit and binding, and made sure the pistons slid up and down smoothly the entire length of their travel.  I checked the needles for straightness.  I may modify/ change the needles (They are "SM" needles currently, which was stock for most Amazons.  I've read that the "KD" [I think] needles run a bit richer and better with hopped up engines in racing situations)

All new:

  • Float bowl gaskets
  • Floats (nitrophyl, from Moss Motors)
  • Float valves (Grosse type)
  • Throttle shafts - had to drill for the actuators to be pinned
  • Throttle plates and locking screws
  • Jets, with hoses

I checked the throttle shafts in the carburettor bodies, and they spun freely, with no wobble or other play.  I lubed them (and all the other moving parts) with a light coating of lithium grease.  

All told, I have probably 10 to 12 hours into these:

volvoclearinghouse
volvoclearinghouse UltimaDork
2/21/23 9:56 a.m.

This forum thread started off at a weird place.  And it was a continuation of another, separate thread about AFR gauges.  Rather than add to the confusion by starting off another thread, let's just begin...back at the beginning.

We started racing LeMons back in 2008...

Whoa.  That's...really the beginning.  How about a little less beginning?  

How about maybe ~2 years ago?  Better?  Better.  OK, back around June of 2021 I started building this car.  It originally looked like this:


Amazingly, with an undead battery and a radiator catch can full of fuel routed to the carburetors, a little air in the tires, and a new clutch slave cylinder, it drove out of the shed under its own motivation.


volvoclearinghouse
volvoclearinghouse UltimaDork
2/24/23 9:33 a.m.

Since we already had a viable LeMons car in Plymford, the temptation to rush the job on the Amazon was less.  The plan was to strip the car down to a bare chassis, fix the structural rust, and then put back on only those bits needed to make the Volvo go, stop, and turn.  

Despite it's outward appearance, with everything unbolted from the chassis, the remaining shell was surprisingly intact.  

Small children wonder how their father will ever make this vaguely car-shaped hulk of sixties Swedish steel race.


volvoclearinghouse
volvoclearinghouse UltimaDork
2/27/23 1:32 p.m.

Rather than slog through a blow-by-blow of every nut, bolt and weld joint of this nearly 2-year-long ordeal (which might be therapeutic, but might also induce a bit of tedium...), the goal is to outline steps of significance, and areas where I diverged from Volvo's original design intent.  Here we go.

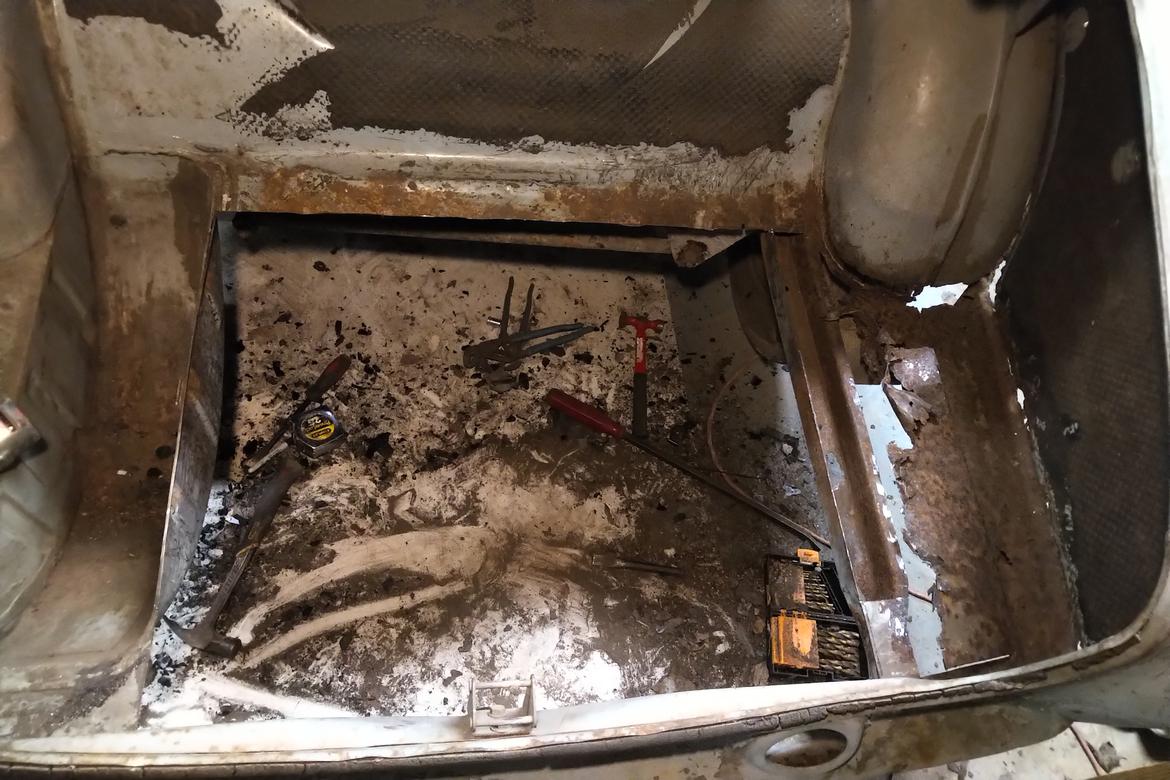
While relatively solid, as 50 year old cars go, as you might imagine there was still some non-trivial amount of corrosion to contend with.  As 50 year old cars bought for LeMons sums of money tend to go.  Stuff like the driver's floor, underbody/ unibody structure, and trunk floor all needed some care.  In the case of the latter, since the goal for this was to create a racecar, the OEM gas tank was pitched in the recycling bin, and the trunkfloor completely redone for a fuel cell.  After removing the cruddy, leaky, stinky old tank (which protrudes through the trunk floor in a totally unsafe way, like many cars of this period), I cut out the majority of the trunk floor.

My shop is what I would call "moderately equipped", in that it possesses most of the tools one might desire to perform most tasks.  The key modifier being "most", and the key concept being "perform".  What that all boils down to is that the ideal tools to perform tasks as expediently and well as possible do not, in fact, always exist.  Like, for example, metal bending and forming.  Where a "well-equipped" shop would contain breaks and shears and English Wheels and all other manner of expensive and real-estate consuming apparatus, in my 18' x 27' lair those are replaced with:

1) A multipurpose steel workbench, quite heavy

2) Clamps, vice grips, mallets, and other instruments of general use.

In my defense, such tools are generally used to somewhat acceptable effect:

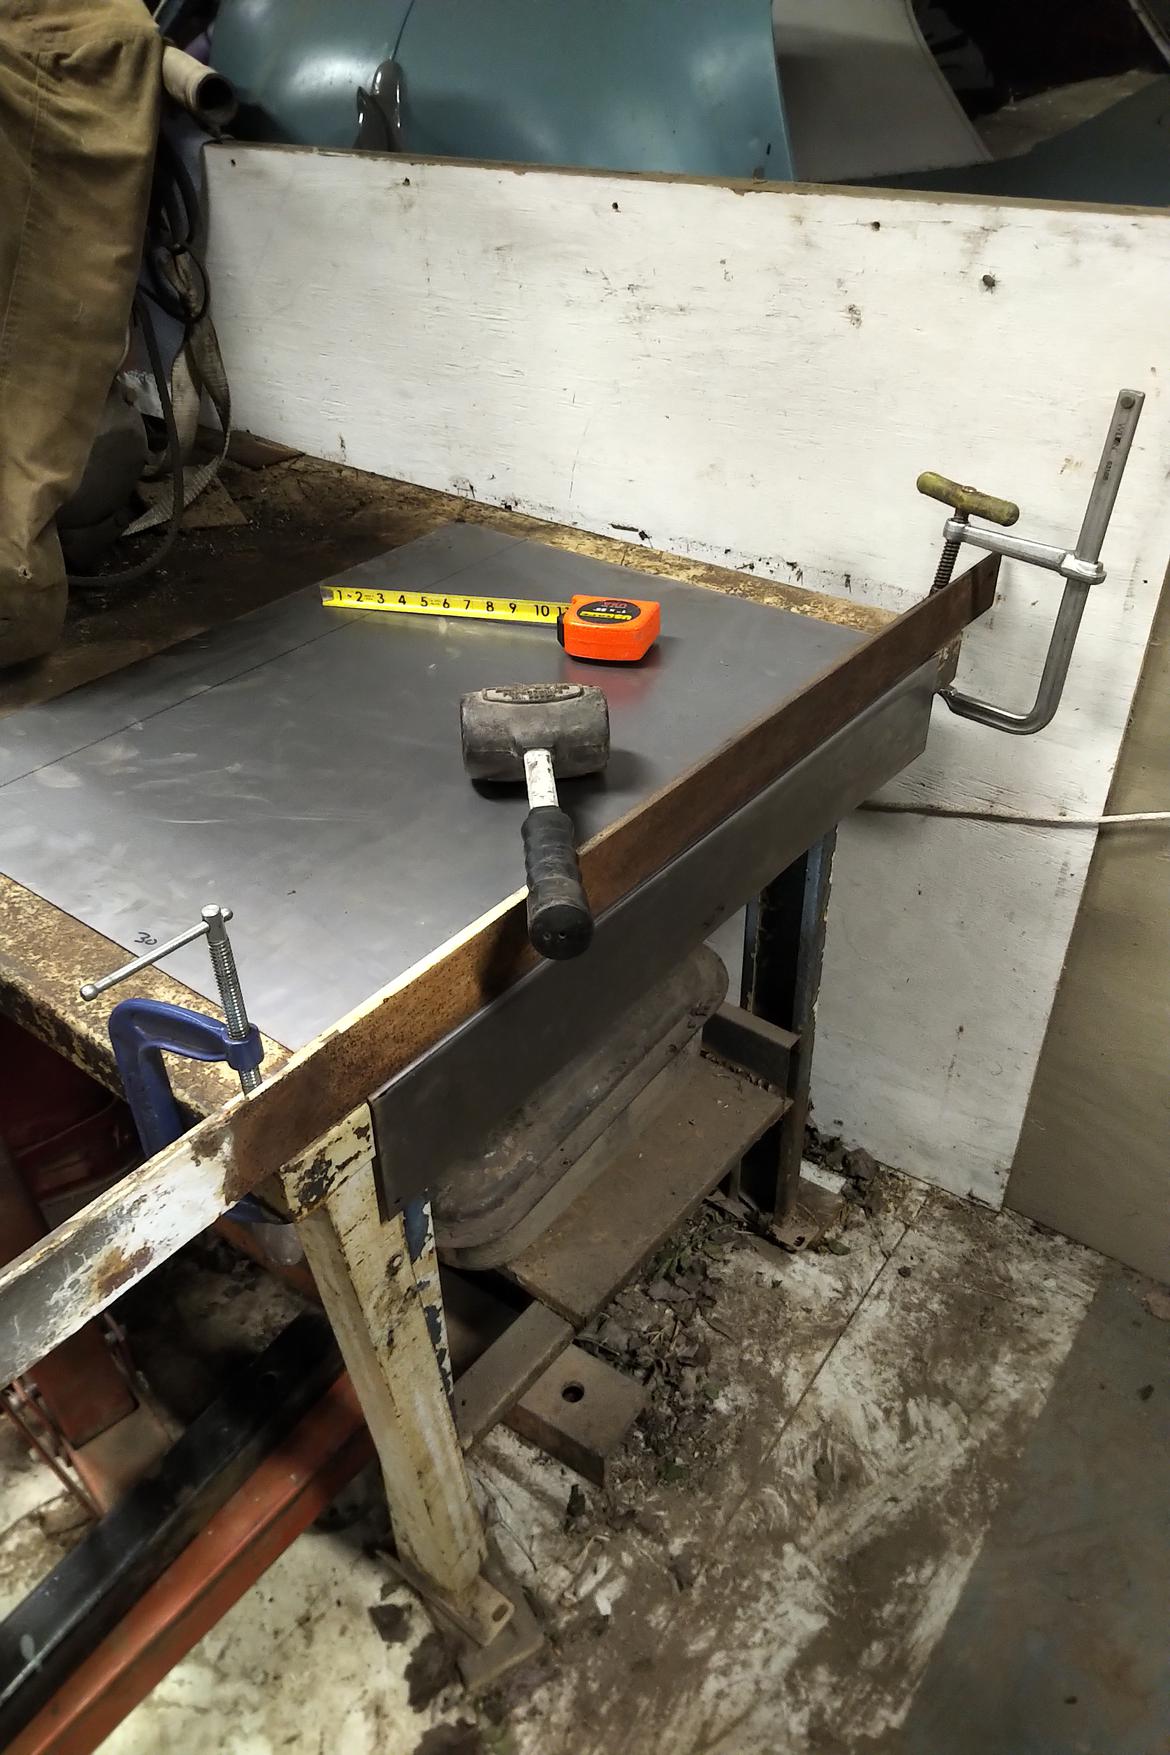
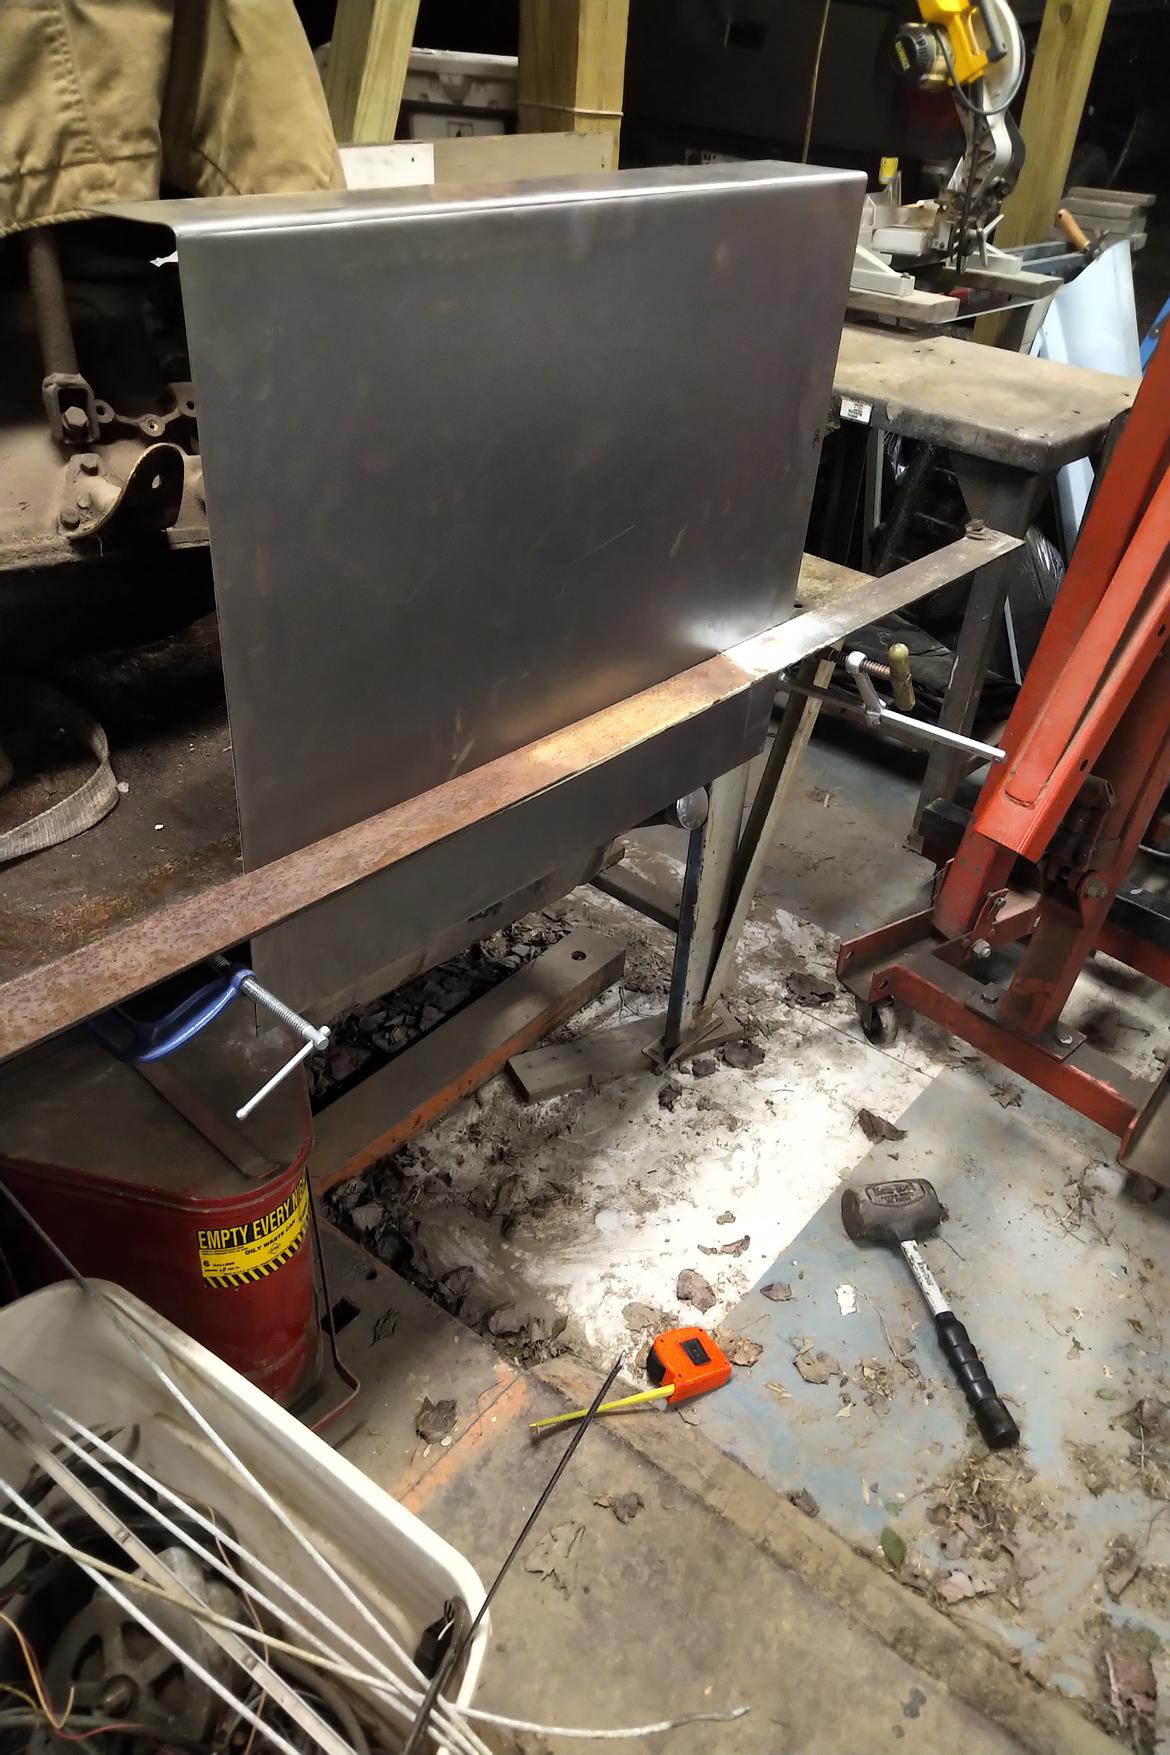
That giant steel workbench (It measures approximately 3' x 6') was salvaged from a place I used to work at, for the princely sum of twenty dollars.  Angle iron makes a great break clamp.

Plenty of measuring, bending, cutting and tack-welding yielded encouraging results:

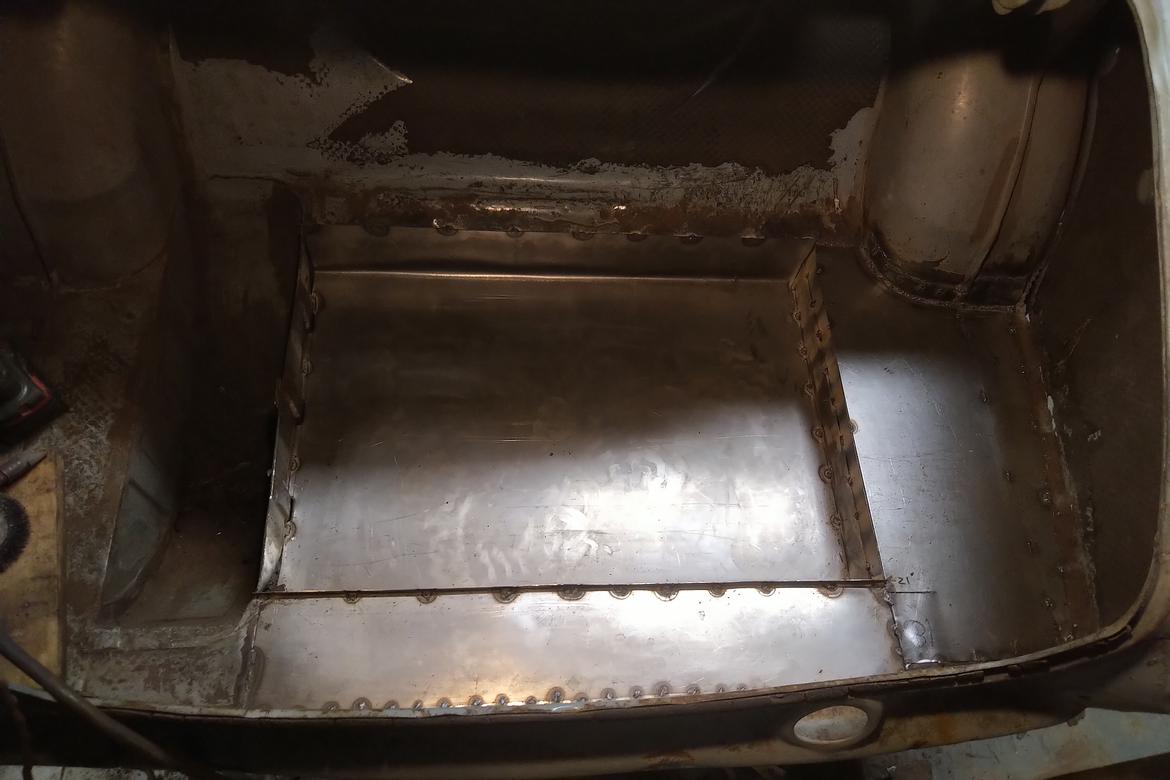
The trunk floor is dropped down about 4" where the fuel cell will ultimately sit, thus lowering the center of gravity of the tank and providing enough area to fit a tank with more volume than stock (good for endurance racing, where fuel stops are a time wasting annoyance).  It also provides a significant level of protection over the stock fuel bomb.  The eagle-eyed observer will note that I took the time to correct all the little bits of rust perforation here, including the edges of the wheel wells and the sides of the trunk floor.  I also drilled out the spot welds and removed the brace for the trunklid catch; it was badly mangled and will be replaced with better reinforcing and trunk latch mounting.  


volvoclearinghouse
volvoclearinghouse UltimaDork
3/2/23 8:39 a.m.

The firewall and where the firewall meets with the passenger side inner fender (and lower fender...and floor...and unibody) was rusted through pretty badly.  This is, unfortunately, fairly typical. as the battery lives in a little cubby shelf right there.  As this picture (shameless borrowed from the world wide web) shows:

Volvo 122S Engine | Barn Finds

While repairing the rest of the OEM sheetmetal, since the plan was to relocate the battery further aft in the chassis, I decided to simplify the firewall thusly:

The plan was also to have a lift-off hood, eliminating the hinges, so the mounting points for the hood hinges all went away as well.  

Not sure why that engine is hovering nearby, It's not time to install it yet!  Perhaps I'd just pulled it out, while doing the firewall repair & modification.  

volvoclearinghouse
volvoclearinghouse UltimaDork
3/7/23 9:17 a.m.

A lot more sheet metal work was done on the car, most of it repair and not necessarily modification.  The 122's shell was pretty solid, but it had some of the usual 122 rust everywhere 122's usually rust.  (is that like wood chucks and chucking wood?)

On another topic, the Amazon's stock brakes are pretty decent for it's vintage, with 3 piston front calipers and drums out back.  But for endurance racing, I wanted more.  Probably what I had planned was a bit overkill, but having suffered through brake issues as a race before, I'd rather have reserve than be deficient.  I'd done some research and found the rotors from a '94 through '96 Grand Marquis looked like they could be made to work fairly easily, and obviously those rotors for that gigantic car would be plenty for a vehicle weighing about half as much.  

I decided to tackle the rears first.  I sliced off the backing plates around where they bolt to the rear axle, leaving a backing plate in tact to retain the seal and bearing.  The remainder of the rear brake, that will be scrap-binned:

And the axle end, with the seal.

I really like the GM metric calipers.  They're single piston sliders, they're cheap, they work well, and they're available in a variety of piston sizes to tune brake balance.  Plus, pads of all sorts are readily available for them.  And, the mounting brackets are $13 and weld onto the axle tube.

To align the brackets, I installed the rotor on the axle, mounted a caliper to the bracket, loaded in some brake pads, and applied shop air tot he caliper to clamp the pads to the rotor.  Then weld the bracket in place.

I had some grinding and hole-making to do, to provide clearance for the axle seal housing to bolt to the axle tube.  The final product came out pretty well, though (my booger welds notwithstanding).  2 rear caliper brackets, done!

volvoclearinghouse
volvoclearinghouse UltimaDork
3/8/23 12:44 p.m.

In order to mount the IPD front sway bar (which is a good bit stiffer than the OEM Volvo stick) the bottom of the front unibody rails needs to be modified for the new attachment points.  

The view from down here:

The plates have nuts welded to the back of them, inside the rail, to allow for one-tool installation and removal of the bars.  I did the same thing in repairing the fornt bumper mounts, though those are basically as the factory did them.

While on the subject of front suspension, the upper A-arm geometry on the Amazon's IFS is notoriously high.  I calculated the static roll center and it's something like...underground.  To raise it up a little, and reduce the tendency to understeer, I lowered the upper A arm pick-up point on the crossmember.

Stock:

The mod in the works:

Done, with the old position filled in with a plate.  I also added new nuts welded on the back of the threaded plate, to provide more engagement for the upper A-arm bolts.  I've had them back out or strip the threads under competition use.  

I welded on a few more reinforcements to the lower A-arm pick up points and the upper shock mounts, then cleaned it all up with a pressure washer and shot it with some light gray paint.

As an aside, note the progress on the new garage going up around the project Volvo.  

I like the light grey paint; in the locomotive world where I work for my regular job, there's a color we used called 'Suede Gray', that they paint a lot of the engine rooms and cab interiors.  It's a nice, neutral color that's light enough (without being white) to improve serviceability.  And so, the entire engine bay went gray as well, after all the weld repairs were complete.

volvoclearinghouse
volvoclearinghouse UltimaDork
3/17/23 7:59 a.m.

To upgrade the front brakes, I wanted to use the same rotors ('95 Ford LTD) on the front as I'd used on the backs.  The reason I chose these calipers was the hat distance, bolt pattern, stud hole, and thickness would play nicely with the rest of the Volvo's suspension geometry and the GM metric calipers I planned to use.    These caliper brackets are about a dozen dollareedoos online, and you pretty much just cut and weld them to make work with what you've got.

Clamp using air pressure, and weld in place with a caliper and pads installed, for perfect alignment every time!

Front brakes!  Easy as 3.1415926535...

The caliper bracket on the OEM Amazon brakes bolts onto the front spindle, as does the steering arm, which makes modifications relatively easy, and reversible.  The studs shown are stock Volvo wheel studs; they're clearly not long enough and too small in diameter to engage the rotor properly.  Luckily, there's thousands of different wheel stud designs out there, courtesy every other OEM on the planet.  Something will work.  

I picture of the setup on the bench, sans disc:

You'll need to log in to post.

Our Preferred Partners
oepA21x96O6yn6bryXSyVSriMTnZJySIl6iJ6etJG6qc2oyLOuY6428KxqCcapB8