


In reply to Keith Tanner:
True. They can take up a lot of real estate if you have much more than a simple system.

In reply to Keith Tanner:
True. They can take up a lot of real estate if you have much more than a simple system.

I recently wired a car using a harness from Ron Francis Wiring. They are here: http://www.ronfrancis.com/ They have a seris thats called Bare Bonz that can be purchased with limited circuits. Before buying I called for their recomendations and they were very helpful and really didn't try to sell me more then I needed. All the components, panel, wires, switches were high quality and came with good instuctions. When I had a problem (never wired a car before) I called and they worked me through the fix very patiently.
Ive rewired two cars (65 Mustang, 80 Camaro) with Painless harnesses and it was pretty painless.
Their instructions are a little odd, and there always has to be some trickery going on. I usually pitch the instructions and just use the schematic they provide along with a schematic of the car its being installed in. The wiring is standard GM on the streetrod harnesses, but it doesnt matter. Its very generic and both the Mustang and Camaro needed some mods to make it work in the car. An 80 Camaro seems to be what it should be based on, but there were some differences with the tail lights and 3rd brake light.
I will first mount the fuse block, keep in mind the Painless fuse block is a lot larger than factory fuse blocks of old muscle cars so you may have to add a bracket or drill some stuff or mount it in a non stock location.
Then I will look at the car and determine how I want to run the wiring. I will usually copy the factory routing the best I can, with one leg of the wiring going down the drivers side inner fender, another leg running along the firewall, another leg going out onto the engine with a split around the brake booster. The wiring down the drivers fender has all the lights, horn, any indicators or items mounted on the firewall. The engine wiring will have distributor/tach, alternator, starter, sensors, etc. Since both cars were carbed, there were not a lot of wires to run on the engine. The firewall run will have the wipers, maybe an ignition box, maybe a remote mounted fuel or oil pressure sensor, based on what is mounted to the firewall. Under the dash is the same thing, with one branch going to the gauge cluster, switches near the gauge cluster, ignition and another branch going to HVAC and anything else in the center console area. Another branch will run along the drivers door jam to the rear of the car.
Then I will separate the wires with zipties based on where they go about every foot or foot and a half, and pull the wires and coil them by the items they terminate at. Sometimes you will have to add a wire or two to the harness, for example with an externally regulated alternator. All the wires in the Painless harness go to the fusebox, so if you have two components interconnected, you need to run those wires yourself.
Then start at the closest item to the fusebox on each branch and work your way around the car to the furthest item, terminating them and tieing up the harness, using OEM tie up points if possible. For example on the innner front fender it was brake switch, then voltage regulator, then drivers side headlight and marker light, then horn, then passenger side headlight and marker light.
Once all the wiring is run and terminated, I will function check then install a ziptie every 6" on all branches, then loom and secure. I dont like electrical tape, because the bad stuff is awful and even the good stuff gets sticky.
The Mustang was rewired just to get it driving in preparation of other upgrades, so for the time being I took all the power window and stereo wiring and coiled it up loosely and placed it under the passenger side carpet, then pulled the fuses for the circuits I was not using at the time.
I always save the scraps and unused connectors for making jumpers, fixes, add-ons, etc. Painless uses really nice wire in their kits, or at least they did.
Short notes...
Lay everything out before terminating anything.
Dont be afraid to add wires to a prebuilt kit.
Dont be afraid to change it up once or twice.
Function check before final looming and tie-up.
Function check as you go along. All the lights wired? Check the lights. Engine wired? give it a crank. Gauges wired? Lets see if they work.

i like EZwire brand universal harnesses. it's almost not worth building my own, although i might do it for the plymouth - ignition, alternator, lights, cooling fan, and some solenoids is about all i need.

OK this may be a silly question but why do you "need" to rewire/wire the car; When we first converted the Datsun all I did was simply leave the wiring in place. Over the course of time I simply pulled out the the unused portions of the stock harness. Also where ever possible I used existing circuits for senders and gauges etc. The car has been a dedicated race car for the last 25 years. I've had two electrical problems, the master kill switch (after 20 years) and the grommet where the harness passes through the firewall (original circa 1972) split and resulted in a chaffed wire that caused a miss........quickly sorted. Don't get me wrong, having had a couple of single seaters I've done up a harness but if you don't need to why not leave it be? Due note I pound over the curbs mercilessly and I would not consider the Datsun wiring harness high end and haven't had issues.
Tom

In reply to Tom1200: Rewired the 86 Rustang Challenge car, old harness 26lbs, new harness less than 2lbs
Old harness, scotch locks everywhere, new harness, all connections are soldered.
Old Harness, crusty small gauge wire, New Harness, fresh heavy gauge wire
I used an eBay 8 fuse basic wiring loom available new for cheap

Keith Tanner wrote: If you do use computer connectors, make sure they can handle the power of your circuits. Fine for sensors, maybe not so much for headlights.
Good point...you want to get the type with solid pins rather than the type with "shell" pins that can only handle about 5A. Even so the solid pins can only handle about 15-20A, so you might need bigger connectors for things like headlights and radiator fans.
Tom1200 wrote: OK this may be a silly question but why do you "need" to rewire/wire the car
because most of the stuff i build is old enough that the factory cloth covered wiring has disintegrated.

patgizz wrote:Tom1200 wrote: OK this may be a silly question but why do you "need" to rewire/wire the carbecause most of the stuff i build is old enough that the factory cloth covered wiring has disintegrated.
that plus wires start to fial due to corrosion and embrittlement.
BTW, if anyone cares- a good crimp on a good wire+ good connector is more reliable than soldering. Unless there's a prevision to eliminate any vibration or bending near the solder. Soldering tends to make a connection very stiff, and brittle. Easy to break.

Tom1200 wrote: OK this may be a silly question but why do you "need" to rewire/wire the car;
The original Mercedes wiring harness takes up a huge amount of space and probably weighs 50 lbs. The relays are huge. The fuses are the old-fashioned "bullet" style, as opposed to a more modern "blade" type. Plus, after 25 years in the California sun, it's all brittle and crumbly.
I figure since I'm scrapping the stock electro-mechanical fuel injection and switching to carbs, I might as well simplify the wiring harness while I'm at it.
Problem is, I have no idea what I'm doing!

But you'll know when you're done, and that's the best way to learn.

As a side note, to secure things like the harness, brake lines, brake cables, hoses, etc. to the car, I am using a technique that I learned from Lotus: Take a plastic jug like from radiator fluid or oil or whatever, cut strips the width you want (1/2", 3/4", etc.), wrap it around whatever you are securing, punch holes in it with a leather belt hole punch, drill a hole in the sheet metal and secure it with a pop rivet. Much cheaper and easier than stocking a selection of P clamps.

aussiesmg wrote: In reply to Tom1200: Rewired the 86 Rustang Challenge car, old harness 26lbs, new harness less than 2lbs Old harness, scotch locks everywhere, new harness, all connections are soldered. Old Harness, crusty small gauge wire, New Harness, fresh heavy gauge wire I used an eBay 8 fuse basic wiring loom available new for cheap
Link?

For ease of access on a new/custom built harness, that may need some adjustment, you can use dental floss instead of loom covers for bundling. It may not be the same as aircraft lacing cord, but it will keep everything together neatly, until you have to add or subtract a few wires. Once the layout and operation is verified then the loom covering is easier as well, since the bundle is held together.
Keith Tanner wrote: Factory engineers spent a lot of time and money designing what's in there. Of course, this is from the guy who lost the lead in the Targa due to a factory relay failing...
Or there's the miata harness which was either made by 6 engineers that hated each other, or one terribly incompetent one. That I love the power leads that split off go around to random places and then connect back together without having connected to anything else. Or that wire that runs from one side of the dash, ties in a knot around another wire, then runs back to the other side of the dash and into the engine bay.
4cylndrfury wrote: The advantage to using the nylon method is youre not soldering wires upside down between a firewall and the block, or behind an accessory belt etc etc.
Why are you soldering on a custom harness. There should be zero soldering on a harness unless you're hacking something together.
GameboyRMH wrote: This is why the big-money crowd uses mil-spec connectors to make modular harnesses. The "grassroots" alternative is to pick up some DB9/DB25/DB50 connectors from a computer store...it's not blingy and doesn't include an everything-proof seal, but it works.
Those DB connectors arent rated for cross talk who knows how much noise you're introducing to all your sensors. Thats why I'm so excited about the MS3P since they finally have a product that doesnt have a flawed connection. And its not like the connectors are big money. How many of those $100 motorsports connectors are you using? 1 for the engine control sub harness, one $40 high amp connector for the starter and alternator, one for the chassis. All the other connectors you should be buying will be the $6 OEM level variety that directly connect to your sensors.
alfadriver wrote:patgizz wrote:that plus wires start to fial due to corrosion and embrittlement. BTW, if anyone cares- a good crimp on a good wire+ good connector is more reliable than soldering. Unless there's a prevision to eliminate any vibration or bending near the solder. Soldering tends to make a connection very stiff, and brittle. Easy to break.Tom1200 wrote: OK this may be a silly question but why do you "need" to rewire/wire the carbecause most of the stuff i build is old enough that the factory cloth covered wiring has disintegrated.
Buying a good ratcheting crimper is well worth the money. All crimps are exactly the same with proper tension without distoring connector to the point it will fail.

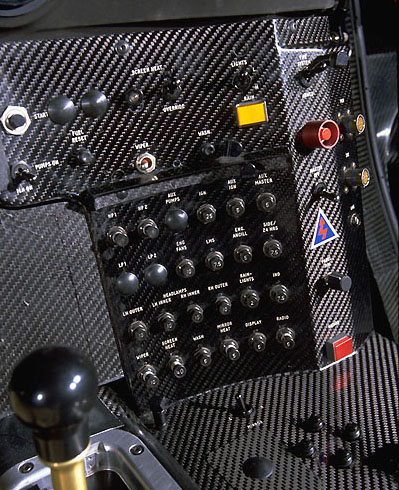
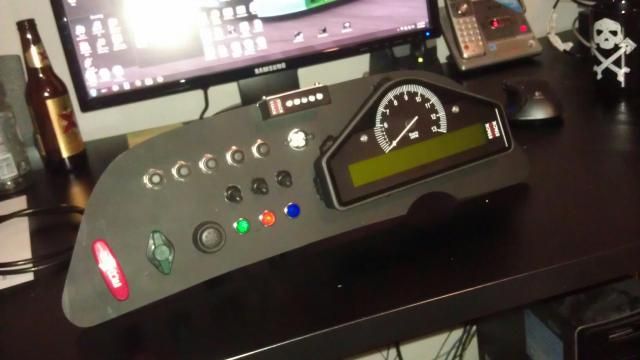
I did the Radical the season before last. I had a freshly trimmed and bundled Suzuki harness for the engine stuff and made a new dash to hold a Stack 8100. I made sub-harnesses for fuel pumps, brake/rain light, and starter and wired it all on the car. But it's the simplest car there is.
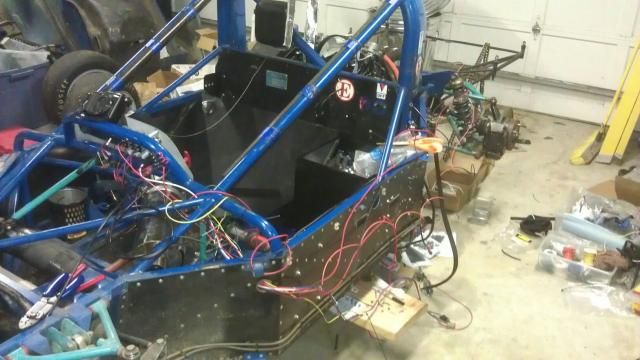

I tend to, as other posters have mentioned, keep factory wire in boxes. That way I can do color coding. I like to build harnesses in place, I typically will run 1 wire to whatever I'm connecting, make sure about mounting etc, then run other wires to that component as needed. One circuit at a time!
I reuse factory connectors, since most all my stuff is pretty well weather protected I'll use those Radio Shack Molex connectors for low draw stuff. High draw, I'll use the blade connectors common on Japanese motorcycles of the '80's and '90's. These are just one of the many types out there:

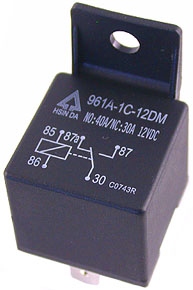
On high draw stuff, make those 'ice cube' relays your friend. There are few things more frustrating than running 15 or so amps through a switch and have it begin to work intermittently. Parts Express (stereo parts) http://www.parts-express.com/ sells the Tyco and some Japanese version of same which are good quality. The PepVanceZone versions are complete and utter E36 M3. PE also sells the connector which makes life a lot easier.

My next harness, I'm going to use circuit breakers. In the meantime I use 'stackable' ATC fuse blocks like these:  that are about $4 from Rock Auto. The way they are made gives a lot of flexibility in laying out wiring. For instance, one block can be hot all the time, one block can be hot only with ignition, or they can be mixed and matched.
Learn to solder, then buy shrink wrap from McMaster in 25 foot rolls. MUCH cheaper that way!
On my last engine harness I used the spiral wire wrap sold by Pegasus Auto Racing. It's great stuff; holds the wires in tight neat bundles, can flex to make turns, if you have to go back in to fix a boo boo (not that I ever make mistakes! ![]() ) it can be easily removed and reinstalled. https://www.pegasusautoracing.com/productselection.asp?Product=4016
) it can be easily removed and reinstalled. https://www.pegasusautoracing.com/productselection.asp?Product=4016

You can buy that same wire loom at Office Depot. I'm not sure if it would be more expensive than at Pegasus, but it sure is convenient when you need some NOW.
I've built harnesses with individual fuse boxes and "ice cube" relays - the MG is built that way. There's some convenience to it, but overall it's a messier setup. Next time I'll use one of those boxes with integrated fuses and relays like the one GM provided with my LS engine package. It's a lot cleaner and you don't have to worry about running power wires to the relays.
One thing to watch when reusing factory connectors or even new parts store ones - they're usually designed to be attached once or twice. With the constant plugging and unplugging that can happen when building or maintaining a racer, sometimes the terminals inside will slip and fail to make a connection. Then you tear your hair out trying to find out what's going on. This is less likely to happen with a new connector, I expect, but I've seen it on everything from a VW Vanagon to a brand new harness right out of the box.
Keith Tanner wrote: One thing to watch when reusing factory connectors or even new parts store ones - they're usually designed to be attached once or twice. With the constant plugging and unplugging that can happen when building or maintaining a racer, sometimes the terminals inside will slip and fail to make a connection. Then you tear your hair out trying to find out what's going on. This is less likely to happen with a new connector, I expect, but I've seen it on everything from a VW Vanagon to a brand new harness right out of the box.
This is a good point. I need to bend the pins on the miata coil pack connectors back together so they make contact with the pins on the coils pretty much every time I disconnect them now. I really should stop being cheap and lazy and spend 30 cents and 10 minutes re-pinning them.
Needs more deutsch connectors.

Also, use marine shrink wrap, built in sealant, shrinks a lot more than the normal stuff and handles more heat.
Well I guess the Datsun harness is of a better quality than I thought, wire is style pliable etc. OK I get that a harness can be heavy but even in my car (1600lbs) 100lbs = about 4hp.........so the weight saving is not a big factor, given the Datsun harness may be all of 8lbs........I totally get the multi owner scotch-lok nightmare replacement.
Tom

Audi and VW vehicles in the late 80s used a waterproof fuse and relay box on the firewall with the wiring all inside the car but access from the engine bay. Since the panel itself is all 1/4 male spade terminals on the bottom, plus a couple of bigger high current ones, they are my go to for upgrading Opels with a battery rust hole in the firewall. Cut hole bigger, mount box, move battery to back. Regular 1/4" female lugs on the wires, same as the Opel fuse panel.
Bonus points for the circuit designator numbers being the same for Opel, BMW, and VAG products.
In reply to Swank Force One:
Here is a similar harness, I paid about $20 less shipped
http://www.ebay.com/itm/11-Circuit-wiring-harness-T-3-NEW-Color-coded-Hot-Rat-Rod-8-fuses-Made-in-USA-/231135565633?pt=Vintage_Car_Truck_Parts_Accessories&hash=item35d0c0d741&vxp=mtr
Our wire color choices were limited but every wire was labelled under the dash, in the engine bay and in the trunk.
Going from the factory efi loom to our basic race car with varb loom made it very simple.
We did retain the original multi switch, for turn signal, high beam, headlights for ease of use when under duress.
Eliminating a lot of other devices definitely simplified the set up.
Some pics in the Rustang build thread page 8
http://grassrootsmotorsports.com/forum/build-projects-and-project-cars/86-mustang-challenger-build/41304/page8/
You'll need to log in to post.


