So a couple months back, I was checking out the Cutlass, when I took a peek under the rear of the car. My reaction: E36 M3, frame rails aren't supposed to look like that. Yup, my rear FREs are rotten in places, and now I need to learn how to patch the frame. It's decently bad, but the car is still stiff, so I know I can patch it. So guys, any advice on welding? Other than always wear the proper equipment, and drop the tank. What type of welder would I need? Flux-core, or MIG? How easy is it? I know to start welding with junk parts, but that's about it. Any help here, guys?
Definitely MIG with gas, and make sure you get one that's powerful enough to properly weld the metal gauge you need for frame rails.
I haven't welded in about twenty years but I'd think that starting on the frame is going to be easier as a learning process because the metal is thicker and you're less likely to blow holes in it.
Other than that, make sure the areas you're welding are spotless clean (no, cleaner than that  ) and take your time.

NOHOME
SuperDork
1/1/15 10:09 a.m.
You want a gas shielded MIG welder. 110 or 220 will both work fine. While I posted the hints below for sheet-metal welding, they also work for frame repairs of the thinner metal variety.
NOHOME wrote:
OK. Without actually being there to drink your beer, here is the process:
Put new wire in machine.Use 0.023 wire for body metal. Use the correct tip also. If the wire has been in the machine for more than a few months, it is rusty and is going to make your life harder than it needs to be. By the same token, the wire should be Lincoln or Miller. Cheap Chinese wire sucks. You will know the wire sucks because it is going to make like a sparkler when you weld.
Clamp two pieces of tin together. Does not matter if 22 or 18 awg.
Does not matter if you want to do a lap or butt-joint. Just make sure that the seam is tight.
Turn the machine on and open the gas valve. Set the flow to about 15cfm.
Ground the workpiece.
Pull the trigger (torch in air, not at workpiece) to let out some wire and trim to about 3/8" from tip.
Using two gloved hands to keep the torch steady, ( I pretty much hold the tip) line the wire up right on the crack. I like lots of light when I am welding and tend to have a light source as close to the work as possible. I also get my face right in close so I can see what the tiny little bead is doing.
(at this point helmet is still optional as long as you close eyes, best practice? not really)
Pull the trigger and do a slow count to one. DO NOT MOVE THE TORCH.
Now, open eyes and look at your weld dot.
If you have a hole in the metal, either turn the heat down a bit or turn the wire up a bit. (pushing wire is like adding ice to a drink, so turning heat down or adding wire both achieve the same result)
Try again.
If you have a rounded lump of wire sitting on top of the tin and no evidence of the weld on the backside, increase heat or decrease wire.
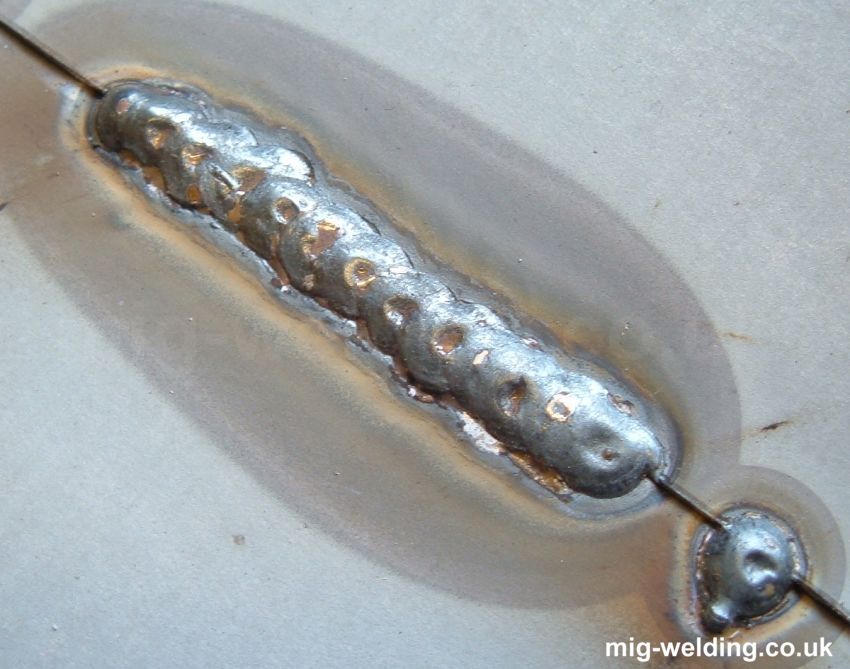
Here is what you are aiming for. (actually, I would say the tacks are a bit too cold)
 The gist of this process is that you are adjusting the machine so that a one second pulse on the trigger is going to produce a bead that is hot enough to penetrate the workpiece and not so hot that it burns a hole. You do this by using the one second weld as the constant and playing with the other two variables. Gun movement is not an issue.
Once you have the machine set and the counting down, you are ready to go. There is not anything else to learn.
This is where you put the helmet on.
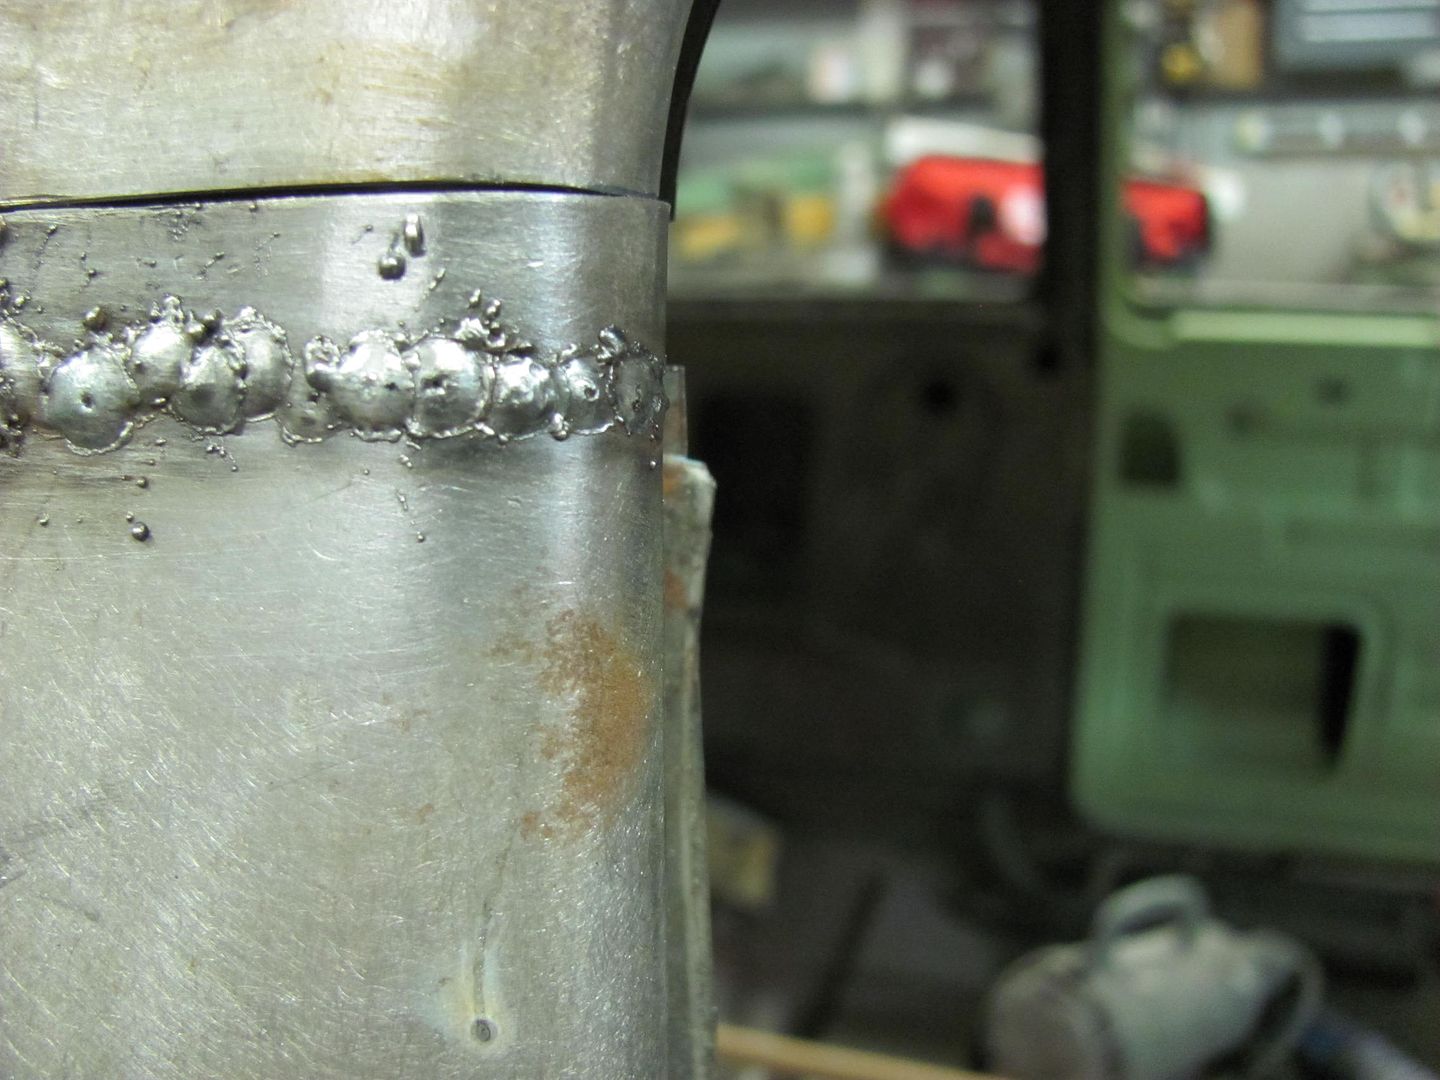
Assuming you have two pieces of tin tacked with nice tacks, just point the gun the front or rear edge of one of the tacks. I like to kind of face the wire into the tack, not critical. The idea is that the molten wire is going to slide of the slope of the existing bead and slide into the seam via capillary action.
Holding the gun steady with both hands, pull the trigger and do a one second count. Release the trigger.
As soon as the color red disappears from the tack you just did, have the wire-repositioned so it overlaps the tack you just did. Hit it with another one second count. Repeat as needed.
You should have something that looks like this: (you can tell he had to count to one twelve times to do that "bead")
The gist of this process is that you are adjusting the machine so that a one second pulse on the trigger is going to produce a bead that is hot enough to penetrate the workpiece and not so hot that it burns a hole. You do this by using the one second weld as the constant and playing with the other two variables. Gun movement is not an issue.
Once you have the machine set and the counting down, you are ready to go. There is not anything else to learn.
This is where you put the helmet on.
Assuming you have two pieces of tin tacked with nice tacks, just point the gun the front or rear edge of one of the tacks. I like to kind of face the wire into the tack, not critical. The idea is that the molten wire is going to slide of the slope of the existing bead and slide into the seam via capillary action.
Holding the gun steady with both hands, pull the trigger and do a one second count. Release the trigger.
As soon as the color red disappears from the tack you just did, have the wire-repositioned so it overlaps the tack you just did. Hit it with another one second count. Repeat as needed.
You should have something that looks like this: (you can tell he had to count to one twelve times to do that "bead")
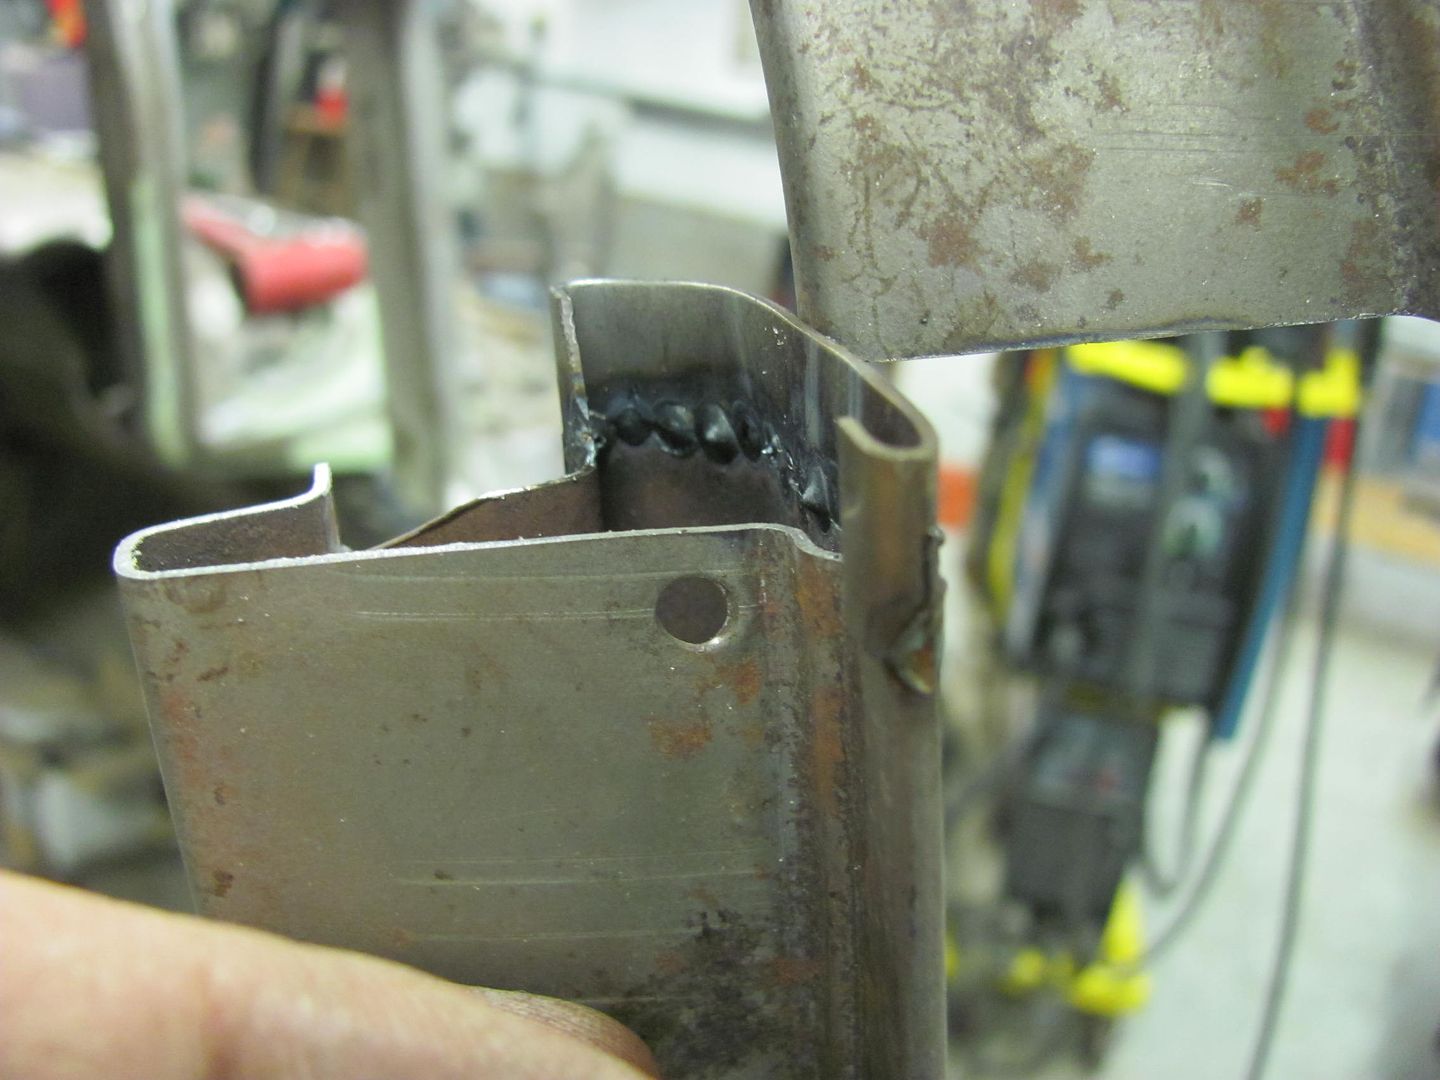
 The examples I found on line were for a lap joint, but this is good for any type of sheetmetal joint. If you flip the work over, it should look pretty much the same on the backside of the weld.
Some things to keep in mind: Metal needs to be as clean as possible on both sides for best results. welding paint, rust or bondo is never going to give the best results.
The fix for the inevitable hole you are going to make is still the one second count: just go around the edges of the hole until it gets filled in.
If you have a gap that is a bit big, stay with the one second count, just zig side to side to bridge the gap. At all times you are working on adding molten steel to the face of the last tack,NOT into the weld seam.
This wont make you a welder and I don't claim to be one. Its a one trick pony that gets bodywork done without really having to know a lot about what you are doing.
The examples I found on line were for a lap joint, but this is good for any type of sheetmetal joint. If you flip the work over, it should look pretty much the same on the backside of the weld.
Some things to keep in mind: Metal needs to be as clean as possible on both sides for best results. welding paint, rust or bondo is never going to give the best results.
The fix for the inevitable hole you are going to make is still the one second count: just go around the edges of the hole until it gets filled in.
If you have a gap that is a bit big, stay with the one second count, just zig side to side to bridge the gap. At all times you are working on adding molten steel to the face of the last tack,NOT into the weld seam.
This wont make you a welder and I don't claim to be one. Its a one trick pony that gets bodywork done without really having to know a lot about what you are doing.
Common mistake is people set the shade of their hood way too dark, and then you can't see what's going on. All the shades provide the same UV protection, so set it bright enough you can see everything when welding.

Shaun
HalfDork
1/1/15 11:40 a.m.
I'm no expert and I had good luck repairing the rear subframe of my civic (the dreaded anti roll bar tear out) by going to a junk yard with a battery powered sawzall and chopping out somewhat more of a chunk than the chunk I needed and then carefully fitting and then welding it in. That the metal was the same gauge and shape helped a good deal. Obviously cleaning all the metal to bright helps allot too.
Shaun
HalfDork
1/1/15 11:44 a.m.
Excellent primer above. I wish I had stumbled into that one one as it breaks it down to the essentials specific to the particular application.

ncjay
Dork
1/1/15 12:02 p.m.
I'll add that you can't weld rust or dirt. If the frame rails are rusted through, make sure the patch is big enough to get the affected areas. Get the weld area as clean as you can.
The stock car boys here cut the back off the G bodies and rebuild them entirely, due to rust. Trying to patch stuff always ends up being torture, because you always try to weld to something that's not really there, so you end up sculpting your frame from mig wire. Take measurements, buy 2x3 tube, cut the back section off, being sure to go far enough ahead to get to real steel, and weld it up out of new material.
No offense guys, but suggesting a mig machine to a newby welding rusty frame rails is bad advice, and probably the worst possible choice. You need an arc welder and some 6011, or specialty rod made to weld dirty, rusty, E36 M3ty material.
In reply to Zomby Woof:
Fluxcore would be even better, lower learning curve than stick.
I disagree for a few reasons. FC is still not good in rust and dirt, and the deposit rates are too low. The small flux core machines just aren't a great choice for frame welding even under ideal conditions.
In reply to Zomby Woof:
If we were talking about a 2.5 ton truck frame, I'd agree with you. This wont be very rusty and dirty, it should be bare metal, maybe some weld through primer on the inside of the tube. Those little $100 FC machines are right in their element welding on somewhat clean 1/16-3/16 steel in one pass.
This kid will have nothing but trouble trying to burn 6011 rod under a car for his first real project.
In reply to Zomby Woof:
I agree. When I was first changing over from stick to mig, I laid some wonderful looking welds that were not actually stuck to anything important. It took a while for me to learn how to burn things in properly.
All I can add is be careful of the gas tank and fuel lines.
NOHOME
SuperDork
1/2/15 2:04 p.m.
Following up on the quick tutorial above, I found some good pictures that illustrate why this works so well.
The person who is doing this butt-weld has got the machine set up to make nice low spots on the front side:
What is important is that when the machine is set up properly for the one second pull, the front will look like above, and the backside will look like the picture below. That is the degree of penetration you are shooting for; just before it falls out the backside. Note that the technique works well with the out of position (non horizontal) welding being done in this application.
I have used this on metal as thick as 16 gauge and as long as that first dot is set up with enough heat, it works perfectly. For thicker metals, I would bevel the edges to form a trench for the filler wire and start running beads.
In reply to Zomby Woof...why would the OP be welding on rusty dirty metal in the first place? If there is no intention of prepping the weld, it does not matter what process is used, its going to be sub-par. I myself find stick welding to be very difficult and impossible to finesse.
a G body with rear frame rails that are rusted out?
that's shocking...
actually, it's the single most rusted out area of those cars. they rust out behind the rear axle, so they aren't really doing much besides holding the rear bumper up, so it's not like it's an important structural member that will cause the car to fall apart...
i believe there is a company out there that makes replacement frame horns for those cars, which makes it a simple matter of cutting the bad one off and welding the new one on..
yup, google found me this site with replacement rear frame rails.. seems kind of spendy, until you add up how much time and screwing around you'd have in making something work:
http://www.autobodyspecialt.com/cgi-bin/commerce.cgi?search=action&category=3555
Cut off rusty part of the frame, replace with 2x4 box steel.

^ It's a stamped steel unibody subframe, not a tractor....
I've seen my buddy Todd do some AMAZING work with a plain old flux core wire fed 110 arc welded. Full on roll cages, frame repair, everything ! ! I used the same welded to shorten a VW pan for a Fiat 600, no problem at all and the spine was much heavier than the standard ladder/X-frame on a GM car.
These little machines are extremely cheap and very versatile, don't count them out entirely.
Just saying.
NOHOME
SuperDork
1/2/15 5:13 p.m.
TeamEvil wrote:
I've seen my buddy Todd do some AMAZING work with a plain old flux core wire fed 110 arc welded. Full on roll cages, frame repair, everything ! ! I used the same welded to shorten a VW pan for a Fiat 600, no problem at all and the spine was much heavier than the standard ladder/X-frame on a GM car.
These little machines are extremely cheap and very versatile, don't count them out entirely.
Just saying.
My biggest issue with flux core is that my "count to one" method does not work, nor does any variation where you have to stop the bead. The flux solidifies and you need to chip it off like a stick weld before you can go back at it.
As far as being a farm implement, the flux core rocks in that it is portable and will weld in a hurricane.

daeman
New Reader
1/2/15 5:24 p.m.
Some good info here guys, but also a lot of mixed points of view. Though that just shows that different things work for different people.
For those who shun mig/fc due to needing things to be perfectly clean..... We're talking chassis repair here, it needs to be of a high standard, after all, its your safety and that of other people at stake. Cleaning up a weld job properly and preparing it right is just as important as actually fusing metal.
Personally, if I was the op, and didn't have a welder I'd be serriously weighing up my options as to wether i borrow/hire a quality welder, buy an entry level welder that I may never use again or part with the cash to have someone do the job for me.
For me, I'd be borrowing or hiring a good welder and also picking the brains of the hirer or friend who's welder it is as for best setting etc. Mig is very much point and shoot with a little bit of practice on some scrap material (still prepped correctly otherwise there isn't much point) and a few YouTube tutorials on torch angle etc.
The recommendation if replacing the rear section with tube is pretty solid and if your planing on keeping the car, is probably the best way to do it. You may find once you start casing the rust that theres more holes and corrosion than actual rail. If you just want to patch, I'd recommend making patches that go over corners as they will provide a little more strength than just flat plate on a flat surface.
Basically, take your time, work safe, prep properly and if in doubt at any stage, ask. Good luck.
< I am disappoint.
I came here expecting tales of chains, tree trunks and reverse gear, sledge hammers and railroad tie braces.
I may or may not be guilty of all of these techniques.
Trans_Maro wrote:
^ It's a stamped steel unibody subframe, not a tractor....
a G body is a full framed car, but they designed something wrong with the back part of the frames and made them prone to rusting out for some reason or another.. the only thing the rear part of the frame where they usually rust out is hold the bumper in place, and there are probably more of them out there with rusty frames than there are without. the only reason you don't generally notice it is because the only G body that got real steel bumpers was the Regal, and you don't notice when the inner structure of the average Monte Carlo or Cutlass bumper is falling off because the plastic bumper hides it and kinda sorta holds it up..
Along with gas tanks, mentioned earlier, make sure that there is nothing in the weld area inside the car, ie: floor mats etc.
Also there is something about grounding so that you don't blow all the bulbs. That may not apply to unibody.
I have access to different welders and at the end of the day I seem to always reach for my Lincoln 110 volt flux core. Portability and ease if use always seem to be more important than the little bit of cleaning you do with the flux residue.
I will stress that what ever you do I would always go with a brand name welder. A quality welder makes learning to weld easier. Another thing is more adjustments are not always better. Sometimes simple is better.


