That was one of the few bikes that looked good with white wheels.

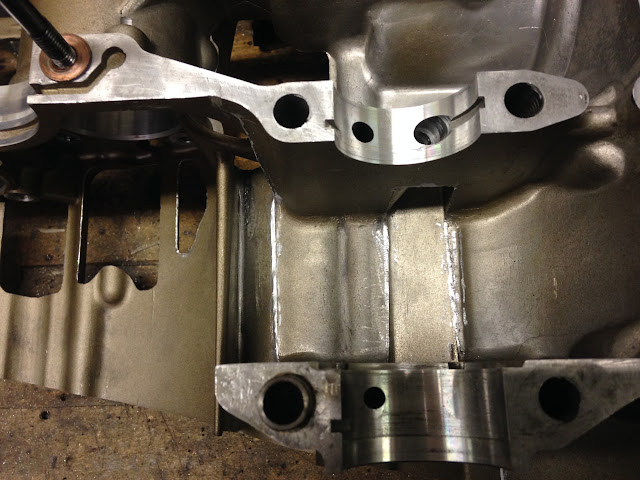
Haven't gotten to the wheels yet, but finished tearing the old engine apart. I deburred the new bottom end cases before giving them a thorough cleaning in the solvent tank.
Kinda hard to see, but there were some nasty burr-filled casting ridges. Before:


After:

I also measured for new crankshaft main bearings and ordered those along with a bunch of gaskets, o-rings, circlips, and replacement hardware. Oh yeah, piston rings, too. I probably missed something small, but I am hoping I am not to far away from reassembly.
Here is the all of the debris I found inside the bottom end, with a penny from my pocket for scale.

There was a hole in the case and the previous owner told me that he heard some crunching sounds the first rotation or two turning it over by hand in the post-crash assessment. It turned freely and quietly when I bought the bike. The hole was in the stator cover and the outside of the flywheel had some scratch marks which can be seen at the top of the pic. The biggest chunk has corresponding scratch marks on one side, and is just the perfect thickness to get wedged between the remainder of the case and the outside of the flywheel. The tiny triangular bit in the center is also a chunk of case and was found unscratched sitting in the bottom of the sump. The little hook on the right is a mystery. It was also in the bottom of the sump. The slightly longer end is clearly broken off, and it looks like the hooked end of a torsion spring of some type. I didn't see any broken springs when tearing the engine apart. I am baffled on this one. The bike has been stored for a couple seasons in garages that are active work spaces with a small hole in the case, so I can't rule out that it broke off or was cut off something other than the Bandit and the end went flying and shot into the Bandit engine. I also have to recognize that the hole is only a few square inches and the chances of an external source are very, very slim. ![]()
The most obvious would be the shift drum, but the spring on there seems fine. What else would have a small torsion spring like that in the engine? Starter clutch....which also seems OK. Any ideas?
I should also mention that there was a tiny bit of small bits of metal in the oil filter, but only a tiny, tiny bit. The inside of the oil pump looks great. The gears in the transmission look great, and the bottom end bearings all look normal for a 23,000 mile high-revving motorcycle. Whew! ![]()
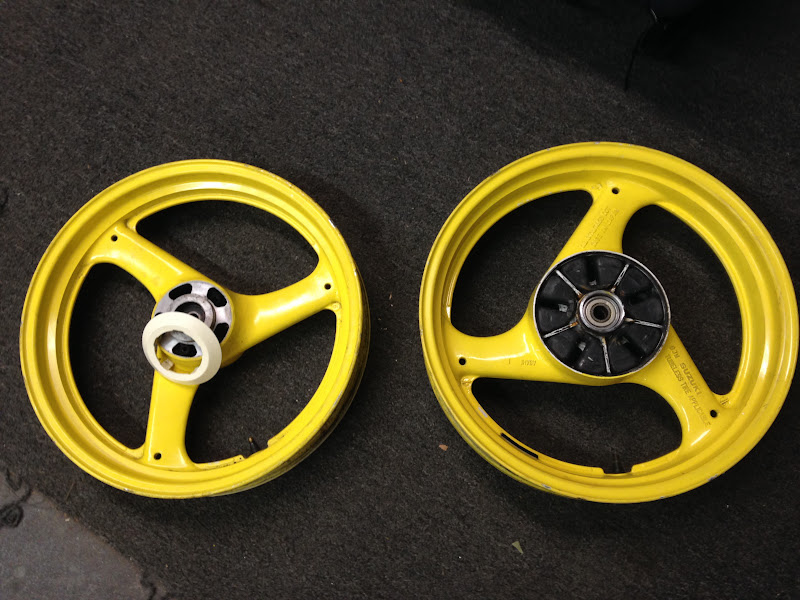
I also got these stripped of external parts and tires to deal with the awful color somehow. I flaked the paint off the plastic trim ring on the front wheel by hand! I didn't see any signs of primer or prep beyond cleaning...hmmm...you mean it takes work to get good results with paint? LOL
In the meantime I will get these two-year-old, 50-miles-from-new tires scuffed in on my Supermoto! ![]()

The original frame is for sale with the crash damage and a clean title if anyone is interested in a Bandit project of their own! Deep discounts/trade for beer could be negotiated with GRMers.
Solved the mystery of the little part in the bottom end! My buddy ID'd it as part of a helicoil, and sure enough, one of the mains in the old case:


In reply to ae86andkp61: This is like CSI Miami. Excellent forensic work.
Long time, no update, but work inches along, keeping me busy for the winter. Starting to look like a bike again!
Here it is with newly-powder-coated bronze wheels, and engine just installed in the new frame. Getting the front tire mounted was a bitch and a half! The scored front brake rotor was replaced. I am hoping to get it running and rideable fairly soon, and it may come back apart for a few tweaks if I really like the bike.
I realized the above pic didn't really show the wheels, so here is a better idea of the color; dark bronze metallic.

My first bike was a GS500E - Bandit in sheep's clothing. Loved it.
Getting close to being ready to fire it up! Sealed up the sump, reinstalled most of the wiring plus the radiator...and got the chain on. I am getting excited!
I neglected to mention that I bought a complete spare engine for cheap and tossed it in to get the bike running while I finish rebuilding the original. I got it fired up last night!
The good news: Fired and revved pretty well. Idle was even ok.
The jury is still out: The spare engine was shipped in a cheap plastic tub, and wasn't drained before shipping, so it arrived coated in oil. The first startup was a bit blue-smokey, and I only ran it a few minutes. Could be residual oil burning off, could be a tired cheap used engine. Time and a ride or two will tell more.
The immediate challenges: I robbed the petcock for another project, so I threw a dirtbike petcock on for the test fire, and the diameter was a bit small, so it was starving for fuel a bit at high revs. Gotta get the right parts.
The carbs were rebuilt shortly before I bought the bike, so I just popped the float bowls off, took the jets out, and gave them a light cleaning. I didn't pull the rack apart and it all looked pretty good. It turns out the choke on number three is seized closed, a fact I discovered after installing the carbs plus the choke cable. ![]() Even worse, I discovered this fact when I yanked on the choke lever and bent the bracket on the carbs!
Even worse, I discovered this fact when I yanked on the choke lever and bent the bracket on the carbs! ![]() At least the air box is still off and the tank was just set roughly in place for a test fire.
At least the air box is still off and the tank was just set roughly in place for a test fire.
The cables and levers are on and attached, but not yet adjusted. Brakes still need to be bled. I will get the fueling sorted first before tackling the rest of the details.
Everything is looking great. Sounds like you have amassed quite a stash of parts. Assuming the oil burning clears up on the current engine, is the builder engine going to be stock, or maybe see what hot rodding might be possible?
Pipe? Cams? Carb work? Or do the sensible thing, and just enjoy?
No big hotrodding plans for the engine rebuild, just a careful, thorough stock rebuild. These bikes have always been known for a sweet rev-happy engine, cool-looking frame, and budget suspension and brakes, so guess where I have thought about focusing my modification efforts? Yup, suspension and brakes. I have a vision in my head, buy it could become a bit of a rabbit hole, so the first goal is to get the bike running and ride it a bit to see how I like it. If I really enjoy it I will engage phase 2.0 with the rebuilt engine, new swingarm, fork, brakes, wheels, and some further cosmetic upgrades.

I had one of these for several years. Bone stock.
I loved the thing. The carburetion was never really smooth between 6-8k, it really woke up above 9k, all th to the way 14k redline.
I think you'll enjoy it.
Thanks, Sevenracer, good to hear! Did you ever play with jetting?
Good news: the smoke seems to have been residual. I got the petcock fixed. The slight setback now is that I pulled the carbs to fix the choke....frustrating when I am this close, but easier now than later when everything is buttoned down, and essential if I am going to ride it in this cool weather.
Here is a video of the idle and lack of smoke before pulling the carbs:
Golly, whatever inspired you to do frame sliders?![]()
I used to own Honda's robotic version of your bike-the CB-1, and loved it.Bone stock save for Cr bend dirt bike bars. I owned that bike longer than any other, rode it everywhere. Rang its neck all the time. Rock On.
Re: frame sliders. The only thing more frustrating than bringing this thing back from low side damage and then dumping it out on the road would be fixing it all up and then dumping it at low speed/stationary in the shop! ![]() I am not clumsy, but as a human I am also far from perfectly coordinated.
I am not clumsy, but as a human I am also far from perfectly coordinated.![]()
My dad used to have a CB-1, and before selling it, he offered it to me, but I declined at the time. I have kicked myself multiple times since then, and that disappointment as a result of poor timing fueled much of this build. They sound like sweet bikes, and your enthusiasm has me excited to get my own 400cc inline four out for a ride soon!
I ordered a few small parts to finish the carb reassembly, and with not much else left to do, started bleeding the brakes and tidying up a few other details.
In reply to ae86andkp61:
Sorry, hadn't checked back in on this thread. But to answer your question on jetting, the PO had a shop re-jet it to "richen the mixture". I never messed with it - It always started and idled well, and always was strong above 8-9k. The little bit of wonkiness in the mid range never bothered me that much.
Well, the front brake has a new used master cylinder and the rear master cylinder has been rebuilt. Both brakes are bled. I've now had the carbs off and apart and back on again a half dozen times! I was plagued by the sticky choke and finally solved the issue by playing with tolerances. I took the four carbs and six choke plungers I have accumulated, and removed all of the plungers from the guides. I test fit various combos until I found the loosest fit for each carb body choke passage, cleaned AGAIN, and reassembled...and it worked!
I took it for the first spin around the block, but the ride was cut short by two issues: with my fat ass on the seat, the chain occasionally brushes in left foot peg hardware, and the rear brake clevis (which didn't look great) is sticky/notchy. I just circled the block and came back figuring I might want to sort out the remaining issues before becoming a further menace to myself and others.
I am also finishing repainting the front fender and sidecovers.
It will need some remaining idle tuning. It runs best just off idle to about 4000 or above 6000rpm. This is with stock jetting...hmmm...sounds familiar. ![]()
Initial impressions also indicate that the stock suspension is waaaay too soft.
Still, it is exciting!
I had a work meeting this morning, so I rode the Bandit in and took the long way home. My ride turned into taking the new bike for a little walk down the side of the road!
It was running poorly in the 4000-6000 range, and while goofing around with it on the road in that range, it became worse to the point it seemed to lose almost all power and was completely unwilling to rev. Since the bike was slowing down and I was a hapless passenger, I pulled over, at which point it died and was reluctant to start. While trying to restart it, I got flustered, and I ran the battery down while unnecessarily playing with the petcock and choke, so I pushed down the shoulder of the busy road to a spot I could reconnoiter, and got it bump started on my second push. I rode back to shop at 8500+rpm (runs OK in that range!!) and on my way I figured I could try a "plug chop." After the first short ride, my first look at the plugs was inconclusive, but I've read that plug reading can be fairly specific to a narrow time window leading up the final combustion event before the reading is taken. In other words, go out for a ride over a wide variety of loads and revs, slow down, pull into the shop at or near idle and shut it off, and the picture you get tells you most about the hot idle pulling into the shop.
I figured I could likely get it to a light steady load, 4500rpm or so in first gear up the little hill on the back route into my shop. I did, it sputtered a bit, I hit the kill switch and clutch, and coasted down into shop. When I pulled the plugs the reading was dramatic: 1, 2, and 4 looked good...tan and fairly even. #3 was black and sooty...very rich!
I pulled the tank, airbox, and carbs, and was triple checking the slides. With the bank of carbs off, I could move them around more and see more. While chatting with the neighbor, I tilted them downwards (as if downdrafts) and noticed that with minimal gravity on the slide, the needle in #3 didn't move consistently with the slide! I popped the top off of that carb and found that the washer that serves as a spring perch was below the circlip instead of above!! The only thing keeping the needle down was gravity, and the vacuum was probably pulling it up way too quickly with no spring resistance, so fuel was essentially totally uncontrolled to that cylinder and often very rich.
I retired for the day knowing that I had a likely culprit...a bit of a relief! My mind was racing to worn emulsion tubes, worn-out float needles, sticky floats, and the like, so it was nice that it was simple.
Long time, no update, but these carbs have posed a bit of a challenge, or an exercise in patience...![]()
The rough running in the mid-range continued for a while, and as I rode it a bit, I also discovered problems with occasional overheating, so over the past few weeks I have tackled a few different areas:
I wanted to make sure that I wasn't chasing a fueling issue and blaming it on carb tuning, so I fixed the poorly-repaired vacuum source for the petcock. Suzuki uses a stupid petcock that doesn't switch off; it is left on, and requires vacuum to get the fuel flowing. Great for the newbs and the absent-minded professors, but a bit of a pain for those of us with more than a couple of brain cells to rub together! ![]() It draws vacuum from a fitting on the number one intake boot, and the junkyard engine's stock barb had broken off at some point in the past. Someone hogged out the hole, jammed a threaded barbed fitting into the hole, connected a bushing as an adapter, and put an oversize hose onto the bushing. This arrangement protruded a bit into the intake flow, and was a bit floppy and loose all around. The connection to the petcock was loose due to the oversize hose, so they put a hose clamp on and tightened it until it cut into the rubber hose, and it still wasn't quite as tight as it probably should be! Not loose enough to be a major red flag vacuum leak, but loose enough to warrant replacement. A new #1 intake boot is $42 or $45 or something like that, so...if your gonna kluge something together, at least kluge it somewhat correctly! I cleaned and degreased the hole in intake boot, cut a scrap of copper tube the correct diameter to length (it was even already curved about the right direction) and cleaned and degreased the copper, and then JB Welded it into the intake. Since I don't have a nice flaring tool, I wrapped the outside of the end of the tube with a few wraps of small diameter wire, pulled tight with the safety-wire pliers, and smoothed it over with JB weld to give the hose and clamp a lip to tighten against. After a couple days of curing, I Deremeled the excess down on the inside of the intake runner and re-installed. Much better!
It draws vacuum from a fitting on the number one intake boot, and the junkyard engine's stock barb had broken off at some point in the past. Someone hogged out the hole, jammed a threaded barbed fitting into the hole, connected a bushing as an adapter, and put an oversize hose onto the bushing. This arrangement protruded a bit into the intake flow, and was a bit floppy and loose all around. The connection to the petcock was loose due to the oversize hose, so they put a hose clamp on and tightened it until it cut into the rubber hose, and it still wasn't quite as tight as it probably should be! Not loose enough to be a major red flag vacuum leak, but loose enough to warrant replacement. A new #1 intake boot is $42 or $45 or something like that, so...if your gonna kluge something together, at least kluge it somewhat correctly! I cleaned and degreased the hole in intake boot, cut a scrap of copper tube the correct diameter to length (it was even already curved about the right direction) and cleaned and degreased the copper, and then JB Welded it into the intake. Since I don't have a nice flaring tool, I wrapped the outside of the end of the tube with a few wraps of small diameter wire, pulled tight with the safety-wire pliers, and smoothed it over with JB weld to give the hose and clamp a lip to tighten against. After a couple days of curing, I Deremeled the excess down on the inside of the intake runner and re-installed. Much better!
I bought an ultrasonic cleaner and completely disassembled the carbs (again) and cleaned everything very thoroughly....more completely than in any of my previous "good-enough" attempts. Here's where I make a note to myself about the workflow for any future ran-when-parked carbureted motorcycle purchases. ![]() I bought a jet kit from the nice folks at Factory Pro, who also assured me that the Bandit 400 has a tendency towards mid-range lean running from the factory, (remember that overheating issue?
I bought a jet kit from the nice folks at Factory Pro, who also assured me that the Bandit 400 has a tendency towards mid-range lean running from the factory, (remember that overheating issue? ![]() ) and that it has a few quirks to the cooling system. I also have all the bits needed to put together a carb type AEM wideband oxygen sensor with a small digital display from the folks at Dyno Tune Nitrous, and a wiring harness which will need only two things once assembled-12V switched power and ground. I also got corresponding connectors to add to the wiring harness of both this Bandit and my Suzuki Goose 350, so I can quickly install the wideband/display on either bike and use it for tuning. I will need to weld in a couple of bungs.
) and that it has a few quirks to the cooling system. I also have all the bits needed to put together a carb type AEM wideband oxygen sensor with a small digital display from the folks at Dyno Tune Nitrous, and a wiring harness which will need only two things once assembled-12V switched power and ground. I also got corresponding connectors to add to the wiring harness of both this Bandit and my Suzuki Goose 350, so I can quickly install the wideband/display on either bike and use it for tuning. I will need to weld in a couple of bungs. ![]() Once tuning is done, the sensor and display can be removed, and the bung plugged.
Once tuning is done, the sensor and display can be removed, and the bung plugged.
The cooling system on the Bandit has a 180-degree thermostat, no bypass beyond the tiniest of holes in the thermostat, and two switches for the fan, on at 203 degrees or so, and off at 195 degrees. The thermostat, switches, and cap are located in a remote cooling block between the engine and the radiator. The idea was quick warmup and effective cooling when needed but the truth is apparently more like localized cool spots and hot spots while warming up, cold-blooded starts, and potential over-cooling on temperate days. I trod down the path blazed by many others before me and brought the Bandit cooling system up to a more modern spec with a higher temperature thermostat (190-degree from a Suzuki Swift) and a dedicated bypass. This allows some circulation while warming up, and less chance of overcooling on those overcast early-spring or late-fall days. The coolant block has a blank fitting from the factory, which might have a use on the GSXR-400, like a temp gauge?
I'd tap that! ![]()
Now we need a return back to the cooling system, so we will use this inline gauge adapter with a 90-degree barbed fitting and put it in the return hose from the radiator to the water pump.
Side-by-side of the thermostats:
Here it is intalled, a bit hard to see since I blacked out the non-matching blue anodization, but the bypass runs down from the coolant block just out of the top right of the photo, down behind the frame slider and into the coolant return.
Here's the sparkly clean carbs with jet-kit bits reinstalled:
Now that I am unemployed, I shouldn't have too many excuses not to update this in the near future! ![]()

Awesome! Ive always liked this era of Suzuki. Ive wanted to find a decent Katana for no damn reason for years.
Long time, no update! The small incremental improvements have been trickling along, and I have done some riding on the bike as well! ![]()
I feel like the aesthetics are as good as I could ask for, and I find myself just staring at the bike sometimes...I loooove the look of this thing! The remaining little ridability issues have been frustrating, and have me daydreaming about an EFI conversion. I also adjusted the rear preload, which helped the overall ride quite a bit, but took the moderately annoying softness of the stock front suspension and elevated it to even more of an issue....looks like more upgrades may be on the horizon. ![]()

If you plan on keeping the bike pick up a spare igniter box.
Did you "Burp" the cooling system once you put it back together? if not then that is one of your cooling issues.
As far as the mid range problems I have always put a washer under the needle to raise it. Its always finikey in the transition.
Any questions just ask, I have worked on a lot of these as a suzuki tech.
You'll need to log in to post.