
Keep the top blue, keep the wheels silver. Dark gray / black the other new additions.

In reply to wvumtnbkr :
Like this? I think I was so interested in the idea of painting the top section that I didn't even attempt to consider with it as is. You may be right. I'll keep pondering on it.

Also still not certain if I want different center color but since the silver doesn't look terrible I'm not in a rush to paint them quite yet.


wvumtnbkr said:Keep the top blue, keep the wheels silver. Dark gray / black the other new additions.
+1

In reply to Sonic :
+2. Black basket weaves only work on GNX's and nothing else.

I'm gonna be the odd man out. I like ALL the things you've considered making black. Top, A & B pillars, and yes, the basket weaves also black. But asthetics are so personal preference. Do what looks best to your eye and makes you happy.
So I decided to apply the treatment from a side view and it's changed my mind I think to no black top paint or even spoiler. I think it would be hard to tape off the spoiler and not look weird since it's molded into the body. I plan to modify the skirts to flare out at some point and wanted to see with or with rear valance so that's added in digitally. Wheel color is still in consideration and to me I don't think a dark gray or magnesium would be terrible. Yet the existing silver isn't bad either. Also be aware I'm red/green color blind so sometimes my colors aren't exactly correct.


With no changes for comparison.


I think rockers and basketweaves black, everything else blue.

Those wheel centers would look cool in a pale gold with the dark blue paint. Just sayin'.
Cool project btw.
In reply to Matt B (fs) :
Gold or bronze is on the list of options for sure. It's hard to beat blue and gold.
It's been a long weekend. Lots of work on the fleet and a little bit on the 914.
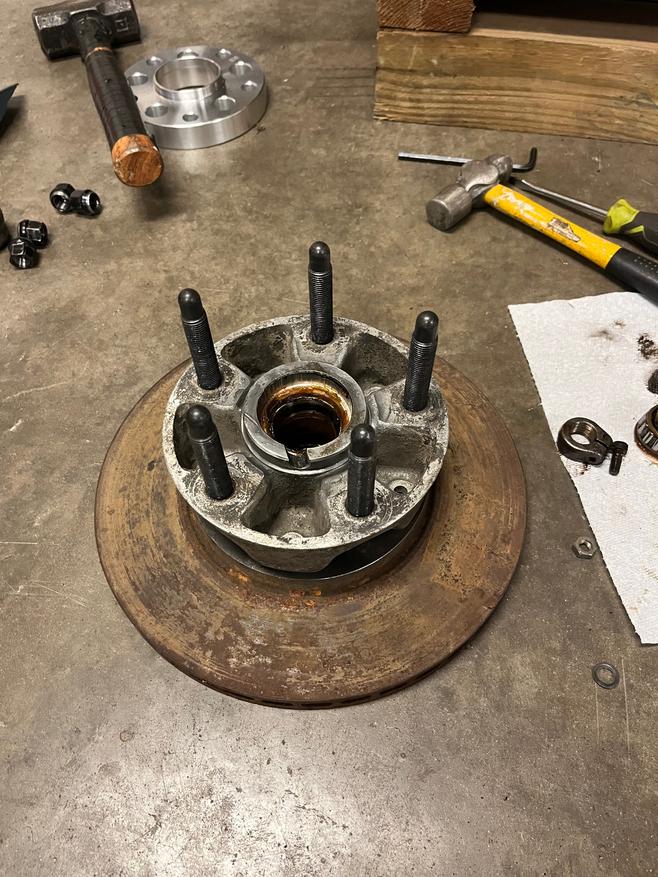
My 1" wheel spacers and extended studs arrived, and it felt this would be a nice break from fabrication. I started with the rear driver side. The ball joint tool made quick work of removing the old shorter studs.

I knew I could install the studs with some spare lug nuts but splurged on a $15 Lisle tool. Totally worth every penny. It made things go so fast. 10 out of 10 totally recommend.
I also did plenty of wire wheeling of surfaces while everything was exposed. I plan to pull all of the hub for new bearings and e-brake modification. Then I'll do a coat of paint and some rust inhibitor where needed.

The studs are all Rennline 72mm. They weren't cheap but I couldn't find anything within the price range that would work. Luckily Pelican had a kit with lug nuts that were cheaper than what I could find anywhere else.
Anyway enough gabbing, here's the spacer on now.

On to the front. I wasn't able to use the ball joint tool but a quick rap from a sledge knocked them out while the hub was still attached to the car. I was thinking this would be more difficult of an assembly process but once I figured out how it all came apart it went super fast.

Once again the stud installer tool made it go so fast.

That was the start of my Saturday morning. The rest of the day was eaten up more important fleet work and general life stuff.
Sunday I started the day with the passenger side install. I knew it would go fast since the driver side took maybe 15 minutes per hub. The rear was a little more difficult since it was the only caliper left installed on the car. Once that was out of the way I blazed through the rest and put the car back on it's wheels for a nice reveal.
Oh, almost forgot I installed some cheapo signal lenses. I need the car to look more finished for motivation and it's funny something so simple can do that. Anyway, the lenses and spacers look SPLENDID.
I rolled it outside for some pics.
FEAST YOUR EYES


The spacers made a huge difference.


I spent the rest of the day doing more of our fleet work. In between jobs and all around the weekend I did some stuff that's not really pic worthy. The spare trunk I got a while back donated it's rubber bumpers. The driver side one was gone so it made contact with the tail light lens cracking it pretty badly.
The front latches from the targa top needed installed with one of the threaded inserts completely MIA. I cut down a rivnut and fit it into place. I still need to epoxy it in for good but for now it's working and finally confirms the fitment isn't all wonky. Before it wouldn't pull flush against either windshield pillar without creating a gap at the other. I was beginning to think the accident damage had affected the pillar alignment but happy to report if it is, you can't tell.
The wiper arms were installed for a more "complete" look. The rocker cover on the passenger side got a little massaging to pull it tight where it belongs. Still far from perfect but now it will stay put where it needs to.
I know I did more stuff that I've already forgot about but it was a good weekend. I left the car on the ground so I could stare at it more before getting it back on the cribbing blocks. Even my oldest mentioned it looked WAY better than before without provocation.
Speaking of staring at it, WOULD YOU JUST LOOK AT THAT!


looking good

Yeah that looks great!!! Makes a huge difference staggering it back out.

I'm a fan of the silver centers, exactly as it is......I must be old school....or maybe just old! ![]()
In reply to MiniDave :
I'm considering just keeping them in silver for a while. No rush to paint them and they really do suit the car as is. Also they have a bit of lived in patina that kinda matches the vibe of the rest of the car.

I love it!
I spent an hour or so starting the process of pulling the wire harness on the parts car. All I have left is the frunk harness to push through the firewall.
I really don't like the idea of using old wire but also kinda want to press the easy button by refreshing what I have. I can remove quite a bit of the stock harness since I will be using the digital dash and planning to update to blade style fuses. Once I get it all out I'm going to assess the condition but so far it seems decent enough I can make it work.
So with that said I'm still considering a universal wiring harness or just going full scratch built. It seems silly to do that because this is just a ratty car but I also have a whole new engine harness and just about everything else electrical will be new. There's a 15 circuit beefy harness that's more modern I've been eye balling from Painless. It's kinda pricey but seems like a good option. All of the other kits seem more geared towards older GM tech and if I'm going through the trouble I'd like it to be updated with the rest of the system. Or do I just use the older style since it's basically chassis anyway? Lot's to ponder.


I love this build, great work so far!

American auto wire. Way better quality and tech support than painless.
In reply to Dusterbd13 :
Are there any kits on the market with pre labeled wires but no fuse box or relay block? I kinda would rather terminate all of that myself as well which has me thinking about just getting a basic kit and using only the wiring. Maybe I am just over thinking this though.
In reply to captainawesome :
Don't touch it. Just go drive the piss out of it.
In reply to wvumtnbkr :
I mean I guess I could always revisit doing a full new harness later? My biggest worry is that I'll never go back and do it right, or the way I think it should be done. Yet I don't know what is really right in this circumstance anyway. I think once I lay out the harness I can see if it's going to be harder to modify or start from scratch. One thing I would like to do is maybe split the stock one into sub-harnesses. They way it is now makes it hard to service one section. Not sure how I would do that yet but it would be a major improvement.
In reply to captainawesome :
Oh, sorry. Get the good new modern harness. Buy once cry once.
Don't touch how it looks. It is soooooo. Gooooood.
In reply to wvumtnbkr :
Yeah it does! Other than some needed bumper repair/support the rest will mostly stay the same. Oh and some mirrors. Gotta find a pair of those.
I have built a ton of harnesses. Never had a problem with a well designed kits fuse panel or relay block.
The old Ron Francis stuff was evil. Not well designed in my opinion. The American auto wire 14 or 22 circuit universal stuff has well thought out labels and appropriate fuse/wire size. Not sure I'd do many/any differently in most cases. I do, however, make service breaks at bulkhead wherever practical. That way the harness is bench serviceable later in life.

I'd vote new harness, like you say, you'll be much less likely to go back later.....plus old wires are scary, always itching to let their smoke out
You'll need to log in to post.


