
I'm a sucker for projects. I simply can't help myself. My sisters and I joke that our family motto is "I can probably do that" - so for better or worse, I have a compulsion to just give things a shot.
So, when my 1990 Miata finally sold, and I had a few pesos in the old bank account that I could divert to something new, I convinced my wife and long suffering companion that we should upgrade our home audio situation. We have a decent receiver, and some fine but huge, old speakers that we inherited from someone that take up quite a lot of space. I had read about the Overnight Sensations on here (probably) and bookmarked them months ago, so rather than just buying some new speakers like a rational consumer, I decided I could probably build some. This thread will be my attempt to create something functional from a precut kit with preselected components - hopefully fairly low risk.
I do have far too many projects, and like many others here, I work too much and also have a very young son. I'm hoping that by posting this, I'll get some motivation to actually get this little side project done in a reasonable amount of time - and have some nice speakers to enjoy music with as a result!
Tonight was my first night with some time to spend on the speakers, so I jumped right in.
Here's one of the cabinets, as delivered

They're fairly nice plywood, CNC routed.
They fit together well

It was here that I discovered that my wood glue had grown legs. OK, no big deal, let's pull out the crossover components and take a look at those.
Here they are on the bench - note clean layer of sacrificial masonite, thanks to my snowblower escapades last week I thoroughly rustproofed the workbench, so I needed something to protect this stuff so I had some hope of a successful assembly.

Cool! Looks easy. Let's cut some mounting boards out of masonite - I like a fine toothed pull saw to cut this stuff, doesn't wake any sleeping babies and I still get a nice clean edge.

The piece it's sitting on is the bottom, and it's just small enough to nestle cozily in there. Perfect.
Let's assemble the new soldering station (because any project is, ultimately, an excuse to buy more tools).

Looking good. That little tray has a tiny nut and bolt that was a challenge to get in, but I managed. Note that I don't have any solder. Right. Add that to the shopping list too.
I started to lay out the components on the board - they'll fit nicely. Parts Express recommends hot glue to secure everything, and I am lacking a hot glue gun, so at this point I decided to call it a night and regroup tomorrow, once I'm more appropriately equipped. I leave you with a shot of the rest of the components in the box - drivers, tweeters, and baffles. I also had to buy binding posts and speaker wire, 2 essentials that don't come in the kit.

Shopping list for tomorrow -Hot glue gun -Solder -Stain for cabinets -Wood glue
See you tomorrow night with an update!

I'm now trying to come up with an excuse to buy a kit too. Looks like a fun project.
I built a set of Swope MTMs from I believe the same designer, but they didn't build the cabinets for them. The Swopes sound great, much better than anything store bought on the same range, so I'm sure you'll enjoy those. Check out the tech talk forum on the parts express website.

It is a fun project. I made a pair a few years ago that I wound up giving to my father. After the overnight sensations, I've now built 4 other pairs of speakers, and I'm reconfiguring one that I had previously (poorly) built.
So... the list is currently
1. Overnight Sensations - went to my parents
2. Statement Monitors - main speakers
3. Lineup F4 (fullrange) - boombox build
4. Quarks - went to sister in law
5. Tritrix MT - went to my brother
6. Lineup F4 - reconfiguring as bookshelves (in progress)
I have lots of siblings and in-laws, so I plan on building at least one pair a year and giving them as presents.
It was a good excuse to buy a decent table saw and router.

I used to be big into building speakers back in High School and College. designed the box sizes, ports, etc...even built a set of transmission line speakers. Still have a set of 15" woofers in cabinets in my garage that I put together. I need to get them hooked up again... ![]()
Thanks for the encouragement! I've never been all that into audio - since I have no shortage of expensive hobbies already - but this seemed like a good way to get just a taste.
Anyway.
Wood glue, stain, and solder acquired. Lowes didn't have hot glue guns. I'll figure something else out when it becomes a problem.
I only had a few minutes, and only enough clamps to do a really good job doing one cabinet - so that's what I did.

Trying to make progress each night, no matter how small.
cmcgregor wrote: Trying to make progress each night, no matter how small.
That's the key, right there. Nice work. BTW, great drill press. ![]()

These have been in my book marks for a few years.... Im interested to see how you like them!!

What is the crossover slope? 12 or 18 db per octave? Also, did they supply a choke for the woofer?
Jerry From LA wrote: What is the crossover slope? 12 or 18 db per octave? Also, did they supply a choke for the woofer?
I have no idea. I don't even know what crossover slope means! The wiring diagram is available here, if that tells you anything. They did provide a port tube, if that's what you mean by a choke.
volvoclearinghouse wrote:cmcgregor wrote: Trying to make progress each night, no matter how small.That's the key, right there. Nice work. BTW, great drill press.
Thanks! That was a $40 Craigslist find. I still need to get a working motor for it, but I haven't needed it badly enough yet to get it fixed.
I want to say that looks like 18 dB, but I'm a bit rusty, so it could be 12.
I used to use simple 6 dB crossovers, which work, but you need pretty forgiving speaker elements.
In reply to volvoclearinghouse:
The advantages of 12 and 18db crossovers are allowing more choices for speakers to be paired together. The disadvantage is the phasing problems and image degradation that come along with them. 6 db per octave requires very careful driver choices to match characteristics together. For instance, if woofer A rolls off at a similar rate to tweeter B's rolling in, you've got a winner.
In reply to cmcgregor: The crossover slope is the rate at which the output from driver gets attenuated before the other driver kicks in. A 6db-per-octave slope means the output of the woofer "crosses over" to tweeter operation in a gradual way while 12 and 18db crossovers make the transition more abruptly.
The choke I'm referring to is a small coil to keep higher frequencies out of the woofer or midrange. Obviously, they won't be heard but they contribute to voice coil heating. The presence of chokes in the package would be clue to the crossover slope. No chokes might mean 6bd-per-octave, thereby gladdening the hearts of purists everywhere. ![]()
In reply to Jerry From LA:
Ah! I see now.
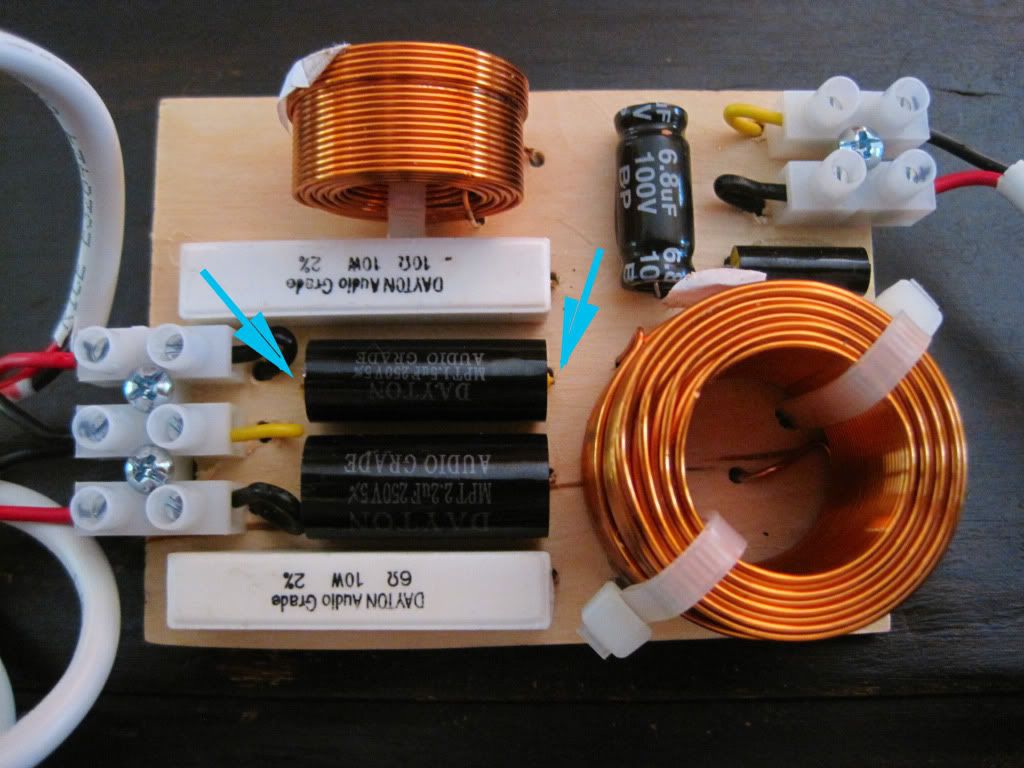
Here's a (googled) image of the assembled crossover - there appear to be 2 chokes (right?).

Those Hakko knockoff irons are supposed to work a lot better with genuine Hakko T18 series tips, the knockoff heaters tend to have a smaller diameter and the knockoff tips all have a bigger ID than the real thing. The genuine tips run $8+ a piece but are supposed to be worth it, I bought a really cheap assortment off ebay to figure out what shape I like best.
In reply to cmcgregor: You got it! Some nice parts in there. Occasionally, some of those audio caps sound better after breaking in for a couple of weeks.

I have the same drill press. Only floor model.
Do you have the motor side pulley? Its a multi ratio setup.
And mine has a 1hp table saw motor on it. I would not recommend that.
Back on topic, im watching and learning. Id like to do some upgrades to the home stereo.
I not only want to build/assemble a speaker kit now, but I want to build a tube amp to go along with it. Damn you cmcgregor look at what you started!![]() I could make a nice little book shelf system for my office to replace my Bose waveradio.
I could make a nice little book shelf system for my office to replace my Bose waveradio.
In reply to T.J.:
LOL! That thought had crossed my mind as well..... One project at a time!
Duster, I don't think I have the correct motor side pulley. Pretty sure the one it came with is a single - it was on a variable speed motor, but the motor overloads very easily. I haven't looked into whether I can get it rebuilt or just swap it. I got a Harbor Freight motor from my dad that they replaced due to a cracked capacitor housing, but the shaft size isn't right. Like I said, when there's an occasion that I need it, that's probably when it will get fixed, and not a minute before.
BrokenYugo - thanks for the tip (puns!). I'm going to give the one that's on it a shot, we'll see how much soldering I actually do in the future.
In reply to cmcgregor:
Whelp, I just ordered an Overnight Sensation kit of my very own.
In reply to T.J.:
I should get a commission!
Last night was devoted to quality time with the wife. That's in short supply these days, so nothing got done on the speakers.
This morning, I ran downstairs and glued up cabinet #2

Then, I decided that I wasn't gonna go into work today. So instead, I messed with my crossover mounts. Here's the first one, with holes drilled and the components mocked up.

That's when I discovered that they're a lot easier to assemble if you cram everything together so you can solder the leads together without needing a bunch of added wire. So I made a revision 2

Much better.
Then I spent far longer than I'd care to admit staring at the wiring diagram and googling images of assembled crossovers to make doubly, triply sure that I got the wiring right before starting to solder it together.
That's when I discovered just how right BrokenYugo was about the tip on that soldering iron. It's hard to get into tight spaces, because the very tip doesn't get quite as hot as the rest of the iron. That would be due to the poor fit of the tip. Lesson learned.
Baby was crying and I didn't quite finish, but I made quite a lot of progress on the first crossover, so hopefully I'll have some time to finish it up and grab a picture during the day tomorrow.

That's a (B4N) Paul Carmody build, isn't it? He builds some nice stuff. I'm doing the full range thing right now, and fiddling with a pair of (M3N) dragon foals. Very impressive for a pair of 3" drivers.

So these are like the IKEA version of speakers? ![]()
Neat.
You'll need to log in to post.


