
NOHOME
PowerDork
5/1/16 7:26 p.m.
This is really trying...
I am now two weeks behind in my schedule to have the underside coated in rocker-guard.
I keep finding details that need to have one more weld...one more grind or one more whatever! AAAAArrrrgggghhhhh!!!!!
Made it this far before I ran out of time, patience and beer.
I really wanted to fire up the Shutz gun and undercoat this thing, but I also dont want to backtrack later.
So far 8 tubes of seam sealer have bit the dust and the frame rail reinforcements are welded in place; pretty happy with that bit.

You're a hero. Keep it up!
In reply to NOHOME:
Re: the thin Miata tin and welding... I had the same experience welding on my early Honda.. best I've heard it put is "it's like welding wet toilet paper" 
My Volvo 1800 however, is sooooo much easier to weld on.. like it was made of real steel or something 
ccrunner
Hang in there! It's looking great and all that attention to these things now will pay off in the long run.
You'll be glad you put in the extra effort here later for sure. Schedules be damned! 
Just remember, perfect is the enemy of great.
LOL - I think the enemy of perfect is "done".

NOHOME
PowerDork
5/2/16 6:24 p.m.
I think that I am getting into an impatient phase of the project.
As to welding the 1/8" steel to the paper thin Miata frame-rails. The solution was kind of counter intuitive. I cranked the welder up to the "D" setting with "E" being max. Set the wire speed pretty low.
By aiming the wire at only the thicker metal, doing a short pulse and letting the molten metal flow on to the thin Miata tin, I was able to get amazing results. I only blew one hole along the way.
Part of the reason I am getting antsy is because I have agreed to take on a paying job in July to help finance the Molvo. The aforementioned MGB (page 25)is going to require a bit of remediation and I need to have the Molvo off the rotisserie and rolling to make this all happen.
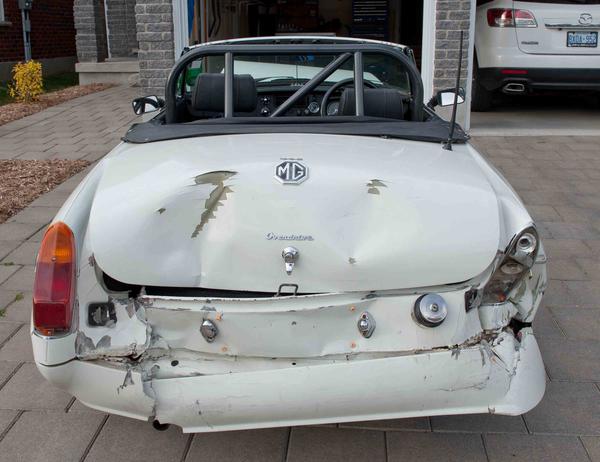
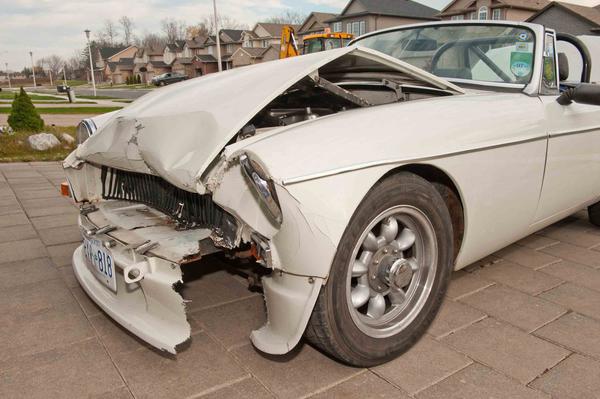
Going to have to put the Molvo on hold for three months while I sort this poor MGB.
Holy crap that thing got wanked! But it looks like it was an amazing car before, and the body Guy is a talented, anal retentive type, so it will probably be amazing again, assuming his pockets are deep enough.

NOHOME
PowerDork
5/2/16 7:14 p.m.
Dusterbd13 wrote:
Holy crap that thing got wanked! But it looks like it was an amazing car before, and the body Guy is a talented, anal retentive type, so it will probably be amazing again, assuming his pockets are deep enough.
Our mutual guess is that it is going to take 20-25k to put it back together. The owner is realistic that another 10k could get burned if he succumbs to the lure of restoring everything better than new. Insurance might cover 12k of this all said and done.
It is an Australian build MG and has seem much of the world in the hands of its career-military owner.
By the way...what you have heard about roll-bars on street cars is true. Both the driver and passenger had a bad wallop to the head because of the rollbar.I figure the odds of rolling an MGB are a couple of orders of magnitude lower than the odds of being rear-ended in an MGB and hence would never put a rollbar in a street driven car.

NOHOME wrote:
By the way...what you have heard about roll-bars on street cars is true. Both the driver and passenger had a bad wallop to the head because of the rollbar.I figure the odds of rolling an MGB are a couple of orders of magnitude lower than the odds of being rear-ended in an MGB and hence would never put a rollbar in a street driven car.
People say the same about rolling Miatas, yet I personally know two people who have. One going too fast (but not all that fast, maybe 50mph) for the road and one where a minivan decided to occupy the same space and sent him down the hill. Rolled three times and walked away, albeit with the afforementioned nasty bump to the head. Another friend got t-boned on the driver's side and you could see where the B-pillar deformed but the roll bar stopped the full sized Chevy pickup from intruding up to the console. He walked out of the hospital the next day. All three of them got free replacements from Hard Dog once they sent in the old bent bars.
I will NEVER own a Miata without a roll bar. Or padding, which Hard Dog sells for $60 shipped.

NOHOME
PowerDork
5/15/16 6:16 a.m.
So, believe it or not, another week-end is going to go by without the bottom getting sprayed.
That is because ADD has struck and I decided to put an engine together. I suspect that this was driven by the fact that the new transmission has arrived and a need to create room on the shelves; hence turn all the boxes of engine parts into one big part.

Hopefully by tonight this will be a long block.
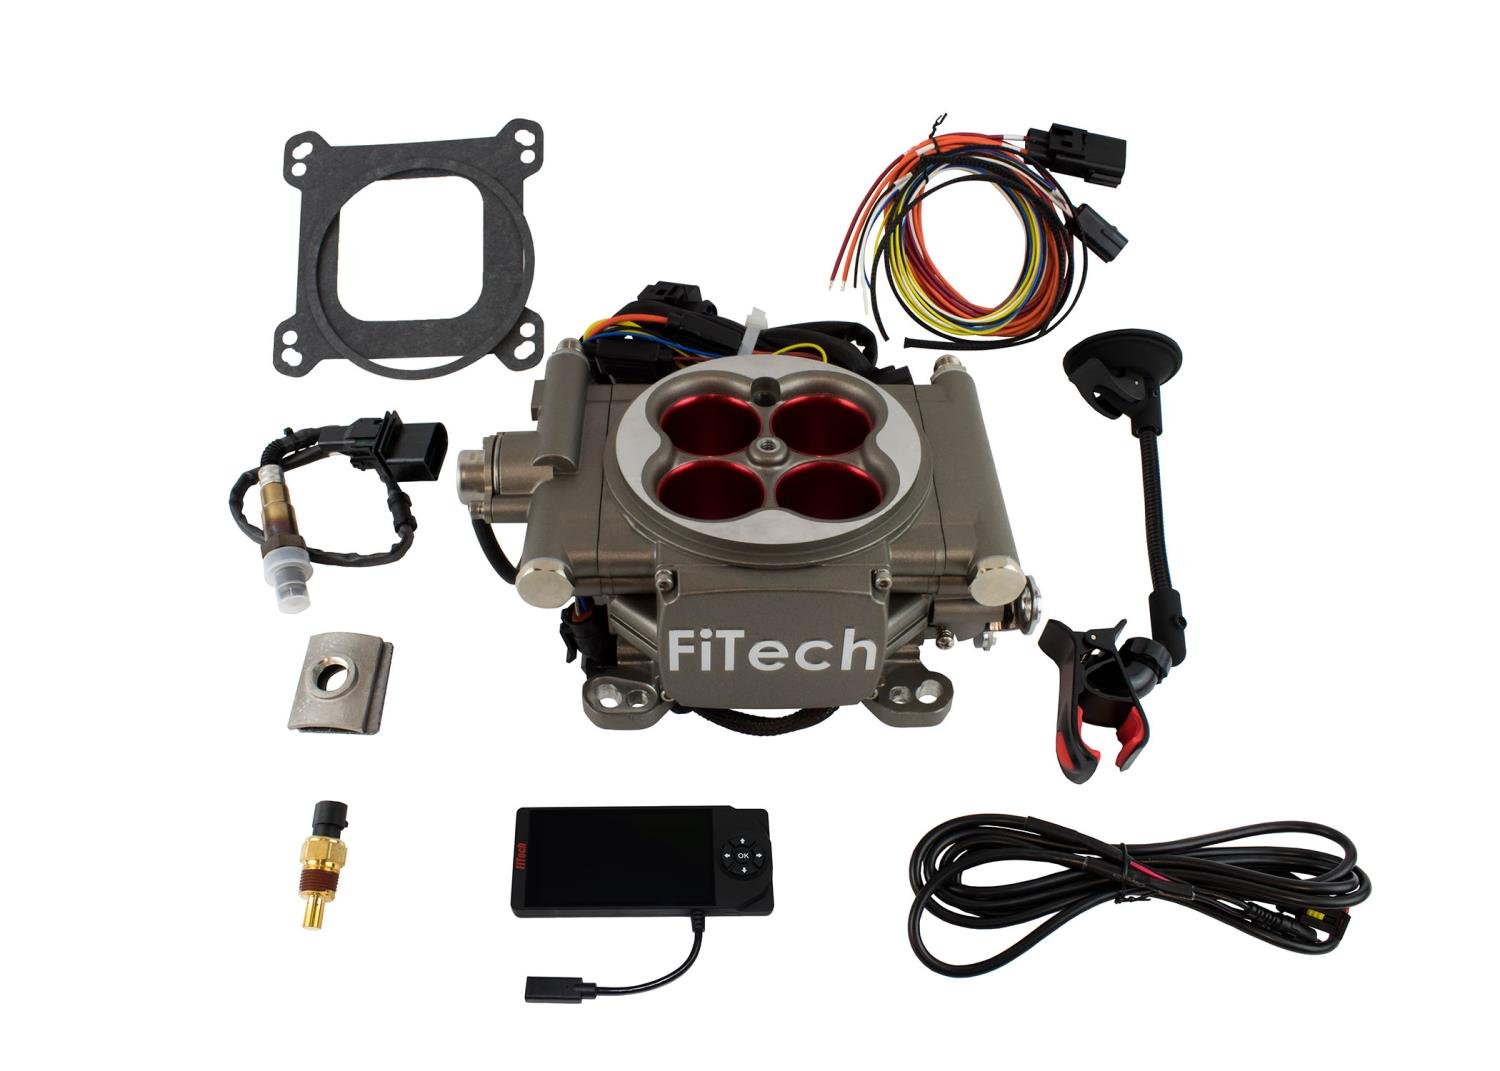
The plan is to go with the FiTech throttle body fuel injection. Unfortunately, a year into release, FiTech is still having a hard time keeping up with demand.
Also learned a neat trick last night. If you want the cam install to be a piece of cake, lay the engine stand on its back so the block is facing up. Cam goes down the middle with little risk to the lobes or bearings. On a ford, install the cam before you install the crank and it is even easier.
Unless you have hood clearance issues please consider using a port injection manifold and an MS2 with a crank trigger (36-1) You can even do distributorless ignition.
Throttle body injection has all the same issues a carb motor has, fuel distribution is the biggie.
Port injection also flows better as it does not have the weight of the fuel in the air, closely followed by wall wetting and puddling.

NOHOME
PowerDork
5/15/16 11:36 a.m.
bentwrench wrote:
Unless you have hood clearance issues please consider using a port injection manifold and an MS2 with a crank trigger (36-1) You can even do distributorless ignition.
Throttle body injection has all the same issues a carb motor has, fuel distribution is the biggie.
Port injection also flows better as it does not have the weight of the fuel in the air, closely followed by wall wetting and puddling.
Going to be this or a carb. The Fitech thing has been out for a bit over a year and getting great reviews as long as you are willing to run fuel return lines and install a proper pump. There is actually a long waiting list for these.
I would not consider it the hot ticket for racing, more for classic cars that you want to drive and not stink of fuel when you arrive. Holley is going to have a VERY similar device out in June.
Is port injection better? Yeah I would argue so. But is it better in any way that I will notice? Not sure. Is it WAY more expensive ( $2500 versus $700 for the FiTech) As to the MS stuff, or any desire to learn a new programing trick...Man, am I ever NOT looking for another project at this point!

Ian F
MegaDork
5/15/16 2:11 p.m.
Aren't you using a SBF? How FiTech TBI is cheaper than MS running OEM parts I don't understand. The only problem I can think of is if the OE Ford manifold won't fit under the 1800 hood.
Odd... Holly was doing stand alone TBI EFI over 20 years ago... not sure how this is "new" for them.

NOHOME
PowerDork
5/15/16 7:10 p.m.
Made it this far:

It was a long day of cleaning and measuring stuff. That I can see or measure on the Chinese heads, everything looks reasonable.
The only thing that caught me out was at the very end when I went to put the roller lifters in their bores; they were VERY HARD to install due to an interference with the head.It was a very slight interference and could be overcome with firm hand pressure, but not what I would call ideal. Also, the rocker studs that came with the heads were the wrong size for the rockers, so I need to get new ones.
Ian:
As to the change of plan in induction, the FiTech and Holley are both self learning EFI throttle bodies. There is no external controller since that now resides on the throttle body.
Google up "Holley Sniper" or "FiTech" to see where this stand alone has gone. The MS stuff alone is going to run the cost of the FiTech and then I need to learn how to program the MS stuff. Like I said, as much as I like to learn new tricks, not looking for more side projects at this point and MS is first and foremost a new skill before it becomes an induction system.

NOHOME
PowerDork
5/22/16 9:51 p.m.
Enough of this wussy mechanical assembly stuff; time to get back to some tin work.
This post is for Ian who needs to get going down this road!
While it was tempting to do spot repair on the sills, I would hate to have rust pop-out within a year or two, so after securing a new factory pressing sill, I declared war on the outer sills. Was a bit concerned about what would be inside.
As usual, no need for spot weld drills. Do a shallow pilot hole with a 1/8 bit and follow with a 5/16 that has been reground with a shallow bevel.


The inside bits were in reasonable shape after a bit of wire wheeling

Last bit I need to figure out is how to remove the last bit of sill that tucks under the B pillar and dogleg. While the front bit was a simple one hour job, the rest of the car seems to be assembled over this little bit of sill

Here you can see the little bit of outer sill left and the only real damage on the inner sill.

The good news is that I think I am finally getting rid of all the sand in this thing. Bet another pound came out today.

Also decided to redo the engine mount cross-member. Was never happy with the way the cross-member was attached to the sub-frame.
Before:
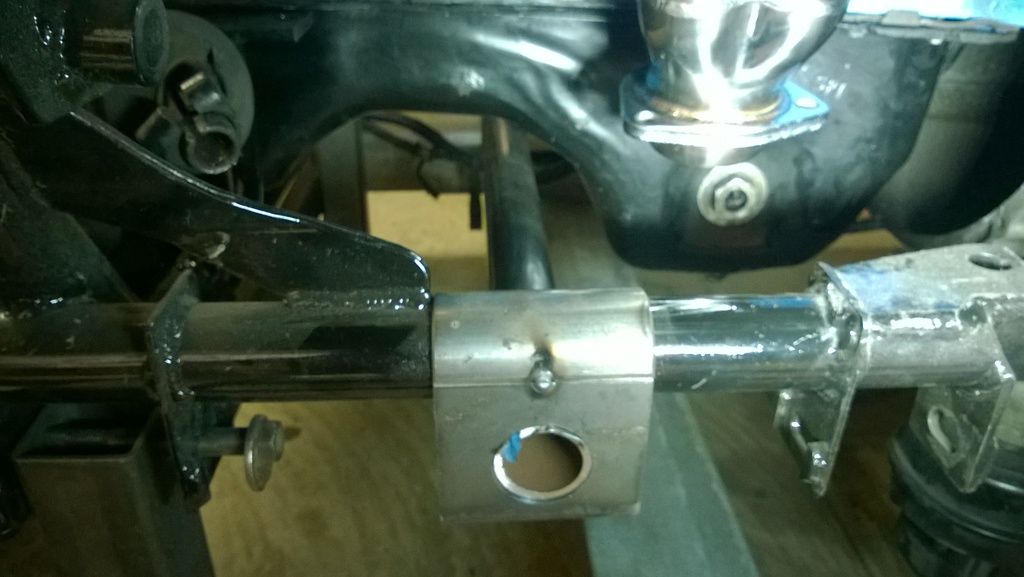
New design. Also moved up to 1.75" tube just because if worked out better with what I had in the shop. Bit of work left to close off the faces, but I like this design a lot better considering that the engine is going to be hanging on this structure.


Ian F
MegaDork
5/23/16 8:24 a.m.
In reply to NOHOME:
You are pretty much correct in that almost the whole car is assembled around the middle sill panel (the one with the big holes in it). There are three layers of metal that make up the sill. My car needs all three. On both sides. Fortunately, they aren't hard to get and the R&R process is fairly well documented.
Speaking of sheet metal - I picked up an entire nose clip from an 1800E at Carlisle this past weekend and paid less for it than one of the 4 repair panels I would need otherwise.
The more ES's I see for sale, the more I realize my car is still worth restoring. There was an ES for sale in the vendor area with an asking price of $5250. It needed almost as much rust repair as my car does. There were bubbles and paint weirdness all over it. It did have some interesting features. Someone had added power steering to it using what I'm fairly certain are parts from a Volvo 164. The pump was mounted where the A/C idler pulley would normally go on a B20 (car also had A/C). The PA inspection sticker on it was from 1994 and the tires were very dry-rotted, so who knows when it last ran. The asking price was a bit strong, IMHO.
NOHOME wrote:

Rather than the sheetmetal brackets that tie them together, could you not bend the cross bar on both ends and then notch and weld it for a cleaner (and probably stronger) joint?

NOHOME
PowerDork
5/23/16 8:01 p.m.
DILYSI Dave wrote:
NOHOME wrote:

Rather than the sheetmetal brackets that tie them together, could you not bend the cross bar on both ends and then notch and weld it for a cleaner (and probably stronger) joint?
The brackets are whittled from 2x4 1/8" wall tube. What I like about this approach is that the weld is not critical since the engine would sit on the cross member even without any welding.

NOHOME
PowerDork
5/23/16 8:22 p.m.
Ian F wrote:
In reply to NOHOME:
You are pretty much correct in that almost the whole car is assembled around the middle sill panel (the one with the big holes in it). There are three layers of metal that make up the sill. My car needs all three. On both sides. Fortunately, they aren't hard to get and the R&R process is fairly well documented.
Speaking of sheet metal - I picked up an entire nose clip from an 1800E at Carlisle this past weekend and paid less for it than one of the 4 repair panels I would need otherwise.
The more ES's I see for sale, the more I realize my car is still worth restoring. There was an ES for sale in the vendor area with an asking price of $5250. It needed almost as much rust repair as my car does. There were bubbles and paint weirdness all over it. It did have some interesting features. Someone had added power steering to it using what I'm fairly certain are parts from a Volvo 164. The pump was mounted where the A/C idler pulley would normally go on a B20 (car also had A/C). The PA inspection sticker on it was from 1994 and the tires were very dry-rotted, so who knows when it last ran. The asking price was a bit strong, IMHO.
Ian:
If you know of any documentation that explains how to uncouple this last bit of the outer sill from the B post, I would love to read it.I can figure something out, but if there is a known road, why re-invent?

Not seeing an easy way yo get the outer sill remains out of this area. The factory propensity to braze stuff is not helpful.


Ian F
MegaDork
5/24/16 9:06 a.m.
It's been awhile, but I remember seeing some YouTube videos about guys doing it. However, they were usually doing complete sill replacements, rather than attempting to remove specific layers. I'm not sure there is any way to completely remove the outer sill panel without removing the part of the fender sections that overlap it. So there may be a bit more drilling and cutting in your future.
I've heard of guys (racers mostly, I think) replacing the middle panel with rectangle stock to increase chassis stiffness. While the 1800 is fairly stiff for a unibody car of the era, it's still not up to modern standards.

NOHOME
PowerDork
5/24/16 9:34 a.m.
Ian F wrote:
I've heard of guys (racers mostly, I think) replacing the middle panel with rectangle stock to increase chassis stiffness. While the 1800 is fairly stiff for a unibody car of the era, it's still not up to modern standards.
Yeah...I think there might be some shortcut taken here where I trim the new panel to avoid cutting into the B post and/or quarter panel. It is not something I would normally do for a proper restoration and I would love to know the P1800 restorers do this just to have it in my mental data-base.
As to having to worry about sill strength, don't forget that I hid a bit of extra re-enforcement inside the sills
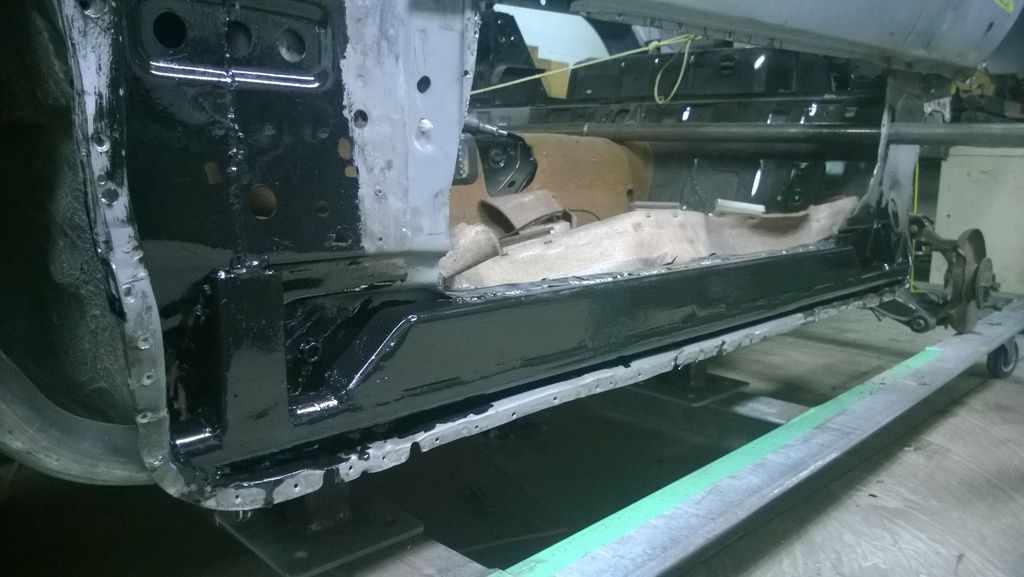
The outer sill should be mostly decorative in this application.

Ian F
MegaDork
5/24/16 10:45 a.m.
In reply to NOHOME:
Ah - right. In that case, I'd probably ditch the middle sill entirely as it is generally the worst culprit for collecting water and road grime and thus rusting. I'd consider cutting out as much as possible leaving enough structure for the outer sill panel to attach to.

NOHOME
PowerDork
5/24/16 11:21 a.m.
Ian F wrote:
In reply to NOHOME:
Ah - right. In that case, I'd probably ditch the middle sill entirely as it is generally the worst culprit for collecting water and road grime and thus rusting. I'd consider cutting out as much as possible leaving enough structure for the outer sill panel to attach to.
No need to get rid of the middle sill. It adds a bunch of strength and is in pretty good shape. I have also already replaced the inner sill structure (just a flat piece of tin) so at this point rust is not an issue.
You might have a different answer that I need. I just got off the phone with my P1800 panel supplier ( P1800.com) who tells me the reason he did not include a PS sill with my order is because he does not have one. Would you have a line on a PS factory outer sill panel? I have seen the repo stuff and it is not confidence inspiring.


