Woody wrote: The original plan was to do a valve adjustment, oil change and flush the brake fluid this week and put it on eBay by Saturday, since I have no intention of getting it registered... ...but then I remembered that I have these:Those are R-compound Toyos on Ronal R9s that I bought for my other car. I also have one of these:
And there's a Test and Tune Day in Hartford this weekend....
![]()
YOU Unbearable man!
We expect video and a discount because the car had been "raced" LOL
turboswede wrote: We expect video and a discount because the car had been "raced" LOL
All Porsches are race cars.
Besides, it's only being tested and tuned.
Video is unlikely.
What test and tune do you run in Hartford? Is it AutoX or a track? I'm in New York City and am getting a bit of cabin fever for the start of the season.
I am posting this picture to help me visualize R9s on a 911, not to entice you to go to the Test and Tune
(I couldn't find a targa...)
RossD wrote: I am posting this picture to help me visualize R9s on a 911, not to entice you to go to the Test and Tune![]()
(I couldn't find a targa...)
sniffs at lack of Porsche funds.
RossD wrote: I am posting this picture to help me visualize R9s on a 911, not to entice you to go to the Test and Tune![]()
(I couldn't find a targa...)
Oh my, I really need one of those.
I like the standard black/magnesium Fuchs better but those look pretty good on the black car (gray wheels) above.
Here's the story of air cooled 911 air conditioning: Remove it and live without it or spend about two grand to replace everything from end to end.
Search "air conditioning" or "a/c" on the Pelican tech forum. You'll have plenty to read.
Forgive the hijack--I don't mean to derail a good thread.
But did American Racing ever produce a version of that R9 wheel? I have a set on my MR2 that look identical to those, but they have ARE center caps.
Or do I somehow have the wrong center caps for Ronal wheels?
Enkei EK 83 is similar. But I think the Ronals are forged.
http://grassrootsmotorsports.com/forum/200x-classifieds/wtb-ronal-r9-or-amg-penta-wheels/43286/page1/
In reply to Will:
Yes I think American Racing did make a Ronal copy, I have a set of 14's that lived on my civic for several years and they have the ARE center caps. They are way heavy but looked pretty good.
LopRacer wrote: In reply to Will: Yes I think American Racing did make a Ronal copy, I have a set of 14's that lived on my civic for several years and they have the ARE center caps. They are way heavy but looked pretty good.
The enkeis above were marketed as ARE and Enkei, same as most Enkeis.
911 is looking gre...well actually I don't see any new pictures; but those ones up above on R9s look great.
Okay, raise your hand if you want to learn how to save a lot of money on Porsche maintenance.
Today we're talking about valve adjustments. Your Porsche needs this done every 10,000 miles, or in other words, every other oil change. I remember reading in How to keep your Volkswagen (or Honda Civic, I don't remember which) Alive, that nothing makes your VW / Honda happier than a valve adjustment. I suspect that the same applies here. Smart shoppers will ask sellers when it was last done, so I'm going to do the job and show you how to do it yourself.
Porsche shops generally bill about four hours for this job. My local shop gets $125 per hour, plus the cost of oil, filter and gaskets. And these cars hold a lot of oil. You do the math.
Let's save some money.
The first thing that you need to do is drain the oil. If you've never changed the oil on a 911, or even if you have, you may want to spread some plastic on the floor. Nobody told me this before my first time and I learned the hard way. Picture if you will, having your oil changed by Capt. Joseph Hazelwood and you'll see where I'm coming from. I spent the next few weeks wiping down baby seals, even though I have no idea how they got into my garage.
You are about to come face to face with three gallons of dirty, sleeping oil. And it's going to be pissed. Get the biggest drain pan you can find. If yours looks like this, make the hole bigger.
First you need to drain the oil tank behind the passenger's side rear wheel. Here's a look at it from below. Notice that it is wet with oil. We'll get back to this later.
While that's draining, throw some paper towels down in the engine compartment and change the filter that German engineers decided to mount sideways.
Dump out your oil pan and then remove the plug at the bottom of the engine to drain the rest of your oil. If your 911 is an '83 or older, you can remove the entire bottom plate and clean the screen, just make sure that you have a new gasket for it.
You will need several containers for the used oil. Remember; Porsches are not air cooed, they're oil cooled.
You won't be refilling the oil until after you've finished the valve adjustment, but this is a good time to add the world's most expensive Post-It note.
Woody wrote: Picture if you will, having your oil changed by Capt. Joseph Hazelwood and you'll see where I'm coming from.
It's not just that you do good work, it's that you describe it so well.
I was lucky, I was between sips when "the world's most expensive post-it note" came along.
Okay, back to the valve adjustment.
Porsches require a special tool to hold the feeler gauges used to measure the gap, since its impossible to get normal feeler gauges in there. And the blades break often, so you're supposed to get some spares. It's a tedious job that you need to develop a feel for.
But we're not going to play that way.
Instead of doing it the Porsche way, we're going to do a "backside valve adjustment". It's much easier and you can use normal feeler gauges. I won't go through a full explanation since others have described it very well, but, in a nutshell, if you measure the gap between the other end of the rocker arm and the cam, you can get the proper gap at valve end. Since the rocker arms don't have a 1:1 ratio, the numbers are different, but the end result is the same. In high school math class, they refer to this as The Commutative Property of Valve Lash.
You will need to remove all four valve covers and replace the gaskets, along with the washers and lock nuts. You can buy everything in a complete kit for less than thirty bucks.
Here's an illustration of what's happening, along with step by step instructions for the backside and normal methods. You still turn the engine the same way, no matter which way you measure the gap.
Traditional: http://www.pelicanparts.com/techarticles/101_Projects_Porsche_911/18-Valve_Adjustment/18-Valve_Adjustment.htm
Backside: http://www.pelicanparts.com/techarticles/911_backside_valveadjust/911_backside_valveadjust.htm
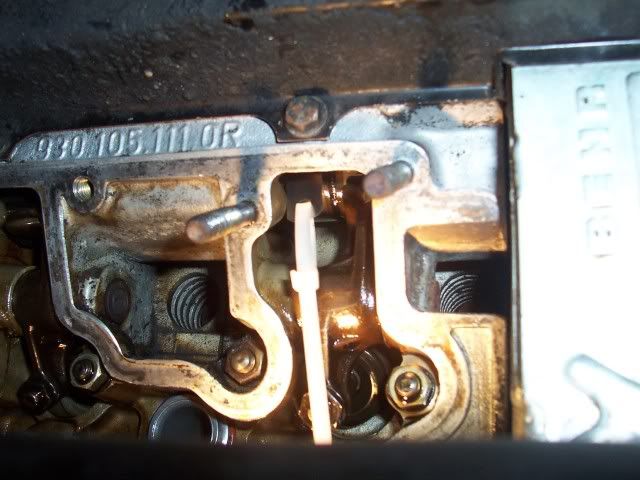
You use two feeler gauges and a "go / no-go" technique. You want the 0.0025 gauge to go in the gap, but not the 0.003. You will be juggling these back and forth, so it's easiest to disassemble your gauge set and identify the gauges with different colors. In this case, white is the "go" and black is the "no-go". You have to be careful with these, especially the 0.0025 gauge because they are almost as thin as foil. It's especially easy to bend the "go" gauge while trying to get it into the gap. It's best to check them several times, because you can lose the proper gap when you tighten the lock nut on the valve. The intake valves are on top and the exhaust valves are on the bottom, but you measure exhaust from above and intake from below when using the backside method.
Here I am measuring an intake valve from below (exhaust side) with my "go" gauge. The adjustment for this valve is then made from above.
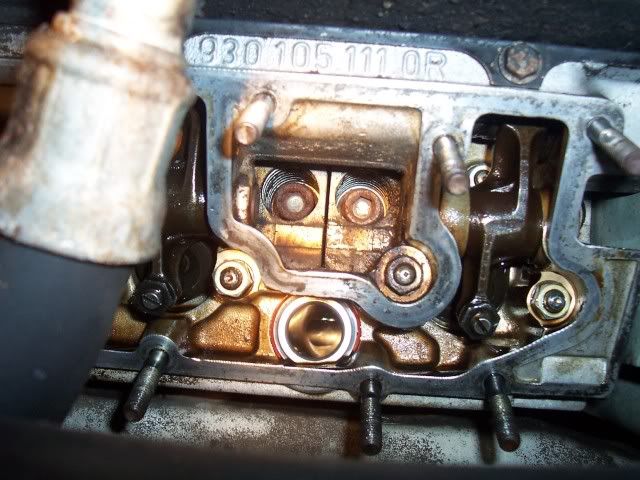
One of the most important observations that you can make when you have the valve covers off is to check for broken cylinder head bolts. Porsche cylinders bolt to the case individually, with four bolts each, 24 bolts in total. This is a common (and expensive) point of failure on Porsche engines, especially the 2.7 liter engines of the mid 70's cars (pre-SC), though it can happen to any air cooled Porsche engine. Exhaust side bolts are more prone to failure than the ones on the intake side and a broken stud may just fall out when you remove the lower valve cover. Look for six of these Allen heads bolts under each valve cover. They're in there pretty deep and are hard to see. I was very happy to find all of mine were right where they belong.
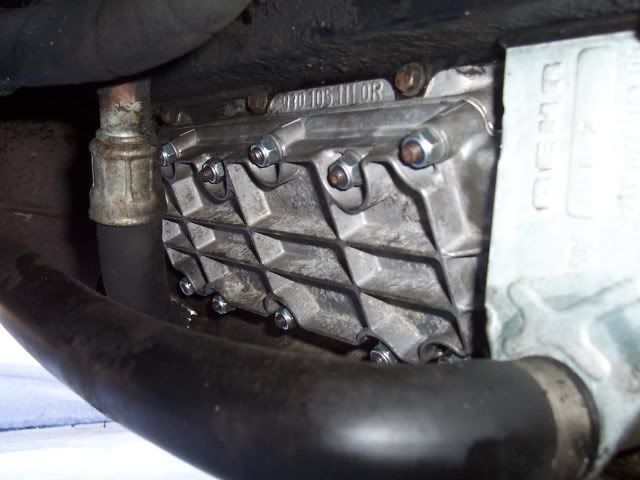
With everything adjusted and the valve covers cleaned, install the covers with new gaskets, washers and lock nuts. They do not need very much torque. If you over tighten them, they are prone to leak. Plain gaskets need to be replaced every time the covers come off, but you can also buy silicone gaskets which can be used repeatedly, though they are more expensive and don't come in a kit with the new lock nuts. Turbo valve covers are a common upgrade because they are reinforced and less prone to leaking.
Now it's time to add oil (don't forget!). Add nine quarts and then go for a drive to bring the engine up to normal operating temperature, then check the oil with the dipstick while the engine is running. You will hear the RPMs drop when you remove the oil cap. Then slowly add another quart or two until it is up to the proper level. Do not overfill your oil tank or the engine will suck oil in through the breather and you'll make lots of smoke.
It's still a fairly tedious job, but when you're done, you can bask in the glory of having turned wrenches on your own Porsche engine, and then roll around in the six hundred dollars you've just saved.
If it's your first 911 oil change, shower before rolling around in your $700 because you'll be so oily the bills will stick to you all over. ;-)
David
You'll need to log in to post.