
Tractor Supply pulled through. Yay! I spent a bit of time with a scrap of sheet steel slowly adding gas flow until the weld quality looked acceptable. I will leave it here rather than spend the money on another set of gauges that haven't been run over by a Lemons car.
It was in the high twenties in the garage. Wigwam skiing socks, four shirts, Nomex fireproof bottoms under the jeans helped a bit. Honestly, once I started with the welder, I didn't feel a touch of cold until I came inside. I love it.
I then spent A TON of time on the inner piece of the lower fender. Something nobody will ever see. I enlarged the slot I made yesterday and slowly welded in and hammered in the replacement piece to match the contours of the GM piece. Here is the result.


Then I took the welder and turned the arc up enough to weld through, and welded the two plates together while clamping them solid, effectively making it one thick piece of steel along the bottom of the fender. Then I addressed some small pinholes in the outer edge and ground it all flat. It will need filler and block sanding to be perfect, but it's pretty nice.

Oh yeah - I had a decade improvement in tune production. My wife bought me a $35 MP3 player and a cord for Christmas and Valentine's Day respectively, this rocks:

And then on to the fender. Wow. A LOT of work here. Shimming top and bottom, rotating it about the wheel center etc. First I ground off the filler I had on the leading edge of the door with the paint stripper on my 4" grinder. Then I slowly knocked the fender into place. I ended up innocently enough with one shim upper and lower. I had to enlarge the hole which is in the A pillar, since the A pillar patch either wasn't reproduced properly or was installed a little off. No big deal, though.
The leading edge of the door was addressed (wish I had pictures of this) by grabbing the door edge with a large adjustable wrench, spreading the load across the outside portion of the door with a long allen key, and bending the door a bit to match the fender. Now the resulting seam is much straighter when viewed from above, and although some filler will undoubtedly be required to flatten it all perfectly, it looks pretty darn good. See below and let me know what you think.


Now one bigger issue remains. The body crease is a bit off between the two surfaces. The upper contour is right on, as is the bottom contour, but the crease is off. Not up/down adjustment off, but the curvature seems slightly different. I think after careful investigation, that this fender is not the one originally fitted to this truck by GM. I think I can hammer/dolly the crease right now that I've properly aligned the entire thing.
Tomorrow is that, and then some work on the floor. If the floor goes well, the beginning of next week has be gathering a team of involuntary volunteers to rotate the truck in the driveway.

That turned out really, really good!

want me to come down there next weekend and help you rotate? its only a couple of hours.....
each way.
hopefully you know more people in greer than i do in albemarle.

Let me know if you need help. I am in the area.
I'll let you all know what day I'm moving it as we get closer, but I'll obviously not ask that you travel far. I have a few neighbors who may be able to assist, and truthfully, it isn't that much of a hill. Thanks to all.
So I am sick, it's -513 degrees outside, a slightly warmer -475 inside the garage, the kids are all sick, but I went out there anyway.
So I have to add some items to me agenda. The upper forward hole on the fender/cowl interface is oddly cut by the PO. I will weld a washer over this hole to make it more normal. Likewise, I had to move a hole in the A pillar path with my dremel as I noted earlier. I'll weld a washer in a similar fashion down there. I'll also weld the rocker panel/cab corner joint.
So the floor is a big pain. I have to remember that it's all going under POR 15 and then carpet. I can't make it perfect, and I'll spend hours and countless grinding discs trying, for no reason at all. This is more or less what I started with (bearing in mind that I started repairing this a few years ago).


The front part of that previous patch is going to get removed, the seam between the floor and the inclined section of the floor/firewall will get welded as well to avoid some of those holes. Luckily, neighbor Jimmy came through with a replacement bulb for the one we wrecked when doing his brakes, so I had some light.
Something like this


It was about at this point that I stood up. Remember by cold immunity from the other night? When I stood up I started to feel my toes, so I cleaned up and went in. I was out there something like two hours. Crazy how "little" I got accomplished there, but it's okay. Another night or two on the floor and then I will clean up the last of the passenger side. Hurray!
Two hours of solid progress, color me jealous! (Though I did home-make cinnamon rolls and home fries from scratch for breakfast)

Tuna, your progress is pretty remarkable - its looking really good!
And I feel you on the temperature issue. Cold garages suck.
Another major music upgrade. I grabbed my wife's old amplifier from the attic so I could use the speakers from my ghetto blaster and her component inputs. See?

So I have a choice that I am having trouble making. I have two bolts which are in elongated and enlarged holes. One hole I made elongated, one hole a PO made larger than normal. Do I weld a washer on the fender to make it look prettier? Do Ieave them alone? Something else? Just for everyone's viewing, the first bolt will be hidden by the cowl when it's bolted on.

And the second will be stuffed between the fender and the inner fender, only viewable if you remove the inner and look at the inside of the fender from under the truck.

The floor was a blast. Ugh. Weld, grind, weld, grind, weld, grind.

Done.
OK. I had a neat idea from a friend at work. He said I should weld the rocker to the cab corner from the outside of the truck, and then recut the groove. Now, this groove will be done a little prettier with filler, so it's not done, but it looks pretty good here.

Yeah?
If I don't do anything to the bolt holes I mentioned above, tomorrow I'll bolt on the hood, radiator support, radiator, and begin to get the inner fender mounted. Exciting!
Javelin wrote: Two hours of solid progress, color me jealous! (Though I did home-make cinnamon rolls and home fries from scratch for breakfast)
Michael, feel free to bring over some of those rolls for me at night, it's only like 3,200 miles.
4cylndrfury wrote: Tuna, your progress is pretty remarkable - its looking really good! And I feel you on the temperature issue. Cold garages suck.
THANK YOU!
It's hard to remember that it's looking better. Sometimes it's way easier to focus on just how much I suck at this.
really looking nice.
and id leave the bolt holes alone. honestly, if they wont be visible, will not make any functional difference, and arent ugly (theyre not), why worry? its kina like floor pans: sins are hidden, and teh harmless ones can stay that way.
i personally would have shaved that small body line myself.

The weld quality keeps getting better. Nice Work.
As for the paint, I'm painting a car right now, and I found that 120 grit is about the minimum I need for decent looking primer, and that's with a high build primer. Like you, I uses a lot of flappy wheels and 60 grit paper to remove previous sins. 120 grit cleaned most of that off, and whatever is left I've found fills nicely with spot glazing.
The floor turned out great, you'll be happy with that. As for the bolt holes, I'd personally weld in the washers. Simply because holes like that tend to allow the bolt to loosen, and then you'll have rattles like crazy. Since they'll be hidden, I wouldn't worry about grinding them flush or anything, just weld the washers and go. The idea to weld the cab seam from the outside and then cut in a groove is genius!

plus 1 for shaving the body line.
I like the idea of fitting a fender washer under the bolt and then welding it in place to cover the mangled hole.
Good votes - I am going to weld a washer on tonight.
VCH, you're right, my weld quality is getting into 'acceptable' territory. You should have seen the ones on the floor before I ground them off. They were almost pretty enough to leave on!
A few more voting items to take care of - stay tuned!
Wackos at job #2 want me again tonight, and are paying well. No updates for your morning oatmeal again I'm afraid, Jav!
Very brief night. I feel icky. Kids are sick, too.
I had to redo one portion of the groove I cut between the cab corner and the rocker. I did that, and took no pictures. Oops.
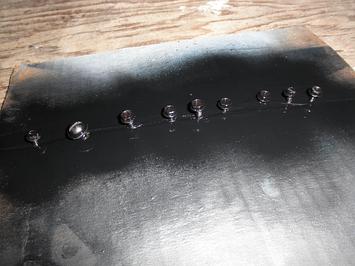
Here's the washer area. I think I'll leave these welds as-is, thoughts?


And then I got crazy, and bolted the hood hinge on again. Then I decided to try fitting the inner fender on. Wild!
Let's see if it fits.

Nope.
Let's try another way.

I guess I'll have to cut it in half and weld it back together once it's in.
Hehehe


That looks pretty cool. I'll bolt on the radiator support tomorrow night and attach the front of the fender and the inner fender properly, and then I am done with this side.
WOOOOOHOOOOOO!
that looks great!!!!!!!!
good job, man.
hell, im excited and it aint even my truck!
Hey tuna- here's some inspiration for you, when you get this far...
This build has come so far Tuna, You should be proud! Got any plans to start covering all the welds and ground spots with some rustoleum or POR15 or anything? Id hate to start seeing surface rust on stuff Ive worked so hard to bring back from the brink...
I'd leave the welds on the washer, they look good. Soooo close on this side!
I went out there, today, but I have an incomplete set of parts. I am trying to mount the inner fender and the radiator support before spinning the truck around. Here is what I have, as compared to the crusty old stuff.
<img src=" " />
" />
BUT
That's all cab mount hardware. I apparently didn't buy any radiator support hardware, and that's the the crusty old stuff looks different other than being crusty and old.
Off to the inner fender!
Sort of.


Roughly half of the bolt holes line up with the OEM fender. Great. I have some more work to do now. Not to mention that the old crusty nut-clip things are useless for about half of them. I guess I'll swap out the cab support mounts and fix the inner fender while I order and wait for the radiator support mounts.
Ick. Not the update I was hoping for, folks.
4cyl, I am just going to fog everything black for now and sand it all off later.
you can get the clip nuts at lowes for about 93 cents a piece. just bought some last night.
and you may be able to clean up and reuse the old mount hardware instead of buying new. ive saved wuite a lot of stuff in my day....
lastly, check and make sure that a little alignment wont make the holes line up. mu s10 di that to me, but once i got 3 or 4 bolts started, the rest fell into place.
michael
Restore your hardware!
http://grassrootsmotorsports.com/reader-rides/4366/top-tip-restore-your-hardware/
Javelin wrote: Restore your hardware! http://grassrootsmotorsports.com/reader-rides/4366/top-tip-restore-your-hardware/
Hard to restore missing stuff, rusted steel and rotted rubber.
You'll need to log in to post.


