JohnyHachi6 wrote:
trigun7469 wrote:
There was a chumpcar team in VA that had the same car, you may want to contact them before you go further they went through a lot of engines.
Do you know the team name or what races they've competed in? I'll definitely try to get in touch. I have some concerns about oiling, and oil drain-back from the heads in cases with excess blow-by, but I think this particular engine will do pretty well in that regard as the rings seem to be in good shape (very solid compression numbers).
Not sure, post on chumpcars forum you will get a response.
In reply to trigun7469:
Yeah, I've asked around there and gotten some good tips and responses, but haven't run into that team yet, I don't think. I'm a little cautious about posting too much there about the car as the ChumpCar forum tends to single-out anything new as being a "threat" to the established teams and people start throwing fits about cars like the SC300. (Despite the fact that it's not nearly as competitive as most of the top-running cars, IMO.)
https://www.facebook.com/pages/Scuderia-Papagalli-della-Corsa/218710804812188
This was the crew I was the one I thinking of, they run a earlier addition lexus.
Ah, ok. That's a different engine. The ES300 has a V6 (essentially the same engine that the GRM Camry had - it's known for being a little problematic on track. The SC300 has an inline 6 (same as the normally aspirated mkIV Supra).

johndej
New Reader
12/15/13 12:42 p.m.
My brothers and I just snagged a 5 speed 92 with a beat body but mechanically sound for $1200, this is great inspiration!
One more item to add to the "stuff to go on the car" list before getting back to the fab work:

Mirrors! I would have preferred to get a big convex mirror as I've heard that they're much better at night when you will get 5 sets of headlights shinning at you with these multi-panel mirrors. However, these were free. Also, one is tinted, one non-tinted, so I figure we can swap these out if conditions dictate. I also picked up some side-mount mirrors, which will be attached to the cage just inside the doors. I learned during my first crapcan race that the OE side mirrors are the first thing to go when people start going crazy/loosing their focus on track. I think I'll probably just remove the OE mirrors since they're responsible for 2-3 hp equivalent in drag on a long straight, IIRC.

Couple last pictures of some other good work that's been checked off the list (mostly thanks to Matt and Darius, two of the drivers who came out to help last weekend).
Door panels removed:

Might save the window motors and use them for some active aero or something down the road.
Sunroof block-off panel, made from some scrap aluminum:

Finished swapping all the wheel studs:

While Matt was changing out the ones in the back, we found that the integrated drum e-brakes (gah! what a crap idea) were going to keep the new studs from being installed without removing the hubs, so we just removed all the drum components and threw them away. I'll need to take the cables out and remove the handbrake handle too (weight savings!).
I was thinking it would be a neat idea (at some point) to install a rear wing and have the ebrake handle control the angle of attack. Going onto a long straight, the driver could pull and set the e-brake handle, rotating the wing into a low drag position (DRS-style), then release it going into the braking zone. I think this could be a lot more robust than some of the electrical systems that other teams have experimented with that can jam/burn out.
So, sometime this week I'll finish up the door bars, then it'll be time to pull the engine for the refresh, which I'll likely start on this weekend.
Thanks. Yeah I've been using an old Lincoln DC/AC TIG welder. Nothing too fancy, but it does a decent job if you get everything setup just the way it likes.
If you plan on ever running a lemons race you might want to add another door bar. There is a new rule this year dictating the minimum space between door bars. Looks like a good build so far though.
camaroz1985 wrote:
If you plan on ever running a lemons race you might want to add another door bar. There is a new rule this year dictating the minimum space between door bars. Looks like a good build so far though.
Thanks for the tip. This meets the ChumpCar and Lemons rules, as far as I know.
ChumpCar:
- 2 bars (X or Nascar)
- Vertical separation of at least 6 inches (center-to-center)
- Upper bar below window
- Lower bar no more than 10" above door sill
Lemons:
- 2 bars
- Top edge of upper bar to bottom edge of lower bar must be more than 7.5" apart. (that's 5.75" center-to center separation for our tubing diameter)
The bars I have fabricated have ~9 inches center-to-center separation at both ends.
The bigger difference is that Lemons just started requiring the same rules for passenger bars as driver bars. Chump is still OK with a single passenger bar. I'm doing an X on the passenger side anyway though, so no big deal.
The biggest thing about the rule changes (for both of these organizations) that really pisses me off is that they only post this stuff on their forums, which are only followed by a small group of people. By the time they get the updated rules actually posted to their websites, it's only a month or two until the season when they are supposed to be implemented. Damn sloppy in my book. They should have a minimum period required to make compliance.
For example, these Lemons door bar rules are not included in the rules as stated on their website, and it's two weeks from 2014 when they are supposed to take effect. ChumpCar recently did this same thing with their major rules revamp. They totally re-wrote the way car value works and changed many modification allowances and didn't post these new rules until a few weeks or maybe a month ago. 

Finished the cutting/notching on the last of the tubing tonight. Good to get that out of the way. Will probably finish up the welding (except for gussets) tomorrow.
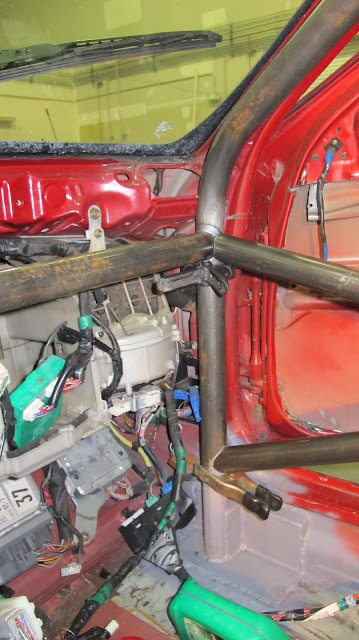
While I was working on the car I wanted to check about the bar separation mentioned above. Looks good.
Front:

Rear:

Cut and notched the tubing for the passenger's door bars. As I mentioned, I'm going with an X-design on this side to save some weight and because I hate notching tons of tubes. The bars will tie into multi-tube junctions so some fancy compound notching was called for.

Kind of a crappy picture, might have been before the finish grinding, but this actually fits up nice and tight all the way around the tube.

The full bar assembly clamped together.


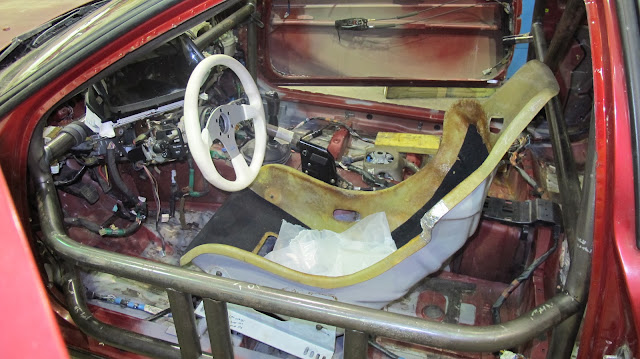
I also got in a new quick release for my Miata (it's gold anodized, cuz that's how I roll  ) so the old one went on to the SC300 along with the hub adapter and Momo boat wheel.


The steering wheel setup works great with the seat a little further forward, but with it all the way back (shown) it's just a tad further away that I'd like (forearm/upper arm angle is like 110 degrees instead of 90). So, as I was contemplating over the last couple weeks, I'll probably order another identical quick release and a deeper steering wheel so they can be swapped based on driver's height during the race.
One more weird thing to note. Last time I was at the shop I forgot to disconnect the battery while I was tacking some bars in place. I had the ground clamp securely clipped to the cage, but I noticed that night and again today that my oil level (not pressure) light keeps coming on now, even though the level isn't low. Think I might have fried that sensor. We'll see what it does after an oil change.
So, prep and finish the cage welding in the next day or two, then on to pulling the engine this weekend. While the engine is out I'll work on:
- Engine cleaning/inspection/refresh
- Cooling fan setup
- De-powering the steering rack
- Transmission seals/oil
- Other stuff(?)
After that, engine goes back in then there's a big laundry list of miscellaneous items:
- Cut springs
- Fabricate rear bulkhead panel
- Remove glass
- Install lexan
- Gusset cage
- Make wheel spacers
- Inspect/install LS400 calipers
- Install adjustable prop. valve
- Flush/bleed brakes
- Change dif. oil
- Install/wire LED headlights
- OEM headlight block-off plates
- Fabricate window net mounts
- Paint cage
- Attach sunroof delete panel
- Install harness
- Mount cage foam
- Reinstall dash
- Battery relocation
- Install fire system
- Mount/balance new tires
....
and more...
So, with that, I brought the car back to my garage.

This evening I'll need to clean up the fallout from some previous projects and make room for the engine/hoist then the engine comes out for the refresh.
In other news, I received my official ChumpCar number panels, which are required for the series.

This is another thing that bugs me - cost: $70. I can put my own white rectangles on my car, thanks... especially since these don't even include the numbers. Oh well. Paying my dues I guess.
My team was a little annoyed by the $70 stickers as well.
I ran my first chump race last year and I'm hooked now. Thanks for keeping up with the regular updates on your build, its a good read and well documented.
In reply to Nitroracer:
What car did you run? Got any advice? I'm always interested to hear any thoughts people have on the series since I'm pretty new to this.

With only one outing so far, I don't have much advice I can give but I can share my experience from that race.
My team ran a MkII Golf four door with a dying stock 8-valve engine. We showed up with something that looked like a true $500 car, while some others seemed to be racing in vehicles that looked nicer than our daily drivers. Getting through tech only took two tries, we had to make a few minor changes to the car. Our kill switch needed to be moved, a firewall hole patched where the HVAC used to suck air, and add a muffler which ended up falling off, but not for the reasons you would expect. I can say be prepared to fix anything, the more you have on hand the less you need to scavenge for. BUT, there is a law of diminishing returns here as well. We ended up helping another volkswagen team looking for parts, and borrowed a reciprocating saw from another team to install the muffler. There is a good camaraderie between the teams and lending a helping hand.
Out on track the car managed to survive the entire 14 hours, which is more than can be said for many other cars that raced. We had much more suspension and brakes than we did power, which was good news for consumables. But we weren't without out problems. We had major oil consumption problems, overheating, and an engine that fell out of the car twice. Yes, the engine mounts broke away and the engine was on the ground. The second time we lost our starter never to be found again. Through all of that, we rallied together and fixed most problems in under 30 minutes and continued to run all day. When trying to balance time between drivers, take this all into account and be flexible. A lot can happen during the course of your race day. Bring a pop-tent for your pit lane too and be prepared for pit stops to save time. Our team was pitted near one of the more successful teams and we learned what we could from them during down time, it was much appreciated.
If you have the funds and time, definitely take the car out to a track for some shake down runs. Best way to find your problems early and have them fixed before the big race. I had have nearly as much fun this weekend as I did during the actual race.

The car looks terrible. It was a rusty hulk to start with and we ran out of time for any kind of theme. Just had a blast going racing instead.
Awesome. Sounds like you guys really have captured the spirit of crapcan racing. Thanks for the advice!

Engine pullin' time. 
Yesterday, I spent a few hours disconnecting everything in preparation for pulling the engine. Went pretty smoothly except for the exhaust, which was the usual pain to get apart, and the wiring harness, which doesn't have any plugs to disconnect it at the firewall (thanks Toyota). 
I'll skip the details - lots of wrenching and disconnecting wiring/plumbing. Here's bay with pretty much everything ready to go:


That day I also tossed the dash back in the car to see how much cutting is going to be required to get it to fit around the cage. Answer: a good bit. I'll be working on that more later.

BTW, you could easily argue that the dash is totally unnecessary, even detrimental to a race car, but I think it really makes the cockpit look a lot cleaner and more professional, so I decided it was worth putting it back in. It's surprisingly light and I don't think it will restrict access to wiring too much.
At that point, I didn't feel like crawling under the car to get the bellhousing bolts out, so I called it a day.


