Great work. I really need to get myself into the rivnut game.

Great work. I really need to get myself into the rivnut game.

In reply to AxeHealey :
The barrier to entry is so low I can't believe I've waited this long to join in the rivnut shenanigans.
This morning I welded up a worn spot on the clutch arm. While taking it apart I realized I don't need the stock clutch spring as it pushing the wrong direction. So I tested it without and sure enough my clevis length is perfect.

After getting it cleaned up and ready for duty I spritzed a little paint to get things marked done. I've got lots of time over the next few days to get more wrapped up.

Intake air sensor hole drilled and intake pipe painted. Tomorrow afternoon I should have a few minutes to get more knocked out.

Since I finished the pedal assembly I felt like it was time to weld the mounting area. This way when done I can bolt it in place and start making brake/clutch lines.
There were a couple cracks and also a hole I drilled thinking it was needed when fitting up the clutch master.


The horseshoe seen here has also been welded up just forgot to take a pic afterward.

I welded up both sides since I needed to flatten them back for a nice flush fitment of the pedal cluster. It feels way stronger now.

While I was in the area I wire brushed all of the driver side floor pan. I needed to know how much sheet metal needed patched or how many pin holes there were to weld up. There were some smaller ones to attend to along with welding up these horseshoe pieces that weren't welded up by the factory.

There is a small area that will need a patch in front of the driver side seat crossmember. The crossmember will require major surgery which will probably reveal more underneath. When doing the patch I'd prefer it to be in one piece. I'm planning to buy the crossmember sheet metal as I think me trying to fix what's there or replicate a nice pretty shape seems like a waste of time.


I spent lots of time welding up pin holes or areas small enough that didn't require pieces of sheetmetal. Some blowouts happened and were managed. I also welded holes that were used for previous owner hack repairs with screws. For now the driver side is at a pause while I order the crossmember.
The passenger side I started wire wheeling and found zero holes on the front section. The seat crossmember on this side appears to be in excellent condition. The rear floor pan section near the firewall was already on the list of future repairs and still no surprises were found. I have a replacement part of the pan that arrived today at my office. I still need to order seat mounts, hinges, jacking points, and the driver side crossmember. I'll start the floor pan patch soon.
I welded up the horseshoe things on this side as well. I plan to cut some metal discs and weld up the holes where the antenna was once bolted up.


After cleaning up and grabbing lunch, the throttle cable from Terrycable arrived. Long story short I finally got the pedal to run the full range and also return correctly. The new throttle pedal ended up causing some issues but got that figured out. The dimensions I gave them worked perfect. Pretty stoked to have this done now.


Nice to see you cooking along with this!!! I feel like once the tin work is all done, it's gonna be pretty quick work after that!
In reply to golfduke :
Agreed. I'm still optimistic about getting a first drive in by June. I am trying hard to not short cut what I planned to do just to get it on the road. The chances of me going back at a later date to some of this stuff is pretty slim so now is the time to do it.

It looks like your throttle return spring is doing the job just fine. For mine, I had to cut off the rubber surrounding the throttle pedal hinge. It was creating significant resistance. Everything's lookin great!
In reply to Lof8 - Andy :
That's exactly the issue I was having. After removing the pedal and bending it back towards me I got a better resting position that no longer stopped short of full return. I spent an hour or so frustrated thinking it was the cable binding, but once I removed the pedal out of the equation it returned no problem. I may cut the rubber though if this isn't a lasting fix.
In reply to captainawesome :
What CVs are you using? I ask because I went through ~6 stock 914 CVs in very short order before I switched to 930's (with adapters) in my 914+EJ/HondaJ swapped track car. The stock 914 cvs would just not hold up, inner or outer, I blew them all to smithereens.
In reply to MichiganMat :
These are from an 04 Boxster 986 5 speed that came with the trans. They have 100mm inner CVs with 28 spline hollow shafts. The inner CV bolt size is 10mm vs the usual 8mm which is I guess a 2 year only thing. From memory I recall the Boxster CV joint on the inner being physically larger than the 914, but the outers are completely different since they have a built in stub axle. I sent the shafts out to Dutchman Axles to have them shortened for my application.
Funny enough I never did the math on power ratings until today.
Power specs from a factory 06 TSX is 205 hp and 164 lb-ft.
The 04 Boxster is rated at 228 hp and 192 lb-ft.
IF I decided to do a better flowing header, intake, and drop in cams I would be getting rear wheel power equal to or barely exceeding the Boxster numbers which I assume are crank. I imagine your J swap has loads more torque than I will produce? Also your tire choice may be effecting your outcome more than mine will. I plan to keep higher treadwear tires in the 300 range for the most part as this is mostly a fun driver. Doing an autocross or track day may be in the cards but I doubt I will optimize the setup for either as I just don't go often enough anymore.
With all that wall of text out of the way, I'm intrigued by your swap. Have a link or info about it?
In reply to captainawesome :
Ah, roger that. Sounds like you'll be in good shape. I haven't documented much of my build over the years, but I do have an instagram that has some pics.
I had been running a WRX EJ+5MT and have recently swapped the EJ to a J32A2. Its a lot of fun when it runs, I seem to hurt it every time I track it. Had a timing belt tensioner break, bunch of destroyed axles, killed a few fuel pumps because of bad plumbing. Its been a real journey, but its close to being reliable.... just in time for me to change it again!

captainawesome said:Axles that are ready to party.
I would totally party with those axles
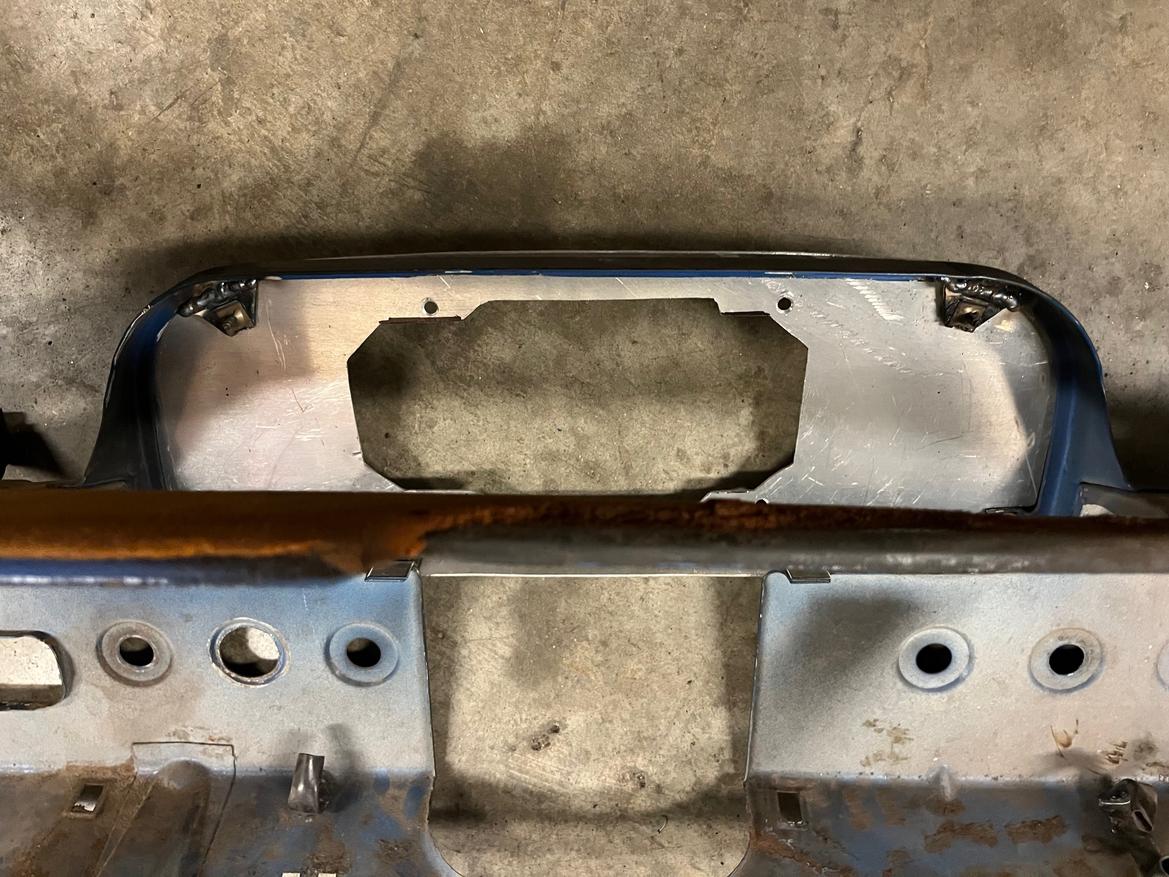
I've been hem hawing about how I want to mount the Powertune dash. I've made a template in preparation with some idea of what it will look like.
Well here's v1 made out of some aluminum I had laying around. I think I'll do the next one in steel and move it down a 1/4 or more. For now though I think this will work as I have bigger fish to sauté. What you see here needs to be drilled for mounting holes and move some on the dash structure since the stock upper holes share the same space as the dash screen.


You can see the dash pad lip on the left side is a little droopy. I imagine in the car it won't look so terrible so the next step will be to mock it all up with a driver's seat and see if it is ready for the big time or needs tweaked.

I wish it was sunk in more. Maybe a 3d printer could do the trick so it doesn't look like a screen stuck to a flat piece of metal? I'm not familiar with software requirements to design one but maybe someone out there in the GRM world is?
I couldn't end the evening without getting the panel to mount to the dash. Since two of the inboard tabs share the same space as the Powertune I cut them off with plans to move them further out.

A little choppy.

I burned them in place after getting all the holes planned out and drilled.
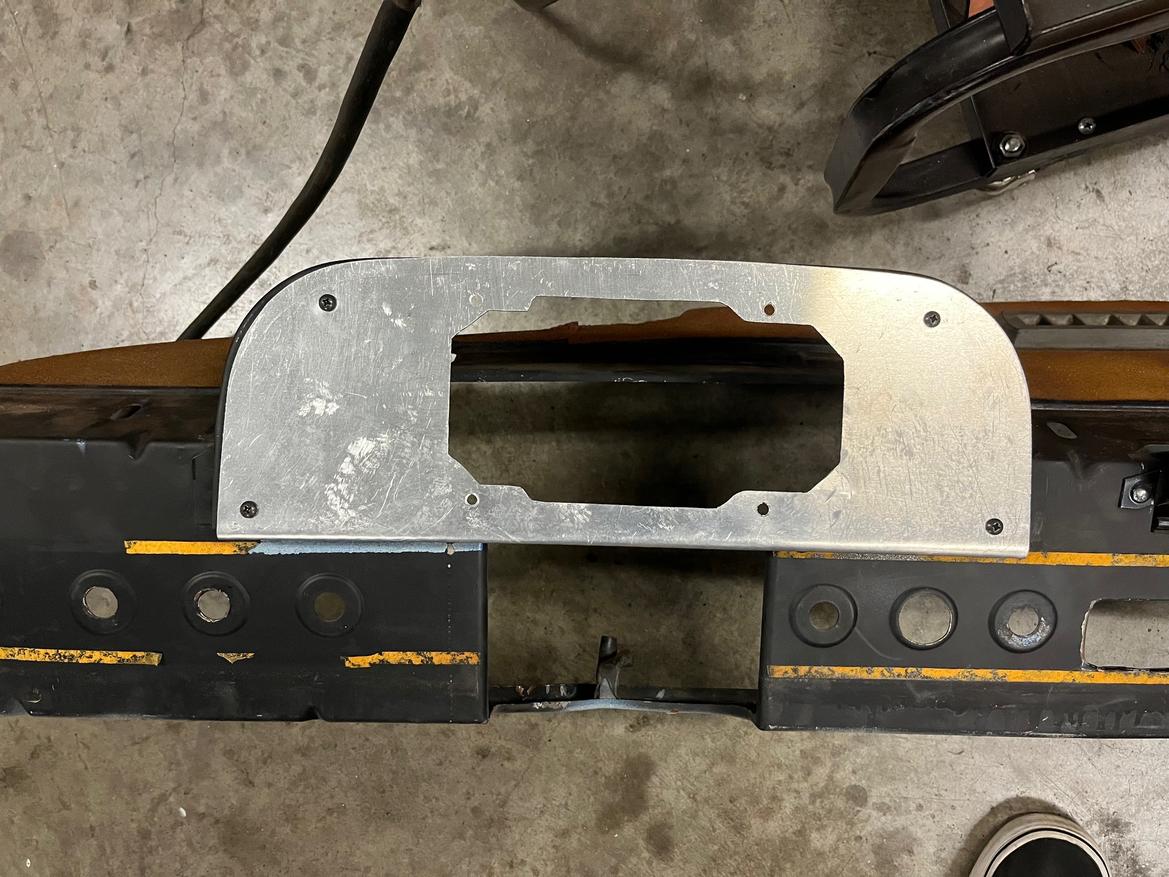
With the dash cap back on and the Powertune loosely fitted.


V1 turned out pretty decent. I'll do something to texturize the metal with a satin or matte black. Maybe glue some ABS sheet to the front?

captainawesome said:I couldn't end the evening without getting the panel to mount to the dash. Since two of the inboard tabs share the same space as the Powertune I cut them off with plans to move them further out.
A little choppy.
I burned them in place after getting all the holes planned out and drilled.
With the dash cap back on and the Powertune loosely fitted.
V1 turned out pretty decent. I'll do something to texturize the metal with a satin or matte black. Maybe glue some ABS sheet to the front?
Crazy tartan cloth glued on that panel?
In reply to wvumtnbkr :
Not a bad idea. I have been brainstorming seat covers as I want something with a bit more flair, so maybe I can match whatever I end up with on those? I just don't want it to look too busy or hackish.

In reply to captainawesome :
I agree. If you cant sink the screen into the surface, do something to bring the surface up to the screen. Piece of wood with surface coating of your choice would be the ea$iest path.
In reply to NOHOME :
Agreed. That may be the path forward with v1 until I make a v2 out of steel. Another option to sink it flush would be to rivet a bracket on the back side to hold it in place. With a trim piece over the face it would cover my rivet sins completely. Hmmmm.
Edit: I just spoke with an employee that has a 3d printer but is also capable of design work. I'm bringing what I have up to the office tomorrow to have him sort out a cover for me. Based on our discussion I think he can get something that fulfills my needs in the short term. If his design is up to snuff, the part he prints won't hold up to heat well and may have to be in two pieces. In the end I should end up with a file that can be printed with better filament and in one piece if the design works out.
In reply to MichiganMat :
Just saw this. The J swap looks great. So you're pulling it out now for something else?
The past couple days I have been trying to finish locating the Haltech and wideband controller. I wanted to try moving everything into the cabin near the firewall, so I bought another cheap ebay RSX "tucked" engine harness for $40 to experiment with. I spent one full evening taking it all apart, depinning, and starting the process of moving the ECU connector towards the cabin VS the rear trunk. I marked every wire I depinned for it's location just to verify and make life easier on the connection end. It wasn't as bad as expected and I learned quite a bit of how things need to be when wrapped back up. I removed a few items that aren't necessary from the harness but was surprised at how little that pile ended up being.
Here's the mess I left when finished.


The next day I got started on the process of removing the need for the Plug N Play adapter from Humble Performance. It's bulky and just adds more clutter than I prefer so I spent more time refining my road map building a spreadsheet to accomplish cutting it out. I'll be removing the A, B, and E Honda harness plugs from the equation. The A and B plugs will integrate into the 34 pin AMP superseal connector for the Haltech, and the E plug wires will go to the rest of the c101 Honda plug. I'm not a fan of the c101 plugs bulkyness but so far it will hold what I need and I'm not finding an alternative I'm happy with. Yet. Good news is if I do I can just repin a new male and female connector in it's place without much surgery involved.

Back to the harness relocation itself. What I should have done from the beginning, was spend time locating the Haltech officially where I wanted it before bothering with this step. The more time I spent trying to make it work, the less it made sense to move it at all. I would need some sort of cover so they weren't out in the open. The shifter stuff is in that same general area. I don't want to build a console that has to make it's way over and around it. Where the harness goes through the firewall was another question mark that didn't seem easily answered. So since I only had a few bucks in this disaster I aborted the mission. Kinda sucks to lose the time but no sense fighting the direction things want to go organically.
With that previous pile of wires pulled, I plugged in the harness originally purchased to see where things land. After messing with routing a bit and scratching my head on the most convenient location for the Haltech, I ended up basically in the same spot as our resident GRMer Lof8 for his swap. The only real downside I can think of going back to a "stock" harness is the few items I wanted to strip from the harness end up remaining. I will probably depin their connectors and wrap those into branches where needed, but after pulling the other harness apart I see no reason to go through the effort of completely deleting them. For now at least.
Anyway I spent a few minutes making sure things can be plugged in easily but also look like they belong there. The riv nut tool saves the day again with 6 m5 holes set up in less than 10 minutes I'd guess. I spaced everything out with some nylon spacers found in the parts bin. The green tape shown below indicates where I'll be shortening and connecting directly to the Haltech with the 34 pin Amp connector. I thought I would need to remove considerably more length from the harness than what it ended up being. I should have mocked this harness up in the chassis months ago and saved myself a ton of grief.


Now with these items located I can cut the rear trunk wall out of the donor car to scab up an access panel that covers or makes the jagged cut eyesore go away. This also allows me to finish the chassis wire modifications and additions to meld the two systems together.
Last night I started the process of installing a front sway bar. I've run into a few snags with this process.
I bought this Weltmeister sway bar with links on ebay shortly after buying the car. It seemed like an insanely great deal at the time but I didn't realize that the bushing cups and bushings not being included were going to be an issue.

After a while of trying to hunt down the proper hardware I gave up. Weltmeister got bought out by a French company called Rose Passion and essentially stopped production of parts. What I was kinda sorta told and confirmed on however that the stock bushing cups would work. I just need a 19mm bushing. Well that bushing size is no longer in production either. Yet Rose Passion sells a poly version under Weltmeister for more than I'd like to spend. I finally got fed up with it and ordered from France. They arrived in a few days which was insane. One of the two I received cracked when sliding over the bar so they sent me a replacement. Now I have three, and all of which feel and look different from each other. So I'm going to reach out to them again and see what the deal is.

So with those bushings and the factory style cups in hand I needed to make the holes for the brackets to bolt to. This process involves a kit from 914 LTD. The inner half mount locates the holes needed to drill.

Well my front end collision has kinda messed some of that surface area up. So I spent most of my evening last night hammering that back into place but also anywhere near the gas tank region where sheet metal has seen movement from stock. None of this is probably worth the effort other than the sway bar mount since it won't ever be visible but it feels good to have it all straight now. I snapped zero pics of this process. It's hard to really see in photos what is being done and isn't all that interesting. It's also really difficult to get in there and make any meaningful change or shape of sheet metal, so there were some janky tactics used to make it work. Hopefully this weekend I can devote the time to get the sway bar installed so all that's left is the fuel lines to reinstall the tank.
Whew.
Today I made a decision or at least am going to try a direction I've been teetering on since I got the car. Either keep the stock seats and just recover, modify the stock seats to my liking, or something aftermarket. Aftermarket seats that are bolt in for these cars are out of my comfort zone for cost and seem to get mixed reviews. Modifying the stock seats would be my next plan but I don't do upholstery and lack the patience to get through the learning curve. In my experience of recovering seats with a kit it's not an easy job to make look good even with well fitting materials already made for you. Most aftermarket seats that need work to fit are too big or look to modern for the vibe I'm going for.
So I found something that I hope fits the style I want but also is super budget friendly. Meet the Jaz Turbo Pro seat!

The pic above is one of the few I've found of these in the wild other than the stock photo from Jaz.
Without the cover it's a poly seat but has better bolsters than all the other options I've found. It looks more period correct and I think fits what I was going for. It also doesn't appear to have as much layback that most of the other poly seat options which I think will be to my favor. The 914 seat doesn't have much at all built into the seat, just the stock bracketry.


Anyway I ordered one seat and one cover for now. I really wanted to make sure it fit the space and was comfortable enough before comitting to a second one.
You'll need to log in to post.