klodkrawler05 said:but I finally have enough progress that I thought it made sense to start a build thread
I thought the proper timeline was buildthread before acquiring vehicle?
docwyte said:In reply to klodkrawler05 :
Would've been kinda funny if you'd put the wagon drivetrain into the M3 convertible...
Agreed, and then post it on E46Fanatics and watch Mango and his legion go insane. I would have rocked that combo for sure!

bbbbRASS said:docwyte said:In reply to klodkrawler05 :
Would've been kinda funny if you'd put the wagon drivetrain into the M3 convertible...
Agreed, and then post it on E46Fanatics and watch Mango and his legion go insane. I would have rocked that combo for sure!
Oh man...that would have been awesome!!

Awesome swap, never gets old seeing M parts get stuffed into wagons.
What's the plan for the M3 once you're through with taking parts off it? You must have gotten a wild deal on it to be worth it to strip a clean title 6MT M3.

I did briefly consider dropping the wagon drivetrain in the m3 in a quick/dirty fashion just to have a car besides SWMBO's van, but decided it would be more work than I wanted.
I forgot about sharing this photo in my last post, prior to removing the S54 from the M3 I wanted to EWS delete the ECU to hopefully give me one less issue to deal with in the wagon. I don't own a laptop and the cord I bought isn't very long, so had to get creative:

The next week saw pretty minor progress as we took a family vacation to San Diego to celebrate surviving our first AZ summer.
Luckily SWMBO is pretty accustomed to my car antics after a dozen years together so she wasn't too surprised when I snuck out of the hotel early to run to a nearby junkyard that had a ton of BMW's in it. I found a car that had a pretty rough, but mostly in tact knockoff m3 bumper for standard width cars. This isn't the final bumper I'll run on the car, but it at least offers a temporary solution to get the car running and lines up with the added m3 oil cooler/brake ducts.

A fellow wagon I follow on social media uses this bumper and it can look acceptable when painted.

After returning home from vacation it was time to get the engine re-sealed. Unfortunately this was my first time getting this deep into an S54 and I did a few steps out of order.
After getting the oil pan off I saw evidence of the oil pump chain hitting on the oil pump. Some forum searching led me to believe this is fairly common. my front timing covers were leaking oil as well so next I dove into that figuring I could then further assess the timing chain guides and determine if I needed to order some additional parts.

And boy did I. Because it's German, you have to take the vanos off to remove the timing cover, taking the vanos off revealed that the exhaust cam hub was broke (kind of common on this motor) and that the timing chain guide for the exhaust cam was also broke (apparently also common)

I was dumbfounded by both of these discoveries because the car ran perfectly smoothly, no CEL, no weird ticks, nothing. So much so that I had been planning not to replace any of the vanos at this time because I could do that easy enough once installed in the car at a later date. Thankfully the broken tensioner and tab of cam gear were all sandwiched together in a corner of the head and hadn't caused any damage. So I ordered the full suite of new vanos unit, billet cam gear and solid chain tensioner from Beisan.
What I also discovered after this disassembly is that due to how the vanos works, after disassembling to this point, you can't roll the motor over. so I wasn't able to do rod bearings like I hoped until the top end was all back together.
those parts arrived about a week later and mid December I was able to begin putting the motor back together.
Beisan billet exhaust hub:

Solid exhaust timing chain tensioner next to old and busted:

New oil pump timing chain tensioner:

timing cover cleaned and re-sealed, new water pump, brand new Beisan vanos unit fully upgraded with viton seals and tighter drive holes to mate with the new exhaust hub:

At this point I cleaned up the garage, pushed the M3 into my work stall and we headed to MI for a month to visit family over the holidays.

nsogiba said:Awesome swap, never gets old seeing M parts get stuffed into wagons.
What's the plan for the M3 once you're through with taking parts off it? You must have gotten a wild deal on it to be worth it to strip a clean title 6MT M3.
The M3 roller is actually already sold to a fellow e46 fanatic locally down here whose been gracious (?) enough to let me continue storing the car at my house as I continue pillaging parts off it. After he purchased the roller my total investment in the M3 donor is $6500. which would be roughly the cost of just buying a motor/transmission from what I've seen these days.
I can't really fathom completing this swap (at least the way I am) without starting with a full car. There are so many dozens to hundreds of parts to swap outside of the engine itself if you're trying to make the swap be somewhat OEM. obviously the suspension/brakes/lsd, power steering rack, hoses, resevoirs, ABS, Grommets that the automatic doesn't have, different clips for the larger fuel lines, heat shields, underbody insulation, reverse light harness, interior switches, brackets etc. you'd easily spend thousands of dollars buying all of these items.
In hindsight with what I've spent on maintenance parts, vanos rebuild, rod bearings etc. I think you could probably even make an argument that buying one of the $15-20k m3's that already have the big 3 completed is an even smarter way to go because it would save so much cost + hours of labor that you'd finish the swap weeks/months faster.
Not sure what triggered this thought, but the last time I bought an e46 wagon was from a member on here, 11 years ago almost exactly!
In reply to docwyte :
Here it is!
https://bringatrailer.com/listing/2002-bmw-325i-touring-10/
This one didn't have the full body swap, and really high mileage on the shell. The E91 has the full body swap and my next E46 will be full body swap too.

In reply to SpeedAddict502 :
Thanks! That's good money for a swapped car. I've done a few swaps in the past and it's always hard to price/sell them when the time comes...
SpeedAddict502 said:In reply to docwyte :
Here it is!
https://bringatrailer.com/listing/2002-bmw-325i-touring-10/
This one didn't have the full body swap, and really high mileage on the shell. The E91 has the full body swap and my next E46 will be full body swap too.
Do you have a build thread you can share? I'd love to see more!
I saw this e91 M3 build last year during the Amelia weekend and loved it (other than the graphics but I get it's a show car).

No I never did a build thread on it. It was all happening in the middle of a move from Houston to Reno with the family.
George at Hill Performance Bimmers did almost all of it, then it spent a long time in paint hell. I think he made some posts about it.
Alrighty! let's get this thing caught up!
We wound up in MI a bit longer than expected, a month later we returned home. That had given me plenty of time to do some additional research, talk to buddies and generally worry myself about potential issues.
One of those issues was the original cam bolts backing out. So I pulled the vanos all back apart so that I could swap the cam bolts to the latest "stronger?" revision:

Next, I had an excuse to buy some new tools in the form of a bearing press kit. I took an extra step here, once I had the crank seal seated roughly to the correct depth, I used micrometers to adjust one side or the other until it was square to the crank. I don't know how much of a difference that'll make, but at least it's as perpendicular to the crank as I could get it.

Top end of the motor back together, I could finally get into the rod bearing replacement that I had set out to do 7 weeks earlier.
If you aren't familiar with S54 rod bearings, the torque spec is silly:
settling torque 5Nm
initial torque 30Nm
angle torque, 105 degrees in a single sweep.
Loosen 1 full turn. repeat the process 2 more times.......on each rod bearing.
In an effort to make this process a little less painful I borrowed a couple torque wrenches from a buddy. That setup laid out here, the digital torque wrench with angle readout was way better than the angle gauge I've used for other projects in the past.

required pic of the old bearings, they didn't look awful for 109k miles:

That task done, the motor was finally complete, I couldn't resist mounting up my black Friday intake purchase and snapping a pic:

Next I had to do some additional prep work on the wagon, the fuel system is pretty different but all plug and play, M3 pump and tank baffle went into the tank, fuel lines/filter got swapped over:

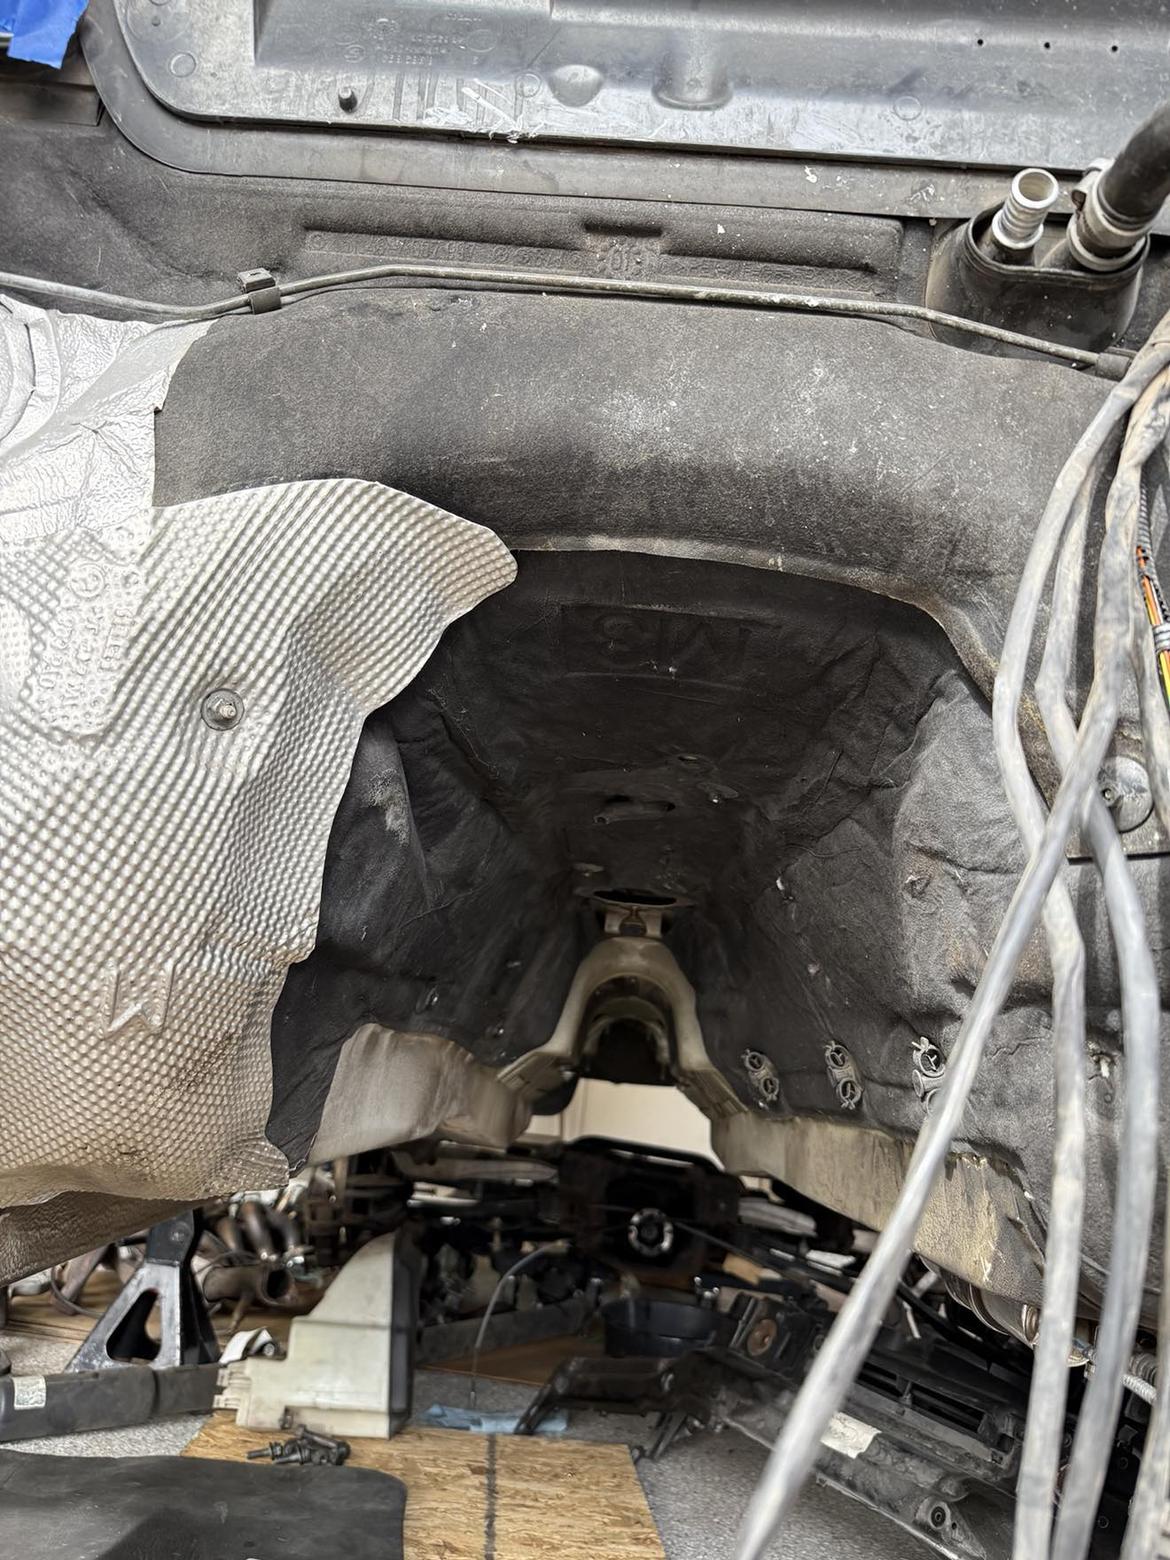
I couldn't see any differences in the M3 transmission tunnel insulation, but it's stamped M3, so with some extra help that got moved over. The heat shields are likewise all stamped M3 so those came too, they actually did have some discernible shape differences presumably to clear the headers.

After a bunch of time staring at a pair of empty engine bays and doing research online I decided I'd bite time bullet and swap the ABS systems too.
My wagon already had the MK60 ABS system, which has become pretty popular for standalone applications and certain versions are known to be flashable so that you can put M3 CSL programming on them.
I was finding conflicting info regarding if I'd be able to flash my non-M ABS, so I decided to spend the time to swap over the M3 MK60 pump module and brake booster/master cylinder.
The master cylinder has larger bores to use with the larger M3 brakes. The booster itself has a different part number as well. This was all direct swap, plugs mated up etc. I knocked this out while watching the Eagles blowout the Chiefs.

The fringe benefit is the ABS swap gave me lots of space to swap over the transmission harnesses (which also hold the o2 sensor wiring) instead of doing a bunch of splicing/soldering (ew failure points)

After that I was pretty much out of things to swap over to the wagon, so I put a new rear main seal, and mounted the clutch/flywheel on to prepare to mate the trans and install it in the car.

Since this car is mostly living on the street I chose stock replacement parts here LUK dual mass flywheel and clutch. I've never done a clutch job and not replaced a DMF with a single mass, but given the amount of city driving I do here I figured I'd stick with OEM until some other part of the build proves I need more holding capacity or quicker revs at the expense of chatter. I also did a new SS clutch fork pivot, and new clutch fork since a bent clutch fork on my last m3 left me stuck in 4th gear before.
The trans was pretty gross from all of the various small oil leaks the car had so I took that up to the local carwash for a quick bath.

Last thing before putting the drivetrain into the car was headers. I bought some Megan racing euro knockoff headers. These will mate up to an OEM euro section 1 which has the catalytic converter so I can remain emissions legal. I also learned somewhere along the way here that the N54 uses longer studs which were helpful when trying to wrangle these onto the motor.

I got too excited at this point and forgot to get a photo of the whole drivetrain prior to sliding it into the engine bay, so here's a finished pic! I had the subframe/suspension on the legs of the cherry picker and slid that+drivetrain into the engine bay all at once, then jacked up the subframe into position. I managed to avoid damaging anything and accomplished this mostly solo with a couple stints of help from SWMBO operating the cherry picker while I laid below the car to line things up.

Whew that gets us up to Feb 16th so we're gaining ground!
Love M3 wagons!
Thanks for documenting it for us!
was there any specific reason the M3 seller was offering such a deal? or was he just wanting to get rid of it?
In reply to wyndscreen :
The story was it had been sitting more than driving the last few years, he had "upgraded" to a newer mercedes AMG convertible. so wanted it out of the garage. The second thing working in my favor was it had been taken in by the PO to see what would be needed to bring it back to it's former glory.
Indy Euro shop prices for: New Fan Clutch, New timing cover gaskets, new rear main seal, new front main seal and 4 new 19" tires came out to a number nearly what the PO estimated the car was worth. so that worked in my favor as well.
First off, I'll apologize, I just realized I could re-size photos on here as I upload them, hopefully that helps!
At this point, my photos start sort of lacking as I was really concentrating the few minutes I chipped away at this each day to getting work done.
I'm doing all new coolers on the car, I wanted to make sure there are zero overheating issues and that the interior stays cold during the weeks on end of 110+ days so that includes the AC condensor:

I went with OE Nissens for the condensor and radiator. but decided to upgrade the oil cooler since Bimmerworld ran them on sale during black Friday......it's......larger....

Next up, the secondary air injection/coolant resevoir mounts on the E46 M3 don't exist on the wagon. they look like this:

As I mentioned earlier, I can't weld, so I used rivets to secure these for now. I'd eventually like to have them welded in place and then paint to match. But once all the supporting parts are in place it's tough to see these anyways.


I was proud of myself for remembering this ground strap prior to trying to start the car, also, my midwest mind can't comprehend that this is mounted under the car to the motor mount and is 23 years old in this condition.

One of the last engine bay hurdles I spent time researching centered around the heater control valve that routes coolant to the heater core. on the M3 it's got 2 plugs 1 for the valve and 1 for an auxilary pump. Both mount the same, both have the inlet/outlet in the same spot. Some guys run wiring from the drivers frame rail where this is mounted into the interior to the heater control valve like the factory, but a lone comment sent me down a new path where I discovered the E46 M3 CSL uses the non M part number! whether because it's smaller/lighter or what I'm not sure, but it definately adds a bit of clearance where the CSL airbox would mount also. So I in this instance I stuck with the non M part. it saved me some wiring work, and hopefully it'll eliminate one potential clearance issue once I mount the CSL airbox.

Next I finally had to tackle wiring. I had been dreading this part, but as my wagon was MS43, it couldn't hardly have been easier. I had to unpin 1 wire, move it to a different location on the ecu wiring. I had to run 2 wires through a port to the center console for the sport button to function, and I had to run 4 wires for the clutch switch since I'm going from auto to manual. I saw this idea on someone elses build and decided to copy it.
I ran each wire individually so that I could fish it through the factory loom. the tape isn't very tight and it's relatively easy to add a couple more 22-24 gauge wires in.
It did make the wiring portion take quite a while longer, but for how few wires I had to run I decided it was worth the headache.
in process:

Getting closer to firing the car I learned that I needed to modify the transmission harness/o2 sensor bundle because the euro header/cats move the o2's further away, I wish I had remembered this when I was swapping the ABS system/trans harness initially because I would've de-pinned/pulled wires and routed them that way. for now, the o2 sensor wires are wrapped in PET Tessa tape and I'll keep an eye out at the junkyards for a spare harness to modify as a future project.


At this point it was fluid time! I was getting pretty excited to hear the car fire up, or find out I'd be spending hours troubleshooting.
If you're really familiar with E46's you should be able to look at this photo and see something obviously missing.

Fluids added, I hopped in the car, turned the key to ignition spot 1, fuel pump primes! ok, good sign, that means the EWS delete is working as expected.
Weird thunk......uh oh..... what is that? how could I have messed up the fuel pump install in a way that would make a thunk?
Call SWMBO out, she turns the key while I crawl around under the car trying to find the thunk.
Hmmm....it's not under the car. I crawl out from the back and as I do I see the source. my hatch open, rear wiper arm is swinging and smacking the bumper on the roof. I must've bumped the stalk during the cluster install or clutch pinning. idiot.
Ok, now lets try it! turn the key, a single click from the starter. Nothing else.......well crap. My worst fears realized, I'm in over my head, I shouldn't have taken on this swap, how will I ever resolve an electrical issue. Deep breath. ok, lets think about this. it's got fuel, the starter relay is clicking. hmm, starter isn't getting power? but I made sure I hooked wires to all terminals....and I even remembered the chassis ground. (remember how proud I was?)
searching online mostly lead to people with E30/E36 swaps having this issue, and always because they hadn't hooked up one of the pair of main power terminals to the starter. Well that's ridiculous, I was certain there were no wires left under the intake manifold unhooked........wait.....Don't E46's have power cable that runs from the battery jump point to the starter...and hadn't I removed that during pulling the engine so it wasn't in the way/damaged....
Yup sure enough. ![]() here's a photo of it sitting on top of the engine.
here's a photo of it sitting on top of the engine.

You have to take the whole intake manifold off to get to that. Once that was done. I hopped back in prior to installing everything again, and it fired right up!
For some reason, embed isn't working for me, but it's public so it should play for anyone who wants a listen.
https://www.facebook.com/bradley.yonkers/videos/3910503402553712
And that pretty much catches us up! I had hoped to keep chipping away this week, but we had a nasty flu/food poisoning run through our family so we had a slow week. Planning to make some more progress today/tomorrow and I'll keep working on sharing updates as I go.
If I should be making the photos even smaller to help make the posts more ledgible please feel free to provide me that feedback as well :)
With the engine at least fired I've started working on the rest of the car. Last weekend I was feeling a little burned out after spending most of the following weekend in the garage getting the car to fire, so I mostly tinkered on little stuff and cleaning the garage to prep for the next big stage of this project.

was pretty great to see the whole front of the car starting to look like a car again, and no more cardboard/junk underneath.
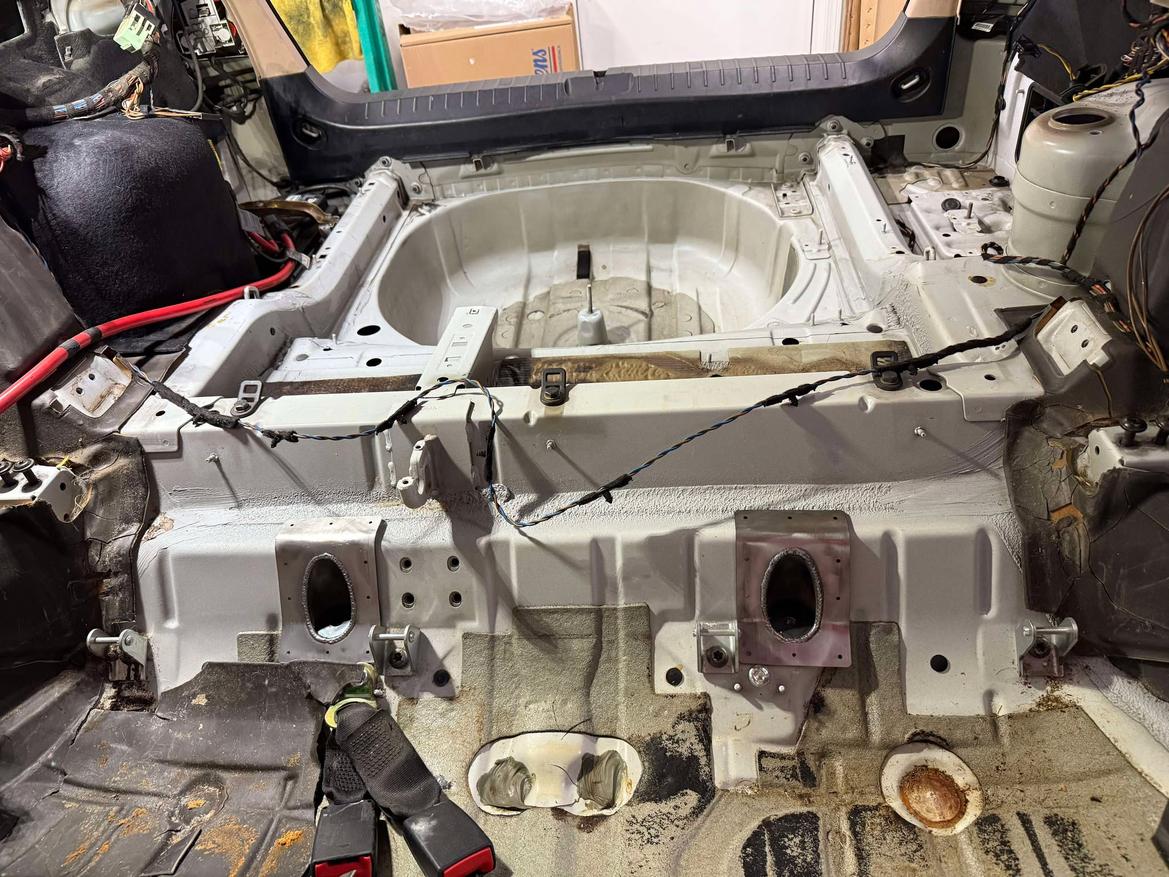
E46's are pretty well known for having subframe mounts made out of the sheet metal equivalent of paper mache. Since the last time I had an e46 there's been a lot of new reinforcement options. I chose this setup from Practical Performance RnD in Sweden. After installation all of the interior will fit back in place like OEM which means I give up none of the practicality of the wagon while still eliminating the risk of tearing a subframe mount.
I went back and forth on the weld in kit vs the epoxy kit. But I think for a DIY kit the epoxy really makes a lot of sense, all the blind surfaces will be fully covered with epoxy which means there shouldn't be any fear of rust between the layers. Plus lots of modern cars (and airplanes) are using structural epoxy now, if it's good enough for the OEM's it's good enough for my project.
After removing the interior, you use the extended drill bit included in the kit to drill up through the factory subframe mounts. this gives you the positions for all of the topside reinforcements.

The kit includes the appropriate size hole saw with a special SS rod that centers on the front subframe mounts, you use that to drill out the front sheet metal:

Front gusset cups will fit like so, they're as large as possible while not interfering with the factory seat mount hardware

Both front cups loosely in place:
The first cut lines get you close, but it took me another dozen or so test fits of the bar to get this to fit without taking away too much of the sheet metal:

The fit is pretty good right out of the box, I was impressed how the bar has little tabs to line up with the floorpan sheet metal.

I've still got some minor tweaking to do on the front gusset cups and the rear sheet metal to get everything as tight as it can be, then I'll have to scuff the surfaces up and prep the parts with primer. I'm also doing the Practical Performance RnD "vinceskinz" on the bottom of the chassis, they're pretty similar to your typical reinforcement plates but with more surface area to wrap around various surfaces to better support being epoxied into place.
My goal is to glue everything in place by Sunday with 3M 07333 structural epoxy.
That looks like a really nice kit and solution.

In reply to klodkrawler05 :
This is high level execution. Thanks for sharing.

Great project! Finding a donor car at a bargain price is lucky...
'M swapped' Tourings are super cool. I looked into S54 swapping my E36 Touring, but there's a lot of added complexity compared to an S52 swap, and I don't think I want to take that on. Planning to get serious about finding an engine, after I finish a couple other projects.
Curious if VinceSkinz does E36 parts? Looks like they're on FB, but no website? I really like their approach, and subframe reinforcement is something I'm considering as part of a suspension refresh I hope to complete this summer.
I haven't seen any e36 stuff from Vinceskinz only the e46 stuff so far. Only on FB so far as I know. his FB does have an email you can use as well, although mine went to spam the first time so I had to reach out via FB anyways, he's pretty responsive and the stuff shipped quick!
Wrapping this up Sunday didn't happen. By the time I finished prepping the car, I discovered I couldn't find my 200mL dispenser. After quite a bit of looking I determined I might not have brought it with me when we moved. A replacement showed up yesterday, so I snuck out of work a bit early figuring I should be able to glue everything in place during the 60 minute working life of the material.
L
O
L
Some of the bits that took me longer than expected, cleaning/prepping/priming all the surfaces that won't get epoxy with etching primer.

I coated the back sides of the parts too where epoxy wasn't going to touch, you also have to rough up the epoxy surfaces to get a good bite:

I mentioned expecting to spend an hour gluing everything in place, It wound up taking me closer to 4.5 hours. I was originally panicing after I spent 40 minutes applying epoxy and putting rivets in the main rear bar before I realized that the material doesn't mix until it's in the dispenser nozzle, so as long as you keep using the material within 60 minutes you can keep working with the tube.
The 3M structural epoxy goes on silver, but dries purple. The only spot I really deviated from the instructions is replacing 4 of the rivets on these front gusset cups with rivnuts. The wagons have 2 little tabs here that a trim panel clips into. so I'll have to fab up something to replace those.

I used a pair of flywheel bolts plus the huge subframe washers to clamp the rear bar in place while I riveted everything in place.

The bottom side reinforcement plates cover a pretty huge area which I like. But working with expoxy that's threatening to drip on your face the whole time was a bit difficult.

And that's it! one of the last large milestone projects completed before I can make the car a rolling chassis again! Next up is rear subframe bushings/camber arms. and then I should be able to roll the car around.

Nice work!
You'll need to log in to post.


