1 ... 42 43 44 45 46 ... 54
Pete. (l33t FS)
Pete. (l33t FS) GRM+ Memberand MegaDork
4/4/21 4:39 p.m.

Meanwhile...


Here we go again.


Backlash was here.

Spec is, IIRC, .015".  

Patterns looked like this, drive:

And coast:


I don't much like the way coast is wiping off to the inside.

The Plan was to just swap diffs, but I think something may have settled somehow and the pinion is now too deep.  I don't have a gauge block handy, but I will check it while everything is on the stand.

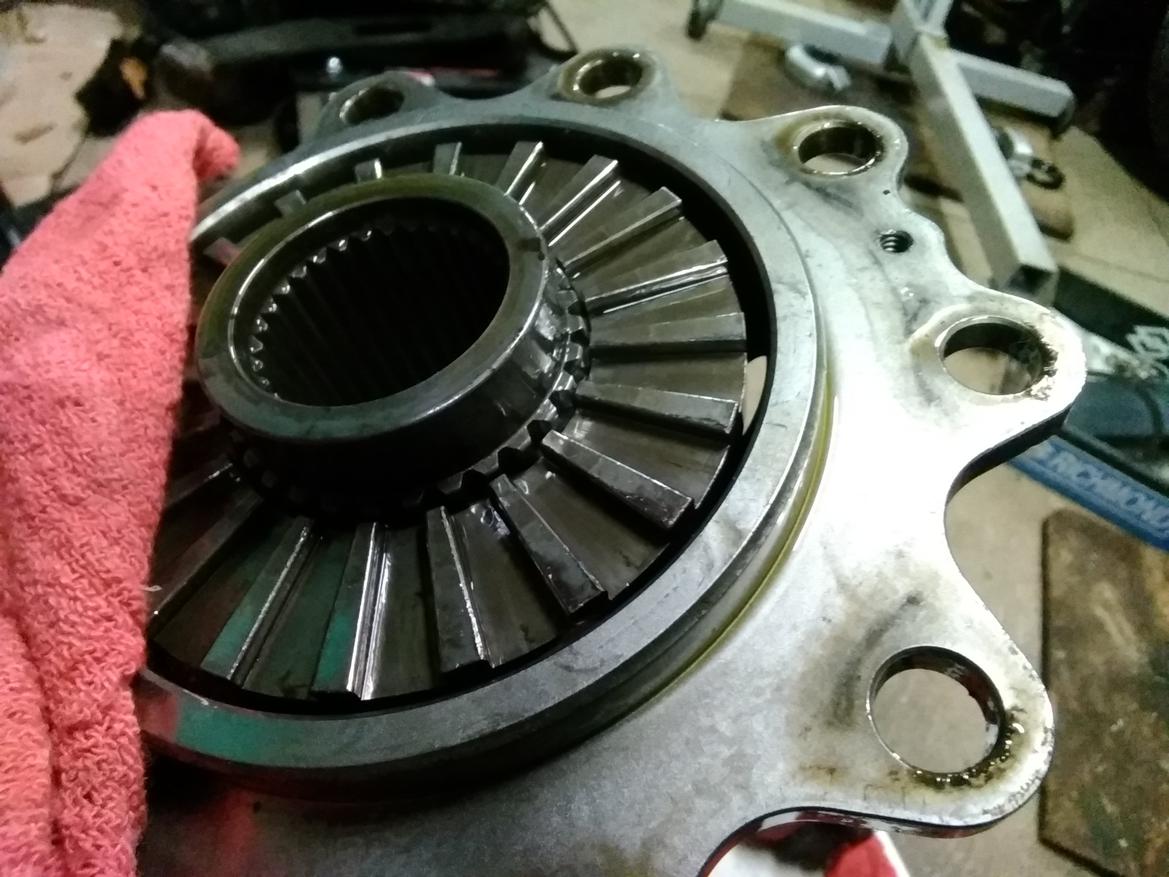
After finding my Traction-Lok length ring gear bolts and swapping the ring gear out, I decided to open up the Locker to see what if I could find any carnage.  After splitting the case, thr main drive unit did NOT want to come out.  It was wedged in place.  After popping it out with a hammer, I found this.

Lots of metallic schmutz in there.  The case splines also have a good deal of wear and shiny spots.

Looking at the drive plates, one looked kinda okay but the other had some big burrs where the disengagement ramps contact the dogs.
Also, the drive side bearing kind of disassembled itself.
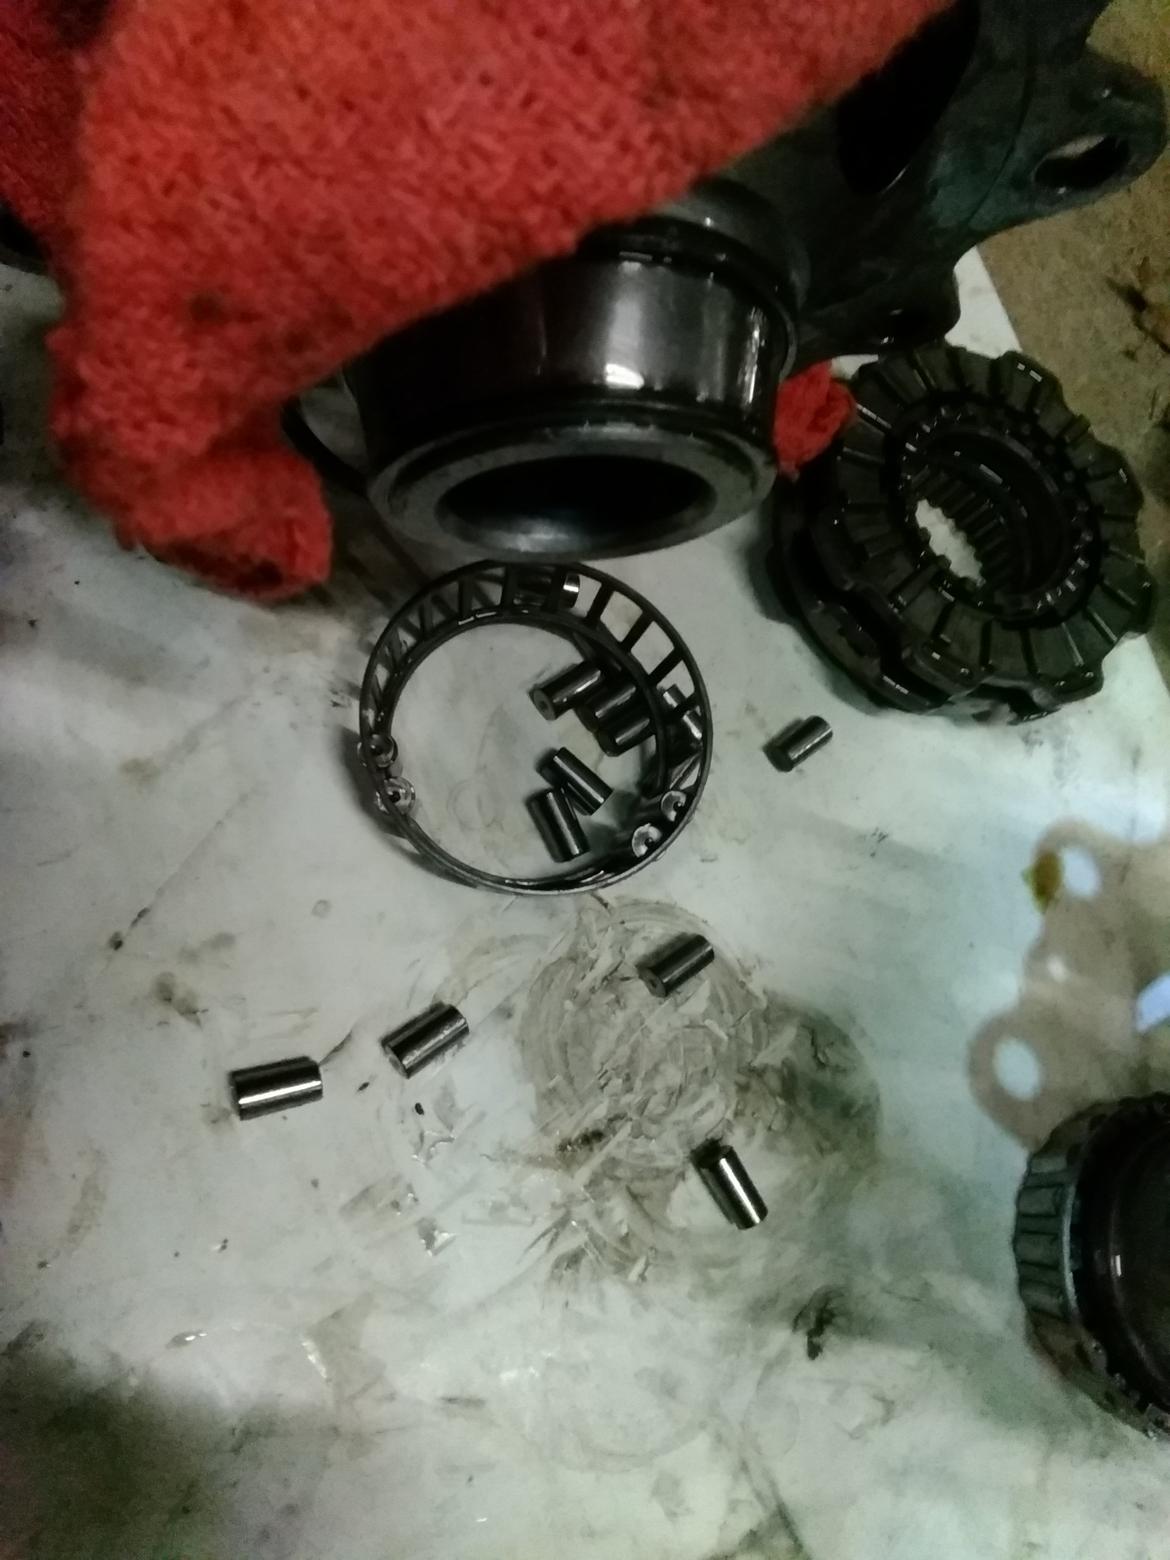
 

The Locker was a good idea but I think in practice, the internal lash made for harshness throughout the drivetrain, and it was just beating everything up.  I feel better now about buying the limited slip diff.

Pete. (l33t FS)
Pete. (l33t FS) GRM+ Memberand MegaDork
4/6/21 9:41 p.m.

Of course, I forgot to bring my pin spanner set home from work last night, so yesterday was just un-photogenically torquing the ring gear bolts to 60 ft-lb and measuring the pinion depth, which near as I can figure actually is at 1.035" like is inscribed on the end of the pinion.

With the Set 47 to 3.25" adaptor races supplied by Yukon with the housing, it actually adjusted really easy, no need for whacking with a hammer after every adjustment.  Also, using a pin spanner makes setup WAY EASIER than hitting the adjuster rings with a punch.

There is "008 BL" inscribed on the ring gear.  I set backlash to roughly .010".


...yeah, those look just about perfect.


Something is going to go wrong, it NEVER goes this easily...

Pete. (l33t FS)
Pete. (l33t FS) GRM+ Memberand MegaDork
4/6/21 9:45 p.m.

....and looking at the second photo, the case is rubbing on the housing.  And I'd already heavily clearanced that area of the housing because apparently Yukon assumed people would only ever run spools in an aluminum housing.


Well, it turns easily, any contact present is light contact, it'll be fine.  Not about to completely disassemble everything, grind, clean, and reassemble for THAT.

Pete. (l33t FS)
Pete. (l33t FS) GRM+ Memberand MegaDork
4/7/21 5:20 p.m.
Pete. (l33t FS) said:

I am remembering vaguely that all 9" diffs take the same length axles except for one type, that needs axles 1/2" longer or shorter.  I hope this ain't it.  Time to research...


so, I'm trying to get the axles in, and they just ain't goin'.  Whip out the tape measure...


Had to cut this much off of the passenger (long) side:

And this much off of the driver (short) side... which is the side that has two sets of splines.  I discovered while torquing the ring gear that if you only have a right side axle, you have zero limited-slip-ness.  The clutch packs only act on the outer spline on the left side.  One of the downsides of the 9" and why people generally run a spool or a Locker.  

Might try a Torsen next if this proves to be unpleasant on the street.  The wider the track gets and the more weight moves aft, the more it understeers profusely.

Pete. (l33t FS)
Pete. (l33t FS) GRM+ Memberand MegaDork
4/8/21 11:06 a.m.

Well, M3 of the E36 variety is getting real.  Just registered for OVR PE1

Pete. (l33t FS)
Pete. (l33t FS) GRM+ Memberand MegaDork
4/11/21 1:58 p.m.

Pete. (l33t FS)
Pete. (l33t FS) GRM+ Memberand MegaDork
4/11/21 8:05 p.m.

Now, the reason why I pulled the whole rearend out.


When I first put the axle brackets on, I went for fully vertical mounting holes so I could play with instant center.  Well, I ended up not needing to do that, and also the stock nice long 19" links attached behind axle centerline, so my new links were about 2" shorter, making IC move around a lot as well as increasing roll steer effects.  Going to undo that error.

With some new Milwaukee brand recip blades, one blade just angered its way through the welds and the link bracket popped off with a mild hammer tap.  A 40 grit flap wheel on the angle grinder took care of the rest.  Never going to use grinding disks again.

Then all hell broke loose juju-wise when I was trying to weld the new link bracket on.  (posted in Rant thread)

Then, cutting the other side off, I dulled FIVE blades, and still needed to use excessive force to beat the bracket off.  It was really hard.


A little while later, it's almost ready to go back in.

Just a couple more things to address while it's on the floor.

Pete. (l33t FS)
Pete. (l33t FS) GRM+ Memberand MegaDork
4/12/21 7:50 p.m.

One of said things.

The bottom hole is the 3rd link height that i'd used to use with the Mazda rears.  It was there in large part because that was the height it needed to be for the link to clear the Watts at full articulation left-droop right-stuffed.  I put it there on the 9" as a first-cut before figuring out where I needed to put it to clear the now-much-taller Watts. (Which had to be taller to clear the rearend)  Which is what the upper hole is.

I installed a bump stop last year, on the belief that the rearend was hitting the exhaust and damaging it.  There is no evidence that the bumpstop ever contacted the rearend, and I'd like to make the instant center a little less extreme, AND one other thing, so I need to make new holes.  Given that the rearend is a bit Swiss cheesey, I am just going to use the bottom hole, with a 5/8" bolt, which will allow me to fudge the link a little higher.  After grinding off the upper hole's reinforcing washer, I decided this was as good as I could get it.

Weld, grind, stick another washer on other side, grind, verify bolt passes through, weld, and now we're ready for the main reason for the 5/8" hole and the relocationage.


Johnny Joints!  I am sick of the rod end rattles, and the constant replacement, and I am HOPING that the bushing-ness means less rearend scream getting transmitted into the cabin.  They are larger, though, so they need room.  I can't really make the link mount taller without rearranging the floor, so compromise.


These are 3/4" thread, 5/8"x1.8" hole.

They will articulate enough.  They have the same articulation angle as the high misalignment rod ends I'd been using.

Pete. (l33t FS)
Pete. (l33t FS) GRM+ Memberand MegaDork
4/15/21 8:25 p.m.

Trailer is back home, last two Black Rockets are mounted inside-out on freshly painted wheels.


It was supposed to be simple: Weld up the crack in the outer tube on the inlet of my repacked 30ish year old Racing Beat muffler.  I cleaned the crack with the flap wheel and decided to remove the muffler so I wasn't welding on my back.  The once 1/8" thick pipe was now tissue paper thin.  I ended up having to go back two inches from the crack and was still blowing through.  Mulishly, I kept at it, building heat dams of weld and stitching it together, and at one point a piece of slag blew off and landed on my shoe.  I now have a real ugly burn on the top of my foot, and remember that this was coincidentally the catalyst for my grandfather becoming a BK amputee the year before I was born.  After far, far too much time, I got the mess welded, basically making a half a dollar bill sized area of pipe out of MIG wire, and considered that it's just going to crack again Very Quickly.

Defeated, and not a little pissed off, I went to the Annex, got the new supplier RB muffler that is really loud and also crack prone because it is made of stainless, and went to work fixing ITS cracks.


It kept cracking where the internal pipe would expand and flex the front face vs. the seam.  So, I added great ugly gouts of weld to shore the pipe to the seam.

Fugly and doomed to failure, but I am low on options right now.

Pete. (l33t FS)
Pete. (l33t FS) GRM+ Memberand MegaDork
4/16/21 8:06 p.m.

One last thing before the rearend goes back in. Now that I have bump stops in the rear, I needed to put a landing zone on the rearend.  Because I welded the spring seats on level on the rearend instead of at the correct angle (the rearend housing has flats on top, that's why), they look like this:

Ran out of welding wire right as I was finishing adding this one.  Guess I should not have wasted time screwing around trying to fix the muffler.  Argon is also getting low, but I do have most of a spool of flux-core I can use to persevere.

A little paint, a new right angle fitting for the breather, and we're ready to go in!

Setting up the links...  I welded the new brackets in at this angle because it would make the links exactly longer enough that I could use my 16" tubes instead of my 14" ones, so I put the new tubes in with the rod ends at the same locknut position.  It looked a little weird, so I measured rearend position versus a handy completely stock RX-7 sitting next to it.  It was over an inch different.

oops.

With the jam nuts completely buried as short as I could make the links, it's still about a half inch different.  Thought to check driveshaft plunge.  With the rearend crushing the bump stops, the driveshaft had about a feeler gauge's worth of plunge left.

oops.

Turned the links 2 turns longer (1/4") and plunge at full compression is acceptable. Axle is 1/2" back from stock.  Plunge everywhere else in travel is great, so I guess this is where the wheelbase is just going to have to be unless I move the engine forward a bit.  Or move the engine back a bit, move the rearend forward a bit, and use a 1.6l Miata driveshaft, which is a bolt in but four inches shorter.

Checked for Watts clearance.  Had to call Houston on this one.

That is with the left side at what I used to have as full droop, which is actually leaving a bit of travel on the table relative to what the springs can do.


also, using a Volvo wheel, Chevy LS3 oil pan, Honda Civic jack, to measure clearance on a Ford rearend with Mitsubishi axle ends, in my Mazda.


sigh.


Rearend back out, got out Nik Blackhurst's favorite tool, and here's the mess I need to figure out.

Pete. (l33t FS)
Pete. (l33t FS) GRM+ Memberand MegaDork
4/17/21 10:05 p.m.

On the theory of "it's not stupid if it works", I took the piece that I cut out, cut a big V on the top for Zerk clearance, welded it in at the bottom, used a lot of heat and hammering to curve it, welded it in with a 4mm gap like welding experts say not to do, heated, hammered, grinded with my Harbor Freight finger sander (which sucks, but works-ish), and we have this:

It's not stupid if it works, right?

Put rearend in car, and was able to lower max droop 1" from where it was with the short lower links and I still had this much clearance at max articulation:

Pete. (l33t FS)
Pete. (l33t FS) GRM+ Memberand MegaDork
4/18/21 2:57 p.m.

Also used this time to deal with a seeping fuel tank.  I parked it over winter nearly on empty, on purpose.


2021 starts out at this mileage.  Volvo is 10k behind, but at the rate it is racking up miles it will probably pass it before I park this for the winter.


OH WOW YOU GUYS I SHOULD HAVE WENT TO JOHNNY JOINTS SOONER.  It no longer feels like I have a Dremel ziptied to my skull when driving.  It's still full of whine in the car but it isn't painfully sharp.

New diff feels great, too.  It's nice to have a car with no massive lash in the drivetrain.

Highway vibes are 95% gone, too!

Pete. (l33t FS)
Pete. (l33t FS) GRM+ Memberand MegaDork
4/18/21 3:31 p.m.

Not bad for eyeballs and tape measure.  Both rear links are equally long, too, which doubly tells me that I welded the links on right and the tub is straight back there, floor not folding on itself yet.

Pete. (l33t FS)
Pete. (l33t FS) GRM+ Memberand MegaDork
4/21/21 11:08 a.m.

Grr.

Most of the snow has melted already.  But.  They salted the roads, downtown at least.  I doubt we'll get 6-10" of rain between now and Saturday morning.

AxeHealey
AxeHealey GRM+ Memberand Dork
4/21/21 12:26 p.m.

In reply to Pete. (l33t FS) :

Grr. is right. I've still got ~2 inches on the grass. I was planning to go grab the Healey from storage this weekend too... Guess not.

Pete. (l33t FS)
Pete. (l33t FS) GRM+ Memberand MegaDork
4/21/21 2:17 p.m.

And then the event was postponed.

Not that I was looking forward to driving in 45-55F temps in a heaterless wind tunnel for five or six hours.

Pete. (l33t FS)
Pete. (l33t FS) GRM+ Memberand MegaDork
4/22/21 2:51 p.m.

Throwback Thursday.  Set the Wayback Machine to 2008.


Pete. (l33t FS)
Pete. (l33t FS) GRM+ Memberand MegaDork
4/30/21 8:40 p.m.

I used to not install the CP strut tower brace, because the joke was that as soon as I installed it, I'd have to take it back off to remove the engine.


TIL that you can pull the engine with the brace in place.


Current status: Draining

Pete. (l33t FS)
Pete. (l33t FS) GRM+ Memberand MegaDork
5/1/21 7:42 p.m.

The Plan was to stick the rotating assembly in the new housings, slap together, tune, drive.  Side seals were in good nick when I put the engine together and all springs and apex seals were new.

How the heck does this happen.

Two corner pieces on the rear rotor were broken.  WTF?

This is the first time I'd ever had issues with Atkins seals.  Engine never saw over 9500. If this were the bridge port, those chunks would have fallen out and caused all sorts of havoc.

Not pictured, the end housings had weird wear marks on the bridge between the secondary and aux ports.  Ugly feeling... yep, the side seals on the gear side of the rotors are worn down in the middle, where they swipe over the intake port.

Well, berk.  Time to make an order with Atkins...

Pete. (l33t FS)
Pete. (l33t FS) GRM+ Memberand MegaDork
5/10/21 7:33 a.m.

I like ported engines, but I have come to decide that I do not like porting.


Not pictured: Trying to remove the exhaust sleeves because the brand new (looks like 2019 production date?) GSL-SE rotor housings had sleeves that were welded up wrong.  Wasted a good three hours on that.

Pete. (l33t FS)
Pete. (l33t FS) GRM+ Memberand MegaDork
5/10/21 7:35 a.m.


And by new I mean NEW

Pete. (l33t FS)
Pete. (l33t FS) GRM+ Memberand MegaDork
5/10/21 8:38 p.m.

'81 runs with the '79 carb!


BUT. It runs crazy rich at idle.  Idle mixture screw can be turned all the way in to no effect. Removing the brake booster hose actually made it rev up and run cleanly. Hm.  Pored over the Haynes, the '79 carb and intake had a device between the intake manifold and carb that looks like it may have been a controlled vacuum leak.  This device had the nipple broken off, so I'd plugged the hole in the intake manifold with a 16x1.5 oil drain plug.  The '81 carb didn't use such a critter so I just plugged the manifold and went my merry way.

After locating the valve and carefully disassembling it, it has a bore with a spring loaded, close tolerance piston that seals to the end of the chamber.  It looks like vacuum opens the valve to a fixed amount of airflow past the piston, and a lack of vacuum seals it by spring tension.  Not having this controlled vacuum leak that the carb was calibrated for would certainly cause a rich condition.


So, I gathered that up to deal with at work, and set about making a work space to do my favorite (sarcasm) thing: Cutting side seals.  First step is to drain my drain pan, which I'd drained the '81's cooling system into a year and a half ago, the '84's cooling system a week or two ago, and had set up under the engine stand to catch the engine drippings.  Home Depot thought it was a cement mixing tub, but for $7 it is way cheaper than a "real" drain pan, and its large size means it can catch coolant no matter how far and wide it decides to spill out.


Sparing the full details, there were four intact dead mice and what may have been two or three mostly dissolved mice.  Lots of stuff that I thought were stringy oil bits were actually mouse guts.  Lots and lots of gagging and rubber gloves were used.  


baaaaaaaaaarf

Pete. (l33t FS)
Pete. (l33t FS) GRM+ Memberand MegaDork
5/30/21 8:02 p.m.

I haven't not been busy, but progress has been slow because I needed emergency glasses and they are WAY too strong.  Have been bouncing between trying and failing to assemble the '84's engine, and figuring out WTF with the '81.  The stock carb got no fuel at idle, the '79 carb (with its superior idle air strategy) got way too much fuel.  $18,000 in emergency home repairs meant I can't just throw money down the problem-hole.


all the same.


Guess this means I should finish the car.

Pete. (l33t FS)
Pete. (l33t FS) GRM+ Memberand MegaDork
5/31/21 1:51 p.m.


After 30mi of road testing, runs really well, dead smooth idle, no smoke. We have a winner.


Also removed and disassembled the turn signal CPU, which is a really REALLY overcomplicated flasher unit, and cleaned the contacts on the relay.  Turns and hazards now work.


Still has horrible vibration at 35mph that tapers off with speed, which I recall reading about somewhere, and the clutch does not disengage when hot.  Grr.

Pete. (l33t FS)
Pete. (l33t FS) GRM+ Memberand MegaDork
6/1/21 5:09 p.m.

This oil is about 200mi old.


Looks like I get to see if that trans I rebuilt is any good.

Not today, for now this one works-ish.

1 ... 42 43 44 45 46 ... 54

You'll need to log in to post.

Our Preferred Partners
IjkOsKTrPZHBjtOi64BEih8Ee2IWXpyZHihTLLbDZs9m54tntU62jxpDbngYiomX