You are headed into a hard, fast, left turn with a descending radius, and your new suspension setup is undergoing incredible stress on the outboard side. Right now all of your attention should be focused solely on driving.
Instead, there are several major worries clouding your concentration. Those used lower control arms were a really good deal at the swap meet, but are they going to hold up under these loads? Are there any cracks in the arms that were not visible after they were bead-blasted? And man, those Minilites look great—but how many stress fractures do they have after 25 years of service?
These are very legitimate concerns for sure. Particularly since most of us are on a restricted racing budget, purchasing used parts is often the norm rather than the exception.
So, how do you know if those parts contain cracks or flaws that could lead to catastrophic failure? While a thorough cleaning and close visual inspection are obvious steps, this will only reveal comparatively large fractures. Sending the pieces out for professional inspection is always the best option, but if you could afford that, you probably wouldn’t be buying used parts in the first place. The local automotive machine shop undoubtedly has a Magnaflux setup, but may not have the expertise to check anything other than engine parts—plus, Magnaflux does not work on non-ferrous materials.
Say No to Crack
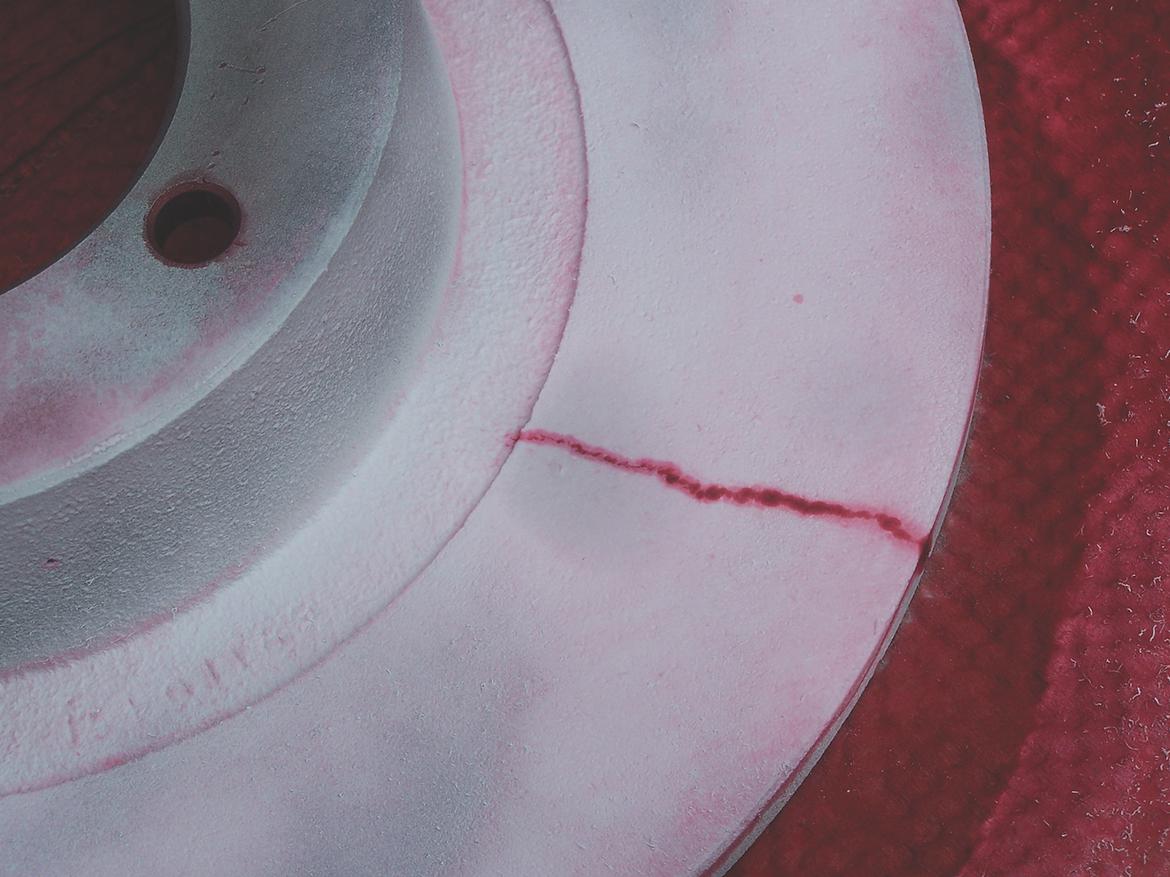
Fortunately, there is an inexpensive, at-home way to perform a DIY crack and flaw inspection on many of your car’s components. The method is called visible dye penetrant testing. This method allows quick and accurate crack detection on almost any solid material such as metal, most plastics, rubber and nonporous ceramics. Any detected flaw will show up very clearly as a vivid red line on a white background.
Using this method, parts can even be inspected at the track. Let’s say you take a spin and bump a front tire against the curbing. Between sessions, the related suspension and steering parts could be cleaned and checked with the dye penetrant, quickly letting you know if the parts are safe for more track use.
As with most good things, there are a couple of drawbacks with dye penetrant testing. The first is that the method will only reveal cracks and flaws that are open to the part’s surface. Internal fractures or porosities that do not extend to the surface cannot be detected. The second problem is that dye penetrant testing of very rough or porous surfaces is difficult. That said, dye penetrant testing is still a great alternative to expensive professional testing such as ultrasonic or eddy-current.
The manner in which visible dye penetrant testing is conducted is rather simple. A red liquid—the dye penetrant—is applied to a clean surface. The dye penetrant is a very thin liquid that both spreads across the component’s surface and also seeks out and penetrates any fracture, pore, weld crack or flaw that is open to the surface.
After a short period of time, the dye is cleaned from the surface, while any dye that has penetrated into cracks and flaws remains. A white powdered developer, suspended in an evaporative solvent, is then applied to the test surface. Because the dye penetrant is so searching and tends to keep thinning and spreading, any dye penetrant that has accumulated in any crack will quickly migrate to the part’s surface and be revealed as a bright red line or spot in the white developer coating.
Although this is basically a simple process, there are tips and techniques that can make the testing easier and more accurate.
Cleaning:
Thoroughly clean and dry the part, removing all paint, grease, oils or moisture. The cleaner the surface, the better the chance that the dye can reach any cracks or flaws. Scrubbing the surface with a soft bristle brush and a volatile solvent is very helpful, as is ensuring that the part is perfectly dry. Welds should be cleaned of slag and oxidation with a wire brush. Many dye penetrant kits contain an aerosol cleaner for organics such as oil and grease.
After cleaning, let the part sit for a while to ensure that any solvent has had time to evaporate from cracks and fissures. Heating the part to around 150 degrees Fahrenheit can expedite the removal of solvent and water. Just keep in mind that many solvents are flammable, particularity in a vapor state.

Apply the Dye Penetrant:
The dye penetrant is very thin and goes a long way, so it is not necessary to apply a heavy coat. Many dye penetrants are available in aerosol or liquid form. A cotton swab is handy for small or confined spaces.
Be sure to use rubber gloves. The dye penetrant is not particularly irritating to the skin, but it does spread very easily and can make a mess if you’re not careful.
Allow the dye to remain for a minimum of 5 minutes. A dwell time of up to 30 minutes or longer is beneficial, as it will allow the dye to penetrate very tight or somewhat contaminated flaws. A longer waiting time is required if the part’s temperature is less than 60 degrees Fahrenheit. Less time is necessary if the part’s temperature is higher than 125 degrees.

Remove Excess Dye:
The surface of most parts can be easily cleaned by merely wiping thoroughly with paper towels or clean rags. Wipe in only one direction until most of the visible dye is removed. Then dampen a towel with the cleaner/remover and wipe in one direction again, but do not scrub hard. Aggressive cleaning may remove dye from any cracks. Cleaners or solvents should not be sprayed directly onto the test piece, as the dye penetrant may be washed out of a porosity or fracture.

Apply Developer:
After the excess dye penetrant is removed, the developer can be sprayed onto the test surface from 8 to 12 inches away. The developer will dry very quickly. Two or three light coatings will normally suffice.
It is important that the coats be applied so that they cover the piece evenly, are only slightly damp and dry quickly. Too heavy a coat may mask any flaw indications.

Inspect:
The test surface should be inspected immediately, then periodically during the next 20 minutes. Larger cracks and flaws will show up immediately, sometimes even before the developer is applied. Tight, small fractures and fissures might take a few minutes to show up, as the tightly held dye penetrant takes more time to bleed through to the surface.
Once on the surface, the dye penetrant’s indication of any crack will continue to grow in width and length. Over a period of time, the line or spot that shows a flaw may grow enough that locating the exact problem becomes difficult. Thus, it is best to check the part often.
Tight cracks will often show a series of inline small dots, while larger cracks will indicate as a continuous red line. Porosity will reveal itself as a scattering of random red dots.
Easy on the Wallet, Too
There are several types of dye penetrant available, including some that show up under ultraviolet light, but the visible dye penetrant described here is the most versatile for DIY use.
The kits are inexpensive and widely available from industrial supply outlets, machine shop supply stores and the Internet. Figure about $30 to buy everything needed to do some testing.


