Episode III – HPD B-Spec Suspension Install, Camber Bolts Install, Corner Balance, Alignment
This week, we got the HPD Fit B-Spec Kit suspension parts installed. The entire kit isn’t Street Touring legal, and some of the kit (due to B-Spec rules) isn’t the ideal either. For that reason we only ordered the dampers, springs and camber bolts (only got two… I think when you order the kit comes with four). The dampers are made by Bilstein and are custom valved to match the Eibach springs HPD picked for the Fit. It probably isn’t perfect for the CR-Z, but the Fit is pretty similar, and we wanted to see how it would work, plus it seemed pretty “Grassroots” way to improve the car for pretty low cost.
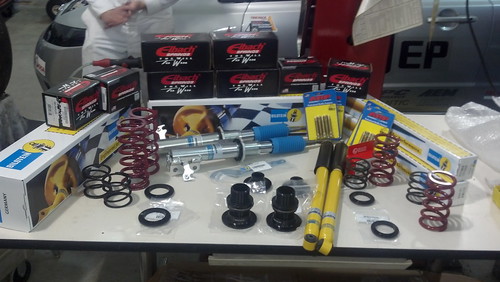
Parts! Beautiful piles of parts!

I didn’t take great shots of the install, but this guy did a pretty solid job.
The rear is pretty simple, the HPD Fit B-Spec Kit (hereafter “B-Spec Kit”) includes two Bilstein dampers, two helper springs, and two Eibach 6” tall, 2.25” diameter, 350lb springs. And a crap top of Eibach stickers; no Bilstein stickers though. Curiously the rears came with installation instructions for a generic Bilstein front strut… that didn’t match the fronts we received. You also get an adjustable spring perch, and a pair of needle bearing that aren’t really needed for anything.
We put the car on a lift, because race shop. Start by taking off the wheels. To get to the top of the rear struts, you have to pop some little panels out. They aren’t bad at all to remove, just insert a screwdriver into the tab and pry it out.
The nut on top of the shock inside the hatch (behind the panels) will have to be removed (note that this is holding the twist beam up, so it will remain in tension as you remove it). You may need to use an Allen key to hold the bolt on the top. We did not. Take care to not drop the washer under the nut down inside the car. It tries quite aggressively to disappear.
There is a bolt holding the bottom of the shock to the twist beam. Removal is straight forward. At this point the stock springs should pretty much fall out. You’ll need to salvage the rubber part on top of the shock and put it onto the top of your new shock. For the springs, you’ll again reuse some of the rubber hardware, but you’ll also want to trim off the little tabs because they get in the way of the new smaller diameter springs.
Assembly is the reverse of assembly; be sure to reuse the stock washers and rubber grommet/washer dealies. The B-Spec kit came with new nuts, so use those instead and discard the originals. Or save them to trade for food after the zombie apocalypse, whatever floats your boat. Put the shock back in first; taking care that you don’t drop the washer down into the bowels of the CR-Z. It can be retrieved with a magnet, but not conveniently or without swearing. We got to do this twice.
Next up was the front, this too was very straightforward. Starting in the engine bay, remove the nut on the top of the strut. You don’t need to worry about compressing the spring because there is a second nut below that is holding the top hat on and is bearing the spring load. Once this is off, move to the wheel well and basically, unbolt the strut. This requires taking out the two 19mm bolts that hold the strut to the knuckle, the 12mm bolt that holds the brake line to the strut, the 14mm bolt that attaches the sway bar drop-link.
Once the strut is out, you’ll need to put on your spring clamps to unbolt the second nut on top of the strut. Once it’s off, you’ll need to retrieve a little rubber nubbin thing to assemble with the Bilstein strut.
Then assemble your Bilstein; again straightforward.

Again, assembly is the reverse of disassembly. Make sure everything is good and tight. After installing the camber bolts, I set the ride height, then got the car on the scales to corner balance it (with driver). We still have some weight reduction work to do, so this will be in more or less constant flux.
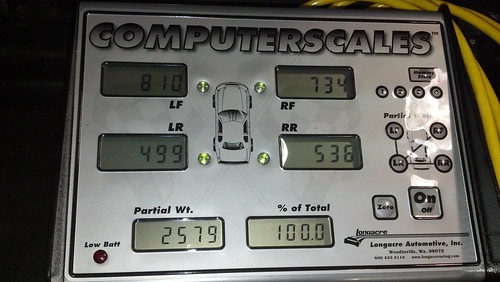
Next we got the car on the scales, and this is what we got:
LF: 813 lbs RF: 731 lbs
LR: 503 lbs RR: 548 lbs
Total: 2595 lbs
Front: 1544 lbs, 59.5%
Rear: 1051 lbs, 40.5%
LF-RR Cross Weight: 1361 lbs, 52.4%
RF-RR Cross Weight: 1234 lbs, 47.6%
Then we remembered to pull out the tool kit, floor mats, other random easily removable crap; getting us down to:

LF-RR Cross Weight: 1318 lbs, 51.1%
RF-RR Cross Weight: 1260 lbs, 48.9%
With the driver, Front-Rear balance improved slightly, about 1%, cross weight was unchanged. We still have some weight reduction work to do, so this will be in more or less constant flux. Unfortunately, we didn’t weigh it before installing the B-Spec Kit suspension, so I’m not sure exactly how much we save here. Maybe 5 lbs in the rear and 15lbs or so in the front.
Next, I got it on the alignment rack and got to work. I was able to get -0.3° (L) and –0.4° (R) camber. This was quite disappointing, as the in-spec range is -1.0° to 1.0°. Another team member found some crash bolts hiding in the shop, so after those were thrown in camber was up to -0.6° (L) and -0.9° (R). I think there will be some eventual slotting of the struts and maybe camber plates and if we can source some.


