1 2 3 ... 12
JohnyHachi6
JohnyHachi6 Dork
12/11/13 1:14 a.m.

Finally have a couple minutes to start a build thread about this...

I recently decided that it was time to do another crap-can race. I did a 24 hr Lemons race a few years ago and had a great time, but liked the idea of ChumpCar, which seemed a little better oriented towards more serious racing.

I wanted to build my own car this time so that I could choose the races to enter, the modifications, and because I really enjoy going through the process of building a car. So, after reading through their new rules, which set specified values for various cars, I came up with a couple options: http://grassrootsmotorsports.com/forum/grm/drivers-needed-bench-racing-grudge-match/71021/page1/

A few days later a Craigslist ad for a '92 SC300 came to my attention and I went to take a look at the car. It had been sitting in a "barn" (that's probably a generous description) for ~7 years after the PO hit a deer, but looked to be in pretty decent shape mechanically. It only had 124k miles on it and there was evidence of some regular maintenance, including a brand new set of Pirelli tires, which had unfortunately dry-rotted into oblivion. However, the owner had lost the key so I couldn't start the engine.

I decided it was worth the $1000 I negotiated down to, convinced that the rare manual transmission would be worth the price even if the rest of car turned out to be crap.

Here's the car as purchased:


Has some crappy half-finished bondo work, missing most of the front end, rest of the paint had been sanded and left for years, windows were left open so the interior was shot, but hey, it's got a 2J and a 5-speed, right?

First order of business was getting a key made. The local Lexus dealer was happy to help (with proof of ownership) by making me a key on-the-spot. Bonus, it only cost, $37.10 - must have been the cheapest trip to a Lexus dealer in history!

I bet my girlfriend a trip to the local gourmet icecream shop that after oiling the cylinders and installing a charged battery it would fire right up. Promptly lost that bet due to an aftermarket security device and bad fuel pump. The security electronics were easily removed - what a joke!

I pulled the rear seat to get to the fuel pump access panel and pulled out the offending unit. This led to more issues as I found that there was some weird corrosion gunk built up on all the steel surfaces in the tank that weren't submerged in fuel (a good argument to storing a car with a full tank, I think):

I had to drop the tank to flush it out thoroughly, which was a pain, but at least I know it's in decent shape now. Here's some of the gunk that came out of the tank:
I cleaned up the corrosion pretty well paying some special attention to the fuel sender, and installed a new Bosche fuel pump:
After taking care of the security system and fuel system the car finally did fire right up without any sign of protest. Warmed up with no issues, took it for a quick rip around the neighborhood, and it ran great. No check engine lights, everything worked great. I was pretty excited. So, I decided to start planning out the rest of the build.

I've been working a few hours a week on the car for the last month and a half now and it's coming along nicely. Lots more updates to come when I can find more time.

Here are some teasers of the updates to come:


Caleb
Caleb Reader
12/11/13 2:23 a.m.

This is very relevant to my interest lol

chandlerGTi
chandlerGTi SuperDork
12/11/13 6:46 a.m.

Sweet.

wvumtnbkr
wvumtnbkr GRM+ Memberand Dork
12/11/13 7:16 a.m.

MOAR!

Strike_Zero
Strike_Zero SuperDork
12/11/13 11:56 a.m.

A manual SC300

midniteson
midniteson Reader
12/11/13 1:33 p.m.

Nice find!

trigun7469
trigun7469 Reader
12/11/13 1:52 p.m.

There was a chumpcar team in VA that had the same car, you may want to contact them before you go further they went through a lot of engines.

JohnyHachi6
JohnyHachi6 Dork
12/11/13 6:04 p.m.
Strike_Zero wrote: A manual SC300

Yessir. Three honest-to-goodness pedals!

JohnyHachi6
JohnyHachi6 Dork
12/11/13 6:06 p.m.
trigun7469 wrote: There was a chumpcar team in VA that had the same car, you may want to contact them before you go further they went through a lot of engines.

Do you know the team name or what races they've competed in? I'll definitely try to get in touch. I have some concerns about oiling, and oil drain-back from the heads in cases with excess blow-by, but I think this particular engine will do pretty well in that regard as the rings seem to be in good shape (very solid compression numbers).

MrJoshua
MrJoshua PowerDork
12/11/13 8:10 p.m.

How stripped was it to get to 2960 lbs?

JohnyHachi6
JohnyHachi6 Dork
12/11/13 9:49 p.m.

In reply to MrJoshua:

I'll write up some more about this, but it still has significant weight left to remove.

JohnyHachi6
JohnyHachi6 Dork
12/11/13 10:30 p.m.

Ok, so before getting back to the actual car build, let me digress for a minute and talk about the planning and budgeting aspect of this project. For anyone looking to get into ChumpCar, I'd highly recommend a carefully planned budget for the car, for each event you plan to run, and for your ChumpCar MPV/TCV, at a minimum. I also have been tracking projected costs and expenditures for team supplies/equipment, maintenance items, and spare parts.

I won't get down to the intimate details here, but I will say that I am running this endeavor on a graduate student (PhD candidate) budget (I make around $20k a year before taxes) so this is an absolute shoe-string operation. The way I've decided to structure the team, as the team/vehicle owner, I am fronting all the cost for the vehicle, supplies, equipment, spares, and general maintenance and I am asking team members to put up the money to cover the event fees, and consumables for the specific event they run. So, basically, I pay for the car and everything to go racing, then the paying drivers split the event cost between them, so I race for "free".

The budget I've laid out projects that I'll be spending about $5,500 all-in to get everything we need for the first event. Some of the event fees and event-specific consumables (~$2,400) will be paid back by renting out seat time to the drivers on the team. So after the first race that means I'll be out ~$3,100, but will (hopefully) have a decent ChumpCar and can race pretty inexpensively at future events.

As I mentioned this is pretty much as cheap as I can imagine things getting to build a semi-competitive car and run an event, unless you have a car with cheaper consumables (ie, smaller tires, cheaper brakes, lower fuel consumption) or are starting with a car you already own or bought already set up for racing.

The event numbers I posted here are based on a double 7 hr or 14 hr enduro with 6 drivers total. The economics get a little better on really long (24 hr) races and for events with less drivers (who therefor drive multiple stints). In some ways, the event cost is worse-case here. But the nice thing is that the event cost is mostly carried by the drivers, not by me.

JohnyHachi6
JohnyHachi6 Dork
12/11/13 10:42 p.m.

Ok, so back to the fun stuff - buildin' race cars!

After getting the car running I wanted to quickly confirm the condition of the engine and ran a compression test. I was very pleasantly surprised by the numbers, which came back almost perfectly even at 200 psi on all 6 cylinders. (200, 200, 203, 200, 200, 195)

Having satisfied myself that everything was in decent shape mechanically, I felt comfortable moving forward with the project.

The first order of business was cleaning out the car and stripping everything that would be getting in the way. The trunk turned out to be a treasure trove:

Some weatherstripping found in the pile-o-goodies might make a decent air-dam down the road and lots of tools, some automotive fluids, and tons of hardware were welcome additions to my garage.

JohnyHachi6
JohnyHachi6 Dork
12/11/13 10:57 p.m.

Next was cleaning/stripping the interior. When throwing out the floor mats - guess what I found... the OE key! Doh! Should have check there before buying one. Oh well. Definitely nice to have a spare.

The rear seat was already out for the fuel pump, so that went in the dumpster.
The speakers, carpet, trim, CD changer, amplifier, etc all came out too.
Up front, the door panels were discarded along with the carpet, interior panels, airbag, headliner, etc. I have kept the OE seats for now so I can drive the car around, but they will go as well once the cage, harnesses and racing seat are installed.

Another nice bonus: tons of change (mostly quarters) under the front seats/carpet. Along with all the cigarette butts, I found a little over $16 total. Car will be paying for itself in no time!

JohnyHachi6
JohnyHachi6 Dork
12/11/13 11:04 p.m.

Somewhere around this time, I decided to make a junkyard run to pick up some replacement parts for the front end. SC300/400's are reasonably common in the pull-a-part yards around Atlanta and a few new arrivals had just been listed on their websites.

I picked up a new bumper cover including the high-beams, and a new washer bottle for $85. I was able to get the original low-beam housings mounted ok and get everything back together enough to drive the car a little without risk of being immediately pulled over.

Before:
After: I removed most of the front crash absorbing bits, and will probably weld in a steel bar under the bumper at a later point to protect the radiator. Kept the OE aluminum bumper support. Might make this into a Nascar-style rear spoiler or something.

JohnyHachi6
JohnyHachi6 Dork
12/11/13 11:10 p.m.

While at the junkyard, I also picked up some spare engine sensors, ignition parts, etc. Mostly items that I would want to have on hand at a race should the car mysteriously stop running.

I also installed a set of BBS wheels that I had picked up from the same pull-a-part about a year prior. They came off an LS400 of similar vintage and the set ran me $100 at the time. They're 16x8's which is a good size allowing for bigger brakes and wider tires without the exorbitant price of many of the larger diameter track tires.

Looks a little goofy with the big wheel gap and tall sidewalls, but that'll be resolved in due time.

JohnyHachi6
JohnyHachi6 Dork
12/11/13 11:28 p.m.

Next, I began to plan what parts were slated for inspection/replacement. I decided that all the engine seals should probably be done along with transmission input/output seals, the water pump, timing belt and tensioner, accessory belt and tensioner, etc. I bought a big chunk of that from Advance with one of their $50 off $100 deals. I also, very fortuitously found someone selling a genuine Toyota 2JZGE gasket set on craigslist for $100 (about 30% of retail IIRC) and picked that up.

I'm planning to pull the engine/trans after the roll cage is complete and clean up everything. I'll go through all these maintenance items then.

In preparation for this, I pulled some of the un-needed items from the engine bay. The AC components and P/S pump and lines were removed and the mechanical cooling fan (evil device that it is) were tossed, leaving a lot more room to work in the engine bay. Note the classic ratchet strap battery tie-down Don't worry it's very temporary.
I also pulled the fan shroud and am working on mounting an electric fan from a Volvo 960(?) onto the shroud at the moment. I did a similar install on my Datsun a few years ago and it worked out great.
I'll post pics of that assembly when it's done.

This car uses a single serpentine belt for all the accessories, so with the A/C and P/S removed, I needed to get a shorter belt. I did some maths and figured out the approximate length I needed, went to the parts store and bought a couple of the closest length belts.

FYI, most parts stores will let you go back to their store room and peruse the belts. The part numbers are based on length and number of ribs so you can easily pick out the item you need if you know what to look for. I found that a belt from an old Porsche 944 application (IIRC) fit the bill. While I was in there I also replaced the belt tensioner pulley, which had a little bearing play. I kept the old one for a spare to have at the track.
Notice that there are some green paint marker marks on the various sensors/actuators/ignition bits on the engine. As I've started accumulating spares, I've swapped them on to the the engine to verify their condition, then marked them as having tested OK. This makes it really easy to grab a spare part from a box and swap it out at the track without worrying about whether it will work or not.

JohnyHachi6
JohnyHachi6 Dork
12/11/13 11:47 p.m.

So, at this point it was time to start working on the roll cage - the single biggest task planned for this build.

I had picked up some nice chromoly tubing on craigslist a couple years ago, (1.75x0.095) and planned to build the whole cage myself to save on the cost. For anyone considering the same, I don't recommend it if you can afford to have a shop do it. It's tremendously time consuming and requires some good, expensive tools and decent fab skills to get it right. However, given my limited finances, access to said tools, and desire to take on these DIY tasks, it was the right decision for me.

For bending the tubing, I'm using a JD Squared Model 4 air/hydraulic bender. This is an excellent unit and has made the bending process pretty straightforward. Here's what one looks like, for reference (not an actual picture of the one I used, but the same model):
One downside to using chromoly, though probably slightly better as a material, it requires TIG-welded joints, which are typically more time consuming to produce and requires more experience (IMO). I had access to an older DC/AC Lincoln TIG welder (Idealarc, I think) that I am using for that, and it works well for the application. I'm also using a big miller MIG welder for some of the spreader plates and such that aren't chromoly.

All the tubing was notched with a harbor freight notcher, shimmed to better align the cutting axis with the tubing holder (these are commonly mis-aligned from the factory). I also had to replace the factory hardware, which stripped out after a couple uses of the indexing plate. I went with a couple pretty cheap bi-metal hole saws and they have held up well once I got the hang of the rpm and lubrication requirements. Rather than trying to bolt this all up to a drill press or vertical mill, I just bolted the notcher to a table and used a heavy-duty hand drill. It worked out just fine and leaves more room to maneuver the tubing compared with a drill-press mounted setup.

There are some more details/pictures of the setup in my miata build thread:
http://grassrootsmotorsports.com/forum/build-projects-and-project-cars/super-budget-90-track-miata/61876/page3/

One of the first steps with actually fabricating the cage was to remove all the sound-deadening tar from the floors. I've done this in the past with liquid nitrogen, which freezes the tar and allows it to be shattered with a hammer, leaving little/no residue. It's a fast and easy method if you can get liquid nitrogen. I think dry ice would do the trick too and plan to try that at some point. (Sorry, no pics of this, I was too busy trying to get everything nice and frozen before all the N2 evaporated.)

Here's a shot showing the trans tunnel/floor after tar removal. The grey areas used to be covered in tar.

JohnyHachi6
JohnyHachi6 Dork
12/12/13 12:12 a.m.

With the tar removed I selected the 6 spots for the main bars to tie into the chassis, made the spreader plates, bent the main hoop, front down-tubes, and rear braces, and tacked everything together.

As a side note, the fuel tank and OE filler tube along with the location of the shocks really limit the rear brace location. I don't want to move to a fuel cell at this stage (due to the cost), and wanted easy access to the shock bolts, so the rear braces land on the frame rails near the shock towers rather than on the rear section of the frame rail, which I would have preferred ideally.

You can also see that I had to remove the full fuel tank access panel and cut out some more of that bulkhead to put in the rear braces.

Rear brace mounting location:
Main hoop and spreader (passenger's side):
Driver's side:
Front down-tube spreader (driver's side):

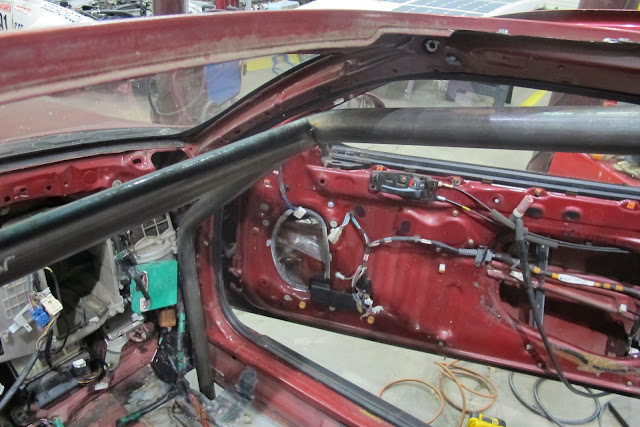
Here's a good time to discuss the process for the cage welding. Due to the close proximity to the roof, it is not possible to get 360 degree welds on the joints there. So, the front down-tube spreader plates cover holes cut through the floor. After everything is tacked together, those plates are slid out from under the tubes and they drop through the floor. The whole cage rotates down and forward and the welds can be completed before rotating the cage back into place and reinstalling the spreaders. This is why I mounted those spreader plates (shown above) on the floor rather than on the door sills, though when complete, they are welded into the sills.

JohnyHachi6
JohnyHachi6 Dork
12/12/13 12:25 a.m.

Some of the spreaders cleaned up and ready for final welding:

Here are the main tubes tacked together and ready to be rotated through the floor:

Before pulling the front spreader plates and rotating the cage, I made and tacked in a rear horizontal between the rear braces in order to help keep them aligned during the welding.

Here is the whole assembly rotated down. You can see the nice amount of room this give to allow for complete welding of these joints:
Here you can see the rear horizontal I mentioned, just in front of the fuel tank:
Here are some shots through the sunroof (which was removed) that show the joints in question:

Some shots of the front down-tubes rotated through the floor:

JohnyHachi6
JohnyHachi6 Dork
12/12/13 12:55 a.m.

Before doing the full welds, I pre-heated all the joints to 200-300F using a propane torch. It was a little cold that night and they say that it's a good idea to preheat chromoly in general and specifically if the tubing is below ~70F. I also post-heated some joints when it was particularly cold or drafty. This keeps the cooling process very gradual, which is ideal for weld strength.
...then went to town with the TIG torch.


I'm not the world's greatest TIG welder by any means, but these are passable. A professional would do a better job limiting the heat input to the metal and there would be a narrower heat affected zone (indicated by discoloration around the weld), leading to a stronger assembly. But, again, these are decent and probably better than most MIG welds.

After doing those tricky welds up top, the cage was rotated back into place and welded to the spreader plates.

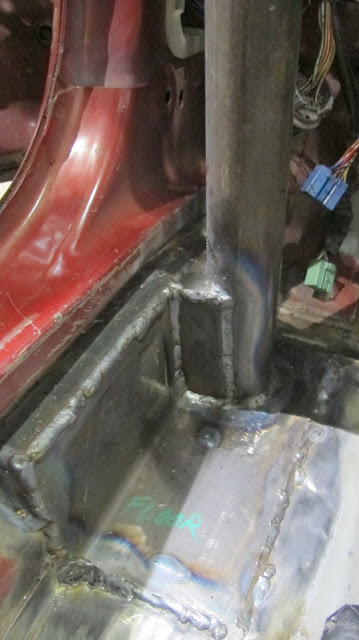
The front down-tubes and spreader plates were full-welded, boxed in and tied into the frame rails/door sills.
JohnyHachi6
JohnyHachi6 Dork
12/12/13 1:06 a.m.

Before moving on to the door bars, main diagonal, harness bar, and dash bar, I wanted to get the seat location finalized, since it affects the design of these final bars.

When I bought the chromoly cage tubing, it also came with a stick of 1" diameter chromoly, which I figured would be perfect for the seat sub-frame.

Welding it up:

You can see I added some plates to gusset the bars into the OE seat sub-frame and frame rail:

The seat attaches via class 10.9 hardware tack welded into place as studs, which makes mounting and moving the seat a pretty simple task.

Finally, I painted all the bare steel that had been welded in near the floors in order to stop any corrosion if water gets in the car while it's stored.


This wraps up the past work I've been doing on the cage. This weekend I'm hoping to get the rest of the bars finished up and possibly welded in.

Kenny_McCormic
Kenny_McCormic UltraDork
12/12/13 1:16 a.m.

Do have any worry about getting crap for using a (presumably thinner walled) lighter chromoly cage in a crapcan racer?

JohnyHachi6
JohnyHachi6 Dork
12/12/13 1:22 a.m.

In reply to Kenny_McCormic:

No, not really. There are no rules about weight and I did it specifically to save money. (I bought all the cage tubing for this and my miata roll bar on CL for ~$275, which was significantly less than I could get mild steel for new). If I were buying it new I would have gone with mild steel because it's cheaper than chromoly and quicker/easier to weld. If anyone has a problem with that, I'll be seriously disappointed. Especially when other teams are paying $5k+ to get cages installed, running $2k sets of wheels on their cars, etc. Like I said, this is an honest-to-goodness shoe-string build. I don't know how you could be much more crapcan than this.

Also, there's no easy way to tell that this is chromoly, so unless someone is really going out of their way to be a d-bag about it, I don't think it'll even come up.

JohnyHachi6
JohnyHachi6 Dork
12/12/13 1:38 a.m.

One evening after working on the cage, I decided to pop the car on the scales so I could get a better idea of the weight (mostly out of concern for spec'ing the brakes). I had guessed that it would be right around 3k lbs in current trim.

At the time, the car was prepared essentially as pictured during the cage build:
- All OE glass in place
- Full tank of fuel
- Full door structure (including window motors, etc)
- No seats
- No sunroof
- Main structure of cage installed (though no door bars, dash bar, main diagonal)
- BBS wheels
- OE SC300 brakes
- Unmodified hood/trunk with complete hinges/hydraulic struts
- Still come sound deadening tar on the trans tunnel/firewall
- OE HVAC blower and heater core
- OE lights
- OE lead acid battery in OE location
- No fire suppression system

So, still a lot of weight left to remove, but also some to go back in.

Here are the numbers:


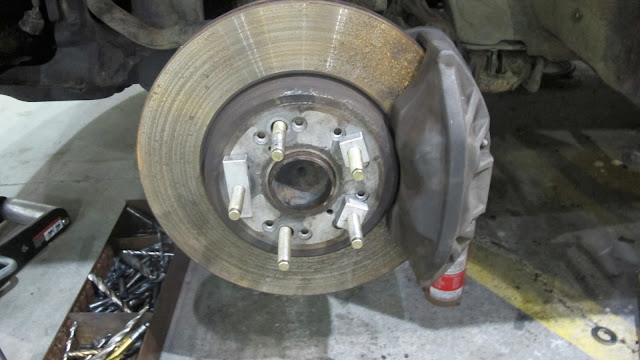
You can see there's a good bit of weight up front, but relocating the battery and modifying the hood should do a lot to mitigate that. Also, the brakes are being replaced with LS400 units, which I think are slightly lighter. Finally, the headlights are probably going to be replaced with some hood-mount LED units, which might be a little lighter and certainly further rearward.

L/R balance looked good and by careful placement of the battery and fire system, it should be possible to maintain the balance with the seat, harness, and driver in the car.

1 2 3 ... 12

You'll need to log in to post.

Our Preferred Partners
XWMcVqpSMPxXA7ZQFgiWivXcTbTToaOrch23mNGrdHtzECr3IYrnUg94IhwANDhG