
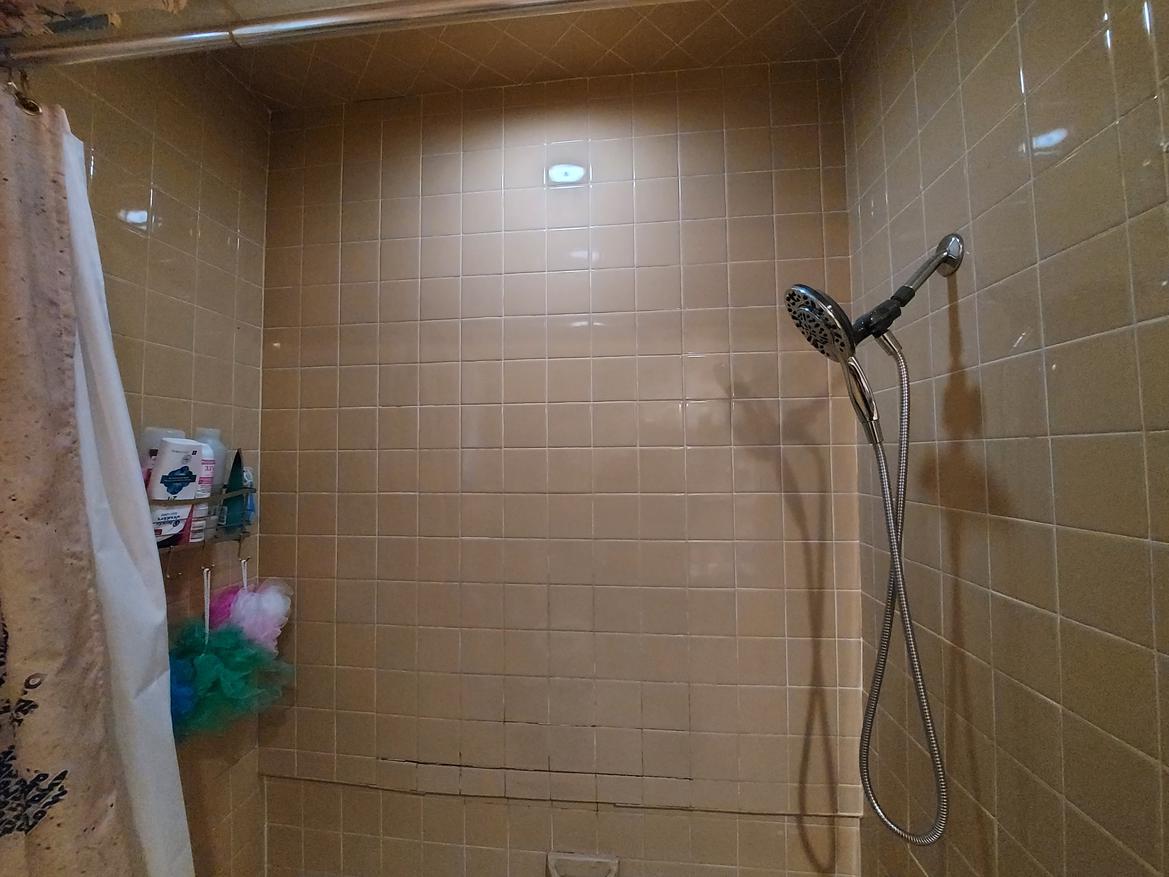
As you can see, I have tile problems, that certainly point to a wall board problem, on the wide "side" wall of the upstairs bathtub. I also have found this morning I have a faucet leak on the right side wall in these pictures.
The thing is the tile wraps the whole way over the ceiling as well as out the sides and around the bathroom.
I REALLY do not want or have the ability to afford to redo the entire room right now. It's not an option.
What do I need to minimize the damage and repair the current problems? Materials, tools, methods?
I have chisels, hammers, utility knives, time, and YouTube. I have never done tile work before. And of course there's the 1"inset on the lower part of the wall that looks like it'll be a problem to work around and is what is stopping me from just slapping up a E36 M3ty surround until we have money to redo the whole room.
I just want to do something to stop that wall from caving in.
Look at some of the shower wall kits, they are plastic or fiberglass and will usually apply directly to the studs. Take out the tile and drywall and use construction adhesive, etc.
I've only been doing bathrooms for 60 years... have never seen an offset wall like that before. First time for everything. There must be some reason they originally did that. I fear if you break into that back wall you might find some major damage behind it, such as the wall studs rotten away. So, the repair gets bigger and bigger as you get into it. What is on the other side of that wall? Another room, or is it an outside wall?
In reply to Purple Frog (Forum Supporter) :
My bedroom. With an outlet that is oddly behind that inset section.
Current guesses are he ran out of scrap lumber the right size so did that, plumbing for the bathroom sink comes up from the shower and over the ceiling (I've seen dumber things here), or to try to set in the soap dish an extra inch.
My big fear with this project is getting whatever wall board down and finding out studs need replaced. The only contractors I trust are booked months out, so calling one to bail me out of that isn't really an option.
Well, guess I'm getting a whole new bathroom after all. Water damage goes behind the closet. 4 studs will need replaced. If we're tearing down half the bathroom might as well do the whole thing.
 insulation and studs were visibly wet 2 feet above this spot.
 and the inset. Oh the inset. The studs are notched and sobering that feels and sounds a lot like plywood with window screen on it is set in. Where it pops out above is 2 layers of drywall making the bump out.

Guess this is now a build thread, at last it might as well be.
 I got this far today. There's a dumpster coming tomorrow. 5 studs are wet to the touch, so probably will need replaced. Somehow without damaging the wall on the other side of them.
Since the bathroom ceiling is 8 feet 3.5 inches tall, I want to take this time to lower it. The AC duct has enough room, the exhaust fan thing doesn't do anything so berkeley it, and just put in some good, bright, not battery powered lights.
My plan is get all the tile of the ceiling in the tub, get rid of the bump thing at the top, attach a 2x4 to the studs the whole way around the room perimeter and across, then fresh lights and drywall.
What's going to be my best wall and wall covering options for the bathroom? Green drywall, purple, all cement board, FRP and silicone? Looking at cost vs ease of install and longevity.
Going to go with a full tub and shower kit to replace this mess, keeping the toilet, and letting the wife shop vanities and cabinets and stuff.
When I did mine a few years ago, I did cement board with a mastic on top before putting on the tile. I figured that would help seal all the seams better than anything else. If the studs seem okay at the top and bottom, you can probably just get away with sistering new ones in, so you don't have to damage the wall in your room.
In reply to WonkoTheSane :
I'm going to see I can get away with that after I run the dehumidifier overnight and through tomorrow. I haven't seen the bottom of the studs yet, but at this point I'm hoping the bottom board isn't borked as well. They're good and dry from eye level to the ceiling though.
Should I just use cement board for the whole room? We're going to buy a seamless acrylic set, new tub and all. I was looking at them today and for about a grand all in I think they'll do ok. Except it's 74" tall, and my current ceiling is 99.5".
But I was thinking just paint for the rest of the room. Kilz primer, and a good latex.
What you're going through is why I've avoided renovating (fixing...) my tub and bathroom as I know for a fact there is severe water damage to the studs - which are outside wall studs. It will snowball into ripping the siding off... which will make me want to replace all of the failed double-glazed windows... all 13 of the berkers... and... why not just tear the entire house down and start over since if I'm going to do that much work, I would like the house to be better suited to my wants/needs. Bearing in mind the entire electrical system needs to be replaced as well. Remember I said snowball?
My WAG on the inset is the builder installed the studs, finished the bedroom wall, then realized they built the tub space just a bit too narrow. So instead of moving the wall, they notched out the studs, leaving you with a strange inset.
Aren't old houses fun?
Usually, the floor is also rotten under the tub so possibly plan on replacing the floor sheathing in that area as well. In areas where there isn't a floor joist to screw to, use flat 2x4 cleats with half screwed under the good flooring and screw the new replacement plywood to it as well so that everything is nice and solid.

SV reX
MegaDork
3/14/23 4:49 p.m.
In reply to RevRico :
Don't use cement board on areas you want to paint. It's an awful paint surface. But it's great under tile.
In reply to SV reX :
Green or purple drywall then for the areas not around the tub?
in reply to Volvo :
at last what I can see of the floor is good so far, thankfully. I put LVP down when we moved in and plywood looked good. Looking in through the water shutoff (that still drips) there's some signs of old damage but nothing recent. When I get the tub pulled I'll know for sure, but I'm cautiously optimistic.
SV reX
MegaDork
3/14/23 5:48 p.m.
In reply to RevRico :
Green works fine. Purple is better.
Both are moisture resistant, but purple is also mildew resistant.

In the last few years I've built 10-12 full tile showers. It's really not difficult and you can certainly handle it DIY with materials from the local "big box" stores. Once you decide on either using the existing framing or new 2x's, I would use Hardie backer board at least 3' up the walls(sheets are 3'x5'x1/2") and then MMR(mold and milder resistant) drywall up to the ceiling. You can use a brush/roll-on waterproofing membrane on the whole wall prior to setting tile in thin set. I've used RedGard with good results. You want to use the best silicone sealant between the backer board and tub, between the drywall and backer board and the drywall itself. Seal everything really well before applying RedGard or tile. Also, a combo light/exhaust fan is a good idea in the shower to get rid of steam and moisture. I also try to use a large CFM radon fan in the attic in conjunction with the small fan in the light unit. This set-up pulls a lot of air and eliminates most of the water that tends to accumulate on the ceiling of the shower. Finally, I don't like using standard fiberglass insulation on the shower walls, I prefer to use Roxul Rockwool insulation.


Dumpster didn't show up till 5pm today, so cleanup will start tomorrow.


Only tile left on the walls is the ceiling of the shower, behind the toilet and behind the vanity.
Because there isn't a water shut off for the bathroom, and the point of use shut offs are dead, I get to add shut offs, replace things. I started eyeballing the maze of copper, might just run direct pex instead.
After cleanup of all the tile tomorrow I'm going to start stripping the walls off to get to bare studs. The dehumidifier is kind of helping.
I'll use that rockwool insulation then. Purple drywall, kilz, good whatever will work with the kilz oil, acetyc, and water based options are out there.
Found a decent looking acrylic surround to put in as well as a black shower base.
If you're going to use PEX tubing, there are different types, manufacturers and sealing styles. I prefer UPONOR expansion PEX over the use of "crimp" style commonly available at the box stores. The only problem is availability as UPONOR is only available thru plumbing supply houses. Supply House online is where I buy my fittings, hose and sealing rings. Also, using a proper battery operated expansion tool is much easier than the manual ones. I have the Milwaukee tool specifically for the UPONOR PEX and you are more than welcome to borrow it for your remodel, but I see that you're 5-1/2 hours away. Just an offer.
In reply to lotusseven7 (Forum Supporter) :
I appreciate the offer. I still need to weigh my options with the plumbing. I'm doing shark bite shutoffs because the copper looks like the house was built around it so getting a torch to things is tricky, but I don't know what I'm doing with the shower itself yet. I'll know better once the wall comes down and I can see it all.
But the fan is an interesting issue. The current fan/light/heater combo setup that we only use the light of vents directly into the attic that doesn't have an exhaust fan, as does the kitchen exhaust. The attic full of shredded vermiculite, which as it turns out, really likes to suck up moisture. I really want to add an exhaust fan of some sort that actually gets the air out of the house.
Whether that's an attic fan, some sort of through the wall situation, replacing the bathroom window with a piece of plexi and a baffled fan, something that ties to the big AC setup in the attic somehow. I don't know yet. I'd have to hire someone to install the attic fan so I have someone to yell at when it leaks, but it might be the best option.
On the plus side, I'm finally going to get the HF drywall hoist I've always wanted when I do the ceiling. When this is all over, my fun project will be making other attachments for it to have a good set of adjustable "hands".
SV reX
MegaDork
3/16/23 7:33 a.m.
In reply to RevRico :
I used to own one of those drywall hoists. They were useful for hanging alone, but REALLY awkward to store between uses. Glad to Herod if it.
Now I rent one when I need it. I haven't needed one in years.
Walls are coming down mostly nicely. berkeleying drywall nails and expanded metal corner beads are doing everything they can to stop me.
If my oscillating tool could hold a blade for moor than 30 seconds that would be awesome. Instead I'm just prying everything off.
Shopvac died today, because of course it did.
The wall in the outside of the house wasn't insulated, at all. Gonna fix that too I guess.
I saw soffet vents today for extractor fans. So I looked outside, and outside, directly above the window, is covered in soffet. Inside the bathroom there's another 12-15"before the current ceiling. Might be the best route to just cut a hole to outside for duct work and attach the fan to the current ceiling.
I'm planning on studs and more drywall to drop the ceiling without taking the current one out aside from in the shower alcove area. Hopefully they will fly.
Lighting. Why must this be so odd? Maybe I'm overthinking it.
I want lights over the main area AND over the shower, that aren't battery powered like I have now in the shower.
So I need wet rated yes?
That leaves me with canless can lights. But, they're setup on a wall of berkeleying light at the store, so I have no idea how bright they really are to pick and choose. Yea yea, lumens and light temperatures, but they don't tell me if I can get away with say 4 in the main and 2 over the shower, or if I need to go crazy and put a dozen lights in the ceiling.
More to think about. Time to go drain the house plumbing so I can install shutoffs.
Hopefully I'll have studs all around by tomorrow night, so I can rough in the wiring that I don't know what I'll need yet other than the the circuits I want, fan, main and vanity, shower.
I would say you're over-thinking it. Home centers have numerous lighting options rated for wet locations above a shower. Unless you plan on some really dark tile or shower surround, you don't need a ton of lumens in a shower. If in doubt, install more than you need and control them with a settable dimmer switch. This also kinda "future-proofs" it as we often need more light as we age. Or it's sometimes nice to have a berk-load of light when cleaning, but less during regular use.

RevRico said:
Lighting. Why must this be so odd? Maybe I'm overthinking it.
I want lights over the main area AND over the shower, that aren't battery powered like I have now in the shower.
So I need wet rated yes?
That leaves me with canless can lights. But, they're setup on a wall of berkeleying light at the store, so I have no idea how bright they really are to pick and choose. Yea yea, lumens and light temperatures, but they don't tell me if I can get away with say 4 in the main and 2 over the shower, or if I need to go crazy and put a dozen lights in the ceiling.
More to think about. Time to go drain the house plumbing so I can install shutoffs.
Hopefully I'll have studs all around by tomorrow night, so I can rough in the wiring that I don't know what I'll need yet other than the the circuits I want, fan, main and vanity, shower.
A few years ago I gutted our downstairs bathroom and ended up having a contractor come in and finish it.
We have a 32 by 32 shower stall, pedestal sink, and toilet.
There's a light/vent fan combo fixture in the center of the ceiling, a bar with two bulbs hanging down above the mirror, and a small circular LED light set in to the ceiling above the shower stall. Two of those in a bath/shower enclosure would be plenty bright.
PEX runs for all the plumbing.
Good luck!
December 3, 1972 the walls were put up, judging by a newspaper I found under the vanity today.
 take note of the nice copper drain line.
 that nice copper drain line?fernco to plastic, to plastic, to idk what.

That random upside down U Shape? Hot water, the pipe with the cap on it. I was just going to install a shutoff then tools broke and no room and I called it a day before I did something stupid.

This is where the lines cross thigh to the living area from the utility area, more useless length in the hot line I couldn't get in the picture.
So I guess I'm just going to replumb the whole damn house, at least all the supply lines. Maybe I should sacrifice a virgin or a goat or something to not need to deal with the drain lines.
berkeleying studs are almost all free. But I suspect I'm going to have to pull the window, because berkeley me why should any part of this be easy.
 that rusty expanded steel corner bead wraps right around the window. Yay.

Tomorrow I lose my good lighting when that comes out and I nut off the wires.
 I'll also lose the not so good ceiling lighting.
Bought 100 feet of red and blue pex today, a crimper, and cool looking crimps, butt loads of fittings and adapters too. Got the exhaust fan, a new oscillating tool, and an update on my tetanus shot when I put a rusty nail through my foot this afternoon. Minor win there, CVS minute clinic is WAY faster and closer than urgent care or the ER AND takes my insurance. Good to know.
So I've also got my hands on the 48 page Latin rites of exorcism to try to make the rest of this project go easily. I'm also trying to find a native American shaman, but rural PA doesn't have very many these days.

So what's the smart way to get rid of this?
Without ripping out the basement back wall I can't really get to it from underneath, but the system is drained, I think. Nothing coming out of the drain but only like 3 gallons of water came out.
But the radiator is in the way and needs to not be.
Also, am I correct in thinking that since the tub didn't shatter when I smacked it with a sledge that it is steel and not cast? I don't see anymore attachment points but I can't move it either


