1 2
edwardh80
edwardh80 Reader
12/26/20 8:41 p.m.

My family & I love camping. We have a Pathfinder, but once the second child arrived, going camping for a week or two made for an extremely squished ride. So we figured we'd by a trailer to cart our gear around. I kept an eye on CL for a while; one day the trailer below popped up near me for $700 so I jumped on it. It's a little 6x4 enclosed trailer, just about perfect in size to dedicate to camping duties.

Fast forward a few months (June 2019), and it was time for our next camping trip to the Pisgah forest region. All our camping gear fit no problems, but it was all just a bit disorganised. The trailer served as storage for all our gear, and we cook on the table at the campsite. Not the best arrangement, but it beats spending vacation at home.

Unloading once we got home again...

Size-wise, the trailer is just about perfect, it just needed better organisation. Pull-out drawer systems incorporating both drawers and kitchens are a popular item in Australia where I'm from, so I wanted something similar, like the Drifta range of kitchen/storage units:

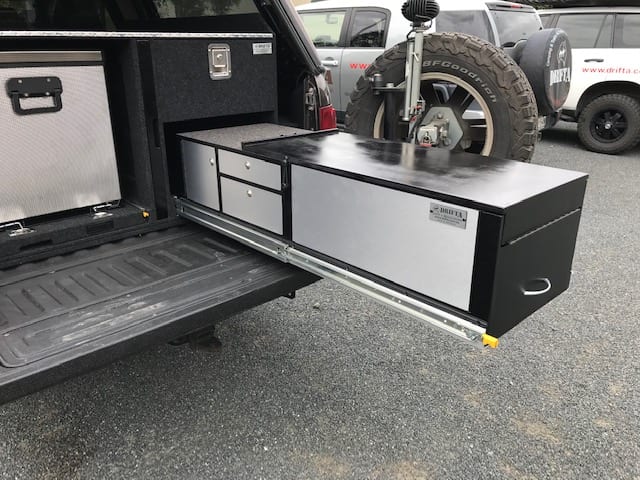
I really like the one below, so much so that I saved a picture of it to refer to later.

I like to think I'm a bit handy, so I figured I could build one myself that would make the most of the available space, rather than adapting something that's good enough. I wanted storage and a kitchen, so that when we camped, everything would be accessible and we wouldn't have to drag tote boxes and stuff in and out of the trailer to cook each time. Longer term, the idea is to get the trailer wired with plenty of 12v lights, outlets, and a shore power input with a converter to 12v for charging a battery (if needed) or simply powering the 12v gear. Maybe down the track I'll include the capability to charge a battery from the tow vehicle or even include solar, but that's a way off for now.

Anyway, the kitchen and storage unit is mostly complete now, but I figured a few people here might be interested, so I thought I'd contribute.

classicJackets (FS)
classicJackets (FS) Dork
12/26/20 9:28 p.m.

Looking forward to reading/seeing more of what you do here, I see a ton of utility in something like this

ultraclyde (Forum Supporter)
ultraclyde (Forum Supporter) UltimaDork
12/27/20 7:42 a.m.

Cool. I've thought about building a mini RV out of a storage trailer many times. When I start planning I usually decide I'd be cheaper buying a used RV lol.

Are you planning on using it to sleep in like a teardrop trailer, or just to haul tent and gear in?

edwardh80
edwardh80 Reader
12/27/20 8:10 p.m.

In reply to ultraclyde (Forum Supporter) :

Not planning on sleeping in it, just want to get it decked out for efficient camping use. We like sleeping in tents :-)

edwardh80
edwardh80 Reader
12/27/20 8:46 p.m.

First step was to strip the thing down and give it a good clean.

Our eldest loves to help out.

The floor that was in there was in decent shape, but obviously had large gaps where critters (lizards, bugs) could get in. So out it came.

Once the floor and inside wall lining was removed, it got a good clean with a pressure washer.

I also wanted to brace the drawbar; it only has a single tube that the hitch is welded too (you can see it in the above photo), and I wanted to beef it up for added peace of mind. The weld looked pretty good to my untrained eye, but more strength is generally better. The joint in question:

I'm not much of a welder at all, mainly because I've never had much opportunity and don't own a welder. It's on the list of skills to acquire. I borrowed a welder and got a buddy to come round and give me a hand. Progress pics:

The balance of the trailer lends itself to tilting up nicely for ease of access underneath smiley

Much better!

Next step - a new floor and replacing the wiring. Hopefully that'll be in tomorrow's write-up. Thanks for following along.

ultraclyde (Forum Supporter)
ultraclyde (Forum Supporter) UltimaDork
12/28/20 5:04 a.m.

I prefer tents too. In fact the only RV we've ever owned was a pop-up for that very reason. For some reason I never thought of just outfitting a trailer to haul the tents and stuff...maybe because I have a full size truck so space was never a huge problem. 
 

but there's a trailer just like this sitting in a relatives yard that I could probably get for free. So now I'm thinking about it lol. 
 

looking good so far!


edwardh80
edwardh80 Reader
12/28/20 8:30 p.m.

Next up was to install a new floor. I would've reused the old floor, except it left fist-sized gaps at the front bottom corners, and I wanted to be able to seal it and keep critters out.

I cut a new section of floor to reach to the first cross-member, than a couple of pieces at the front where I carefully cut the curve at the end so it sat hard against the outside skin.

Once the floor was in, it was time to replace the wiring. You can see above that it was a hodge-podge of single wires joined by scotch locks / quick crimp connectors. Definitely second rate, and besides, I managed to tear the wiring for the right side tail lights apart somehow, so it needed replacing. I replaced it all with a simple 4-wire loom run all the way in split tubing, and inside the trailer rather than strung underneath as you can see in some of the previous pics.

Once the wiring was finished, any remaining gaps between the floor and the frame (they were minimal) were fully sealed with caulk. Then the exposed underside of the wooden floor scored a thorough covering with rubberised undercoating spray. Finally, my daughter made a wall hanging for extra homeliness.

It felt like a decent bit of work just to get back to the same point I was at when I bought the trailer, but at least the wiring and the drawbar were up to my own standards now.

Rons
Rons GRM+ Memberand Reader
12/28/20 11:09 p.m.

You need to find some clear coat to cover that plywood at about dead centre there's an almost Daliesque figure in the plywood.

edwardh80
edwardh80 Reader
12/30/20 2:06 p.m.
Rons said:

You need to find some clear coat to cover that plywood at about dead centre there's an almost Daliesque figure in the plywood.

Reminds me of this one laugh

edwardh80
edwardh80 Reader
12/30/20 2:39 p.m.

Unfortunately I don't have a dedicated garage, just a roughly 20x12 shed. So I built this outside my shed under a tree. I also needed a good work bench; I have a small benchtop, but it's no where near big enough for large woodwork projects. Plus I didn't want to spread sawdust everywhere through the shed. The shed in the pic below is our cr@ppy old garden shed (not our "big" shed) that's really only got garden tools, hurricane boards, lizards and other critters living in it.

My solution to the workbench problem was to make a couple of saw horses using those cheap harbor freight brackets and some 2x4's. I used some hanger brackets and ran 2x 6' 2x4/s between the two saw horses as shown below. Then I placed the old trailer floor on top, and it made for a nice 6x4 work bench, that I can disassemble and keep in the shed.

I came up with a design like the one in the back of the SUV in my opening post. Kitchen on the right, drawer on the left. The drawer was to be about 1' tall and wide, and 5' long, sliding on full-extension drawer slides. The kitchen was to be about 2' wide by 1.5' high, and 6 feet long, but running on the same size 5' slides as the drawer so it only protrudes 5'. The remaining space would stay "inside" the trailer but is accessible through the rear cupboard door. Heavy duty drawer slides are expensive, so I elected to go with the 5' slides to keep costs down; they were still $220 a set. The remaining empty space between the back of the drawer and the front wall of the trailer is an enclosed box that could be used at a later date for battery storage. Sorry I don't have a good drawing of the plans, the details were in my head and the basic dimensions were drawn on paper. It'll become clear pretty quickly.

Obviously the drawers require a structure to which the slides are mounted, so that was the first thing to get tackled. Here's some pics of the base structure coming together.

I used 1/2" ply for most of the structure. Cutting out the pieces was tedious - I don't have a good table saw, so I used my router with a 1/8" diameter bit, and ran the router along a straight edge. I also cut shallow rebates to locate all the pieces properly.

The little enclosed section behind the drawer is shown above.

The drawer will sit on the left, the kitchen on the right. The taller section of the back left is for possible use to hang a shore power to 12v converter. I placed extra 3/4" pieces along the bottom outside to the drawer slides had some meat with which to be secured. The two slides that were to sit on either side of the middle vertical section will be secured by chicago bolts.

edwardh80
edwardh80 Reader
1/2/21 7:54 p.m.

Once the base was done, it was time to tackle the easier of the two moving parts - the drawer. I thought I took more progress pics, but can't seem to find them. The pics below convey the general idea.

It's essentially a 1' x 1' x 5' open-topped box made out of 1/2" ply. The inside bottom side portions were beefed up with a 4" wide strip of 3/4" ply.

The screws on the ends show where the 3/4" ply sits. To finish the basic drawer, the little rectangular sections on the bottom left and right (outside of the screw lines) were removed with a router along the entire length of the bottom edges. This makes room for to drawer slides while the stepped inside of the drawer sides maximises the available volume. The pic below shows what I mean. Don't mind the mess on the right; the box contains the smaller drawer slides I bought for the drawers I designed in the kitchen section.

edwardh80
edwardh80 Reader
1/4/21 7:09 p.m.

I forgot to include a photo of the finished drawer installed. Getting a bit ahead of the sequence of how things transpired, but want to let you see the finished drawer as intended.

edwardh80
edwardh80 Reader
1/4/21 7:30 p.m.

Once I cut my teeth on the drawer it was time to plunge into the kitchen portion. Much more complicated, but the general concept worked on the drawer, so no reason why the kitchen wouldn't work.

I cut the sides with the router, then added the 4" extra at the base to strengthen that area. Then on one side (which would be the eventual front) I needed to cut the openings for the cupboard doors and drawers. Below is the cut along the bottom of all openings - at all times I had to make sure I subtracted the right amount and marked the spot for the straight edge to line up on so the router cut would give me the correct resulting dimensions.

Getting set up for the second run of top cuts. You'll notice that the doors will be taller than the top of the drawer fronts (below the stepped section) as I had an idea for the counter-top.

Two of the vertical cuts on the doors are done in the pic below. The doors are on the left, the drawers will be on the right.

Cut-outs all done. I kept these and labeled them to reuse as doors and drawer-fronts in the appropriate position.

While I'm on a roll I may as well begin the assembly of the main pieces... If you look closely you'll see I cut rebates to locate the internal cross pieces that will be fitted later. The blank portion closest to the camera will be the foot or so of length that will remain inside the base structure fixed to the trailer. From the start of the first door opening to the end of the kitchen is 5', it's 6' overall.

This was a pleasing moment as it was finally starting to look like the idea in my head!

edwardh80
edwardh80 Reader
1/5/21 8:25 p.m.

After the main kitchen structure was put together, it was time to add details. Most of the assembly work from here on could be done inside, with cutting of pieces still being done outside the shed.

Internal pieces being added.

Doubling up the end panel for strength and to act as a support for the drawer runners on that side.

Adding extra thickness to a few spots so there is meat for the drawer runner screws to bite into.

Top is on the rear section of the kitchen. The two cupboards are below; each door opening is about 11" x 11". The kitchen is 22" wide, which is the same as our home kitchen counter-top.

In reply to edwardh80 :

That's turning out great!

edwardh80
edwardh80 Reader
1/7/21 11:58 a.m.

Next step was the drawers for the kitchen. Now that the bottom 4" is essentially 1" thick due to the strengthening strip, it's not feasible to put a side-opening drawer in there. So I wanted to use the 4" or so of otherwise wasted volume under the drawers with another drawer that comes out the front end. I cut an opening at the same time I was doing the openings on the side.

I wanted a mix of drawers, so I settled on one deep one in the left opening, as well as a medium and shallow depth drawers on the right. Again, I'm a bit sad I didn't take more pictures, but the pics below show the drawers on their runners without the drawer-fronts attached. They are basically little square boxes, glued and screwed for strength.

I used the original cut-out pieces as drawer-fronts. You'll see the one in the bottom of the foreground drawer has a fancy opening cut out to open the drawer with rather than having to use hardware.

We take a 40L 12v cooler with us camping. Eventually I want to have it sitting on slides so it can pull out of the trailer and sit above the kitchen. But this would sacrifice counter space at the back end of the kitchen. So I came up with a folding section of counter top at the front section as shown below, it folds through a solid piano hinge. Time will tell how solid it is, I may come up with a way to support it a little better - either removable brackets that clip onto the front edges, or an adjustable height support off the ground.

You'll see in the above pic that the outer section has a rake to it. I did this so that when it sags under the weight of whatever it's supporting that it would sit level. The angle I gave it turned out to be too much, so I trimmed it some more and now it sits just right. 

By this stage I had also trimmed 3/8" off the bottom outside edges to allow space for the drawer slides.

All ready for surface finishing!

I loath painting so I was not looking forward to this part, but I am stoked how the parts turned out.

californiamilleghia
californiamilleghia SuperDork
1/7/21 12:06 p.m.

Let you daughter paint the boxes ........ Green with flowers and trees etc

Years ago when we did trade shows I had my friends kids paint the boring plywood box  with our trade show set-up , 

Then at the end of the show we could ask the forklift driver to  bring our crate over and it was easy to find compared to all the plain plywood one :)

Love what you are doing , are you going to add a solar shower ?


ultraclyde (Forum Supporter)
ultraclyde (Forum Supporter) UltimaDork
1/7/21 2:12 p.m.

Nice work, very well designed and I like the simple, strong aesthetic. Almost scandinavian looking. Also...that's a LOT of screws. 

An idea for support on the fold out area: Mount a triangle of plywood in the recess that's on top when it's folded in. put a hinge on the edge of the triangle so that when you unfold the extension, the triangle folds down to brace against the side of the box. you could even countersink a couple magnets so it would snap into alignment. The outdoor grill on my pop-up camper basically used that idea made of metal and it worked well. 

edwardh80
edwardh80 Reader
1/8/21 9:08 p.m.
ultraclyde (Forum Supporter) said:

Nice work, very well designed and I like the simple, strong aesthetic. Almost scandinavian looking. Also...that's a LOT of screws. 

An idea for support on the fold out area: Mount a triangle of plywood in the recess that's on top when it's folded in. put a hinge on the edge of the triangle so that when you unfold the extension, the triangle folds down to brace against the side of the box. you could even countersink a couple magnets so it would snap into alignment. The outdoor grill on my pop-up camper basically used that idea made of metal and it worked well. 

Thanks for the suggestion. The only problem I see with this idea is that when the triangle folds out, the vertical part that is meant to sit against the front of the box will still be 1.5" away from the front, as it will need to sit inside the recess when it's folded. The edges of the top are 1.5" all around. Is there a way to make the triangle slide towards the front of the box when it's unfolded?

I'm not planning on a solar shower, but solar power may be on the cards if we camp off-grid and fit a battery for running the lights and cooler.

edwardh80
edwardh80 Reader
1/8/21 9:33 p.m.

One thing I forgot to mention on the base unit. On the pic below you can see a taller section at the back left behind where the drawer will sit. The vertical section is there to provide a solid place to mount a 110V AC to 12V DC converter. Between that spot and the drawer is an approx 1' square enclosed box where I would place a battery, you can see the line where the lid is not yet fitted properly and sitting slightly proud.

I didn't want a hinged lid on the battery box as it would swing up and be blocked by the 12V converter. So I came up with the arrangement below.

It's a bit out of focus in the distance, but essentially there are two short dowels sticking out of the far "wall". The lid has two matching holes, and is fitted by sliding sideways onto those dowels, then is pressed down at the near end onto the vertical dowels. The little 45 degree chamfer is so I can grip the edge and lift it to remove the lid.

Once the surfaces had all been finished, it was time to fit everything to the trailer. First in was the base. I only varnished the outside, no one will ever see the inside surfaces so I didn't want to do anymore than I already had to.

Heavy duty drawer slides fitted. The two outside runners were screwed into the meaty section of wall, while the two runners in the center were screwed to each other with Chicago screws. This worked a treat. These runners lock in both the closed and open position; they are pretty snazzy in that if you swap the L & R runners side for side (i.e. so each sits upside down in the other's position) they only lock in the closed position. Very clever.

Time to install the drawer.

And in the stowed position. The drawer slides beautifully.

edwardh80
edwardh80 Reader
1/12/21 8:23 p.m.

About time I posted the final section on the kitchen build.

Once the drawer was in it was time for the kitchen. Installation progress pics:

Install cupboard doors...

Folding counter top fitted. Open...

...and closed.

Fitted the end drawer. It fills the entire space under the side drawers and stops level with the divider between the drawers and the first cupboard.

Fitted the rest of the drawers.

Some functional checks:

The finished product:

I'm so pleased with how it turned out. There were many hours put into this, probably twice the duration I anticipated. But it's done, and I couldn't be happier with the end product.

Next step is installing some simple electrical functions - lights, USB outlets, and 12V outlets for the cooler and other accessories. Might be a while before I'm in a position to post further updates.

Pete Gossett (Forum Supporter)
Pete Gossett (Forum Supporter) GRM+ Memberand MegaDork
1/12/21 9:45 p.m.

In reply to edwardh80 :

You do amazing work! I'm looking forward to some pics of it in-use so I can get a better idea of why you chose this layout for everything. 

codrus (Forum Supporter)
codrus (Forum Supporter) GRM+ Memberand UberDork
1/13/21 2:22 a.m.

Very cool assembly!

Seeing the jackstand at the back makes me wonder though -- how much weight can you put in the drawers before sliding them out makes the trailer tilt over on its wheels?  Any plans to address that, or is it always going to be hooked to the tow vehicle when in use?


edwardh80
edwardh80 Reader
1/13/21 7:29 p.m.
codrus (Forum Supporter) said:

Very cool assembly!

Seeing the jackstand at the back makes me wonder though -- how much weight can you put in the drawers before sliding them out makes the trailer tilt over on its wheels?  Any plans to address that, or is it always going to be hooked to the tow vehicle when in use?


Yep, it's an issue that needs addressing smiley without the jack stand, the trailer wants to tilt backwards when I pull out the empty kitchen. With the jackstand I can sit on the kitchen and the empty trailer doesn't look like tilting - admittedly I'm only 165lbs on a fat day. So once there's a bit of weight in the trailer, there'll be even less tendency to tilt. I am planning to fit a couple of stabilising jacks underneath each of the back corners.

Thanks for the comments!

edwardh80
edwardh80 Reader
5/22/21 6:22 p.m.

About time I updated this topic. Time to add the electrics!

The intent was to run everything on 12V power so that if we were camping without utilities we can add a deep cycle battery and still have a few creature comforts and the convenience of lights. I wanted a connection for shore power also, so that I didn't have to rely on a battery. At first I was planning on using a 110V AC --> 12V DC converter as used in many RV's. These converters are generally 100-200 bucks or so.

First I had to add the shore power connector. I used one of these:

Where to put it though? There was limited options; in the end I chose a spot at the front just adjacent to the drawbar tube.

Yes, it's a boring photo, and I'm only including it to show the annoying little trim piece on the bottom. I knew in advance I'd have to flatten it somehow:

I squashed it with C-clamps and tried to mash it between a hammer and dolly. In the end it turned out pretty reasonable. Mark the hole and attack with a hole saw:

And voila!

The connector cable to the converter was run alongside the trailer tail light wiring.

Previously I had pulled our old fridge apart as I had intended to reuse the sheetmetal. That turned out to be a bad idea (covered with spray-foam insulation), but I pulled a few other parts that might be useful. I installed the door switch on a small bracket so that when the rear door of the trailer closes, the lights turn off smiley Just because I can.

1 2

You'll need to log in to post.

Our Preferred Partners
kZrwQnHfwRj9rn9foWonbRhEttCDEs6nGjAPUn6sl1KiobfWqGRvvj2xF4eFtcQ5