In reply to ae86andkp61 (Forum Supporter) :
We'll see how it goes. I'm working on making the elbow.
I started back into some F6A head development this week.
The first five, of the darker blue mold, is the intake. The last five, of a lighter blue mold, are of the exhaust. This thing is funky.
I'm starting into some exhaust development.
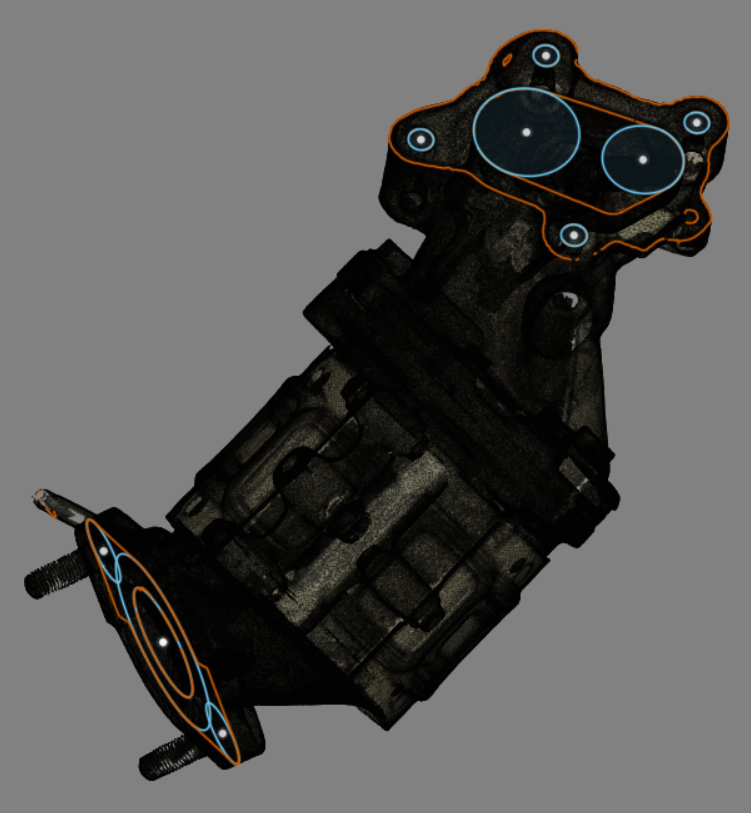
I had a friend scan the OEM downpipe with a Romer arm. These things have gotten way better over the last few years.

This is a 3D printed mock up of a down pipe.


I detailed some of the process here:
https://burdickjp.gitlab.io/2021/09/15/downPipeScanPrint.html
man, nice work! very cool how the silicone worked so well to mold the ports. Who knows, you may end up with a market for some of this stuff in Japan!
stylngle2003 said:man, nice work! very cool how the silicone worked so well to mold the ports. Who knows, you may end up with a market for some of this stuff in Japan!
They didn't come out well the first time! I was picking goopy silicone out of the head for a while.
Use fresh material and good conditions!
Next steps on the downpipe: check toolpaths. Stainless is more expensive, so we'll start with aluminum. Here's operation 1:


More work on my turbine outlet elbow. These were done in 6061 aluminum because it's cheap. The final product will be done in 304 stainless.


These next two pictures show portions of the inside which can't be machined from the two setups done thus far.


To get to those we'll need a fixture. So I'm working on a fixture.

You didn't tell me you had a build thread going.
Are you going to resent a suggestion to spend five minutes with a cartridge roll blending those two ridges?
DarkMonohue said:Are you going to resent a suggestion to spend five minutes with a cartridge roll blending those two ridges?
Aaaaand disregard.
When your engine fits in the bounding box of an A4 sheet of paper, it means that it fits on a document scanner.

The cones I picked up were too big on the big end, so I put together a fixture to cut them down to the correct size.


The 2.25 inch OD tubing I got from Vibrant. Everything else I got from Stainless Bros. I'll have to figure out what kind of surface treatment I want to do to get a uniform look.

burdickjp said:The 2.25 inch OD tubing I got from Vibrant. Everything else I got from Stainless Bros. I'll have to figure out what kind of surface treatment I want to do to get a uniform look.
Columbia River Mandrel Bending used to be a good resource, too. I assume they still are.
Once you everything welded up you could probably hit it all with a scotchbrite pad to even out the finish. Might depend on how visible it will be once it's in the car.
Just checking in as another Cappuccino owner to say I love the work you're doing. One of the upgrades I had been looking for was an "N1" ECU, supposedly sold over the counter from Suzuki in Japan, now long out of production and occasionally available on yahoo JP auctions. Seeing a modern PNP option is great! I will be very curious to see what power levels you see, and where the bottlenecks in the system are.
I drove mine from Phoenix, AZ back to the east coast right after purchase back in 2017 (with a stop for the Pikes Peak hillclimb). Hope you don't mind me photo bombing your thread, I can take them down if needed:


I like your wheels!
This week is printing some prototypes for intake tubin' and practicing welding stainless.

Cool; I'm still enjoying following along, and excited to see the progress being made!
Flynlow, nice Cappo, and welcome to the party! Hoping to have my silver EA21R project driving in time for nice weather this year.
burdickjp said:I like your wheels!
This week is printing some prototypes for intake tubin' and practicing welding stainless.
What little I can offer is to get your gaps just as tight as you can, right down to no gap at all if possible. Then you need a lot less filler, or even no filler at all, which is better yet.
Lots of people will insist that you must back purge when welding stainless. That's not strictly true. You can also use Solar Flux B, which is a powder you mix with methanol into a slurry and paint over the backside of the joint before you weld. It acts as a shield against oxygen and prevents sugaring just as back purging does. One's not necessarily better or worse than the other. Just know that there are multiple ways to go about it.
A friend of mine could weld in free air so the penetration was just barely shy of the backside and never caused any significant sugaring, but that's the exception and certainly not the rule...
I'm trying both back purging and Solar Flux with the stainless. I have 1.5 m of 50 mm tubing to weld through 30 mm at a time until I feel confident that I'm not screwing it up too badly.
You'll need to log in to post.