1 ... 3 4 5 6
Manual_Trans
Manual_Trans New Reader
8/16/24 6:02 p.m.

In reply to Run_Away :

Thank you! That's definitely my goal. I've been contemplating some more racy parts for it, like some mild carbon aero bits, but I don't want to deviate too far from the OEM+ vibes. It also doesn't have enough power to back up race car looks... yet. If there's one thing I despise, it's whatever you call the opposite of a sleeper. 

AngryCorvair (Forum Supporter)
AngryCorvair (Forum Supporter) GRM+ Memberand MegaDork
8/16/24 6:21 p.m.

Agree with previous comments, this truck is tasty and you've done some really nice work on it.

smokeysevin
smokeysevin GRM+ Memberand New Reader
8/17/24 8:37 a.m.

Have you noticed the brake balance being off and is the pedal being soft?

When I ran pistons that were close in size to the front brakes in the rear of my truck the back end was twitchy and the pedal was soft even with a proportioning valve.

Swapping to a smaller piston in the back helped dramatically and firmed the pedal up nicely. It will ultimately depend on how your master cylinder is biased/sized though.


Sean

Manual_Trans
Manual_Trans New Reader
8/17/24 6:54 p.m.

I haven't noticed a difference in the balance under hard braking, but I did perceive the pedal to feel a little soft at first. I've since acclimated to it and I suspect it might have to do with the new pad compound. Less bite on cold rotors, but increasing aggressiveness as they warm up. The pistons on the new rear calipers aren't very large and they're singles. The front calipers are much larger double piston units, so the rear brakes shouldn't be able to overpower them, assuming the bias is set up appropriately. All I know is that so far, even with a bit of aggressive driving on some super windy roads, it seems to be working as intended. It remains very planted and composed under hard braking, even if I'm a little sloppy and brake pretty late.

Also, after a spirited drive to and from a local Cars & Coffee this morning, I can say that the new rear sway bar made a very noticeable difference in the rotation of the truck. When turning and accelerating through a couple of sweeping on-ramps and interchanges, I could feel the rear follow through more... I don't know... eagerly? But not too eager, where I was clenching up or fighting oversteer at all. It felt way more solid and responsive, with excellent grip and composure. I'm constantly impressed with the handling of this truck. I can't wait to get the front sorted with all new joints and the massive sway bar installed. 

Manual_Trans
Manual_Trans New Reader
8/19/24 9:15 p.m.

My new badge showed up! 

I'm a graphic designer by trade, and I use Illustrator to make vector logos and designs pretty much every day. I wanted a custom badge for this thing and I decided to design one for myself. I toyed with dozens of different variations of new and old Mopar emblems, Japanese symbols, and all kinds of weird stuff. I eventually settled on the fratzog because it's less popular, it's about to get a big revival with the new Charger, and I just think it looks cool. I drafted up the design with the intention of making a solid aluminum badge and then adding a thin layer of carbon on top of that to create the logo. After some more consideration, I realized that I was completely overthinking everything. The hood is already a carbon fiber surface, so just make the logo out of negative space and be done. 

As previously mentioned, I ordered this through SendCutSend. I opted for 0.1" thick aluminum with clear anodizing to prevent corrosion and discoloration. I wanted a few of them so I could toy with different colors and finishes on my own.  I was able to order four of these for the completely reasonable price of $32. They showed up in ten days from the time I submitted my order. Here's what it looks like, right out of the package and just sitting on the hood:

It already looks really good, but I have plans to spice it up just a tiny bit before I stick it on there. I'll share a picture when I'm done. 

Manual_Trans
Manual_Trans New Reader
8/20/24 3:52 a.m.

Okay, it's done and stuck to the hood now. I really like how it turned out. The lighting in my garage sucks, but you get the idea. 

I applied some Flame Red (PR4, an OEM Dodge color) touch up paint to the inside edges of the logo to add a tiny pop of color. I also sanded the outer edges so they had a little bit of shine to them, but I left the main surface brushed aluminum. Once the red paint was dry, I covered the whole badge in three thick coats of high-gloss clear to seal it all up. 

Blunder
Blunder Reader
8/21/24 10:27 p.m.

When you say this design is gonna get a big revival with the charger does that mean this style was an oem Dodge badge in the past?

twentyover
twentyover GRM+ Memberand Dork
8/21/24 11:47 p.m.
Blunder said:

When you say this design is gonna get a big revival with the charger does that mean this style was an oem Dodge badge in the past?

Kind of interesting being old, you just 'know things' that those born later have no idea about.

The fratzog was used on Dodge cars from 1962 until circa 1975. According to Motor trand, it never appeared in advertisements,

"the fratzog was never used in advertising, but instead on emblems, badges, and in print on owner's manuals and service manuals."

https://www.motortrend.com/features/what-is-the-fratzog-logo/

(I hope this doesn't violate any copyright, if so, please edit it out)

Want to know more about USS Pueblo or an 18% prime interest rate? I'm old, and I know things

Manual_Trans
Manual_Trans New Reader
8/22/24 12:23 a.m.
twentyover said: 

The fratzog was used on Dodge cars from 1962 until circa 1975. According to Motor trand, it never appeared in advertisements,

"the fratzog was never used in advertising, but instead on emblems, badges, and in print on owner's manuals and service manuals."

Growing up a Mopar kid, the symbol was present in a lot of places for me. When I was really little, my dad had a white, '60s A100 Dodge van with no back windows and a slant six between the front seats. It looked like an old delivery van that had been gutted in the rear. He sold it when I was in grade school, but he kept one of the OEM hubcaps hanging on the wall in our garage until we moved out of that house when I was a teenager. That hubcap was silver with a black fratzog in the center. In the early 2000s, my younger sister bought her first car. It was a 1974 Dart Swinger and I believe it had a fratzog in the center of the steering wheel. She later got it tattooed on her neck, behind her ear. 

Speaking of being old, I'm just now realizing that my dad's A100 was roughly the same age as my truck is now, back when he still had it. Yikes. Where does the time go? 

Manual_Trans
Manual_Trans New Reader
8/29/24 5:32 p.m.

Front sway bar, new upper ball joints and tie rod ends, and modified control arms are (mostly) done. Unlike the rear bar, the front unit bolted right up to the factory mounting location without major issues. At 33mm, it's quite large. 

Instead of new end links, the front kit only included some poly bushings for the stock links. Since I wasn't aware of that, I didn't bother ordering new links when I bought the sway bars, so I installed the new bushings on the tired existing links. Given my headache with the end links on the rear bar, I decided to make new, completely custom links for the front and the back. I'm currently waiting on some rod ends from QA1. Once those get here, I'll build those to the exact specs for my truck and share my progress. 

The only thing that's bothering me about the new front bar is the proximity to the frame. This is a picture of the driver's side and you can see that there's maybe a couple of millimeters between the bar and the frame here. There is a tiny bit of play in the mounting brackets up front, so I'm planning to loosen those bolts, pry the bar forward as far as it will go, and then re-tighten everything. I hope that's enough to prevent any sort of contact here. 

Manual_Trans
Manual_Trans New Reader
8/29/24 5:51 p.m.

For the control arms, I've been having issues with the overly tall bump stop attachment points. Here's a picture from when I initially installed the drop kit:

And this was after I installed shorter bump stops than what came with the kit. The cone-shaped stops that came installed on the arms were in constant contact with the frame, thus making it a really rough ride up front. I don't know what DJM was thinking with that placement. I mean, I did cut half a coil from the stock springs to get an extra inch of drop, but you can clearly see in the picture that even an extra inch wouldn't have been an adequate amount of suspension travel. Especially with the taller bump stops they provided. 

In the three years since I installed these, the driver's side bump stop had completely vacated the premises, while the passenger side one was in pretty bad shape from somewhat frequent contact. So I finally did what I've been meaning to do for years now and took a grinder to them and cut those damn mounts off completely. 

The plan is to drill a hole between what's left of the welds and remount some new bump stops directly to the arm. This should restore a much more functional/comfortable suspension travel range up front. My only concern is the possibility of tire contact with the fender flares at full compression, but I can add height to the bump stops as needed to prevent that. I'll take it for a spin soon to the alignment shop and see how it feels. 

I also want to tackle a squeak in the passenger control arm. At least that's where I think the noise is coming from. The zerk fittings on that control arm won't accept any grease. They never have. I even tried applying heat to them beforehand and it made no difference. So either they're both somehow defective or maybe the holes where they're mounted weren't drilled all the way through the tubes, thus blocking grease from going in. I don't know, but I'll pull off those fittings and figure it out. The sqeak is minor, but it drives me nuts at slow speeds. 

Manual_Trans
Manual_Trans New Reader
9/13/24 3:29 a.m.

No major updates this time, but I did get some pretty cool rolling shots as I arrived at the local cars and coffee this past weekend. I have to say that this truck looks pretty tough when rolling!

I did receive the new QA1 rod ends that I've been waiting for to build my custom end links for the front and rear. I scheduled an appointment next Thursday to take it in for an alignment and I'm hoping to have them fabricated and installed by then, even though they shouldn't affect the alignment. It's going to be in a show on the following Saturday and I want it to be as buttoned up as possible. 

Manual_Trans
Manual_Trans New Reader
9/18/24 6:13 p.m.

Last night I was able to finished building my custom end links for the front of the truck. Here's what they look like before installing. 

QA1 rod ends with studs and jam nuts, 3/8" threaded stainless rods and aluminum spacers that I cut to length, stainless washers and nyloc nuts, and poly bushings. These are the exact same total length and orientation as the factory end links. They went in without issue and seem to clear everything as intended. I haven't driven it yet to check for issues, but I have an appointment tomorrow morning for an alignment. I'll give them a good flogging to ensure they don't make contact anywhere or make any unwelcome sounds. 

For the rear bar, I had to design new brackets to attach the links to the frame at the correct angle. The overall shape and thickness is very similar to the factory brackets. I designed them to be used on either side of the truck, so I didn't have to worry about getting them turned around. I went with 304 stainless, but I'm not positive I chose the ideal thickness (.187"). Once I receive them from SendCutSend, I'll throw them on and see how they hold up. The links themselves will be identical to the front ones I made, but much shorter. 

Manual_Trans
Manual_Trans New Reader
9/23/24 4:57 p.m.

The new rear end link brackets showed up and they look great. I need to pick up some more bolts to mount them. I might get around to installing them tonight. If I do, I'll share images of the process. 

After having the truck realigned at a local shop last week, the tech told me that my ball joints were at a "dangerous" angle. I kept thinking he was talking about the bottom ball joints, and they looked fine to me. Then I took a look at the upper ball joints with the truck on the ground and noticed this:

Somehow I didn't notice this when I was putting it all back together. I don't know about dangerous but the angle here is definitely not ideal. I need to find a way to flatten the ball joint mounting flange somehow. Unfortunately, it's cast into the housing, so I don't think bending it is an option. Here's what it looks like out of the truck:

I think if that three-hole flange was at a ninety-degree instead of tilted upward, it would basically solve the problem for me. Is there any sort of adapter for something like this? Or are there other ball joints with that same bolt spacing, but a different angle of flange? I've been looking at some aftermarket adjustable upper arms, but they're super expensive and the mounting flange for the ball joint looks to be in the same orientation, so it won't solve this issue for me. 

One idea is to take a bunch of measurements and have a company like Joe's racing make me a set of custom arms that will use a more generic, screw-in style ball joint. I'm not sure what the best option is at the moment. I need to do some more research. 

Manual_Trans
Manual_Trans New Reader
9/24/24 3:51 p.m.

My new brackets for the rear end links came in a couple of days ago and I installed them last night. I designed these myself and had them cut out of 304 stainless because it was slightly more affordable than aluminum of similar thickness and would arrive sooner. If you've been reading along, you might remember my debacle with the rear sway bar and how the mounting hardware they provided, wouldn't work with my truck, so I had to improvise. The only real issue was that the end links were too long and mounted at an ugly angle, which kept the sway bar pointed downward too far. 

I designed these brackets to remedy the issue, while working with the holes that were already in the frame. I also slotted the holes so they could be flipped and used on either side. They showed up looking really pretty and they do indeed fit as intended. If I could do it over again, I'd make a few tweaks to improve the alignment just a little, but these will definitely do for now. I made the rear end links the same way I made the front links: threaded rod, QA1 rod ends with studs, jam nuts, poly bushings, washers, and nyloc nuts. 

You can see that the angle is much better than it was, but it's still pointed downward a few degrees too far. I think that end link would ideally be about an inch long in order to make the bar truly parallel to the frame. But honestly, the angle is close enough that I'm no longer concerned about it. 

What I am concerned about is the fact that I can't seem to get the nyloc nut to tighten down enough to squeeze the bushings. They're snug, but there's no squish happening. They're definitely not tight enough. I tightened the nuts with a longer ratchet, in order to get more torque out of it, but it doesn't want to move any further and I'm afraid I'm going to twist the rod or mess up the threads in the rod end. It feels really, really tight, but there's hardly any pressure on the bushings and I'm not sure what's causing the issue. The threaded rod is bottomed out in the rod end. This is my first time making links with rod ends, so I'm not sure if I'm missing something or if I've done something incorrectly here. I'm all ears if someone with more experience with these things has some input. 

Shavarsh
Shavarsh Dork
9/24/24 4:59 p.m.

In reply to Manual_Trans :

Is there any unthreaded portion of the rod? Are all the parts right hand thread? 

What is likely happening is that the small diameter section of each bushing is meeting and pressing on the small diameter part of the other bushing. This is keeping the larger diameter sections separated. You could try flipping one of the bushings over to see if it will get tight in that configuration. If it does, I would cut the small diameter portion of each of the bushings a bit shorter, then reassemble correctly.

Manual_Trans
Manual_Trans New Reader
9/25/24 5:23 p.m.

In reply to Shavarsh :

Everything is right-hand threaded and I tightened those rods down into the ends as far as they would go, then added the jam nuts and tightened the E36 M3 out of those too. So I don't know why it's doing this. The front links did something similar, but they still got a little tighter than the rear ones. I'm wondering if maybe the nyloc nuts I purchased are getting stuck or something. All of them seem to have stopped spinning with roughly the same amount of threads sticking out the bottom of them. It kind of feels like they seized up once threaded on a certain amount. Is that a thing? 

Shavarsh
Shavarsh Dork
9/25/24 5:46 p.m.

In reply to Manual_Trans :

If the threads and the nuts are both stainless they could have seized together. Can you remove the nuts? If so they are not seized. I would try flipping one of the bushings.

chandler
chandler MegaDork
9/26/24 10:05 a.m.

A set of viper CCW just showed up, could probably get your initial purchase selling the lips and barrels you don't need and then find the right sizes over time

Viper Classics

gearheadE30
gearheadE30 Dork
9/26/24 11:36 a.m.

Sweet truck, I like the ride height you've got it set at but some of the pictures of your ball joint angles make me really nervous. Some aftermarket stuff compensates for the angle that comes with lowering and I don't see lower ball joint angles in any of the pics, but the angle on the upper looks extreme. This may be why DJM had the bump stops where they did. Does anyone make an upper joint that doesn't have that angle built into it? 

Manual_Trans
Manual_Trans New Reader
9/27/24 3:37 a.m.

In reply to gearheadE30 :

Here's an image that shows the bottom ball joint angle and I think it looks perfectly fine.

The top one is definitely at a weird angle and I really don't like it. I've been looking for a replacement upper joint that doesn't have the angle built into it, but haven't had any luck yet. The aftermarket upper arms that I found for my truck look like they use the same exact ball joint and they don't compensate for the angle, so they won't help with it. I'm not totally sure what to do to improve the angle at the moment. 

Manual_Trans
Manual_Trans New Reader
9/27/24 3:40 a.m.
chandler said:

A set of viper CCW just showed up, could probably get your initial purchase selling the lips and barrels you don't need and then find the right sizes over time

Viper Classics

With the right finish, those could look pretty sweet on my truck. I'm going to need to move up to 18s for my next set to fit the brakes that I've been eying for it. I've seen people use a stepped lip to increase the diameter of multi-piece wheels before, so I'm pretty sure I could use those centers to build an 18" wheel package. Plus I love the look of a stepped lip. 

Manual_Trans
Manual_Trans New Reader
10/15/24 1:19 a.m.

I just submitted a request to a suspension company called X2 Industries to see if they'd build me some custom upper control arms. They carry some adjustable tubular arms for my truck already, but they use the stock upper ball joints with that terrible angle, so they don't actually solve anything for me. I called them a few days ago and spoke to someone about my issue and they said they might be able to make me something custom, but that he'd have to talk to one of his engineers. It sounds promising, but likely very expensive. 

In the meantime, I discovered that one of the brand new rear brake lines has a really tiny leak. That whole rear disc swap kit is such garbage. I'm going to end up re-engineering the entire thing from scratch at this rate. I was lamenting a lack of performance brake lines for my truck earlier and I believe I found a solution. There's a company called Hel Performance that makes custom brake lines (among other things). They have a great brake line building page on their site that allows you to build custom braided stainless lines for pretty much anything on the road. You can even customize the color of the vinyl hose covers! 

So anyway, I went to work ordering what I needed from them. My truck actually has five soft brake lines on it to replace. There's a fifth, middle brake line that connects the chassis hardline to the ones that are mounted on top of the rear axle housing. I compared all of the OEM brake line measurements and specs, then used their configurator to build my five replacement lines. I opted for the gray, "carbon fibre look" covers for the hoses because that seemed to be the best match, without being obnoxious. They were priced pretty reasonably and they showed up in just a couple of days. They look great.

The long ones and most of the clamps will go up front, the super short ones go in the rear, and the middle one goes... in the middle. The center one will attach to the little splitter block piece, which splits the fluid to the rear brake lines. While I'm not super excited about the install itself, I am looking forward to a firmer pedal and some fresh, quality lines under the truck. At this rate, the truck will be almost completely new by the time I'm even relatively satisfied with it. 

Speaking of new parts, I also noticed that my master cylinder is leaking where the reservoir attaches to it. And in typical me fashion, I started looking at better parts to replace it with. I only enjoy fixing things if I get to replace a worn-out piece with something shiny and better. After a bit of digging, I think I settled on this master cylinder from Wilwood: 
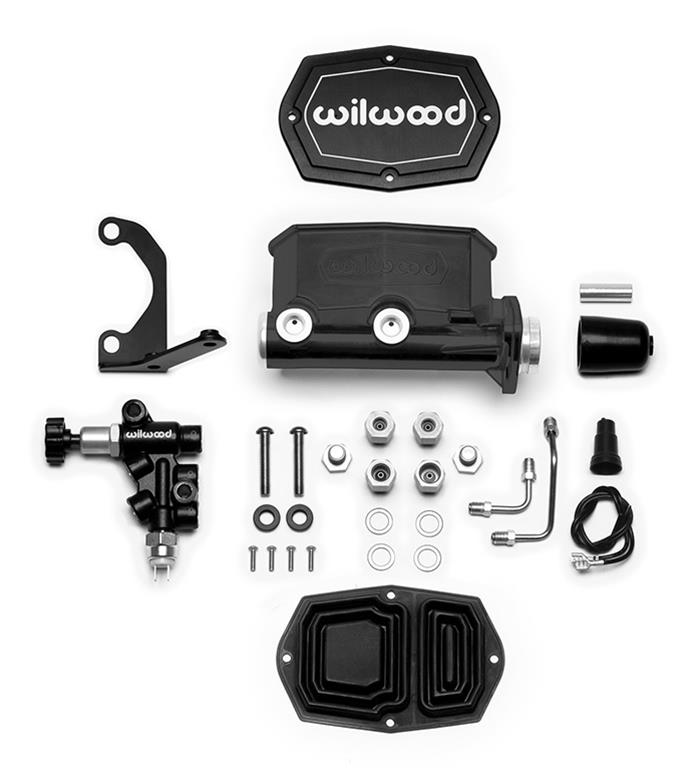
As far as I can tell, it should fit onto my brake booster and line up with most of what I need it to line up with. It keeps the fluid for the front and rear separated, so even if a brake line completely shreds itself, the opposite side (front to rear) will remain functional. This is a huge benefit. Not only that, but this model features a manual proportioning valve, so I can fine tune my brake balance to compensate for whatever custom brake setup I end up with. I don't think anyone's put one of these on a Dakota before and Wilwood doesn't make a direct swap, so it looks like I'll be figuring everything out as I go along, as usual. 

Manual_Trans
Manual_Trans Reader
10/30/24 8:31 p.m.

I went ahead and pulled the trigger on the Wilwood setup. The parts showed up recently and I held it all up to the factory master cylinder. The mounting bracket lines up perfectly, so it will bolt right up. I'm hoping the rod on the inside will work properly; that's the only part I can't check before disassembling everything. I have a second set of hands coming over in a couple of weeks to help the install go faster and to pump the pedal for me when I bleed the whole system again. We'll tackle the new brake lines at the same time. 

Manual_Trans
Manual_Trans Reader
12/14/24 3:31 a.m.

It's been a while since I updated this, but I've been super busy with life stuff and the weather has been too bad to drive the truck or go to events. I did begin the process of swapping out the master cylinder. I got about a third of the way through and realized that I was missing some fittings that were necessary for the install, so I had to take a break while I ordered the new parts. In the meantime, I decided to refinish the brake booster. Apparently this thing had been leaking for quite a while because it looked like E36 M3. It had a ton of rust below the master cylinder that was the result of brake fluid slowly running down behind it for years. I just couldn't bring myself to bolt this new, billet, anodized master cylinder onto a rusty (albeit completely functional) booster. 

I used some sanding drums on my Dremel, a wire brush, and sandpaper to smooth out the booster and get rid of all the rust that I could reach. I did a sloppy tape job around it and sprayed the whole thing with some glossy black Rustoleum. It's not perfect, but it's about a thousand times better than it was before, so I'd call it a win. Here's a handy side-by-side with the best picture I have of the master and booster before I cleaned it all up:

The lighting is a lot better on the left image because this was the pre-paint job era, back when the truck lived outside. You can see how much cleaner everything is now, though. It's a lot easier to keep it clean when it stays in a garage and never sees rain anymore. 

All that's left to do is bolt up the new master assembly, shorten, bend, and then install the new fittings onto the hard lines so they connect with the new proportioning valve. The master cylinder has already been bench bled according to Wilwood's instructions, so the rest of the process should be relatively painless. I'm also going to finally install all of those new Hel Performance braided stainless hoses, so there will be a lot of bleeding to do. Then I get to drive it and adjust the brake balance to my liking, which I'm really looking forward to. 

Oh, and I may have made an impulse purchase, late the other night. Just something fun to play with that I've never tried before. I need to find a way to retard the timing in order to prevent blowing the engine up before I install it, which is proving to be more of a challenge than I anticipated. More on that later. 

1 ... 3 4 5 6

You'll need to log in to post.

Our Preferred Partners
rLH2KNrH1QaBQSx3P1qgAibvHdyhNWCpXHAy49YmfxN2GKdUgAfb6PWS8VPXuN4b