The car looks great.
I’m in the same boat now swapping the three speed for a 5 speed in my ‘69 Cougar.
The car looks great.
I’m in the same boat now swapping the three speed for a 5 speed in my ‘69 Cougar.
wawazat said:The car looks great.
I’m in the same boat now swapping the three speed for a 5 speed in my ‘69 Cougar.
What 5 speed are you using?
I would think with the ford platform that you could easily go T5 or TKO?
Mine will be a T5. THe TKO is a bit masssive for the tunnel on this car.
Greg
Yup, T-5 of TKO bolt in and fit in the tunnel. I'm using a TKO600 behind my 351 Cleveland. I've had plenty of T-5's behind 2.3T and 5.0 Mustangs in the past but wasn't confident in their long-term survival behind the bigger engine.
Thanks Guys, I have a few more cool things planned.
I had a blast last fall tearing around the county roads with the Suspension done up even with the 3 speed and the wheezy stock engine, however no 1st Gear downshifts due to the crappy Non Synchro 1st gear.
Greg
5/8/20
I was able to get the 2 Torque Boxes Welded in the Right side of the car.
Hope to get the Left Side Over the weekend.
On some parts the welds ran really nicely.

Helper kept taking the welding helmet.

I will keep on keepin' on!
Hopefully a 5 speed will be slammed in there by the end of the month!
Greg
5/10/20
I got All the Underfloor Welding Done! YAY.
4 Torque Boxes are in, and the Connectors are all done too.
Just need to reattach the brake line and fuel line to frame and connect the E brake together, Then Paint, But I hope to do that after I begin to fit the T5 to the trans tunnel.. err the trans tunnel to the T5.
Greg
5/11/20
I got some small things done Sunday and today.
I pulled some Aluminum and Stainless off and decided to Buff ( I have been randomly doing this since I got the car.) This trim level of early 60's car has a lot Of britework, some of which I have kept, some of which I got rid of.
I decided to Buff up the R. Rear Stone Chip guard, and both of the rocker spears.
AL / Stainless before:

Chip Guard done, Spear to be polished.

THe Bottom of the RF Fender has had previous patch work, there is some filler and fairly well shaped piece of metal there, It had become un-attached from the bottom of the fender, so I decided place some small welds to help hold things together:

I also decided to put an original pentastar back on the RH lower Fender, It was a quirky thing that lots of MoPars had from the factory in the Mid 60's to Mid 70's.
The Original Holes for the emblem were there, just covered with body filler, so I drilled out the filler and added the new emblem on.
Also Got the Brake line, Fuel Line re installed, and the the E Brake Cable Routed.
Windows that I cut for the Ebrake cable and tension adjustment fit into the newly installed frame connector.

Cable Routes to Left Rear through a break out window that the manufacturer includes.

Fuel line fits nicely inside the Frame Connector.

This steel clip was attached to the floor and kept the fuel line from vibrating and oscillating around, I was able to reuse it, just welded it to the frame connector.
 I hope to begin pulling out the 3 speed in a day or 2!
Greg
5/19/20
Preparing for the T5 Swap...
I have not yet gotten to cutting any floors or raising any crossmembers yet, Will be getting to that soon.
I got the 3 speed out and was eyeing up the viability of the parts needed to do the swap. I have 2 t5's and 2 conversion bell housings to choose from; One was From the Slant 6 Bellhousing Group Buy back in ~2005 which I was not a part of, but I acquired one from someone that abandoned their Transmission swap project.
I had a nice flywheel made about 10 years ago at Wilcap - this is the time to use it.. It was made for the '68 Up Slant 6 Crank Hub Register which is ~2.165"Ø and the engine / Crank currently in the car is a Small Hub Crank ...Production years 1960-67 which has a Hub of ~1.870"Ø.
If it were just some sort of stockish build I would get the correct flywheel and be done.. but that's not the case so I designed up some Adapter Rings and am getting those made now.
Picture of the progress:
Bye Bye old Sandy, Greasy Non Synchro 1st Gear 3 Speed!

Who Knows maybe this car was in a flood? there is tons of sand on top of the trans and stuck to all the greasy Stuff under here!

Lots of sand, Grease and undercoating to scrape off in the tunnel before cutting / grinding / welding.

Get It light by taking all the sand out!

Time for class... er world class t5 that is.. I was taking notes.
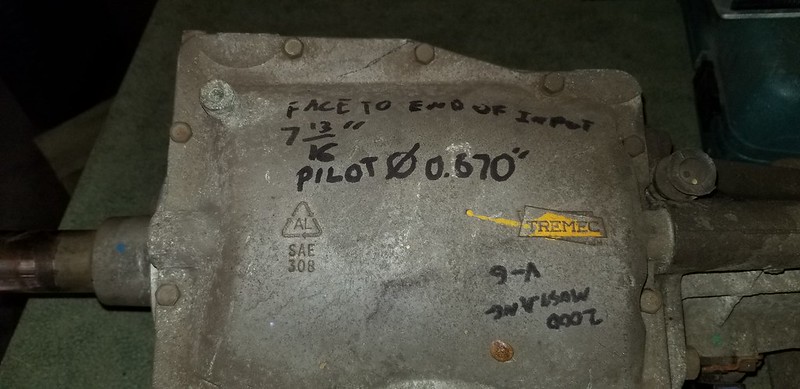
I was able to purchase a complete T5 with most of the necessary parts from another die hard slant 6 fellow. Since he did a lot of the work and engineering this does make things easier for me... He also had Desirable parts in the swap that are just bespoke or no longer made.. such as the McLeod 9" Pressure plate. Back in 2000-2004 it was easier to get parts like this from McLeod.
Here is the Pressure Plate when I got it.. Good parts, but it needed refreshed.

It also Had a Nice 9" Dual Friction Disc with the t5 Splines in the Center Hub. Kevlar Pucks on one side and Organic Facing on the other.
I sent Both the Disc and Pressure Plate to Falcon Clutch In Deer Park NY.
I talked to them on the phone and Told them I wanted the Pressure Ring Blanchard Ground and Rebuilt with the same exact spring pressures as it had When I sent it to them.. I also had them Reface the 9" clutch disc the same way that it was made from McLeod.. One side with pucks and the other side full organic..
Here's how it came back: (New Parts on Right Side !)

Here's the Flywheel.. Sort of a Fidazna'ish Slant 6 Flywheel.

I got a 28 Spline Yoke, And once the T5 is in the Car I can measure for a driveshaft too.

Again, I was able to buy some parts from a successful t5 slant 6 swap that was removed from a car??!? So I don't have to make a trans crossmember, but this one is thin.. so I think I will weld up some metal to beef it up.. Its made of light gauge metal for some reason.
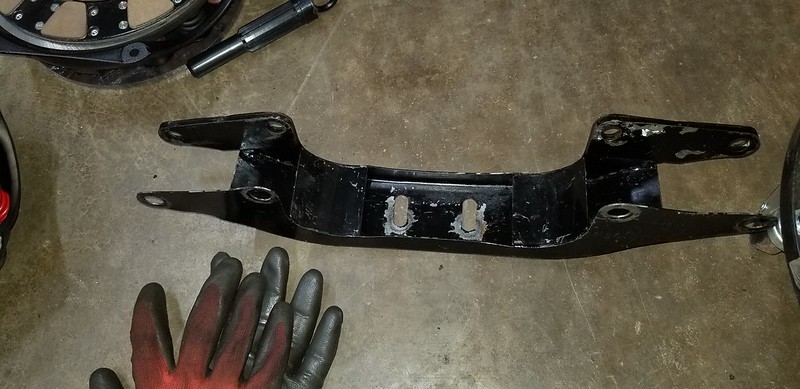
Lastly, I have some measuring and futzing Around with the Input Bearing and associated adapters.
Parts on order to make this all work.. Also might have to fire up the lathe!.

Cheers! Greg
5/21/20
Major Progress Today! Began to Fit the T5 to the Chassis.. Feels Like a Major Milestone.
The Flywheel Adapter Rings are complete and I can pick them up at the machine shop tomorrow.
Did some Cutting to Test Fit the Trans in the car.. Will get to raising the top of the cross member tomorrow or over the weekend.
During the Test Fit I found that the Trans will not seat as the Pilot Bearing Adapter is a Bit too tall ~ 1.01" So the Gap on the Transmission Face was slightly Less than 3/8" - I figure if I take ~ 7/16" off that adapter on the lathe so it sits further down in the engine will be just about right, 'specially when stuff starts getting hot in the bell housing.
Pics..
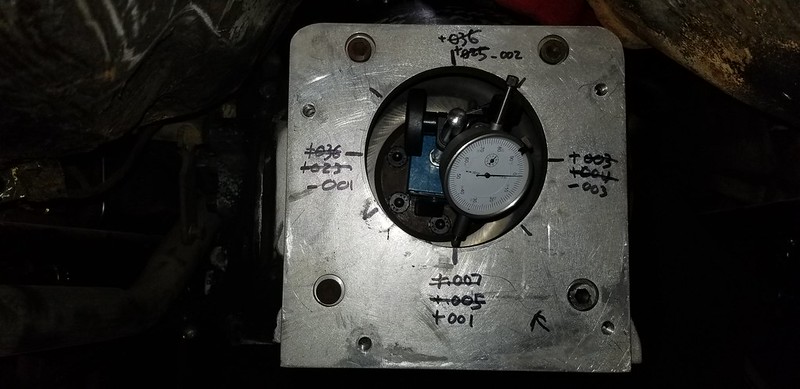
Futz'ed around with the Bell housing and Dial Indicator for a while... First Time I did one of those that way... Really Should go back and fix my other stick cars and indicate the Bell on them too. When I was younger I did not know or was never taught that you cant properly just slam random Bell housings and engine blocks together.
Marking the Cut Lines... Time to get the scissors out.

Mind the Gap... The trans wont push in any further.. gotta get that fixed.

The thing fits well until you want to get a proper driveshaft / u joint angle.

Cheers!
Greg
5/24/20
Got the T5 fully mocked and the crossmember cut. I have a few more spots to clearance the transmission tunnel so that I can raise the trans enough to begin taking measurements for a driveshaft and also to check Driveshaft angles.
I was able to take ~7/16" out of my pilot bearing adapter to get the trans to fully seat onto the bell housing.
I also got the Flywheel adapter Rings (I had 2 Made) and the ID was .010" small so I trimmed the ID Bigger on the lathe, and the OD is a nice Press Fit.
Pics:
Flywheel Adapter Rings arrived! - Adapts a Large Register Flywheel to a small register crank.
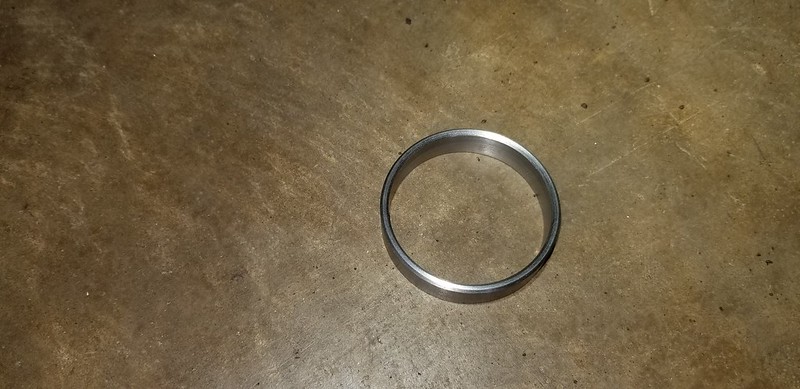
Installed.. Press Fit so it doesn't go any where ;-)

All the Parts Getting installed on the crank now.

More Hacking through the floor.
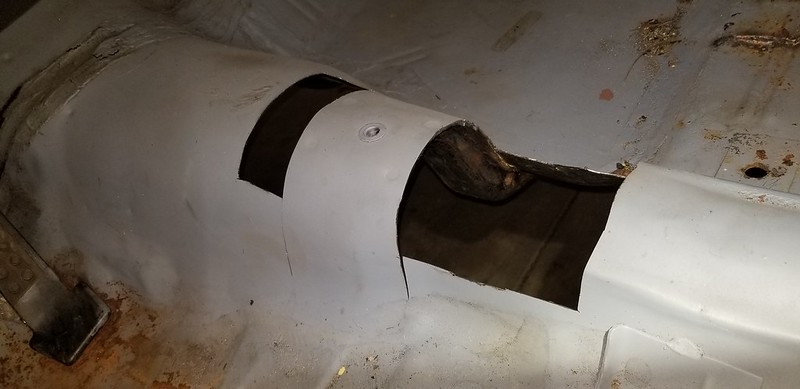
Man, that body Saw sure is handy to have when you want to make delicate precision sheet metal incisions..
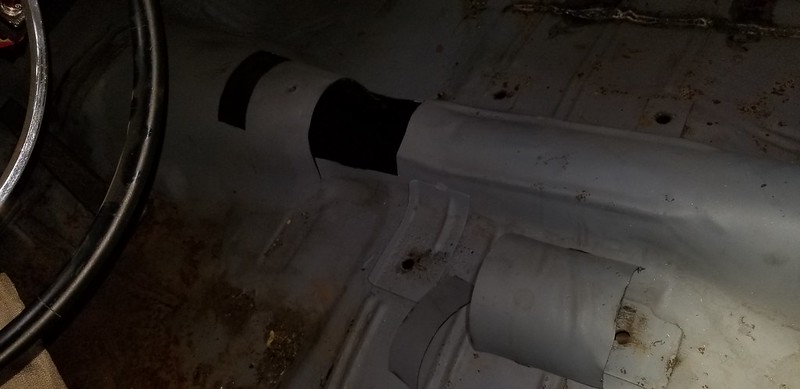
Marked the Cut Line.. No turning back now... Break out the Cut off Wheel!

This will become the upper crossmember, I am not making some new piece, just welding this one back in up higher.

Shorter Pilot Bearing adapter works. Also have room to press bearing back a bit further if needed.
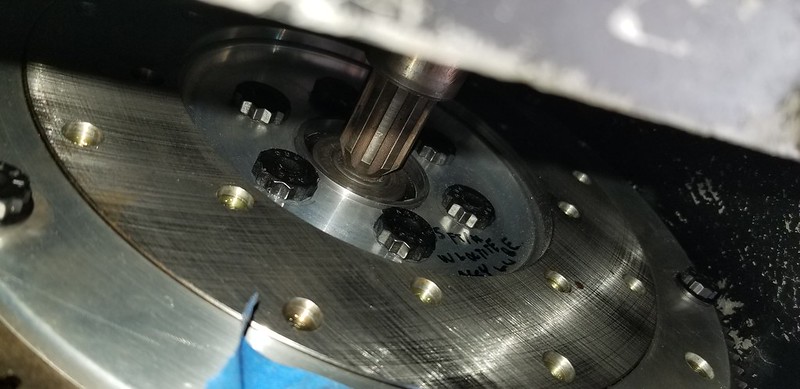
Some Parts where the T5 still hits the tunnel... The Chrysler trans's were a lot more sculpted in this area..
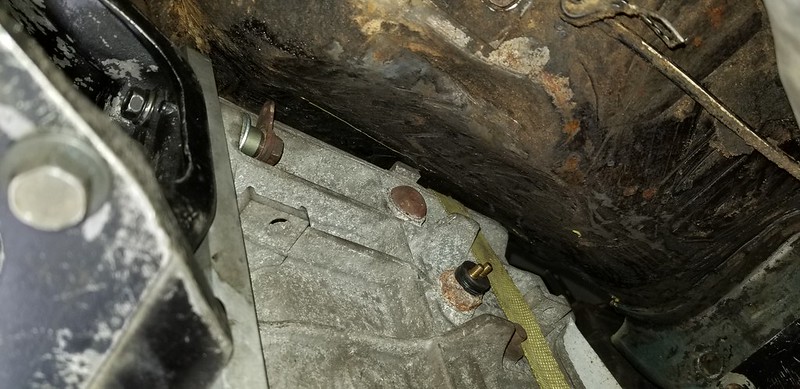
Woo Hoo! 5 speed sticking up from below!
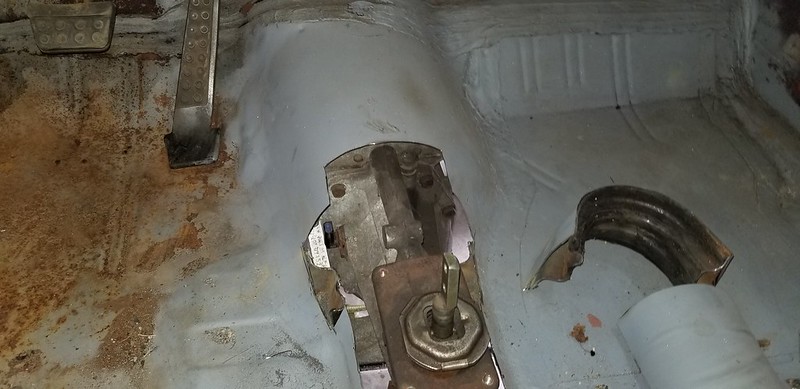
A couple more clearance checks...

'Till Next Time!
Greg
5/28/20
Sorted out the lower Cross member below the transmission.
I had a lower trans cross member for a mopar with a t5 swap from an old friend, Sam Powell.

That part ended up not fitting due to it being for a different Body style 67-76 A Body Mopar..
So I began to modify the original trans cross member out of this car that was used with the 3 speed.
I got to cutting and modding, Fabbing and Welding.
My original Idea Sort of worked, but it located the Trans up too high in the car.
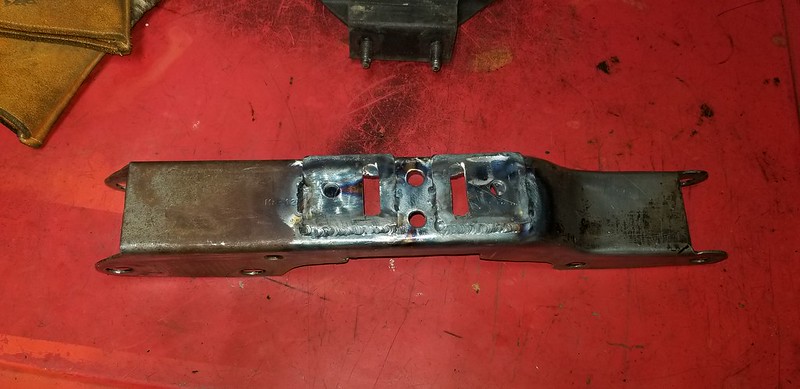
This was an easy mod, Cut come clearance windows on the front and rear of the cross member and then weld up the 2 large holes that ma mopar had for the access to the trans bolts, and put small slots there..... but it was not to work :-(
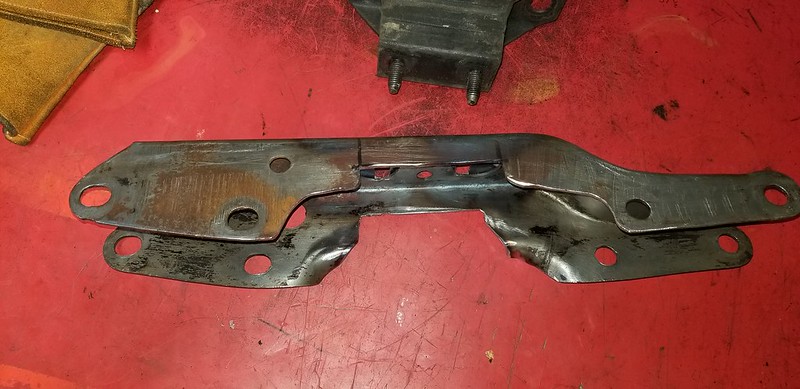
Simple and worked well in theory ( in my mind) but not in real life on the car.

So that not so messy part had to morph into this betwixt beauty of mangled wire welding metal:

I basically had to cut and lower the lower attachment point of mount ~5/8". So I cut some metal strips and installed the lowering kit.

Finsihed rresult holds the trans in place without too much fiddling to get things all together.

Next, Clutch fork fitting, Driveshaft getting, then Upper cross member making.
Stay tuned!
Greg
5/30/20
It feels like I have reached a milestone today..
First, the Dr. Diff Rear 11.7" Cobra Rear Disk Kit Arrived!
The Drums I had on the rear axle were just place holders anyway, and one wheel cylinder began to leak.
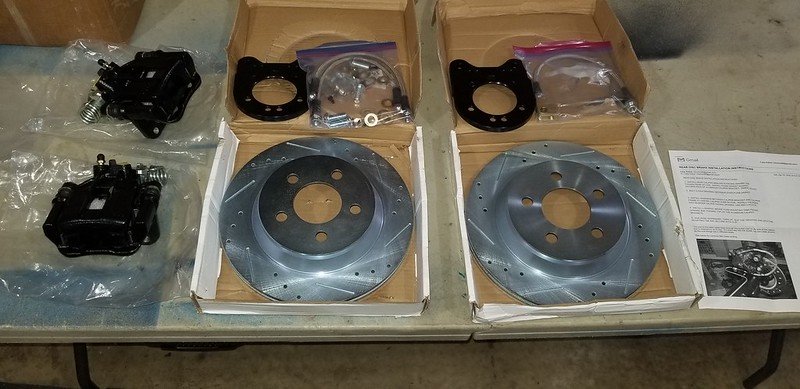
Next and probably more importantly, I finalized the Mounting of the T5 5 speed and verified clutch / TOB operation, lower cross member placement, etc.
I had some issues to contend with, mostly related to the input bearing / Throw out bearing slider / support shaft.
Driveshaft Shop is making a new driveshaft with 1310 U joints up front, and a 1310 / 7260 Conversion Joint at the rear axle.
Here are some Pictures of what I have accomplished:
I tried to use the clutch fork from the 3 speed bellhousing, but the fulcrum is about an inch too close so it makes the geometry wrong.
I wanted to use the link end from the 3 speed fork, (Bottom on the picture) and weld it onto the Overdrive Bell housing Fork that is painted black. If I was putting this in a 67 or Newer A Body , or F body or Truck etc. I probably would not need to do this Modification.

Cut the end off the OD Bellhousing Fork..

Cut the gland end off the other fork and match it up.
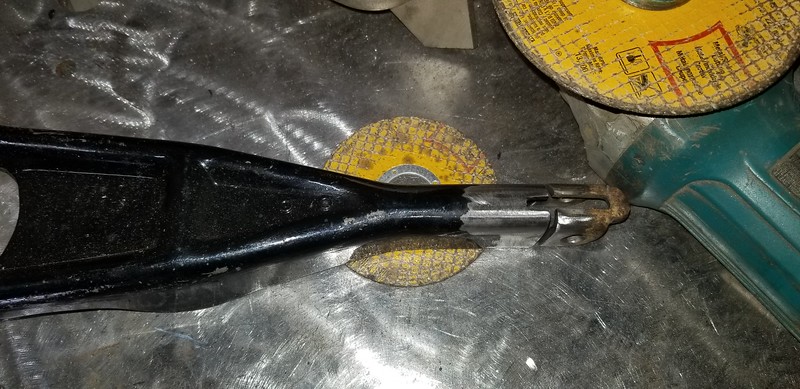
Little bit of hot glue for mock up...
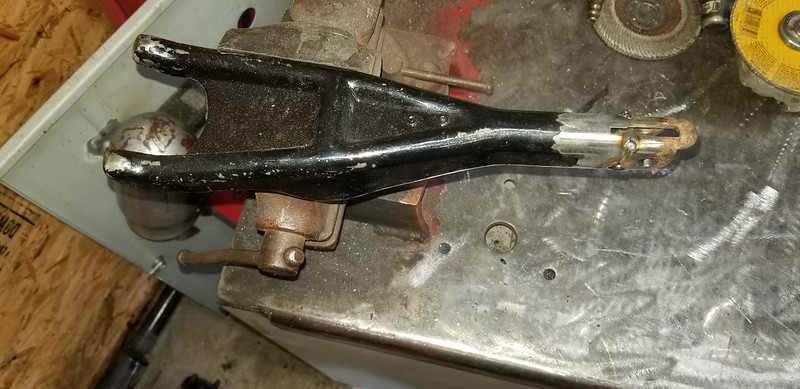
Mock up reveals that the Rod is not perpendicular.. That geometry will not be happy... will need to cut another 3/8" out and mock it again.

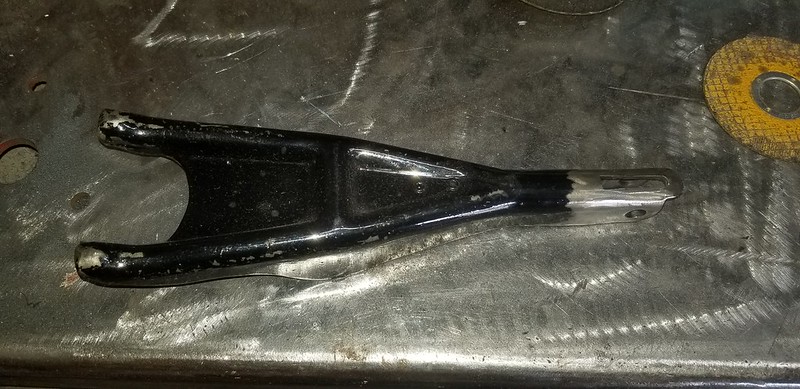
This mockup is much better, Time to break out the hot glue gun.

Finished part at the correct length for this Chassis and Z bar configuration!
More Mock up revealed that the TOB will not be able to move back far enough toward the input bearing with the pressure plate cover that I will be using :-( Time to take it apart and get that aluminum turned down in the lathe.
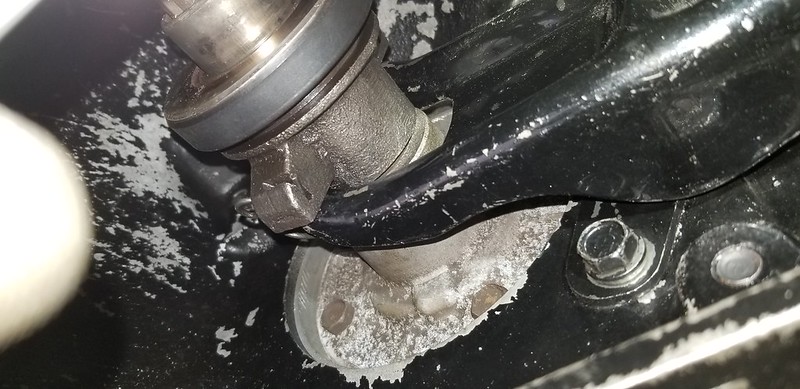
In this trans's OE application there would have been a Hydro TOB and a much lower pressure plate, So I need to remove about 1/2" of that aluminum so the TOB can slide back a bit more.

Here is the part after removing 1/2" of that aluminum that is around the pressed in steel TOB support.
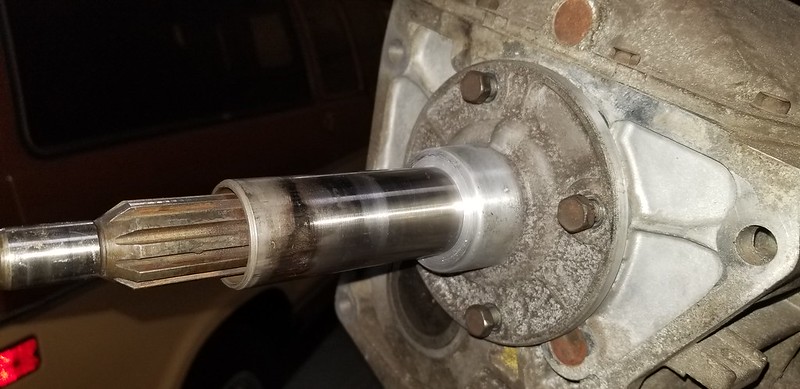
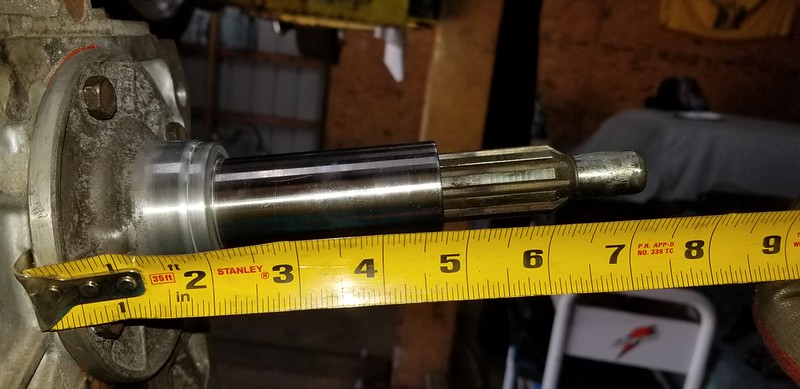
After putting the Trans back inI found that the Front of the TOB support was hitting the clutch itself. Here is the 2000 Mustang V6 Bearing support on the Right compared to the same part from an 88 Ford 4 cylinder T5... At first I thought I could just swap the bearing supports and be done, but they are different with different bearings.. so back to the lathe to take 1/4" off the front of that steel tube on the V6 Part.... Man I am glad I at least have a junky lathe for this project.

Here is the finished part... Steel tube 1/4" shorter, also with a little bit of clearancing at ~ the 2" mark of the aluminum so that the clutch fork does not hang up on the "backstop" for the OE Hydro TOB.
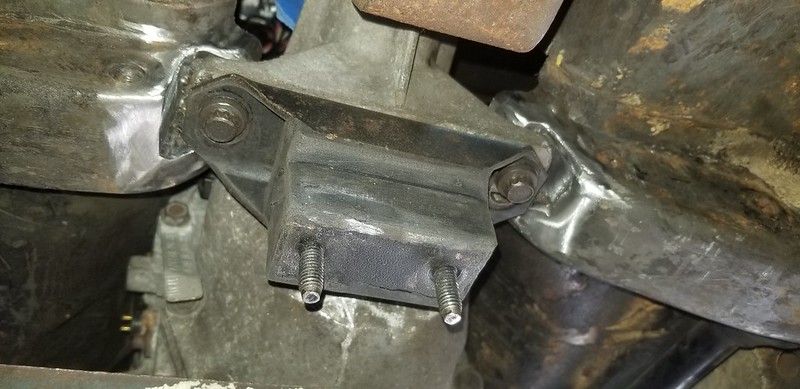
Began to weld in my "clearance windows" in the upper cross member... So far no rubbing, bumping that I can see.
[url=https://flic.kr/p/2j7eoZu]
This is a promising picture. The new 5 speed is home.
Once I get that uper X member Burned in and the driveshaft I can crank up the Torsion Bars again and do a test Hit.... :-o

Greg
Love every bit of this build! Hope our PA car shows and meets get back in action soon and your baby gets out to play.
In reply to trumant :
Thanks, Honestly if carshows don't get going soon that does not bother me. I have other cars for those if they do. If they don't I get more time to work on this thing.
I think I will be trying to hit more roads, Mountain Passes and Tracks when it's all built and done anyway. I have been Finding some pretty awesome mountain passes in the center of the state. Thankfully the Turnpike priced me onto the back roads, and they are Great!
Greg
6/7/20
Thanks for the encouraging Words Guys. There's much more on the to do list but it's fun to be able to see measurable progress..
Next on the List.
- Finish the Floor / Get a presentable Shifter Boot, Cut a Hole in the carpet.
- Change the Rear Gear Chunk to the 3.91 Trutrac Unit - While I have the Axles out and the Drum Brakes mostly removed It would be a fine time to put the Rear Disc Setup on.
- Install 13" Front Baer Brakes.
- Relocate Battery to Trunk
- Prep and Install lighweight Hood
- I am sure there's more but I cant think of it all right now.
Pics from some of the work that was done:
I finalized the clutch Linkage setup... This involved making sure the Z bar Mount placed the Z bar in the correct plane.. So I had to reclock the Ball stud that mounts onto the Bell housing to accomplish this.

Here is a shot of the Additional material I added to get the Ball stud studly and sturdy.

Here is the The New Driveshaft. Uses a 28 Spline 1310 Slip yoke and 1310 x 1310 U Joint up front and a 1310 x 7260 (small Mopar 2 1/8") Yoke Flange on the rear Axle.

Recycled Bits of Upper X Member Going In a Bit Higher now...

Had Some 1/8" Plate lying around that i cut up to fill the ~2.5" Space.

I have some more pattern Making to do to fill in the gaps.

The Cell Buckle on the steering wheel functions as my speedometer for now. I put the phone in there with the Speedometer app, until I can get something more real worked out.

Till Next Time,
Greg
6/9/20
Got some Patterns Made for enclosing the Trans tunnel, and I am repurposing an old / Broken Hurst Shifter Handle for the T5 with some Collars and longer bolts from the hardware store.
Most of the Right Side Of the Trans Tunnel is done... about 2 Hours of welding little dots on the sheet metal.
Pictorial:
Made a bunch of templates on manila Folder Parts... Transferred to sheet metal then cut out.

Left Side Needs more metal added.

Hollow Collars and longer 8mm Bolts allow for Left Side Shifter Offset about 1" towards the driver.

Greg
6/12/20
I finished the Trans Tunnel, Got it All welded up. Also Made an access plate to change the shifter from the top if/when needed. Reinstalled most of the interior and trimmed the Carpet to fit the shifter handle.
Got a Farilane / Cobra Galaxie shifter boot and bezel that I think looks alright. Waiting on a new shifter ball then probably will blast and Paint the shifter handle as now it's rusty mess.
Pics:
Tunnel Compete, Top cover is retained with 6 screws for shifter service.

Interior Reinstalled:
I have a Plan to replace the Stock Seats sometime.

I think the next Jobs will be gettin' the Good Brakes on and Battery Relocation.
Hey, Maybe I should build an engine for it too? Still Rocking the vicioussssss 1 bbl, stock cam, stock head and Points ignition.
Greg
I found the collar like you did had a tendency to loosen no matter what. I fixed with a piece of square tube with the flats between the shifter and handle.
You'll need to log in to post.