1 ... 44 45 46 47 48 ... 54
Pete. (l33t FS)
Pete. (l33t FS) GRM+ Memberand MegaDork
7/9/21 10:52 p.m.

Page one of this thread:

First I scratched my head at the '81 RX-7.  Its exhaust is all plumbed in, with a Magnaflow muffler mating the 12A exhaust manifold to the ??? exhaust system.  I do not want a header on what is supposed to be a pleasant car.

Last week:

Short answer:  16.74 at 80.6 or somesuch

Today:


*sigh*

Out came the exhaust manifold and Magnaflow, and not without a fight.  Two manifold studs came out of the engine, one of which yanked a bunch of threads out with it. Looks like the car doesn't want a header either.  Fortunately, I have a lot of dead 12A rotor housings to scrounge exhaust studs from.  One went in easily, the other needed some attention.  Cutoff disk and a 10x1.5 bolt (looks like it came from a Mopar) made a thread chaser, and then the replacement stud threaded right in.


Next is a test fit, with a purpose.  A little cutoff disk work on a threaded bung...


some eyeballing for position...

take header off, clean the rust off with a flap wheel, put header back on, verify clearance with this angle, take header back off, drill 1/2" hole, start to open up hole with burr in die grinder, bend burr when it grabs in the hole, figure out how to straighten the burr, finish opening the hole up, dig out welder, tack, put the header back on, decide it should be rotated a few degrees, remove header, break tacks, reposition, finish-weld the device, clean end of the header with flap wheel, put header back on, realize that about ten inches of pipe are missing.


Crud.


Remove header, scrounge around, find bad precedent for hoarding, aka never throw anything away evar:

Yep.  Still had the hunk of pipe that I had cut off for the Magnaflow, four years ago.


Clean, clean, weld...

I didn't feel comfortable with just bolting the rusty header to a used exhaust gasket, found my tube of high temp silicone was dried out at the nozzle end.  A razor blade opened it up so I could fingerpaint some goo onto the header side of the gasket, and then the header could finally go back on for the last time.

Happy clamping!

At this point it was 9:30 and probably time to go home...

Pete. (l33t FS)
Pete. (l33t FS) GRM+ Memberand MegaDork
7/11/21 6:16 p.m.

Now the part I don't like.  Interior work.


Lot of time screwing around trying to figure out what was what in there, trying to find my Haynes, going to Burger King so I can use their free wi-fi in their parking lot, going out to get spade terminals that I know I have at work for some reason but work is like 90 minutes away, etc.

But, it's all wired up.  There was a guy on eBay selling gauge panels that go in where the tape deck sits.  None of that is actually functional, so it was a no brainer.  The gauge panel set kind of requires two gauges present to hold it all together, so I used one of closeout oil pressure gauges I bought a while back for the GTI. 

Discovered that the HVAC drain was routed under the carpet, not through the firewall.  That explains a lot!  Was able to fit the MTX-L wiring and the drain through the grommet but it was tight.  Verified everything worked, calibrated the MTX-L with its new sensor, and put the dashboard back together.

Then discovered that the cigarette lighter did not work.  Critical for GPS duties, since this car is meant for road trips.  Pulled dash apart, found the power wire popped off, because the presence of the gauges made it too short.  

*sigh*

Pull dash apart further so I could get in there and splice half a foot more wire in there, put it all back together again, everything works now!  Push car outside, close garage door, start up the engine, MTX-L is reading "E2".  E36 M3!

Pulling the center panel back out popped the 6 pin connector to the O2 cable out.  Plugged it back in, restart engine... "Htr".  Success!  "CAL".  E36 M3!

Shut down, open garage, push car back inside, unplug O2 cable, ignition on for 30 seconds to reset the calibration.  Was able to access sensor without jacking car, so removed sensor, set my Bauer blower at it to clear all the gasoliney vapors from it, key off, reconnect sensor cable, wrap with electrical tape to keep this from happening again (ahem), calibrate sensor, reinstall...

wvumtnbkr
wvumtnbkr GRM+ Memberand PowerDork
7/11/21 6:47 p.m.

And then?

Pete. (l33t FS)
Pete. (l33t FS) GRM+ Memberand MegaDork
7/12/21 7:34 p.m.

In reply to wvumtnbkr :

And then the skies opened up, and I don't want to take the car out in the rain until I find an antenna for it.  Currently the antenna package is "empty hole".

wvumtnbkr
wvumtnbkr GRM+ Memberand PowerDork
7/13/21 7:04 a.m.

Does the sensor work now?

Pete. (l33t FS)
Pete. (l33t FS) GRM+ Memberand MegaDork
7/25/21 9:27 p.m.

In reply to wvumtnbkr :

It did.

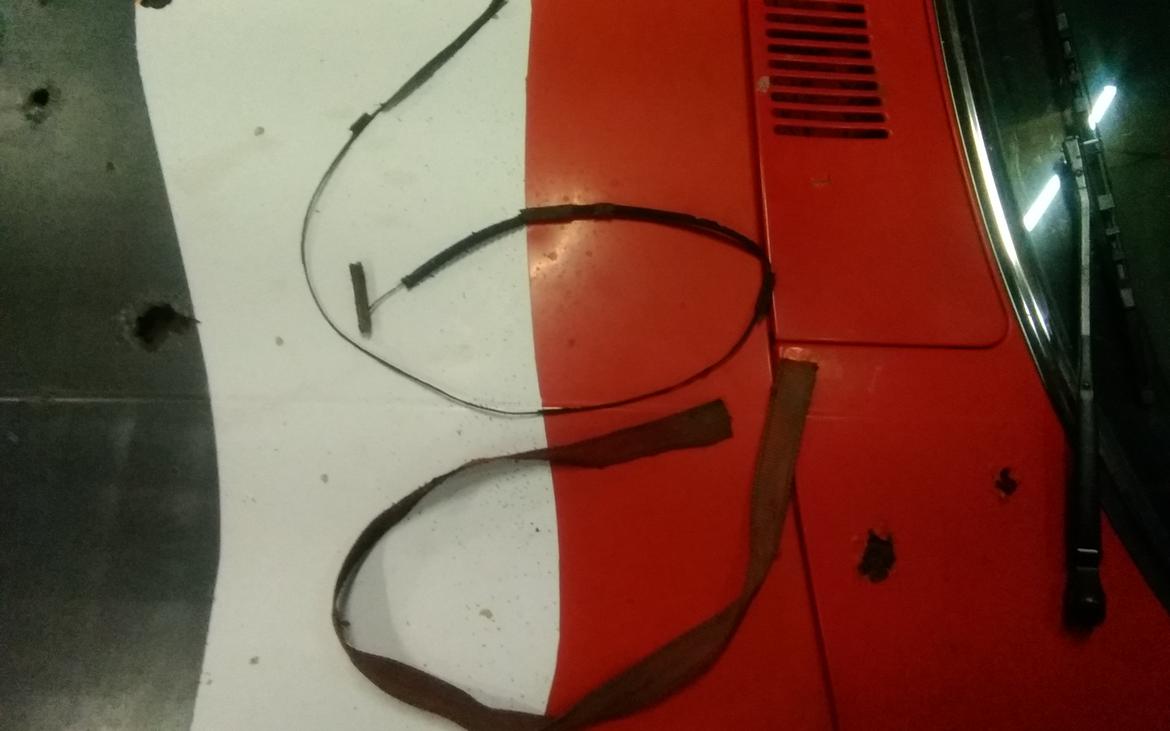
Then the alternator belt esploded.

(top is belt remains. bottom is roadside scavenged ratchet strap chunk used to pull the air pump belt back on so I could limp home)

Pete. (l33t FS)
Pete. (l33t FS) GRM+ Memberand MegaDork
8/8/21 11:55 a.m.

Much frustration at work, at home, and in the garage has led me to step away from things for a while.

Just got off the phone with Summit, applied a 20% of coupon lavishly, to be applied to both RX-7s and the Volvo.  The Volvo part is quite interesting and I can't wait to try it out.

Pete. (l33t FS)
Pete. (l33t FS) GRM+ Memberand MegaDork
8/8/21 5:34 p.m.

Okay, albatross number one.

Last time I tried to stack the engine, I had a lot of issues getting the rear apex seals in because the corner pieces kept getting unglued, and then getting the outer apex seal springs in, the the point that one of them went *ping* across the garage, never to be seen again.  This is only an issue if you have a relieved bridge port and have to install the rear apex seals backwards.  And THEN one of the corner pieces disappeared into the engine, I had to unstack it, found that the Right Stuff had hardened so it would have drank coolant anyway, I got majorly pissed off, and in the time between then and when the new set of apex seal springs arrived, I got discouraged and moved on to other things.

Everything had been all cleaned up after the re-unstacking, new coolant seals made, etc.  Just needed to get into the mental space to handle the most stressful 90 minutes of rotary engine building.

Mild panic rising.


Got two of the three in, then the third one came unglued when I picked it up.  Crap!!  Mild panic rising.


Apex seal gluing rig.  Keeps it square and flush.

Yes, it's a big magnet and a counterweight.

It took three tries to get it glued.  Ugggh.

But fortunately, was able to get all the long seal springs in without them snagging on the corner piece and popping it loose.

Then we get to here....

Engine is tightened up.  All those wet spots are sweat.  Oh yeah, the other reason I lost interest in getting work done...

infernosg
infernosg Reader
8/9/21 9:13 a.m.

Weird you're having issues with gluing the apex seals. Maybe metal seals are different, I dunno. What adhesive are you using? I've always used just a single drop of super glue and glued the side pieces so the overall length of the apex seal is slightly too long. The assumption is torquing the tensions bolts and compressing the stack will pop the glue loose for better compression at initial start up.

Pete. (l33t FS)
Pete. (l33t FS) GRM+ Memberand MegaDork
8/9/21 11:39 a.m.

In reply to infernosg :

What non metallic seals are two piece?  (Actually, what non metallic seals exist?)

Gluing them on long is not an option because the short spring will crack it loose when you slide the seal in.  Gluing it together short just makes it harder to put the long spring in.

When installing seals right side up, I don't glue at all, I just put in the long/only apex seal spring, then push the corner piece into place.  Friction holds it in place just fine.

infernosg
infernosg Reader
8/9/21 1:30 p.m.

In reply to Pete. (l33t FS) :

Carbon (can you still get those?) and ceramic :)

I guess I install my seals totally wrong. One dot of super glue to hold the side piece one (slightly long) and I install the whole thing, with both springs, all at once into the rotor. I've been using the same ceramic side seals for years so maybe they behave differently.

Pete. (l33t FS)
Pete. (l33t FS) GRM+ Memberand MegaDork
8/9/21 2:09 p.m.

In reply to infernosg :

The "carbon" seals are aluminum-carbon, and I thought the ceramics were like ceramic metal, not ceramic pottery.


Everyone does it different I guess.  I have a hard enough time holding the short spring in place while slotting the seals in.  

To be fair, in twenty years of building these engines, this was the first time the apex seals gave me grief.

infernosg
infernosg Reader
8/9/21 3:06 p.m.

In reply to Pete. (l33t FS) :

I just re-read your original post and realized I completely missed your comment about installing the apex seals for the rear rotor backward. I'm assuming this means side piece forward in which case I can see how that would put more stress on the glue than the normal orientation. My engine isn't bridgeported (yet) so I haven't had to worry about it.

Pete. (l33t FS)
Pete. (l33t FS) GRM+ Memberand MegaDork
8/9/21 6:12 p.m.

I guess I should be specific... all four intake ports are bridge ported, but the "primary" ports do not extend through the rotor housing surface.  You can see in the top pic the bevel I cut into the rotor housing for the "secondary" port - the cut is within 1mm of the coolant seal land, and forms a continuous curve with the side housing side.  It's just a little bit larger than the wear face on the corner piece (Atkins) so I really don't feel comfortable having it sit there.


i've seen people run two piece seals with heavy rotor housing reliefs.  It gives me all the heebies and jeebies.  I expect my engine to last at least 50k miles, not a season of drag racing (which is like 12 miles).  That is why I have not extended the ports into the coolant seal track, too.

Pete. (l33t FS)
Pete. (l33t FS) GRM+ Memberand MegaDork
8/17/21 12:57 p.m.

I'm getting fan mail from Italy now!


what the...


Oh yeah!  The 37mm venturis for my Dell'Orto that I will need later.

Pete. (l33t FS)
Pete. (l33t FS) GRM+ Memberand MegaDork
8/20/21 12:30 p.m.

Poking around at the 13B.  It's mostly assembled, but I'm really taking my time and measuring a lot of things I used to ignore, like the runout at the flywheel.  (It is .005", and appears to all be in the rear counterweight)

Contemplating the jump to a trigger wheel, because I want sequential injection.  I have a 36-1 that I would have to cut down to 4.5" to fit under the water pump, which means making all new teeth by hand.  Or I have a FC crank angle sensor that has been converted to 12-1 (really 24-1-1).  Or I have an unmolested CAS that would require a mod kit to the Megasquirt.

Poking around.  Learned that MS2/Extra does not do sequential injection on rotaries because of a lack of timing registers, so I'd need to get an MS3 daughterboard.  And if I did that, I might as well spend an extra $500 and get the full MS3X setup so I don't need to buy an $80 mod kit.

or I could just keep using the distributor and batch fire the injectors.


I'll probably do that one.


What I did buy involves the numbers 1050 and the letter X.

Pete. (l33t FS)
Pete. (l33t FS) GRM+ Memberand MegaDork
8/20/21 8:18 p.m.

More frustration in the Batcave.  Out of the three options of having a sidedraft carb with a wraparound manifold, an air filter, or an alternator, I can only pick two.


at least I am building quite the intake manifold collection.

Pete. (l33t FS)
Pete. (l33t FS) GRM+ Memberand MegaDork
8/22/21 2:59 p.m.

Lot of annoying bits and bobs needed before an engine can be dropped in, most of which were lost/destroyed when the side housings were reconditioned, so I had to borrow bits from my collection of stuff.  At 90+ during the day, it's just too damn hot to get much work done.

But I think it's ready to wrestle in.  I'm rather happy that I had an '82 rear housing to grab the heater hose nipple from. '81 were thread-in and '83 had a tee for the oil cooler.


Poking around at the '81.  I removed the master cylinder and backed off the brake booster pushrod a half turn.  I am thinking this might be my brake drag when hot issue.

Also, removed the top of the carb to see about rejetting it.  It is really, really lean on the primaries, like 17:1 accelerating up hills before you push the secondaries open.  The '79 carb had #90 primary main air bleeds, the parts carb I bought had #70, so I played musical jets. Now it seems to be running closer to 14:1 any time before the secondaries open, 12.5-13:1 at WOT (vice 13.5-14:1) and it feels much more responsive.  Still runs hot on the highway, though.

j_tso
j_tso Reader
8/24/21 4:08 p.m.
Pete. (l33t FS) said:

More frustration in the Batcave.  Out of the three options of having a sidedraft carb with a wraparound manifold, an air filter, or an alternator, I can only pick two.

You mean without buying more parts? What's up with the alternator?

Pete. (l33t FS)
Pete. (l33t FS) GRM+ Memberand MegaDork
8/24/21 4:30 p.m.
j_tso said:
Pete. (l33t FS) said:

More frustration in the Batcave.  Out of the three options of having a sidedraft carb with a wraparound manifold, an air filter, or an alternator, I can only pick two.

You mean without buying more parts? What's up with the alternator?

The carburetor is too close to it for a regular air cleaner assembly to fit.

I do have the ancient Racing Beat air filter housing, which is massively offset for alternator clearance.  However, this also means that you cannot use a priper element, it just has a chicken wire thing and some foam drapes over that.  Not nearly good enough for me.


It's not a matter of buying more parts, it is more a matter of it simply won't work.

Also, the manifold sits the carburetor RIGHT DOWN on the engine, so I'd have to lose the solenoid rack.  My plan involved sticking the TPS on the Dell'Orto so that the emissions computer can control the vacuum advance.  Dell'Ortos do not have a ported vacuum source, and I strongly believe in having vacuum advance, and Mazda, for whatever weird Mazda reason, supplied the vacuum advance with MANIFOLD vacuum, switched by a solenoid controlled by the computer from signals from the TPS to function like it was connected to ported vacuum.  (Note: Nikkis have a ported vacuum source....)

j_tso
j_tso Reader
8/24/21 5:55 p.m.

Yeah, the solenoid rack would have to be moved. I had a 2 piece wraparound on a 6port 13B and there wasn't a lot of room under, had to be careful changing chokes on a warm engine.

I had a K&N filter and housing and didn't have interference issues with the alternator. Something like this:

It's not quite ported vacuum but this fitting goes on the port used for balancing. The hole in the barrel is right behind the throttle plate. I don't know how accurately that would work with a stock distributor, but that would be a step down from computer controlled.

Pete. (l33t FS)
Pete. (l33t FS) GRM+ Memberand MegaDork
8/24/21 7:56 p.m.

In reply to j_tso :

I have that kind of air cleaner ($20 at Summit clearance rack).  It does not fit.

It might be okay on a 13B, using the Racing Beat mishmash of adaptor on 6-port lower (which was heavily offset to the rear), but it doesn't fit on a one piece wraparound manifold on a 12A, which keeps the carb much more centered over the engine.


To give an idea of how much clearance there isn't, it still fouled the alternator even if I removed the spacer on the pivot bolt and sat the alternator that much more forward.


My intake manifold collection now consists of:

6 port 13B:

Racing Beat sidedraft upper to fit GSL-SE

Racing Beat sidedraft upper to fit Series 4/5 (bought this new, might have been the last one they had?)

??? Holley  (definitely not Racing Beat)

Atkins sidedraft (too long to allow clearance to strut tower without using a very short air cleaner)

4 port 13B:

Racing Beat Holley

TWM dual DCOE

and now

4 port 12A:

??? wraparound sidedraft (bought from Mazdatrix earlier this month)


The manifold on the car is a '79 12A piece that I got from someone who didn't know what he had...

j_tso
j_tso Reader
8/25/21 10:42 a.m.

geez, pick a setup!  I'm not any better. If I find a deal on ebay or wherever I'll put it on my car just to tinker.

The 6port 13B went through the wraparound with a 45 DCOE then a 48 DCO, next a 48 IDA, finally a dual 45 DCOE with an adapter plate to the TWM manifold.

I think it ran best with the 48 DCO.

Now I've got a 12A with a 45 DCOE on a Lake Cities manifold which the Atkins one is based off, can confirm a short filter is needed, but I can fit a K&N element with 1" stacks.

I didn't want to be a hoarder so the TWM is the only manifold I've kept. Long term project (or if the 12A dies) is putting it on a 13B 4 port.

Pete. (l33t FS)
Pete. (l33t FS) GRM+ Memberand MegaDork
8/27/21 9:02 p.m.

So, after a header, rejetting the carb, fixing the ignition, and fixing the brakes so they are not binding...

....

16.74 at 82.yuck


I am getting fed up.


also, with a quarter tank of fuel, and 220lb of me and my clothes, the car weighed 2545 per Dragway 42's scale.  So 2325 or so.  That isn't awful, but my '80 weighed 2200 per Norwalk's scales, and the '81-83 is supposed to be a little lighter than the '79-80 due to removal of some bracing that turned out to be unnecessary.  Both cars had A/C and the same type of interior.  Both have small axle rears but the '80 had drums, which are lighter but I don't know about 100lb lighter.

The '80 also had a stock Nikki and could run 15.7 through the muffler and 15.1 through open header.  I *should* be able to make the same amount of power, as I have a Racing Beat header on the '81 and the '80 had the utterly craptacular Pacesetter header.  One thing the '80 had, besides a very mild street port, was an '83 intake manifold that I'd modded to be completely independent runner.  I have enough '81-85 manifolds that I can try that again.

Pete. (l33t FS)
Pete. (l33t FS) GRM+ Memberand MegaDork
8/27/21 11:01 p.m.


Uh oh

1 ... 44 45 46 47 48 ... 54

You'll need to log in to post.

Our Preferred Partners
RXR9RoGE4480U7t9a3dGZBfVpaDcMtNnCcu8amyTx0yrSxKR2kyVLsjfFsoe7OCt