Replacement parts are rolling in including these:

I got four of them to replace all the wheels on the car. I was amazed when I weighed them today and found out they are slightly more than 10lbs lighter per wheel.
I bought these from Jegs (just because they had $25 off for orders over $500).
https://www.jegs.com/i/Weld+Racing/927/559-5415/10002/-1?gclid=Cj0KCQjwhr2FBhDbARIsACjwLo22tqhhmzR8fmnwoOBYQV-UYIyJLuI0r3U02gQDwX57Xugk2zNfx1YaApDR
10lbs is a damn good rotating mass savings!
java230 said:
10lbs is a damn good rotating mass savings!
Yeah! I would have done this years ago if I had realized how much weight I could save. I always figured the thin wall steel wheels were not that much heavier. The cost wasn't really that bad either. The steel wheels I was running are $135 per wheel and the aluminum wheels are $188.

Time to document things again. I had a hard time finding a replacement lower control arm (or A frame as Troyer calls it). Part of the problem was figuring out what part I had which was bent. I used to order these through my friend Rusty Ball. He was a long time modified racer and had his own shop. I just told Rusty I needed a new lower control arm and he would get it. He knew exactly what I needed. Sadly Rusty died recently. So I had to figure this out myself. Troyer unhelpfully didn't put a part number on it. Also unhelpfully they don't show dimensions on their website. After talking to many people someone at Troyer gave me the phone number of shop in PA and said the guy there might be able to help you. I still find it strange that the people at Troyer sent me to some third party as the expert on this stuff but I can't fault the results. The guy in PA was able to have me measure things and determined I have a Troyer part number TFA-11023. Here is the listing from Troyer's site.

That part about "out of stock" is pretty much permanent at this point. Both Troyer and the guy in PA told me they really don't make these anymore as all of the cars have switched over to using Uni-Balls instead of ball joints. I still want the ball joint because it allows for more suspension travel and I need all I can get. The good news was the guy in PA had two of these. He said he probably hadn't sold one in ten years. I bought both so I have a spare. Troyer also said they could still make the part but it would two weeks at least. If I can find a K719 screw in ball joint sleeve I definitely could make my own. It's just some welding and tapping the tube for the heim joint. Anyway hopefully I'm OK for a while now. (Edit: Just found that Coleman Racing carries the K719/K772 sleeve. It's the same sleeve for both.)
As another documentation thing. The lower ball joint that fits this lower control arm is a K719 and the upper is K772. For both I use Howe ball joints but everyone talks about them using the K numbers which I believe are the Moog part numbers.
Front end is starting to come back together. Still waiting on the spindle and lower a-arm.

The upper control arm was a lot more work than just bolting it in place. I had forgotten that the control arm has 6 inch bolt centers and Troyer uses 5.5". I believe John Reed had access to a machine shop and he slotted the old ones. I don't have access to a machine shop but I do now have a drill press and some drill press vises that can be bolted down. The combination meant I could drill half a hole with a 1/2" bit. So each hole became 1/4" wider to make the holes a 1/2" closer together. The end result doesn't look as professional but it works. Gotta remember to thank my father in-law for that drill press again! He got good use out of it for about 40 years and he seems happy that it is still being used.
KevinGale said:

Looks to me like an old MSR fuel bottle for liquid fuel backpacking stoves.

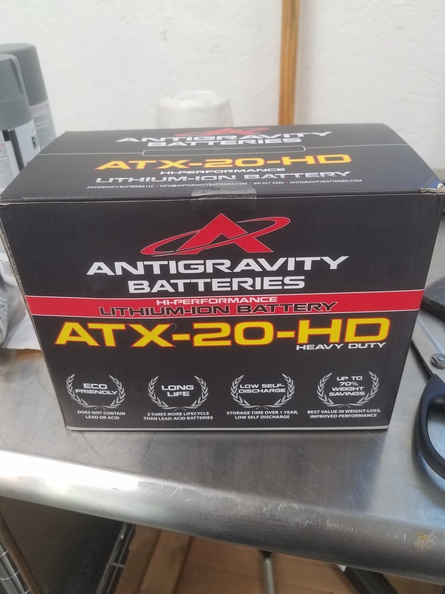
The Braille battery was starting to give problems. It would would (after a few starts) have problems turning the motor over. I was going to just replace it with another Braille AGM battery but just at this time my sister in-law needed a battery for her Harley. She had given me her battery to charge but it wouldn't take a charge and got really hot when you tried to charge it. I finally gave up on it but I noticed that her Harley battery had exactly the same form factor as the Braille in the race car. I figured the race car battery was probably still good enough to turn over her motorcycle so that battery is now in her bike and I bought this for the race car.

I also had to buy a special Lithium charger. But it is 10lbs or so lighter than the Braille. It was about twice the cost. But 10 lbs is a lot of weight. Between the battery and the wheels I've taken about 50 lbs out of the car.
I charged the new battery and installed it. The form factor is about the same as the Braille so I used the same mount with a little more closed cell foam. Then I proceeded to start the car multiple time and just turn the engine over. I did it a bunch of times and it still sounded just as strong at the end. We will see how it survives. Lithium batteries generally hold up to more cycling than lead acid. So even if I draw it down it probably won't hurt it as much.
Gave up on my Impact helmet. It's been backordered for a month and I'm starting to get worried that it won't arrive in time for the Burke event. When I called them in April, Impact said that they thought they would be shipping large helmets in June. It is just barely June so they might still make it but I realized today that I can't really wait until the last minute hoping it ships. I need a helmet for the Burke event! So I canceled the order and bought a Zamp instead. Luke and Dave previously recommended them and Summit had a couple of these top air styles in stock. I hate changing helmet brands. I liked the Impact helmet and I knew how it fit. Another reason I didn't want to wait until the last minute is getting the right size. Zamp, tells you how to measure your head to find the size to order. But there is a chance that even going by their measurements I will find the helmet doesn't fit and have to exchange it for another size. I want to have time to do that.

Zamp RZ-56 Air - Large
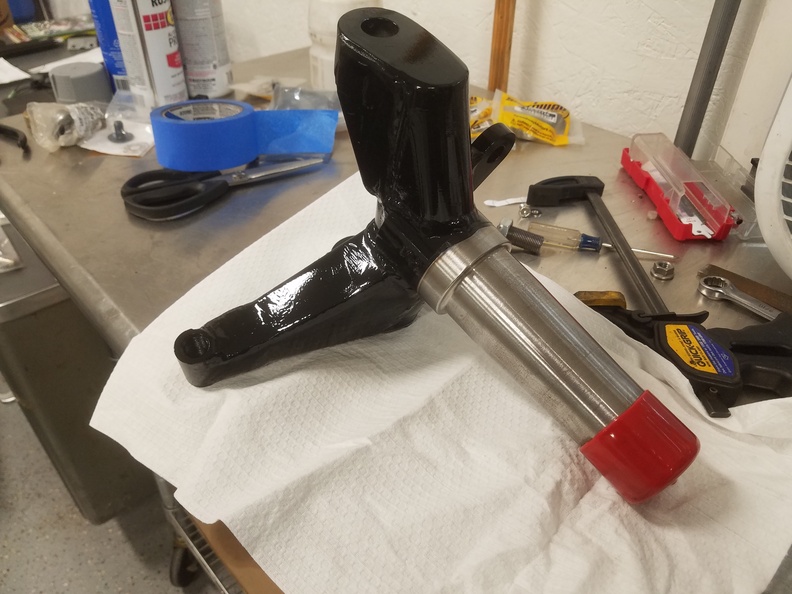
I have a spindle! Just in time to install it this weekend. Also pictured is the new clevis that Paul Tinguad at Super Car Machine Shop made for me! This post also serves to document the spindle part number. It took a while to figure this out with some help from Sweet to decipher their part numbers. Sweet then made one for me. It's so new I can still smell the paint curing. No one had this part number in stock. It is actually different from what was on the car since the old one had adjustable Ackerman which I don't need.

I always enjoy keeping up with this thread, thanks for sharing!
In reply to Shavarsh :
It's nice to have someone who understands my getting excited about hunks of steel arriving via UPS. Thanks for reading.
Check A&A manufacture for "builder" parts, I have bought the screw in Ball joint sleeves from them before.

Well I was hoping to just bolt things together this weekend instead I am doing this:

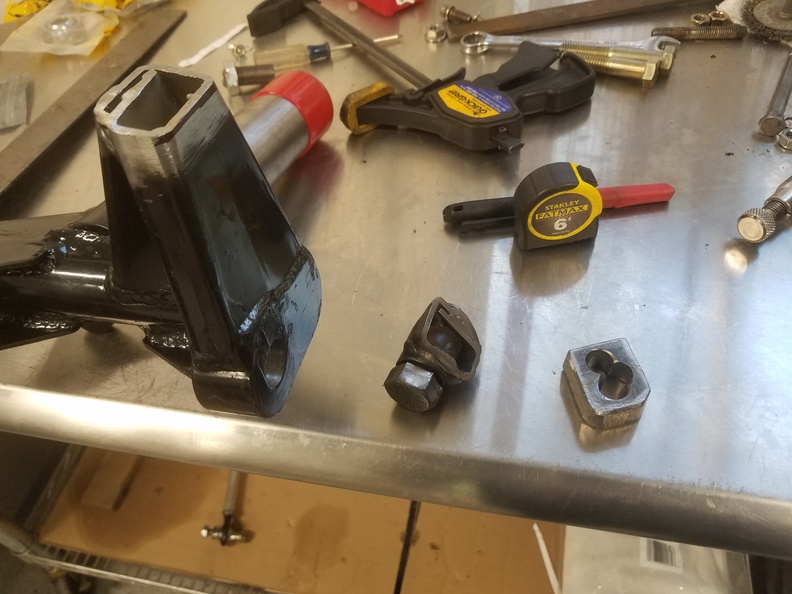
That is my new spindle after cutting it apart. As I was installing it I measured the length of the steering arm. I was expecting it would be the same length as the right side spindle which is also a Sweet spindle and the same base model. What I found however was the new spindle had a 5 inch long steering arm and the existing right side spindle had a 5 1/2" steering arm. For a circle track car that only turns left this might be OK. The old spindle with the adjustable length arm went shorter. But I bought the non adjustable and I assumed it would be the same length as the non adjustable right side spindle I have. Not sure if Sweet always makes them different or if my right side spindle is older and now they make both sides 5" long. I wanted to ask Sweet but it was the weekend already and I didn't want to wait until Monday. Even if they could fix it it might take a week or two and that would make my timeline really tight.
So after some thought I decided I just needed to make the new spindle's steering arm 1/2" longer. I wasted some time looking for some 1/2" steel but eventually realized I need 5/8". Using a 1/8" thick cutoff wheel to slice the spindle apart meant I needed that extra 1/8" to have the arm come out 1/2" longer.
I cut the arm apart and cut a piece of the 5/8" to fill the gap. I also drilled a few holes in the 5/8" piece just to add some lightness.
Here it is stacked together

And here it is after much welding, grinding and painting. Now 5 1/2" long to match the right side.

This pretty much took the whole day. So much for just bolting stuff together.
While I was waiting for paint to dry I did work on another stool. I've found the 15" wide mod wheels make great shop stools. Just add a wood top glued on and you have nice stool. It is very strong, stable and light enough to carry around. I also use them a lot as small tables to put things on when I'm working. I already had one but I decided to using the two wheels I bent in the crash to make two new stools.
The one on the left I finished last week. The one on the right is now waiting for the glue to dry.

warpedredneck said:
Check A&A manufacture for "builder" parts, I have bought the screw in Ball joint sleeves from them before.
I should have thought of them. I've bought stuff from them in the past.

Unpleasant surprise today. I noticed the steering shaft was rubbing on the chassis because of a bare spot where the paint had been rubbed off. That didn't make any sense since when I rebuilt the steering shaft in 2020 I gave it lots of room. I spun the steering wheel and saw the problem. The shaft is bent! Here is a picture of it when I was building it along with the weld in stubs.

The good news is I used all Woodward splined inserts so I just had to remove some set screws to take the whole shaft out. Both sections of the shaft are bent but the u-joints seem perfectly fine.
In early 2020 when I rebuilt the shaft I had to make a last minute change. The normal shaft tubing is 3/4" x .120 wall. However everyone who sells the Woodward weld in .120 wall size inserts was out of stock. I did find some inserts for 3/4" x .065 wall tubing. So I bought those and some .065 tubing. So these shafts are basically half the wall thickness I normally use. I didn't think that would be a problem and maybe it isn't unless I crash but at some point they bent. I already have the .120 wall tubing since I bought it last time before finding out the .120 wall stubs were out of stock.
So I just ordered some new weld in stubs for the .120 wall tubing I have. Not sure I will try the .065 wall again. I don't feel like the steering shafts should have bent and part of me is wondering if they were bending before the crash. Probably not but this in one case where the little bit of extra weight will make me feel better.
Looking at things again my guess is the steering shaft actually got hit by the lower control rod. The Troyer has a long rod that connects at the lower ball joint with a clevis and angles back into the chassis when it ends near the motor. Normally this cannot get near the steering shaft but everything including this rod bent a lot in the crash and I think it came into contact with the steering shaft. And since the shaft was made of pretty thin wall tubing it wouldn't have taken much to bend it. So it was probably fine before the crash. But I am still replacing it with the .120 wall I have.

Half an hour of panic this afternoon. I just got done changing the oil for the first time on the refreshed motor. For the break in I was running regular non synthetic oil and now I want to run my usual Mobil 1. I am changing the viscosity however. I've always run 20W-50 but I really don't think 50 weight is necessary and Sherman agrees and since he put the engine together and has been building racing engines professionally for years I trust his judgement. So I'm now running a 0W-40 Mobil 1.
Anyway back to the panic. After I changed the oil and checked the oberg filter (looked fine) I wanted to run the car for a little bit to check the oil level in the tank. It wouldn't start. It cranked over just fine. In fact the new lithium battery spins it so fast I noticed I was making more than 40lbs of oil pressure. But no fire, it didn't even seem like it was trying to start. Pulled a plug and verified I had no spark. I then did what I should have done first and stuck my head into the cockpit and looked down under the dash to see if the Crane Hi-6 ignition box was getting power. It wasn't or at least the red led wasn't on.
I started wondering if the Crane ignition had died. It is probably 25 years old. It has always worked perfectly so I've never had any reason to replace it. It took a while of searching on the internet to find a manual for the ignition (or at least a model that was close to the right one). I saved the PDF since who knows if I will be able to find it again next time I need it.
The manual had a troubleshooting section on what to check of the red led doesn't come on. Two red wires. I quickly checked the first wire and it looked fine. The second wire I saw went out through the firewall and that triggered my memory that it goes through a brake kill switch. The car has a pressure sensitive switch. If you push on the brakes really hard (like you would if you had a stuck throttle) the switch will interrupt the ignition and kill the engine.
One of the wires to the switch was broken. Or more accurately the crimp connector was broken and the wire had just pulled out. This made me feel a lot better! And sure enough one new connector later the car fired up instantly. I was having visions of needing to buy and install a new ignition box in the next two weeks. It also made sense in another way. I had fired up the car when I put in the new battery and it hasn't even been off the lift since then. But I had worked on the steering in the same area as that switch. I almost certainly bumped that wire and broke the connector that previously was just hanging on.
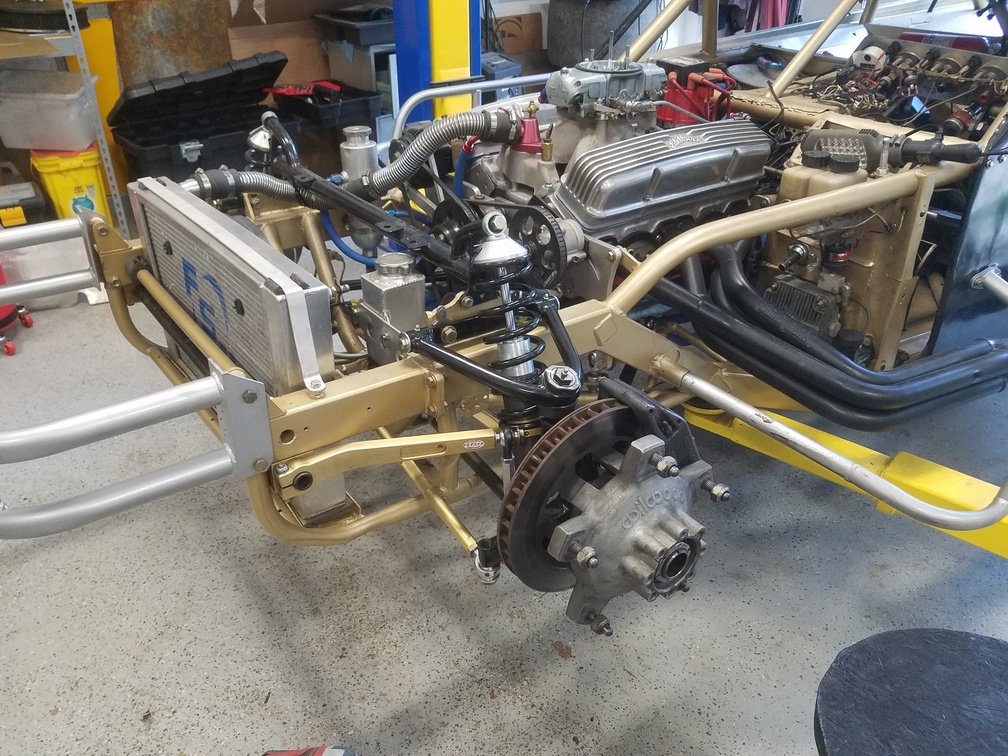
Progress! The front end is bolted back together. Still need to do an alignment and maybe check bumpsteer.


Making sure the driveshaft yoke is topped off with water! :-)

There is a method to this madness! Ever since I put in the Jerico transmission I've had an oil leak. The spray of oil starts at about the end of the transmission tailshaft and spreads out from there. It was also obvious that oil is getting flung off the rotating yoke. It has been a minor annoyance and I've had to clean the underside of the car many times.
For the longest time I just figured the tailshaft seal for the yoke was bad and it just leaked a little. But I finally got around to replacing that seal in early 2020. Of course we didn't race in 2020 and now after the first race of 2021 I could see the leak was even worse than before. My wonderful wife gave the car a bath. Not fun since you basically have to stand under the car washing it while blend of dirt, gear oil, degreaser and water drips down on you.
The new seal looked fine and I was confused. So onto the internet! A quick search for my problem lead to a bunch of people who had replaced seals only to find their leak didn't go away. Many of them posted that what they finally found was the yoke itself was leaking. They reported a hole or holes at the end of the u-joint of the yoke. I looked at my yoke but I couldn't see any holes but I wanted to fix this problem. I pulled out the driveshaft and put it in the vice with the yoke pointed up. I filled it with water. Bingo! It didn't take long to spot water dripping out.
After a whole bunch of cleaning I used some RTV on the inside and outside of the yoke hoping to plug the hole. The picture is after sitting overnight. No leaks.
I'm really hoping this will solve the problem! I'm so tired of having the rear of the car spay coated with gear oil.
In reply to KevinGale :
It wants to be British. That's the standard method of rust proofing on British cars.
We have reverse threaded crank seals that are simply a controlled oil leak. and seals that don't seal. Plus gaskets that, well frustrate their owners.
I'm sure Harley Davidson owners can add to the story.
I'll be happy if this leak goes away but it certainly won't be the end of them. The phrase "Dry Sump, Wet Floor" is entirely accurate. I've never been able to stop at least one of the many fittings from leaking a bit. If you look under the car right now you will see one place where there is a thick layer of shop towels zip tied to one oil line. It leaks off the pump just a drop every now and then. Enough to make a spot on the floor. I've tried fixing it every time the oil system is disassembled but it keeps coming back. Making it go away for a while requires removing the dry sump which isn't worth it. The shop towels absorb the occasional drips well enough.
Working on mounting tires to the new wheels. I may have a hard time getting used to how shiny they are. I suppose I can always paint them.

KevinGale said:
Working on mounting tires to the new wheels. I may have a hard time getting used to how shiny they are. I suppose I can always paint them.

They'll get un-shiny on their own. Just give them time. I just noticed the shape of the body on that. Is it partially Chevy Cavalier?
In reply to APEowner :
Yes I think this was/is a Chevy Cavalier. Not entirely sure. I think the roof panel may be what decides that? Seems like I should know more about this but I didn't really care when I bought it and it doesn't really matter much since it's just a skin.
The car really could use a new body. A bunch of the panels are getting pretty beat up. Hanging a new body on the car is not really in my skill set. I also don't have the right sheet metal tools. My wife said I will probably solve the problem by just buying a new roller with a nice body and start racing that. :-)


