


More Tools Than Sense said:I'm going to possibly need a way to hold the body against the seals, but honestly, it's kind of a snug fit already.
Dzus fasteners or similar?

More Tools Than Sense said:I'm going to possibly need a way to hold the body against the seals, but honestly, it's kind of a snug fit already.
Dzus fasteners or similar?

Thanks again for the kind words of encouragement. And we'll have to see about the fasteners, I'm leaning towards free materials or nothing though.
Moving back up to the front of the car, We had cut the hood into 3 pieces.
You can also see that a snail is getting in the way of hood clearance but that is mostly the waste-gate actuator, which can be moved down with some creativity.

So, we came to the conclusion that wide wheels should be kept on one way or another and decided to add 6 inches overall to the hood width.
We started by screwing in some scraps of plywood to hold it in place and then checked our work.

We flipped the hood upside down and "clamped" on some small strips of pine. Now, we fiberglassed over those, starting with the quart of resin I picked up for free. This got us most of the way done but we had to mix a bit more from the 4 gallons I got at $20 a gallon.

Good news/ Bad News. Good news; all but one of the fiberglass braces set up fine. Bad news; I'm sure you can guess which one didn't.
So I potentially had 3.9 gallons of useless garbage that I paid $80 for. So, I figured, why not try fresh hardener with the old resin. I got a tiny tube of hardener locally and made a test piece, and, Success! The bulk resin (the purple stuff in the picture) turned blue right at the one hour mark like it was supposed to and seemed to have no more problems (ahem) getting hard. So, I ordered a bulk pack of hardener for $20 off of ebay and we are back in business.

Last weekend we cleaned it up a bit more and using some scraps of flashing as backing , laid down another layer of glass.

It's still looking a bit rough right now, but surely, by the time we are done with all of this fiberglass work, we will have gained enough experience to be ready to start.


That weatherstripping seal is brilliant for making the body removable. Loving the fiberglass work! Please keep it coming.
More fiberglass work to do this weekend but over the last few days, something different is taking shape.
First a 'template' made from scrap plywood and some brake line.

Then it's time to break out the affordable bender which is... affordable.
I guess I can't complain about it too much but it only works in the upright position and it's easy to make your bends in the wrong place.

I got the first 2 right though!

It was only after I made the main hoop that I realized I wanted it all the way out to the corners though, and these were in the way...

So I got rid of them. obviously, the gussets will be added back later when the bar is done.
I made some feet for the bar and stretched the legs back open by 2 inches.

This was a whole process where I trapped the bar under the lift with a car on it, but I didn't take any pictures of that.
But I did have to make a little squaring set up to make sure both sides were even.

Other than that, I made the rear bars and support plates that sit nice and close to the rear struts.

The plan for now it to build a half cage, (just this, harness bar and door bars) and try to add a lot of the rigidity back into the frame since, you know, half of the car is gone.
Do ya'll think it would be worth it to add a small brace from strut to strut (with one inch tube) to add more stiffness or will the cage be doing that already?

A diagonal in the main hoop from driver's head to passenger floor would help both for rigidity and roll-over protection, I would think...
In reply to nlevine :
Oh, yeah, left that out of the post but diagonal will be included with the harness bar intercepting it.

2x3 square tube frame connector xmade a HUGE difference in my miata. We essentially cut out the floor where the stamped non structural framerails ran under the floorpan and seats, and welded in the tube tying it into the multilayer frame rails the subfelrames attach to.

If you're worried about getting rigidity back, do the doors have to open?

This is wild! Looks great!
@Dusterbd13-michael - I'm not sure I completely understand where this bracing would go, Under the seat, near that cross brace they bolt to, or behind the seats, near the feet of the cage?
@bumpsteer - I do plan to keep the doors functional for now, I'm hoping to make this thing streetable as well and I'm getting too old to be Bo-Duking it everywhere I go.
Started on the door bars the other day, so first logical step is to make space for them inside said doors.

Next, I was trying to figure out how to best make the door bars so I looked at a whole bunch of different companies and designs,
and then decided to do it completely differently from all of them. Most everybody seems to have the bars shoot out forward and then into the cavity of the door. But, I'm still not sure what seats we are going to be using so I wanted to leave as much space available as possible. And I wanted to tie the roll cage into the body in more places so my brother suggested we just shoot right through the door jam. I looked at the door latch and said, shrug, why not.

There is alot of space inside the doors so you can see how far the bars hang out, this set up should hopefully keep egress easy and comfort high.
I took better pictures of the process on the passenger side, where I started with the first bend, then lined up and leveled the tube before notching out the first weld point.

Next it goes back in the bender for two opposing bends to get it back around and inside the foot-well.

I originally was just going to tie it to the front of the door jam but I figured it would add to the rigidity better to attach it to this footwell brace up at the front corners as well.

I did make some brackets to attach the door bars to the door jams but I didn't take any pictures of them and as I sit here now, I'm pretty sure I am going to re-make them completely so, just as well.

That alone should add a ton of rigidity to the car!
I like the door bars! Only downside compared to the normal way is the door-to-weatherstripping seal won't be continuous anymore.
In reply to maschinenbau :
Ha! like I have weatherstripping
 these are the flyin miata rail caps. What i did was cut out the rails these bolt over, and weld in 2x3 tubing instead. I tied these into the triple layer rails at aither end of the car, as well as the floor.
Hopefully that makes more sense.
In reply to Dusterbd13-michael :
Thanks, that makes a lot more sense, I was thinking you were talking about rails that ran 90 deg to that, probably because I had been talking about strut braces previously.
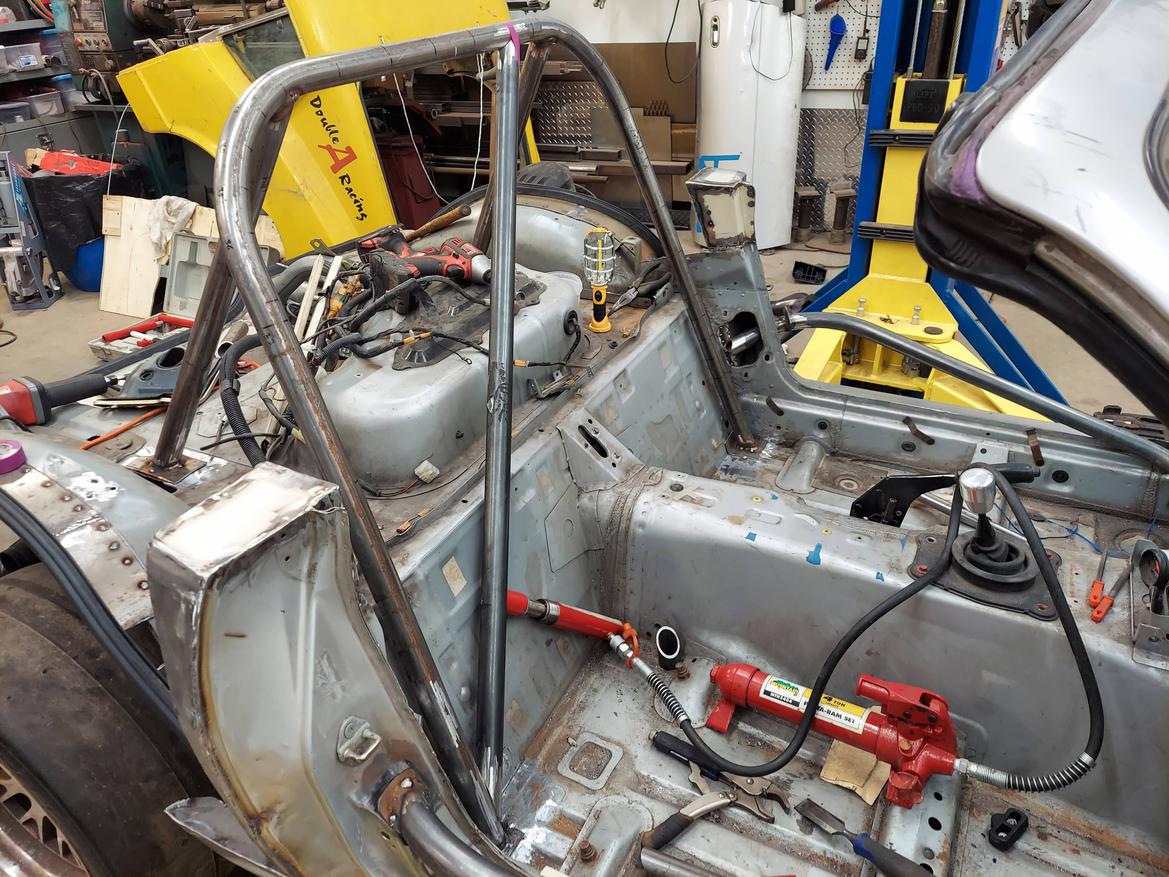
Well, after finishing up the door bars, I pulled the cage out and finished all of the welds that were just tacked before. I was running low on argon and attempted to use it all up but didn't actually run out. I was headed that way so I went and got the bottle filled on my way to work anyway.

Next, I dropped it back in the tub and made sure all of the corners were sitting in the right places and made up a cross-bar.
You can see I'm using a lot of over-kill to hold it in place while I tack the corners.
After I got that all welded up too, I went back to the door-bars.

This is the bracket I had made up already, I mostly wanted to get an attachment point on the outside of the car body somehow. Since the footwell brace is essentially on the wrong side considering that all the forces will be coming from outside the car, trying to make their way inside the car in crash. (And if they're not, I've got bigger problems)

After looking at this for a while, I decided that there was not enough weld area on the bar itself and added 2 more gussets.

One under the bar and one on top.

And here we are, Lastly I need to make the harness bar before crossing fingers and welding everything down into the car.

This might make the neighbors a bit happier... but looking at the weeds
Did you use a Sawzall to chop up the Miata? What blades work the best?

I cut up my miata with a Diablo Carbide thick metal. Slight overkill but made quick work.
Yeah, Diablo blades are the tits, I swapped over to a bargain brand the other day and they were so dull and slow I swapped back to the worn out old blade with missing teeth that I had been using, and it still cut faster.
Well I got the harness bar tacked together on Saturday in a process that took way too long. I must have checked-modified-rechecked that bar 50 times or more but I finally got a good fit.

I also finished the passenger side on Sunday and took zero pictures.
But with that all done, I decided it was time to actually attach the bar to the car so I cleaned up all the paint and dirt off the miata body, took a deep breath, and then put the fiberglass body back over it for one final test fit.
And, I already knew that there was a small gap between the bar and the roof but after looking at it again, and seeing how little clearance we would get for our heads, I decided to bump the bar up 3/4"
And how to do that without starting over? Little boxes.

I did end up changing this shape a little bit, but it's just a box made from 1/8" metal that I will weld down to the floor/ rocker walls and then weld the bar down on top of. With these installed, the bar is super close to hitting the roofline for maximum helmet clearance.

 Thank you for the tip! They work great.
Kind of a slow week but I got the cage finished up. Here it is on top of the spacers.

Which are now fully welded, mediocrity abounds, boys!

I added some plates back in where the original gussets were removed.

And then added in the door bars, their brackets and some extra attachment points.

The only issue was, there was no way to weld the back of the doorbars where they meet the cage, so...

And more mediocre welding to finish the job.

Safety! I guess.


Mediocrity is the new good to go!! Remember, perfection is the enemy of completion!!
Been more than 6 months since I've posted anything, lots of other projects getting in the way. My wife needed help building a costume for the Hacksmith team/ DE studios, that took up a lot of time, we also went to Japan this Summer for a work trip/ our anniversary and I had to spend a good bit of time learning to speak Japanese, Spoilers, I still can't, but still working on it.


Anyway, the Mionnette has been stuffed in storage for most of that, but she's back on the main stage!

We decided that the body work not falling off at speed was good enough for now and decided to get back to focusing on the important stuff, like Turbochargers.
Most of the piping and mounting has been done but I was still missing a few components, the blow off valve, the wastegate actuator and a CPU.
The wastegate actuator just needed to be moved because the hood was hitting it. Could we have cut a hole in the hood? absolutely and if this were a cooler looking part we would have done just that. but a dinky little hole for a cheapo actuator wasn't vibing so I moved it down under the turbo.

It used to exist on a bracket bolted to those two bolts on the front of the turbo, so I cut and welded that same bracket and used it to bolt it to the block. I obviously had to chop up the pushrod as well and I'm sure those bends are not great for the design, but I think since it only needs to exert force in a pulling direction, it should be ok? Guess we'll find out.
I had already bought a cheapo ebay BOV and now I needed to add it to the system. It came with an aluminum bracket to weld onto the charge pipe but... my charge pipes are stainless steel. (it was cheaper via classifieds)
So I ordered the cheapest piece of SS pipe that was the right size (an unnecessary 45) and welded that onto the charge pipe. I also had to make a steel plate from scratch on the mill and then weld the dissimilar metals together so that the BOV could be bolted on. ( I couldn't find any SS plate and didn't want to waste budget on it)

I also needed a nipple for the vacuum line and this time I did find a SS bolt in the drawer so I turned it down on the lathe and welded it on, before drilling the rest of the way through. I couldn't spot any major leaks so away we go.

Next up is the CPU, my brother is taking the lead on that so hopefully, he will have it trouble shot and loaded with a usable map by this weekend? maybe next weekend.
Either way we have sensors to install and an intake to finish so work should continue.
Just got caught up on this from the beginning. Great stuff! Love the comic relief lines! Getting the 3yo involved is the best. Just know it leads to harder drugs...
Thanks for posting this up!

wow. Just read this necro thread, and am following along for the valiant finish!
You'll need to log in to post.


