


In reply to Dusterbd13-michael :
You mean boost leaks!

In reply to Dusterbd13-michael :
You mean boost leaks!

In reply to adam525i :
Both!
Lets add coolant and oil for good measure too.
Started replacing vacuum lines i can do with roll stuff i have on hand, and adding zip ties as clamps on every hose. And cleaned the electric boost solenoid and made it actually flow now. And.....

Andddddd?
The suspense is mildly interesting.
In reply to wvumtnbkr :
Don't get too excited. Im out of steam for today, and have to wait on timing belt tools i forgot to order.
But, vacuum and boost leaks should make a huge difference in power amd drivability. Hopefully ill even hit the factory 11psi now!
More hoses ordered. And valve cover gaskets.
Need to find two hoses yet that don't seem to exist on the diagrams. Go from the valve covers to pipe under the intake.
 this hyperflow intercooler is freaking HUGE.
 26 inch rear, 28 front fender lip height. Sedan springs were no the right call back there. Time to pull it apart for the baja springs. Im debating doing the front springs too, as the baja stuff is stiffer. Dont know exactly how much, but noticeable difference in coil diameter front and rear.
 plugs were definitely due.
Just fixing lots of details like missing clamps, cracked hoses, dirty grounds, deferred maintenance, etc. Still waiting for timing belt tools.

Plugs done, valve cover gasket done, vacuum hoses done, pcv done, diff refilled, axle swapped, all tge body lift parts gone, interior reassembled.
Timing belt next

Not going to lie, this timing belt job has me quite a bit nervous. I'm giving myself the best access and view that I possibly can. So I remove the front bumper. The impact beam comes off next I'm soaking it and penetrating oil. It's pretty crusty we'll see if the one from the parts car fits.

Theres a pair of water pump hoses behind the plastic behid the drivers cam gears. That are original to the car near as i can tell.
Based on the other hoses, they're garbaje and at the point of imminent failure.
This is gonna be interesting!
 these were a cast iron motherberkeleyer to do. But after breaking the rear timing cover, got a lot easier! You can see a part of a clearance hole indrilled to get to a hose clamp with some tool, which was definitely the right approach.
Hopefully today ill get the new tensioner bled, then can work the new belt into place this week.
This feels like its taking forever to get done at 15 minutes to an hour at a time. But its all the time i have....
God bless you! If I wore a belt that long, I'd probably weigh 600 lbs, :) Yeah, drilling access holes seems like the right move. I don't think it will cause any problems with dirt intrusion. Alas, time is sometimes hard to manage. It takes a few swings of the hammer to make a big rock into gravel. Curious, are all Subaru's this "easy" to work on? Keep chipping away.

if you're worried about intrusion, you could RTV a piece of plastic over the hole. from the accessible side, of course.
Dirtydog: my last legacy wasnt quite as bad, but it was also na with fixed valve timing. Southern all its life, and closer to date of manufacture at the time. It was also 20x the purchase price!
Amgry: you and Dirtydog both bring up intrusion. Is this something I should be worried about? My use xase is a daily driver. Gravel driveway, once a year dirt road to scout camp, once a year snow, rest pavement in the south.

In reply to Dusterbd13-michael :
I have dirt and gravel going everywhere in my Subaru when I drive it off pavement.
The odds of a pebble big enough to get in between the belt and the gear are low, but putting something over the hole is cheap insurance against it ever happening. I figure if Subaru put the shields there, the bean counters agreed it was enough a potential problem to spend the cost on design, tooling and plastic to make it happen.
On the other side, make sure any sort of cover you rig up doesn't shake loose and get in the gears, too.
You're absolutely right.
I'll bend up a piece of aluminum and rivit/rtv in place. Wont be as well sealed as factory,but better than the hole.
Previous total: 1243.06
Car: 400
Trans mount: 35.35
Trans filter: 5.79
Rear trans seal: 3.99
Trans fluid: 23
Exhaust: 100
Stereo harness: 6
Storage cubby: 25
25.51 swaybar
My half of the Parts car: 225
Rock auto order: 304.90
Nicopp: 15
Brake Unions:5.00
Exhaust gaskets: 31.59
Gauges and pillar pod (had) 20 fmv
Silicone Hose kit: 42.31
Rustoleum: 9.98
New stuff:
Throttle body gasket: 6.99
11.46 30.25 45.99 25.29 28.90 31.63 for various PCV and breather hoses (173.52 total)
Valve cover gasket 16.30
Pcv valve 34.99
2005 Wrx intercooler, airbox, and reusable air filter: 20
Misc shop supplies line item (zip ties, push pins, rtv, grease, hose clamps, etc that I have floating around and just grab without thinking about it) :20
CURRENT TOTAL: 1514.86
Last update, a month ago, saw the rear subframe out, frame rail repaired, rear unibody painted, and ready for reassembly. I really don’t feel like I’ve made all that much progress since then, but it appears that I actually have despite only getting 15 minutes to an hour at a shot to work on this thing. I’m way too busy for my own good in this season of my life.
First, I had to replace the popped rear brake line that started this whole cascade of Subaru rebuild. The lines had rotted at the little block under the passenger’s rear floorboard. I used about half a roll of nicopp to run new lines the whole way from the caliper to the rear seat area, and then used some double IFF unions for the junction
 20231227_185537 by Michael Crawford, on Flickr
 20231227_182358 by Michael Crawford, on Flickr
A trick angrycorvair gave me to limit the amount of bleeding needed after repair was to compress the pedal and hold in an inch or three into travel. This prevents gravity from draining the master cylinder dry, and slows gravity draining the lines. I cut up a scrap of 1x4 on the bandsaw to make a dead leg to do that with, and it worked beautifully! Thank god for friends that are engineers and smarter than me.
 20231226_180426 by Michael Crawford, on Flickr
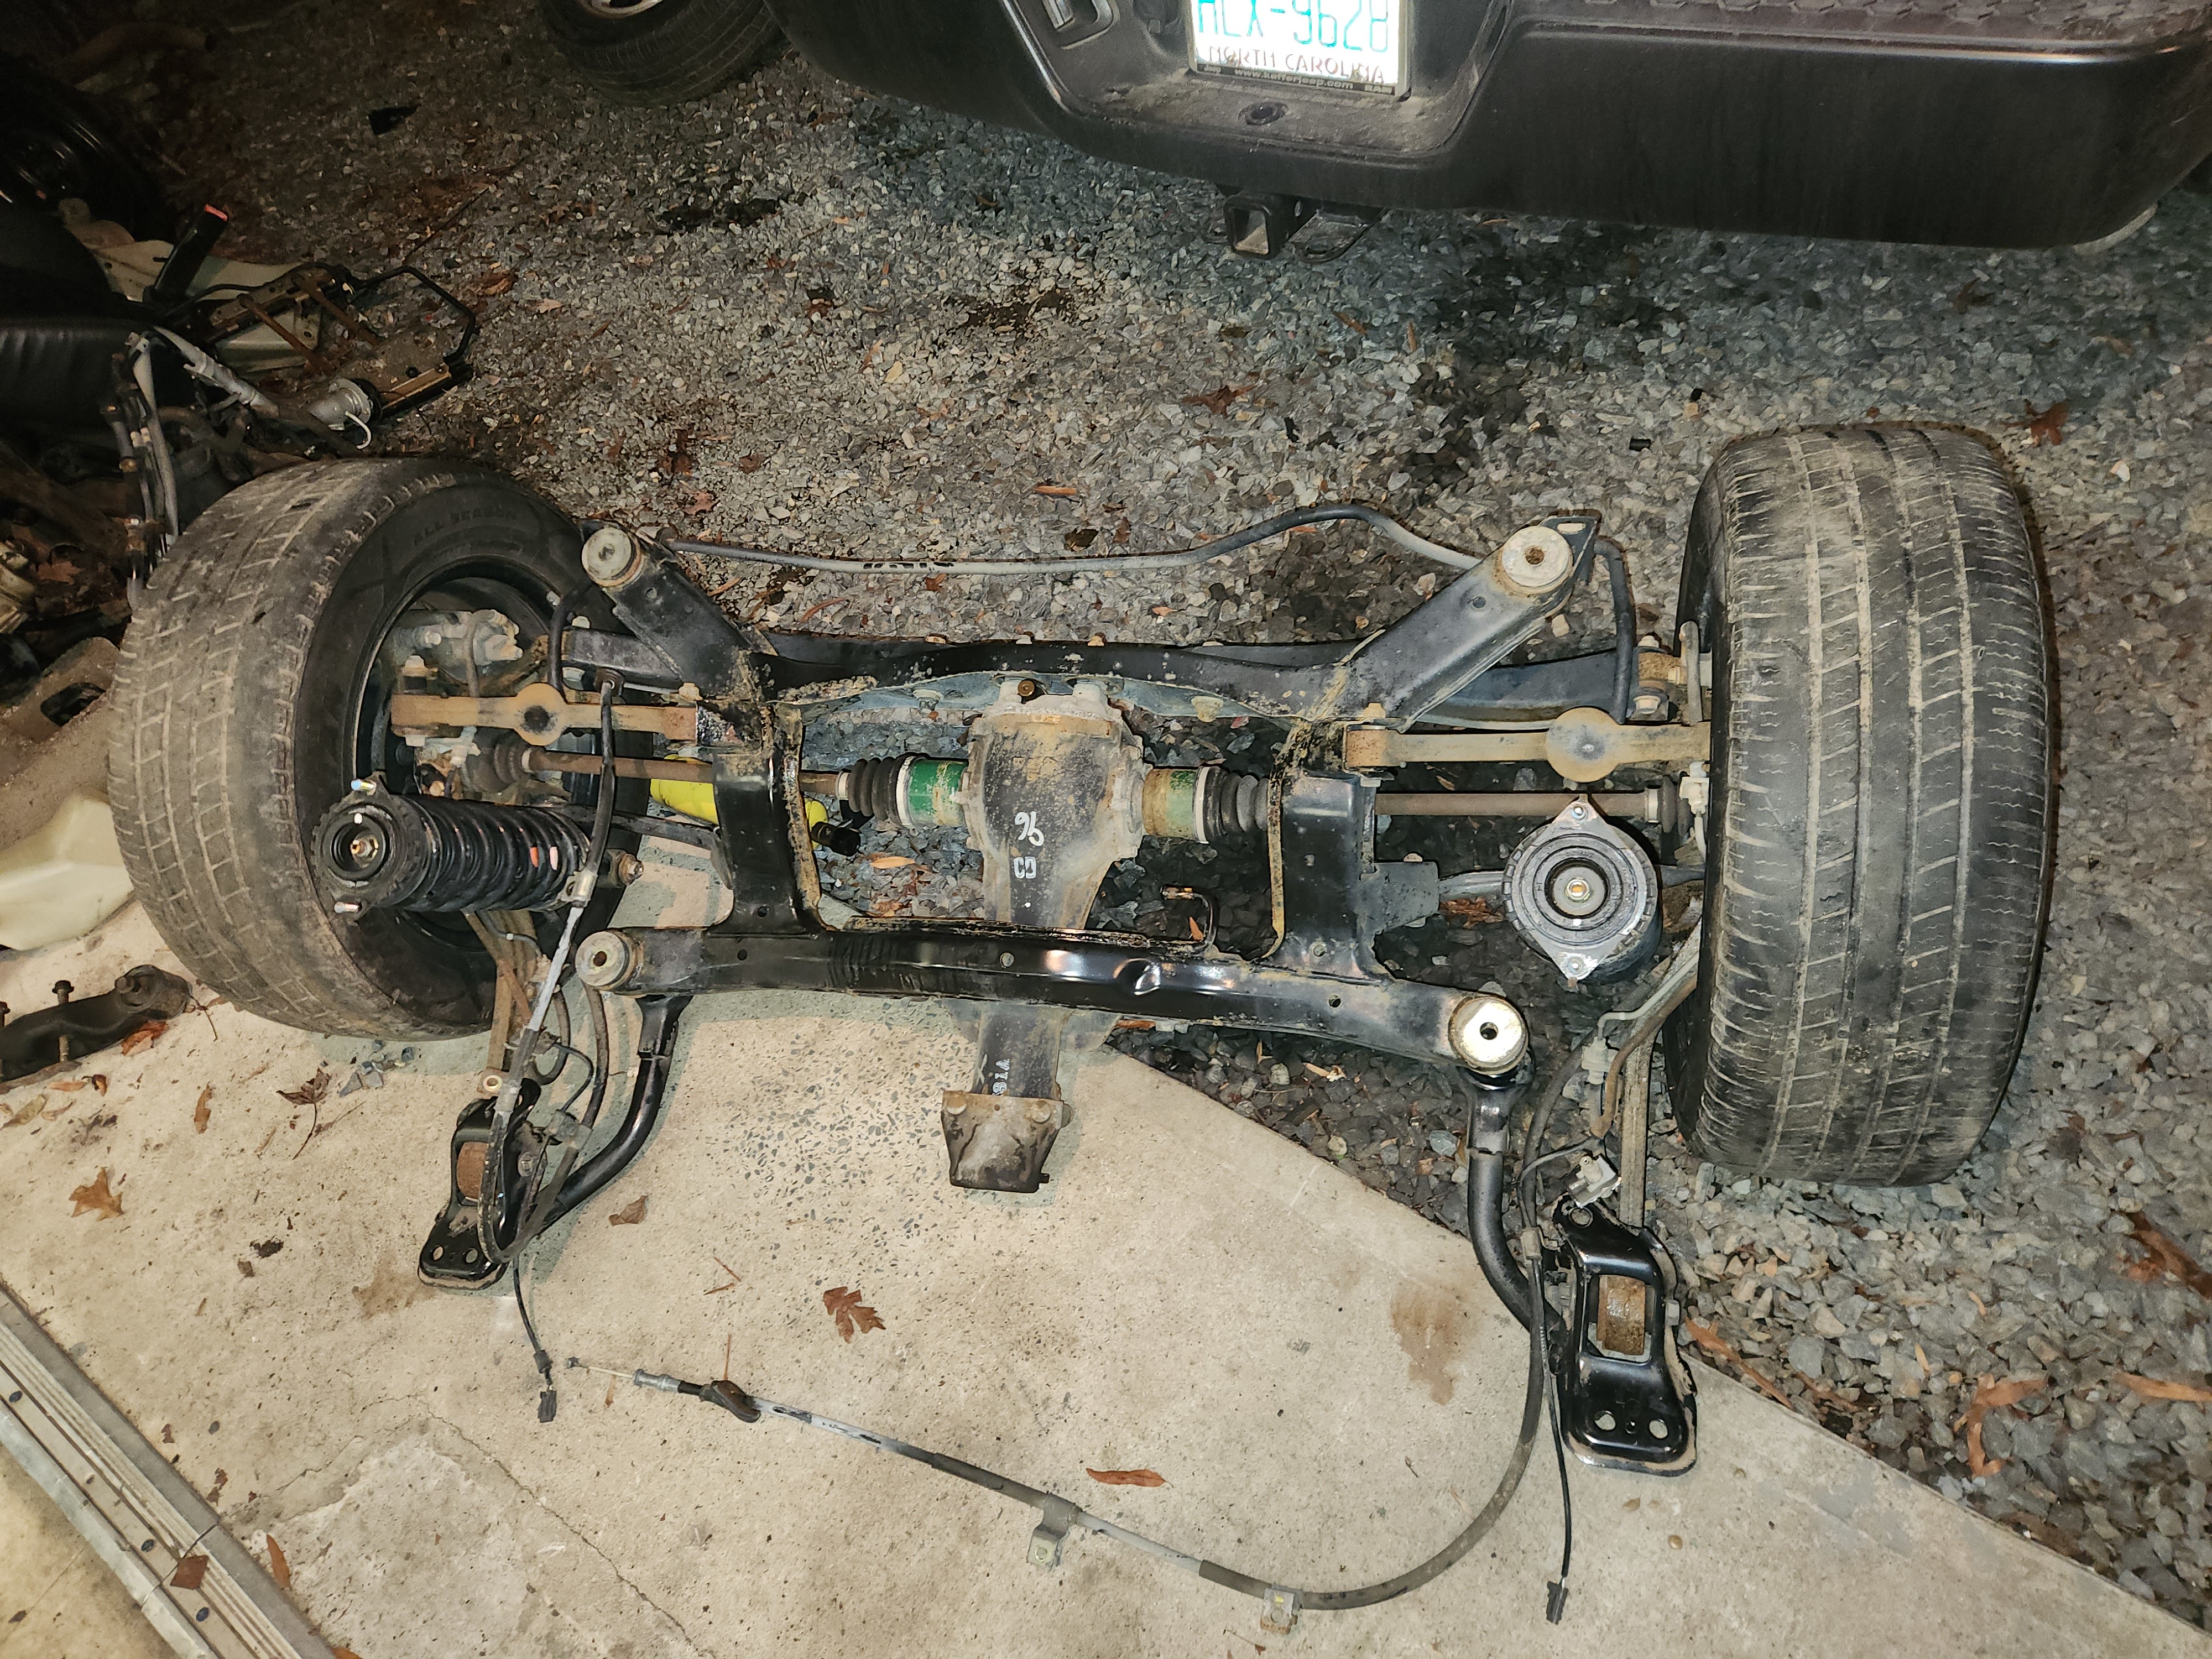
So, my wife daughter and I slid the subframe under the car, and lowered the car down on the quickjacks to meet the rear suspension. This was after multiple failed attempts to raise the assembly to meet the car and a thumb I thought I broke; my wife is wiser than me sometimes. The rear subframe was installed with all the legacy GT hardware, deleting the spacers and longer bolts to remove the body lift and lower the car about 2 inches. I also retained the legacy GT rear diff as its supposedly the same ratio and limited slip. If someone has different information, please let me know ASAP!!
Also, you may note my mistake already.
 20231228_181906 by Michael Crawford, on Flickr
 20231228_204346 by Michael Crawford, on Flickr
Sitting on the ground, I figured out I hit it hard with the lowering stick.
 20231228_205136 by Michael Crawford, on Flickr
The mistake I made (and have yet to correct) is that I used the LGT sedan struts and springs at all 4 corners in untouched states. The back rubs HARD, and the front is an inch and a half higher than the rear. Plan is to put the Baja springs on the LGT struts. However, I’m looking for a set of maxpeedingrods adjustable damping coil overs for this for way less than new price. $300 is more than the challenge budget can stand, but the performance will be much appreciated. And I have experience with that brand and series of coil over in other platforms, and quite like them.
Anyway, I assembled the interior next to get rid of the massive pile of parts that used to be a Subaru. Working with all the parts from the parts car, and the parts from the Baja, I picked the best of them. Then to clean, I used chemical guys cleaner and the blue scrub pads intended for Teflon pans. Then, another spray with the cleaner to float the filth scrubbed off, and wiped with microfiber. Its kind of amazing how much filth comes off, and how nice the interior cleaned up. Take a look of the untouched left side vs the cleaned right side of the wheel. Also, not pictured, is that my daughter steam cleaned the carpets a few times to make them the best they could be, which turned out to be pretty damn nice! It’s a really nice interior now!
 20240114_172345 by Michael Crawford, on Flickr
 20240114_171130 by Michael Crawford, on Flickr
 20240106_171344 by Michael Crawford, on Flickr
So, I turned it around at that point, and had planned to find the vacuum leak and remove the front spacers. Shouldn’t be too bad, right?
 20240106_170333 by Michael Crawford, on Flickr
The smoke test went way worse than I expected. My regulator was set for 3psi, and it was unable to build that pressure due to the amount of leaks. Every hose, the intercooler end tank, throttle body mounting gasket, silicone turbo inlet tube, pipe between maf and turbo inlet, the list goes on. Pretty much every rubber component in the engine bay was baked and leaking vacuum pr boost. The intercooler caught me off guard though. Regardless, it was time to fix it. I hunted down all the PCV and breather molded hoses and ordered them as there’s no way to make those out of cut to fit hose. I also ordered the throttle body gasket instead of making one because I’m not THAT cheap. The rest of the hoses were made from my box of belts and hoses, which is all leftover remnants from other jobs and part outs collected over the years and included in the misc shop supply line item. I also added hose clamps or zip ties on every single hose, as most hoses didn’t have anything on them, including the intake tract and turbo inlet. I also went ahead and cleaned the electronic boost control solenoid, as it wasn’t making any noise when triggered or flowing any solvent through it. After working with it, it now flows. I also replaced the PCV valve assembly because I’m already there, and it’s the right thing to do.
To replace the intercooler, I pulled the hyperflow out of storage. I swear it got bigger while I wasn’t looking.
 20240106_185320 by Michael Crawford, on Flickr
unfortunately, its not going to fit the engine bay easily, and I’m not willing to do the work to force it to fit. So its going back in storage.
 20240118_065252 by Michael Crawford, on Flickr
I sourced a $20 wrx intercooler that I will get put in instead of the cracked baja piece. Id have rather found the STI stuff, as Id ultimately like to upgrade the intercooler for better charge cooling, but ill take what I can get at my budget. Hopefully the afe air filter fits the baja box!
 Screenshot_20240122_130816_Facebook by Michael Crawford, on Flickr
While waiting on hoses and intercooler and other stuff, I decided now was the time to pull the front subframe spacers, fix the leaking valve cover gasket, change the plugs, do the timeing belt, and change the coolant hoses. Seemed like a good idea at the time.
Pulling the font subframe spacers was pretty simple, but I have to pull the column back out as I forgot the firewall seal when I put it back in. otherwise, drama free. I have the LGT fender apron extensions to put back in yet as well as the front sway bar. While I was in there, I swapped the spindles from the LGT with the LCAs, as the baja LCAs had some significant pitting, and one spindle had the head of the balljoint pinch bolt missing. Additionally, I swapped the bad CV shaft for the new one that came with the car. Had my 14-year-old helping me by handing tools and running jack and camera. These were the two pictures she took that didn’t involve my butt crack or her fingers blocking the camera. Damn kids…. (on the bright side, its evident that the 20lbs I’ve lost is making a difference in my pants being looser!)
 20240114_162658 by Michael Crawford, on Flickr
 20240114_165259 by Michael Crawford, on Flickr
Next I did plugs. They were definitely due to be changed.
 20240117_065503 by Michael Crawford, on Flickr
And the leaking passenger’s valve cover. I was pleased by how clean the inside of this engine is!
 20240119_202559 by Michael Crawford, on Flickr
 20240119_202606 by Michael Crawford, on Flickr
On to the timing belt job (which is still in process by the way. Were up to real-time, as I’m writing this in a dealership service department waiting on my work truck to be fixed). I pulled the radiator, condenser, and front bumper to make it easier. This job scares me with the 4 cams, vvt, flat motor, etc. so I’m giving myself the best chances I can. And the best access to see timing marks, etc. upon disassembly, I found the front impact beam fairly crusty, but the inner fenders flawless.
 20240120_082705 by Michael Crawford, on Flickr
 20240120_082720 by Michael Crawford, on Flickr
 20240121_090435 by Michael Crawford, on Flickr
The timing belt itself wasn’t visually too bad, but some of the idlers were surprisingly rough. Also, the hoses going to the water pump were at risk of eminent failure. Seriously rotten. I had purchased an eBay STI silicone coolant hose kit a while back, and I’m finding that the hoses in as delivered form aren’t a match to many hoses in the Baja like I believed they would be. But, cut up they are enough to redo the cooling system!
 20240122_063810 by Michael Crawford, on Flickr
Hopefully this week ill finish the timing belt job, and start on the rest of the long list of tasks to finish so I can drive this pile again.
Say your prayers and hug your families.

The bearings fail long before the belts do. They tend to puke the ball bearings out and ruin your day.
Lots of great work there!
RE: the differential gear ratio
It's printed on the ring gear itself, but that involves taking off the rear cover.
I checked some notes I have for when I'm junk yard scrounging, and show that at one point in time I trusted myself enough to note that the Legacy Limited GT has an LSD with a 4.444 gear. I have zero notes on the Baja, but you might be able to look up the transmission code and see what the front diff has based on that.
It shouldn't be too hard to count the number of input shaft rotations to the output on both diffs, that will tell you what you need to know with cracking anything open or disassembling. Definitely worth checking before trying to drive the thing!
Awesome work on this thing though, it's going to be a really nice car (truck/ute) when you're done for not a lot of cash.

I reference this site often to get Subaru ratios, it'll also tell you what's got a rear LSD:
https://www.rallispec.com/downloads/Transmission%20ID%20Chart_Public.pdf
In reply to rallyxPOS13 :
I was also going to post that, then I realized it only lists MT options in that PDF.
So what would it feel like if the front and rear diffs were different ratios? I'm not quite to test drive yet so I'm truly wondering. I'm about 3/4 tempted just to swap the differentials and rear axles just for Peace of Mind however.
 front sway bar got a little bigger
You'll need to log in to post.


