1 2 3 4 5
HappyAndy
HappyAndy Dork
12/3/12 8:52 a.m.

Does the APC solenoid make any noise? Whith the engine off, ign switch on, and hood open, you should hear it click when you step on the brake peadel. Also tapping the bolt that holds the knock sensor onto the block should get a few cycles out of the APC solenoid too.

Adrian_Thompson
Adrian_Thompson SuperDork
12/3/12 9:14 a.m.
HappyAndy wrote: Does the APC solenoid make any noise? Whith the engine off, ign switch on, and hood open, you should hear it click when you step on the brake peadel. Also tapping the bolt that holds the knock sensor onto the block should get a few cycles out of the APC solenoid too.

Cool, I'll check when I can. The battery is out right now while I do some other stuff in the engine bay so I cna't power up.

dabird
dabird Reader
12/3/12 3:53 p.m.

In reply to Adrian_Thompson:

you can check it but i can already tell you the APC clicks like it should.

Adrian_Thompson
Adrian_Thompson SuperDork
12/3/12 3:56 p.m.
dabird wrote: In reply to Adrian_Thompson: you can check it but i can already tell you the APC clicks like it should.

Cool thanks. You may have told me that when I picked it up, but there was so much info and I was so happy to be getting the car it probably went in one ear, then finding nothing to slow it's progress went straight out the other :)

BTW best news is the spousal unit doesn't hate it, even after doing some erands in it with me

dabird
dabird Reader
12/3/12 4:27 p.m.

In reply to Adrian_Thompson: Well I would advise you to go through all the regular APC diagnostics just for your own piece of mind. I've always had a feeling it was cruise control related and i also have never hooked up a gauge and tested the base boost. Good to hear that you won't be sleeping in the bed of Tom's truck

Adrian_Thompson
Adrian_Thompson SuperDork
12/9/12 4:31 p.m.

Well in true GRM fasion I spent the last 3 hours saving myself $50-70 buy building not buying a new engine mount. The not so amazing results are shown below.

Adrian_Thompson
Adrian_Thompson SuperDork
12/9/12 4:45 p.m.

Whoops, let's try that again. Below is my home made engine mount, now that may look like just a simple rectangle of aluminum with three holes in it too you, but it is in fact, eerr well a rectangle of aluminum with three holes in it. But it's a rectangle I'm very proud of. I didn't have anything to cut alloy, so I headed over to my father in laws to borrow his mill, I had to mount the alloy plate virticaly then cut it off, in three stages as the bit I was using was too tall. Then I had to cut to length, swap heads and drill the holes in stages. All in all, including clean up afterwards that little rectangle cost me about 2 1/2 hours work, just to save a few $$'s But more importantly I got to play with some tools, BS with my FIL and avoid the holiday cooking fest my wife was having with some friends and my mother, although I did miss out on the three bottles of champaign they drank too! <img src="" />

So, one I've hit a few spots in the engine bay with POR15 I can put it back together and see what the improvement is in shifting.

Adrian_Thompson
Adrian_Thompson SuperDork
1/7/13 8:26 a.m.

No, this isn’t one of those build threads where the car is bought, posted and never heard from again. Something has been happening since I built the engine mount, it’s just been happening slowly. I was sick most of the holidays which sucked, but I have been doing bits in dribs and drabs and we’re now back on the road.

While I had bits out to reach the engine mount I decided to clean them up and some of the surface rust around the engine bay. So out with the hot soapy water, then the wire cup attachment on the angle grinder, clean it, apply rust bullet then black rustoleum. Unfortunately while hitting the underside the angle grinder caught on an edge and threw itself at my arm, tore through my cloths and gave me serious defoliation. The pic below is a couple of days later, it hurt like a bugger.

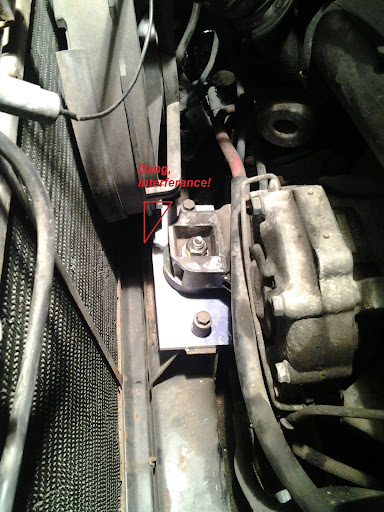
So when it was time to start putting things back together I discovered a really good reason I should have shaped my engine mount rather than made it square. In its original form it wanted to occupy the same space as the right hand radiator fan. Bugger. I didn’t discover this until the engine was being supported by the mount and the blocks, jack etc. removed. Well I could have taken it out again, but I wouldn’t have had anything handy to cut it with even then (I made it in my father in laws workshop) so I just grabbed a hack saw blade (just the blade) and spent 45 mins cutting the corner off in situ. Then it was just put everything back together.

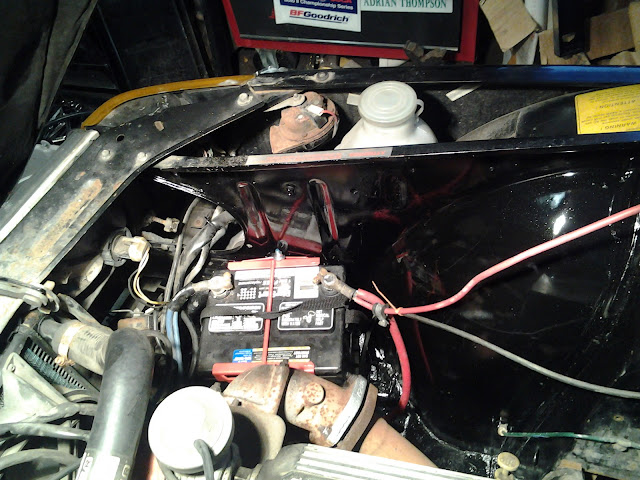
While everything was out I’d blinged up the intercooler pipes a bit by cleaning the old paint and grime off, so then I had to throw some pretty red paint at the lettering. Now I’d found that the battery had nothing to hold it in place, it was just sitting on the tray, retained by the cables. I went rooting through the piles of E36 M3 I’ve never thrown away and found an old battery top clamp (the red bit below) so I got some ¼” studding, nuts bolts and washers, drilled a couple of holes and used that. Now it had been recommended on Saabrally.com that I move the battery to the trunk or under the rear seat, I wish I’d done it now as the clamp is just about touching the turbo outlet elbow and I don’t like it as a long term solution. The thing is the current batter works so I don’t want to buy a new gel cell while this one is good and I don’t want to put a lead acid in the passenger compartment because out gassing.

So, it’s all back together except for the sump guard which I’ll leave off until I’ve pressure washed the engine bay and one of the horns that I can’t figure out where it attaches. So, it doesn’t look much different from before, but it’s back together and running again.

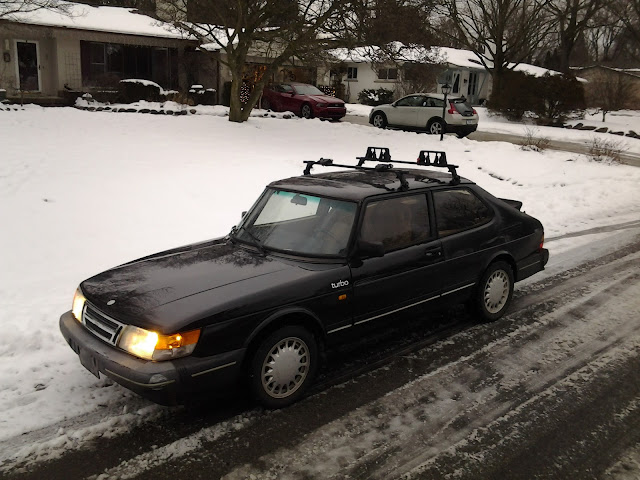
Impressions, well 2nd gear syncro didn’t magical repair itself, but it’s approx. 1,000,000% better than before. It’s much easier to drive now, no clunking and lurching, I just have to rev match down shifts and take it slow upshifting, I wish I had a light weigh flywheel So here it is, running again, I popped down to the gas station to throw in a few gallons, I must get the title transferred and registered soon

Tom_Spangler
Tom_Spangler GRM+ Memberand Dork
1/7/13 8:53 a.m.

Looking good. It will be interesting to see how the Rust Bullet holds up to the underhood heat levels of a turbo car.

Adrian_Thompson
Adrian_Thompson SuperDork
1/7/13 9:35 a.m.
Tom_Spangler wrote: Looking good. It will be interesting to see how the Rust Bullet holds up to the underhood heat levels of a turbo car.

Yup me too. If you look carefully you’ll see a bit of silver paint on the outlet flange of the turbo elbow. That’s a bit of rust bullet I painted on specifically to see how it held up to the real high heat of the turbo itself.

Adrian_Thompson
Adrian_Thompson SuperDork
1/14/13 9:36 a.m.

OK, mini update as I didn’t take any pics, I got a couple of hours on the car yesterday. First though, miracle of miracles SWMBO drove the car yesterday morning, and still doesn’t hate it!! It was an unintended master stroke to buy a car she likes the styling of rather than an E30 or something :) She managed to shift up into 2nd slowly without crunching and somehow managed to avoid changing down to second, instead taking corners in 3rd, then coasting to stops and selecting 1st instead. At some time I will need either a new box, or to rebuild this one to sort out the total lack of syncro.

I got the interior out of the Saab, everything except the headliner and A. B. C pillar trim pieces and the dash. It was very easy actual, just a couple of hours work for the whole thing. The carpet comes out in two parts which was great, I vacuumed the front half then ran it through the washing machine :) It kept its shape, but didn't get very much cleaner, there's some seriously ground in dirt. I think I might do that a couple more times then call it good enough to dye. Either that or wait for another nice day then out with the simple green and pressure washer. There were no nasty surprise yet, but I haven't removed the insulation to check the floor pan, that will be on the list.

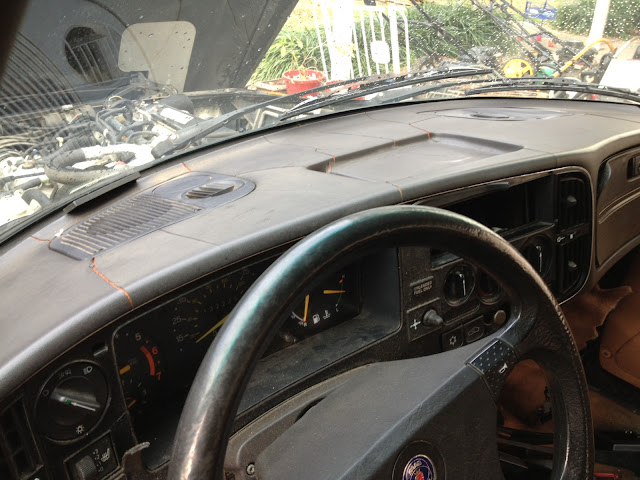
I'm trying to work out what to do about the dash, it's in bad shape, here’s an older pic.

I’ve heard the horror stories from Tom’s E30 build and I’m hesitant to pull the whole thing for repair and/or flocking. I may pull the instrument binnacle and try to repair that out of the car, then I'm thinking of ways to repair or bodge the dash in situe. Possible pull the screen, grind out and fill the cracks then paint in the car with the screen removed? I've also had a great but crazy idea for the headliner, parcel shelf and door inserts. Trying to help match the dark blue of the replacement velour seats I have with the other stuff I'll paint black without making it a coffin in there. Black Watch Tartan (I can't call it paid, that's a garment no the pattern, yes I'm a pedant ) That color of tartan has black, dark blue and gray in it to help tie everything together. It would also be awesomely crazy in a fun kind of way.

Powar
Powar Dork
1/17/13 9:59 a.m.

Great progress. I'm glad to see you're enjoying it.

HappyAndy
HappyAndy Dork
1/17/13 4:44 p.m.

Man I'm envious. I wish I could make some real progress on mine.

Adrian_Thompson
Adrian_Thompson UltraDork
3/4/13 9:40 a.m.

Crap, 7 weeks without progress!!!! Well after the last mini write up, the car was outside, Most of the interior was in the garage, then workmen came and dumped more stuff in the garage for repairing the chimney and doing some brick work, then more snow, guests, vacation….. Progress stopped. Not totally as I did clean all the interior panels then clean and re-dye the carpets, but I’ve got no pics of that, not that it’s very interesting. So, vacation over, visitors gone, workmen basically finished, most of the snow has gone and no other commitments meant that I finally got out for a couple of hours yesterday.
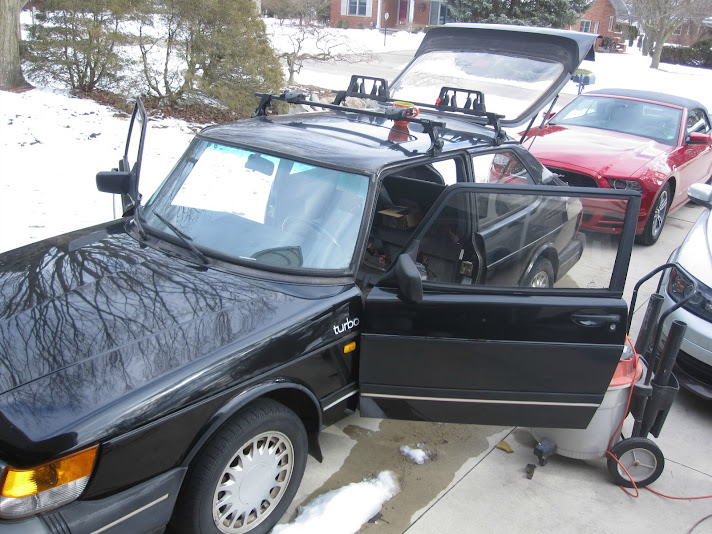
Work at last, note I said most of the snow had gone, not all of it.

No I didn’t achieve much, basically clear a car size hole in the garage, sweep up a bit then clean out the car. When I pulled out the interior and panels it was pretty groaty in there with 25 years’ worth of stuff getting under seats, through the consul etc. I hit the car hard with the shop vac and a stiff paint brush to dislodge years of compacted dirt. Much better to see what there is. There was some water in the footwells and the rear under floor spare tire, tool area had standing water. Everything is now dried out and the car is in the garage with an 80+ year old Sears brand de-humidifier inside sucking out every drop of water. I did pull off the rear hatch trim and get the external hatch release working, although I had to disable the hook from the key/solenoid to do so. The key doesn’t fit and I don’t know where the internal hatch release button should be. So not much real progress, but it was a couple of hours out there and a lot of think time. This is what the interior currently looks like.
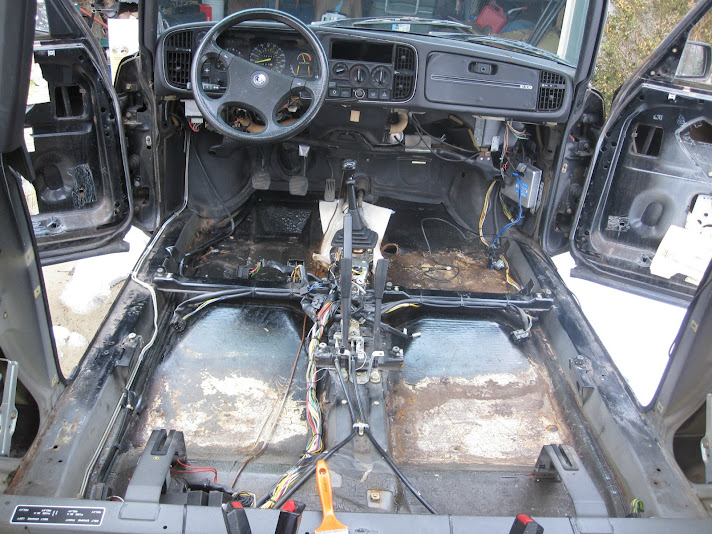
Interior looking forwards, the brown is not rust, it’s paint that’s come of the sound deadening mat that looks dirty
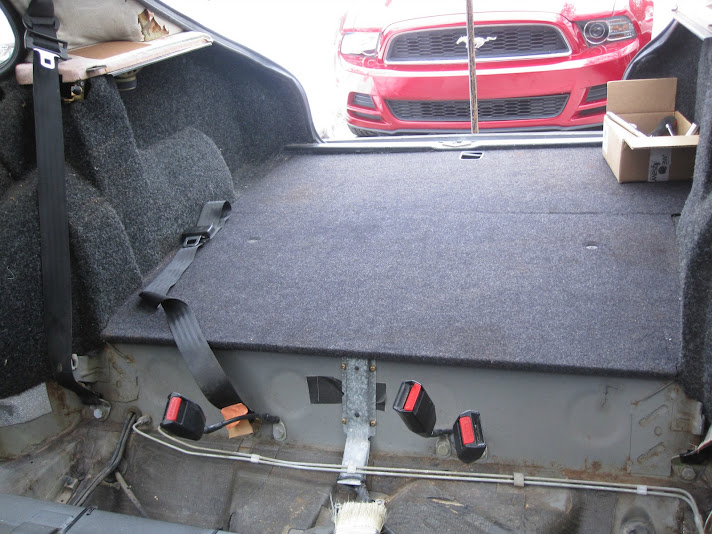
Looking back

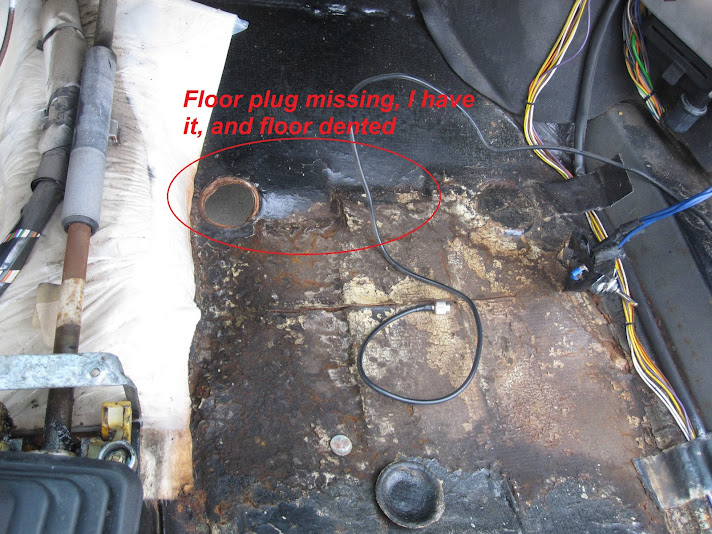
passenger side floor had a big dent and the drain plug has come out. Time for a big block of wood and BFG hammer.

Drivers side next to the rocker panel, there is a crease and some surface rust, I didn’t see anything underneath, I hope if I hit it with the angle grinder and wire brush attachment I’ll find it’s also solid, BFG and wood time again then hit it with rust bullet. I hope I don’t need to do any welding here.
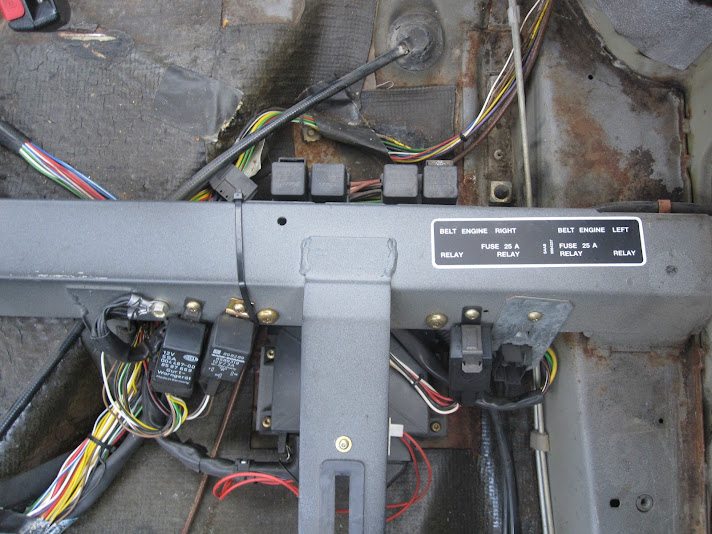
I need to check what I can get rid of here, I hope it can all go as I’m getting rid of the nonfunctional rat trap seatbelts and replacing with regular 3 point or 5 point, more on that in the next post.

This is the rat trap seat belt mechanism itself to be removed. I’ve been told that the lower mount is still here for regular 3 point belts as they were still used In the rest of the world at this time, but I’m not sure which or where that is, can someone help out with that?
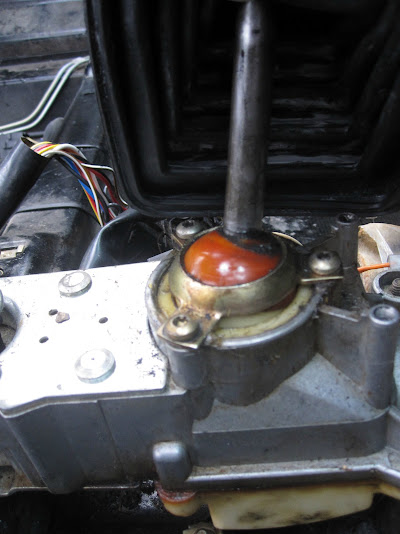
Some good news here. It doesn’t show up well, but I found that the 3 screws visible here holding the shifter in are loose adding to the slop in the change. I still have no 2nd gear syncro, but this will help. I have a new (old) shifter assembly in the parts so I plan on seeing which is better and setting up from scratch.
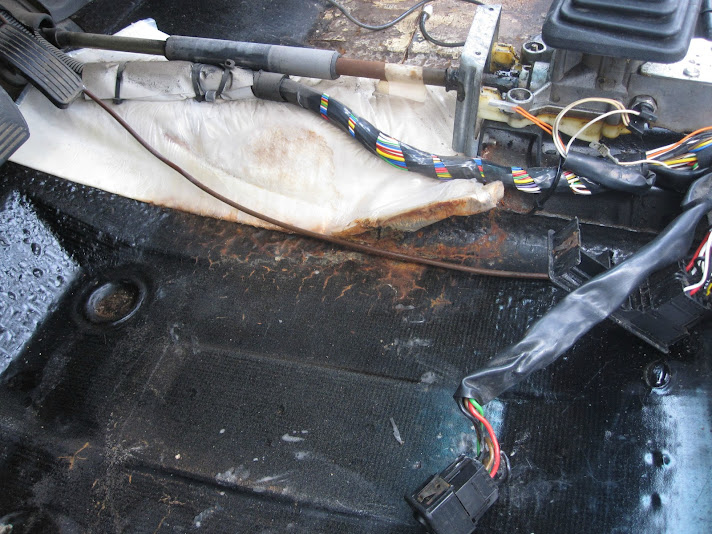
This is the heat blanket over the center tunnel, I think this is just surface rust, but I’ve heard of cars rusting under here so I think it needs to come out, inspected and be cleaned up and painted

Adrian_Thompson
Adrian_Thompson UltraDork
3/4/13 10:03 a.m.

So, now what to do next, thoughts and plans coming up. I’m thinking out loud here and soliciting input. My plan was to do some mods while working on the car, but the fact is I have no 2nd gear syncro, and I think that a new gearbox or gearbox rebuild has to be planned for next winter (an LSD is a pipe dream, but I can hope). So that being said it’s a case of what do I need to do to get up and running, with that in mind I was planning on staying stock and entering SF (Stock Front wheel driver) in Rallycross. Yes I’ve made a stiffer engine mount to replace the busted one and yes I’m planning on swapping the rat trap seat belts for regular 3 pointers, those mods aren’t going to give a rank beginner any advantage and from what I can tell SCCA rallycrossers are approx.. 10,000,000% less anal that autocrossers so I didn’t think that will matter. But, there has to be a but , I’ve had another idea. I’ll get to that in a mo. First off the headliner and sun roof. As you can see the headliner is fubbard, I had planned to pull it, strip it, recover and reinstall. But I don’t have the cover for the sun roof part, so I was thinking, just scrub it to get rid of the remnants of material and foam, then spray bomb the whole thing with fabric paint to make it look not toooooo bad. But then we have the issue of the sun roof. It’s leaking somewhere, I don’t know if it’s blocked trains, the seal, poor fitment or a combination. I do know that the sunroof opens electrically, but won’t close without a struggle. When bought the car and opened it took three people to close. One pressing the button, one manually winding the motor at the back (it’s mounted vertically inside the rear vertical panel behind the bumper, run by long cables!!!) and one pushing the roof from above. I know the motor works, I assume that the gears are stripped at the motor end (it kind of sounds like that) or the rook end. Question, can you swap the gears or do you have to replace the whole cables. Also is there a how to and supplier for parts? I’m definitely not prepared to go for the sheet metal riveted over the opening method of repair no matter what class I end up in, this car will see street miles so no striped interior and I like sunroof’s.

If I can fix the roof without pulling the headliner, then I’ll go for the clean and paint method. If not and I have to pull it I guess I’ll recover. I guess worst case is I pull it and just stick some kind of fabric to the outer skin?

Adrian_Thompson
Adrian_Thompson UltraDork
3/4/13 10:33 a.m.

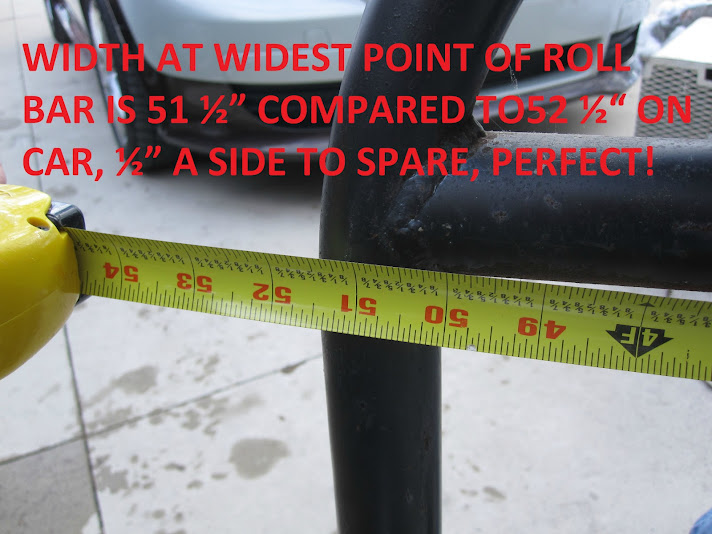
Next, seatbelts, roll bar and practicality. Now I know the answer to this next bit should be don’t do it, but I can’t help thinking about it I have this lurking in the basement. Pic in front of a tarp so you can actually see it and not lose it in the clutter behind. What is it? It’s a bolt in six point cage for a 1g DSM with the rear bars missing. I’ve thrown up a couple of ad’s in the past with no bites, so I was thinking of using the main hoop with the existing flanges cut off as the basis for a roll bar for Loki. Outside it looks like this. I’d cut off the bars for the front section, door bars and rear stays then get someone else to weld in new rear stays to the rear upper shock mounts.

But how bit is it? As you can see it’s the perfect width, right around 1” narrower (½” per side) than the sheet metal of the ‘B’ pillar, great. It would need new feet and boxes that came off the inner sill/rocker, but you expect that, and it would be solidly mounted on the sill, not the weaker floor. So height, it’s a crappy angle, but from the floor to the top of the bar is approx. 41-41½” while the car from inner sill/rocker to headliner is right around 40½”. Perfect, the old mounts need to be cut off so if I keep the headliner I cut up 1”, If I remove the headliner I keep it full height.

So the basic dimensions look about right, but does it come close to fitting? I was worried as the 1G DSM has a very pronounced tumblehome which is reflected in how much the top of the cage bends in. The only thing to do is try and put it in, I know it won’t quite fit, but I can get an idea of clearance and interference. So, grab my neighbor Dan (356 owner and rally enthusiast so always willing to come over, lend a hand and BS on a Sunday afternoon) and try to get it in.

The result? Better than I could ever have hoped. I can’t get it to stand up fully, but I knew that already, it’s looking good though. The tumblehome is actually perfect, it catches on the wide ‘B’ pillar trim of the rat trap belts, but they are going roll bar or not. The top corner is actually much much closer than the angle looks in this pic, it would be just about perfect after all.
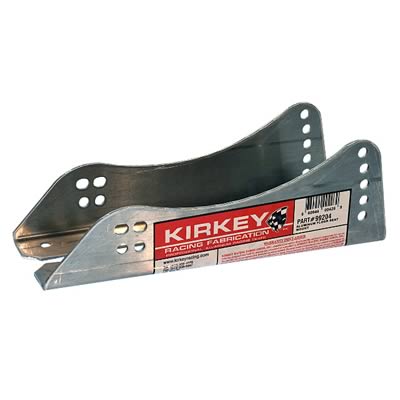
So should I shouldn’t I? Any pretext of being able to use the car occasionally for picking up the kids goes out the window as I’d get rid of the rear seats and carpet the area, but it would be a great load bay . I’d also have to use harness and race seat for rally cross. I was hoping to buy a Corbeau race seat from Paul at Team Illuminate, but recent unforeseen expenses ($1,000 to spend an extra day in Florida and change flights after our cruise ship was delayed 10 hours from docking in Tampa due to fog) that’s gone out the window. But I do have a brand new Kirkey economy seat in its box in the basement and a friend with a brand new in box 5 point harness that’s sat in the dark for 10 years. I could add a pair of Kirkey seat mounts from Summit for $50 http://www.summitracing.com/parts/kir-99204 This would also push me into PF (Prepared FWD), but does it matter? I’ve never driven on dirt before.

Tempting tempting, thoughts? Advice?

Adrian_Thompson
Adrian_Thompson UltraDork
3/4/13 10:39 a.m.

So, what’s next? I think I’ll order some maintenance bits from Rock auto, oil filter, wiper blades, rear hatch struts etc. Then this week blow out the sun roof vents, investigate the surface rust (please, please, please just be surface rust) on the floorpan and pull out the slow driver’s door window electric motor and try and free that up. Hopefully I can get some advice on the sun roof issues/cables/gears and get cracking on that too. The first rally cross I can make is May, so I have a couple of months. Once back together the only thing I really need to rally cross is tires, but I hope that the birthday fairy comes with some Bilsteins next month, we’ll see, hints are begin dropped now.

oldeskewltoy
oldeskewltoy Dork
3/4/13 11:09 a.m.
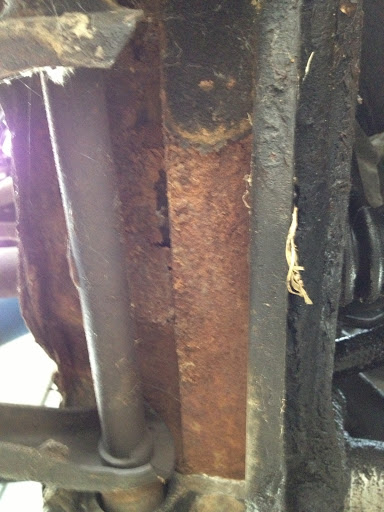
Adrian_Thompson wrote: Underside of Right Front lower control arm mount. This is the most serious rust on the car and the area that normally kills 99's and 900's. This isn't bad and very saveable. Initialy I will get rid of the rust, treat and cover with POR 15. This will be cut out and re-welded inthe future, but really isn't as bad as it looks. Another shot of RF LCA rust. This is good, I've seen many pics were there is nothing here. Worst case there is a panel available for approx. $200 Look, rust free rockers and underbody!!!!!
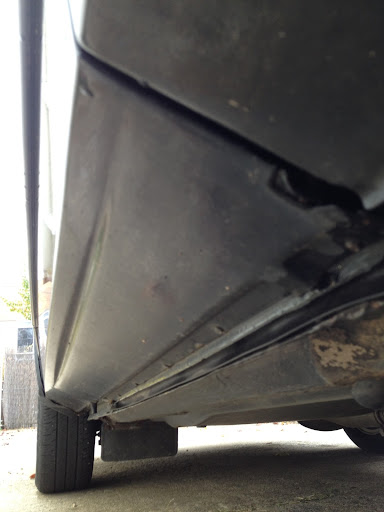
Contact Jerry Sweet in NJ... he has designed a few pattern to cut replacement plates to weld in, around for this kind of decay. He's been successfully doing this for about 13 years now........

http://www.sweetmotorsnj.com/

Adrian_Thompson
Adrian_Thompson UltraDork
3/4/13 12:00 p.m.

Yeah, the rockers are perfect. I konw about the LCA mount. My intention for that is once the car is back together interior wise, get it up on jeck stands, strip off the LCA and use a hand held sand blaster to get it back to bare metal. Then I can decide if it needs welding now or later. I can weld, but my welder is MIA 3,000 miles away. I can borrow one, but it's many many ears since I've done much welding and I always sucked at upside down welding.

Are the Jerry Sweet parts the same as sold the Safe-T-Cap Frame Repair Kit sold by http://autorust.com/store/index.php?main_page=product_info&cPath=8&products_id=304 ??

Powar
Powar Dork
3/4/13 12:17 p.m.

There shouldn't really be any sort of cover on the sunroof. They are just directly covered with fabric- no backing board or anything like the rest of the headliner. I've never had to replace a sunroof motor, as I've never had one fail or get weak.

Didn't Matt say that he had determined that the sunroof drains weren't clogged? Regardless, I'd try to clear them again. That car sat under his trees for a good while. I'd also remove the rear side vents and make sure that the hoses are clear on the very end, and that they're still properly clipped in place. You'll see what I mean if you remove them.

If you do remove that bit of insulation under the shifter rod and wiring loom for some cleanup (good idea, btw), be sure to reinstall it (or something else with some heat resistance). The cat is just under it, and I've seen firsthand what the cat can do to the wiring harness in that area if the heat shield starts to rust and that insulation is missing. It isn't pretty.

Since you have the interior mostly disassembled, I'd go ahead and remove the headliner backing board (it's easy at this point), and just scrape off all of the old nastiness and recover it. The job isn't particularly hard- just tedious. This will also expose all of the sunroof drain hoses and possibly help in troubleshooting the root of your water issues.

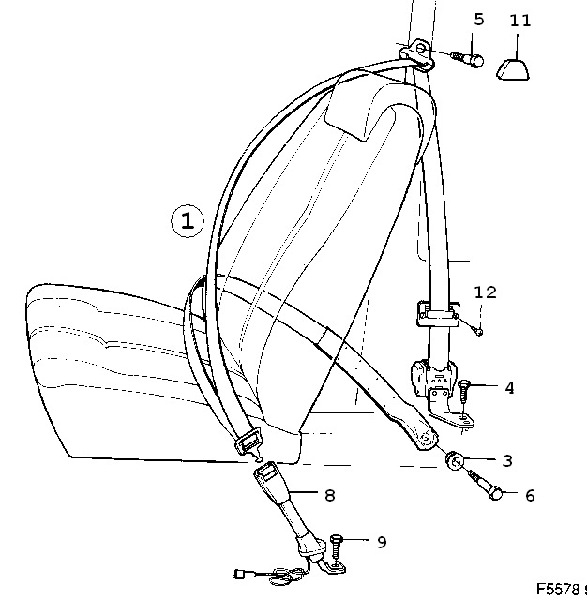
I've only done the seat belt conversion on one car and I wasn't satisfied with the results (we used belts from the wrong car), but I do remember referring to this FAQ from SaabNet: http://www.saabnet.com/tsn/faq/seatbelts/

Here's a pic of the proper mounting, lifted directly from the EPC:

Adrian_Thompson
Adrian_Thompson UltraDork
3/4/13 12:38 p.m.

Thanks Powar (Is your name Steve, i can't remember?) What didn't you like about your seatbelt conversion? As posted up thread I was thinking of using new aftermarket 3 point belts. If this is too much of a hassel, it may be the push I need to add the roll bar and harnesses instead.

Powar
Powar Dork
3/4/13 1:50 p.m.
Adrian_Thompson wrote: Thanks Powar (Is your name Steve, i can't remember?) What didn't you like about your seatbelt conversion? As posted up thread I was thinking of using new aftermarket 3 point belts. If this is too much of a hassel, it may be the push I need to add the roll bar and harnesses instead.

Tim.

I'd use the manual belts from an pre-'89 car. This way, you can use the factory attachment points. Don't forget to get the rear side panels from the same car. When we did the conversion on an '88 SPG, we used the manual belts from my girlfriend's '93 that we had just stripped. They mounted slightly differently, and we had to mount them at an angle that caused the belt to bind oddly, and not really want to retract. A quick search on SaabNetLinkCentral would probably yield the best recommendation of what car to pull them from.

singleslammer
singleslammer Dork
3/4/13 2:35 p.m.

I want to see these sweet purple seats that you keep talking about. I vote install as is and embrace the 80s!

Adrian_Thompson
Adrian_Thompson UltraDork
3/4/13 2:52 p.m.
singleslammer wrote: I want to see these sweet purple seats that you keep talking about. I vote install as is and embrace the 80s!

They're blue, not purple!!!!!

Spangler, shut up before you start.

Tom_Spangler
Tom_Spangler GRM+ Memberand Dork
3/4/13 3:05 p.m.

Purple. Dark purple, but purple nonetheless.

1 2 3 4 5

You'll need to log in to post.

Our Preferred Partners
fhXcJn5xwhtevmcz20arbejQBq4lVD3dmqSTqUEIZ6HWnyf0BhNanbdTY2o4e3ap