RX8racer
RX8racer New Reader
7/9/24 7:27 p.m.

Time for a build thread!  Figured this would be a good place to share and get input along the way.

I bought this slightly dead RX8 race car back in 2020 when COVID was starting. Great car. Well loved. Excellent suspension, wheel package, aero etc.  Needed an engine rebuild.


I thought it would be a fun project, give me a reason to learn how to rebuild a rotary engine and experiment with a different race car beyond Miatas.  Figured it would be ready for the 2021 season.

Yeah, right...


Long story short but things didn't quite go to plan... Surprise, right?! Work and other stuff got in the way and here we are 4 frickin' years later finally getting started on this. This weekend, I started getting the car ready to remove the engine for a rebuild. I've done this before on Miata race cars so it is not my first rodeo but it is my first rodeo with an RX8.

After 2 afternoons of working carefully and lots of sweating, we are here:


I plan on pulling the engine and transmission next weekend. I'm sure this will go as smoothly as my stubbly chin.

As of now, unsure whether to race it in SCCA or NASA - or just use it for fun track days and endurance racing.  The plan is to get it running and then figure out the rest. 


Follow along. Wish me luck. ​

dannyp84
dannyp84 HalfDork
7/10/24 9:33 a.m.

I recommend SCCA based on the experiences with them that I've had so far, I like the way they run their operation, and the people have been great. Once you're familiar with the RX-8, you might find that getting the engine in and out is a breeze. A friend of mine runs a rotary shop, and he says the RX-8 is the easiest and quickest for getting the engine out, compared to earlier RX-7s.

Colin Wood
Colin Wood Associate Editor
7/10/24 11:58 a.m.

If it helps, getting started later than planned is better than not getting started at all. 

Best of luck in your endeavors.

RX8racer
RX8racer New Reader
7/10/24 7:10 p.m.
Colin Wood said:

If it helps, getting started later than planned is better than not getting started at all. 

Best of luck in your endeavors.

Thanks!  You should be a motivational speaker. :)

J.A. Ackley
J.A. Ackley Senior Editor
7/11/24 11:08 a.m.

Watching with interest. Looking forward to seeing your progress!

RX8racer
RX8racer New Reader
7/11/24 11:32 a.m.
J.A. Ackley said:

Watching with interest. Looking forward to seeing your progress!

Thanks! 

Hopefully this thread keeps me motivated and on track.

RX8racer
RX8racer New Reader
7/15/24 12:57 p.m.

Engine is out! I pulled both the engine and transmission together as a unit. I was surprised it came out so easily easy.  There are some architectural similarities with the Miata chassis where the lessons learned from that car transfer over to the RX8.


Engine bay is surprisingly clean and oil free. I sprayed it with some degreaser after taking this pic and scrubbed down the surfaces that I could reach with a nylon brush.


Lastly, i removed all the ancillaries and dropped it off at a local racer's house who is going to tear it down and see what we need to do to rebuild it. Not sure what is going to be able to be reused. When I turned it over by hand, liquid would spurt out the open holes. Not sure if it was oil, water or a mix of both. Obviously, the last guy that attempted the rebuild screwed something up during assembly. That was a known issue going into this project. Soon we will figure out what he screwed up.


J.A. Ackley
J.A. Ackley Senior Editor
7/15/24 2:27 p.m.

In reply to RX8racer :

Nice. I'm glad to see the engine and tranny come out so easily. They say rotaries are fairly simple, so let's hope that the journey continues to go as smoothly.

RX8racer
RX8racer New Reader
7/29/24 12:13 p.m.

Made some progress this weekend.

First, installed DEI Floor and Tunnel shield to the transmission tunnel and a bit of the firewall. I have used this on all my race cars and my street Miatas and RX7s over the years. It makes a huge difference in cabin temps. By installing this on the underside of the trans tunnel, the tub does not absorb heat and radiate it into the cabin. Love this stuff.

The RX8's transmission tunnel is frickin huge...


Second, Engine is disassembled and we discovered it's faults.
1. All 3 irons showed significant wear around the combustion chamber. We could slip a 20 thou feeler gauge between the housings and the irons. This explains how / why fluid was misting out of the engine when I was turning the eccentric shaft.
2. Oil pump showed some wear. Not a big deal but it will get replaced with a better used option we have.
3. Front and rear rotors were reversed. Common assembly error for noobs.

The housings looked very good and re-usable. Looks like I'll need to be the 3 new iron$ :( Was not expecting that expense. Sigh...


To Dos for the next week or two:
- Fuel injectors are about to get shipped to RC Engineering for cleaning and testing.
- Need to figure out how to install a fuel test port
- Need to order some EGT sensors to install into the headers and figure out what to use for engine data for tuning and monitoring.

If anyone has advice on these topics, please do share.

Thanks all!

RX8racer
RX8racer New Reader
8/7/24 5:09 p.m.

Update!

Mazda Motorsports is out of stock on the front RX8 iron so I started looking for used options.  Struck out on ebay, forum, fb.  I did find a used engine on ebay that had a video of the engine running and a pic of the blue Mazda reman tag with a date of 01/23.  This should mean that it was built Jan of 2023 so it should be low mileage and usable.  Wound up buying that.  Will hopefully arrive in a couple of weeks.  Hopefully, the engine is not a dud...

In the meantime, I sent the fuel injectors to RC Engineering to be cleaned, tested and rebuilt.  Good thing I did!  They needed it!


I also continued to work under the car finishing up the install of the DEI Floor and Tunnel Shield.  In doing so, I noticed this wee bit of surface rust near the header.  Rotary exhausts run about 1,600* EGTs.  The heat from the header over 10+ years of track use and racing had burnt off the paint and cause this surface rust.  It cleaned up quickly with a wire wheel.  I ordered some rust converter from POR15 and their paint.  Once that arrives, I'll seal it up and add a bit of the DEI stuff here. 


Beyond that, started working on cleaning up the very dirty interior, removed the passenger airbag and been shopping for gaskets, hoses and seals to re-install the engine.  

RX8racer
RX8racer New Reader
8/10/24 9:21 p.m.

Waiting on parts so I continued cleaning up the inside of the car. Got a bag of dry ice from the supermarket and removed the sound deadening material in the driver and passenger floor pan. Came off pretty easily. Patience waiting for the ice to cool the material made removal rather easy.  Still need to do the trunk but ran out of time and energy


Here's the after pile

J.A. Ackley
J.A. Ackley Senior Editor
8/11/24 12:13 p.m.

Thanks for the informative updates. Keep up the good work. 

RX8racer
RX8racer New Reader
8/14/24 12:59 p.m.

Couple of quick updates. 
 

I had an hour of spare time so I tackled restoring the headlights. It's a race car so the headlights are rarely used but they were pretty beat and I needed to keep my hands busy. Bought the 3M heavy duty kit and went to work. 
 

The headlights were really rough, yellowed, pitted, over sprayed. There was a bunch of imperfections that could not be sanded out. Still turned out much better than what I started with. 
 

Before, during and after:
 

RX8racer
RX8racer New Reader
8/14/24 1:08 p.m.

Also ordered some tow straps. Found these on old reliable https://www.pegasusautoracing.com/ for $21 each. Amazon had a bunch of cheap chinesium knockoffs but I don't trust those. They don't have any specs on material used and weight capacity. Last thing I need is for the tow strap to fail if I'm being towed in. 
 

Had to order some M20-2.5 thread pitch bolts so that I could bolt them to the factory tow hook provision. Ordered those from boltsandnuts.com since they were the cheapest. 
 

one more thing checked off the to do list 


RX8racer
RX8racer New Reader
9/9/24 8:24 p.m.

Time for some updates.  The engine is assembled! :djcelebra

Engine recap

  • The original engine was freshly rebuilt but ran poorly. The experienced engine builder fell ill (RIP) during the build and enlisted an inexperienced bud to finish it up.
  • Previously, the disassembly had identified the following problems:
    • Rotors swapped front to rear
    • All 3 irons were worn at the combustion chamber with a big enough gap that a 20 thou feeler could be slid through
    • Oil pump had some wear
    • Housing were in good shape
  • The irons were not available new at Mazda Motorsports so I bought a used engine off ebay. :(
  • Disassembling the ebay engine revealed typical wear for a 50k mile engine but it had good irons and other usable parts.
  • We used the irons and oil pump off the ebay engine with the housings and rotating assembly from the original engine.

There was one big surprise we found during assembly............. One of the original rotors had it's apex seal grooves cut to 2mm depth!!!!!! :SHOCKED: My engine builder discovered this when he went to install the apex seals. That was undoubtedly the biggest issue with the old engine. Thankfully he had a spare C weight rotor that was 2 grams different so he swapped that out. :ylsuper: The ebay engine had D weight rotors. The engine is officially home now and should be good to go.


I started the process of assembling the "long block" yesterday by cleaning up the intake manifolds inside and out. Used some degreaser, carb cleaner and brake parts cleaner and various brass and nylon brushes to scrub the inside and get any residue out of the manifolds. They were actually very clean but there was some oily residue internally. Externally was pretty clean too but had some buildup of dirt and grime so gave that a quick scrub. This was my first time inspecting the RX8 manifold with these odd valves. Kinda cool but odd things. Especially since they wobble around.

Also installed the 2 red injectors and the bracket with the wiring harness but didn't progress much further since I need to order up some gaskets, crush washers, new coolant hoses all around etc.  Time to fire the parts cannon!


J.A. Ackley
J.A. Ackley Senior Editor
9/10/24 12:15 p.m.

In reply to RX8racer :

Thanks for the update! It's amazing what you discover when you start taking things apart.

RX8racer
RX8racer New Reader
9/12/24 12:29 p.m.

Yeah what a surprise that was!

Received a care package from Mazda Motorsports yesterday.  Gaskets, crush washers, coolant hoses, hose clamps and other random parts to get the engine assembled and running.  Gotta love how Mazda supports us grassroots racers by providing us with massive discounts on OEM parts!  

RX8racer
RX8racer New Reader
10/1/24 12:02 p.m.

It's been a couple of weeks since the last post but lots of progress.  Nothing super exciting.  Just the steady slog of assembling things and maneuvering the engine and transmission into their home.


- Engine rebuild complete

- Cleaned up the inside and outside of the intake manifold and other accessories.  The engineering Mazda has done over the years with these funky intake valves to improve and add airflow is pretty cool and nerdy.  First time seeing it in person.

- Had some EGT bungs welded into the Racing Beat header.  Got the big 1/4" options from https://www.exhaustgas.com/ to deal with the 1,500* F heat.

- Got the engine all assembled, transmission and header attached ready to install.  I decided to R&R the transmission and engine together.  Many of the threads on the RX8 forum seem to convince you that it is not possible to do so but I found it was pretty straightforward.  Much easier than trying to marry the transmission to the engine while in the car - for me anyway...


Before re-installing the engine and transmission, decided to weigh the car to get an idea of what I'm starting with.  2,270 ish lbs.  No engine, transmission, exhaust, seat, driveshaft, hood, front bumper.  Still has an unknown amount of 8 year old gas that I need to sipon out.  I wonder what the total weight will end up at.  


Install wasn't too bad.  Took me about 1:45 working slowly by myself.  Lost 15-30 minutes trying to figure out where the engine was fouling against the driver side engine mount.  That was a D'oh! moment!  People say that you can't use a load leveler to install the engine because it will foul against the firewall.  They are correct!  But I had known that in advance and expected it.  It was helpful to have the load leveler to get the engine and trans into the tunnel. 

Once it was here, I supported the engine with a floor jack and switched to a chain to get it the rest of the way home.  Definitely a lot more clearance with the chain!

I slowly maneuvered the engine and transmission into the tunnel using the hoist and later resorting to the floor jack to got everything into it's home.  It's definitely easier to do this on an NA Miata.  Not bad for a first timer.  This is something that I do not want to do often...

I'll slowly pick away at the remaining work of re-attaching the ECU, wiring, exhaust, seat etc.  Will hopefully be running by the end of the year.


RX8racer
RX8racer New Reader
10/14/24 10:42 a.m.

Made a bunch of progress on the getting the car ready for its first start.

Intake is together.

Started installing the coolant system together. Was able to cut and reuse the 2 stock upper radiator hoses. Will need to do something custom for the lower radiator hose since the stock one won’t fit on this cross flow, dual pass Ron Davis radiator.

i also discovered that I ordered the wrong coolant hose that goes between the thermostat housing and the bottom of the coolant overflow tank. Looks like I’ll have 2 new oem hoses to post for sale soon. :)

Temporarily installed the new oem coolant tank.

Installed the ecu and related parts in the black box.

I had installed a new clutch slave so decided to bleed that. I tried to suck out the 8 year old brake fluid from the reservoir but couldn’t figure out how to do so. So I tried to flush it out via the driver side caliper. Discovered that the bleeder was clogged so grabbed a bleeder screw off one of my Miata’s spare front caliper. Used my mityvac handheld vacuum pump to suck the reservoir dry via the caliper bleeder screw. Then repeated the process with the slave bleeder. Then refilled the brake reservoir with fresh Motul 660. Repeated the vacuum bleed of the caliper and slave and called it good enough for now. Will bleed and flush the system again more thoroughly later.

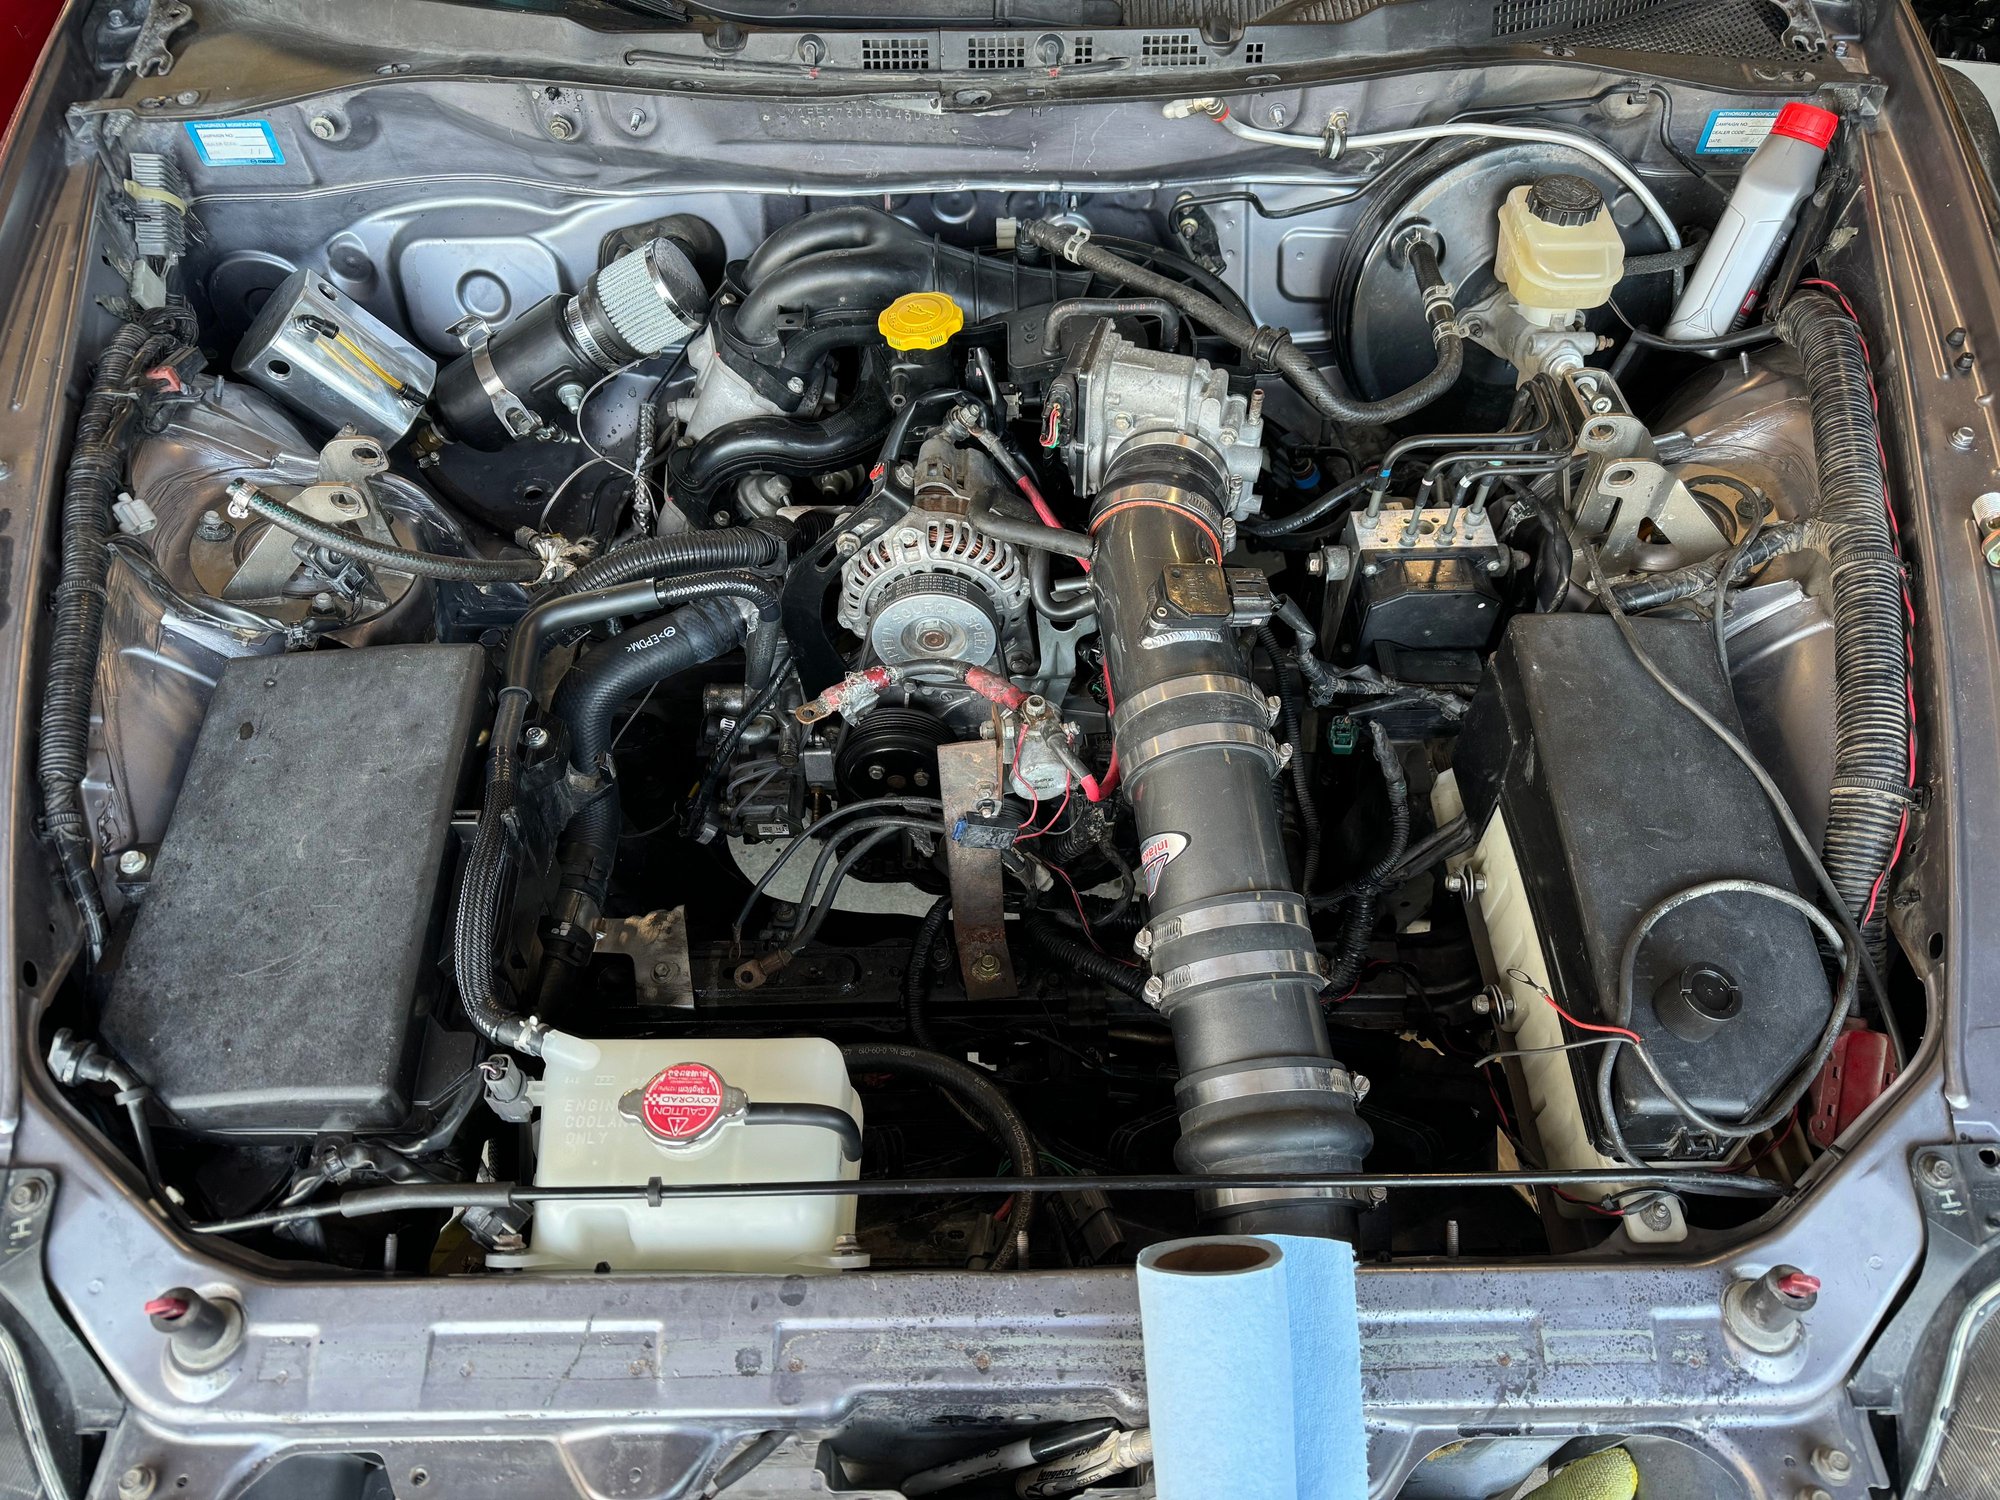
Here’s where I left things under hood.  That mess of wires and angle iron is how the previous owner setup the main battery kill switch.  He had a Braille battery in the stock location.  I'll leave that as is for now but I plan on relocating the battery to the trunk and redoing that kill switch wiring.  The existing Braille is dead so I need to figure out what I want to replace it with - another Braille, Optima red top, Odysey of some sort...


I also changed the diff oil.  AFTER changing the oil, realized there was evidence of what looks like the axle seal leaking...  Sigh....  That is a problem for future me to address.  For now, we are closer to getting it ready for first start and drive.

You'll need to log in to post.

Our Preferred Partners
ZUD0o7xi22ZOqWEMevbpUxz0YsStyUioU1zUFNw44ulx5D9YOmAhIPcIYcW48Cry