1 ... 7 8 9 10 11 ... 23
JThw8
JThw8 PowerDork
1/20/15 7:46 p.m.

Started on a project I knew I was going to hate tonite...I was right. Blank side, no place to put any fun graphics or anything...boring. For a guy who likes to pinstripe, airbrush and cut vinyl that just wouldn't do. Not to mention I kinda got the boss on board with this by promising to throw the Asphault Adventures logos on it for promotion.

Start with a posterboard template.

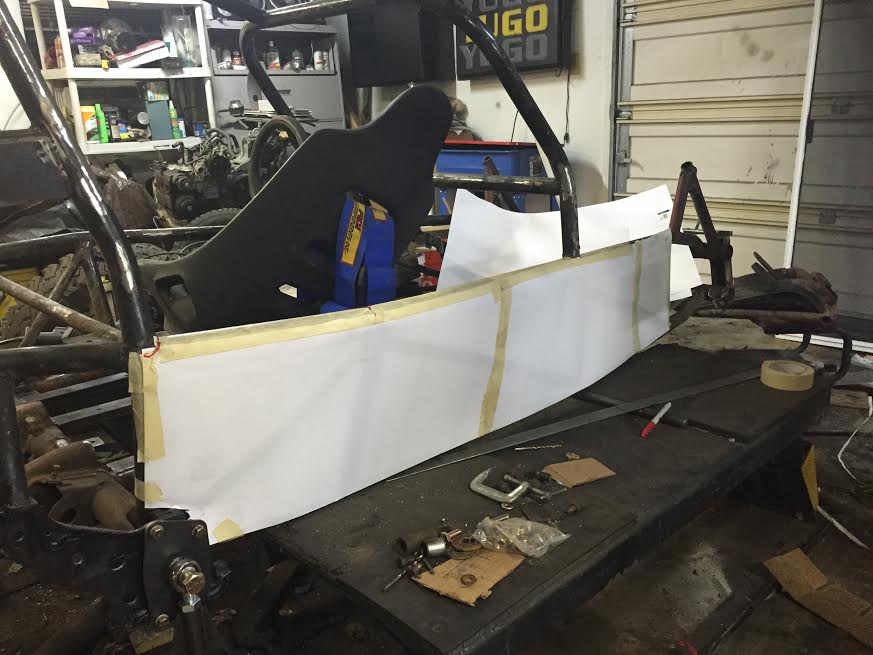
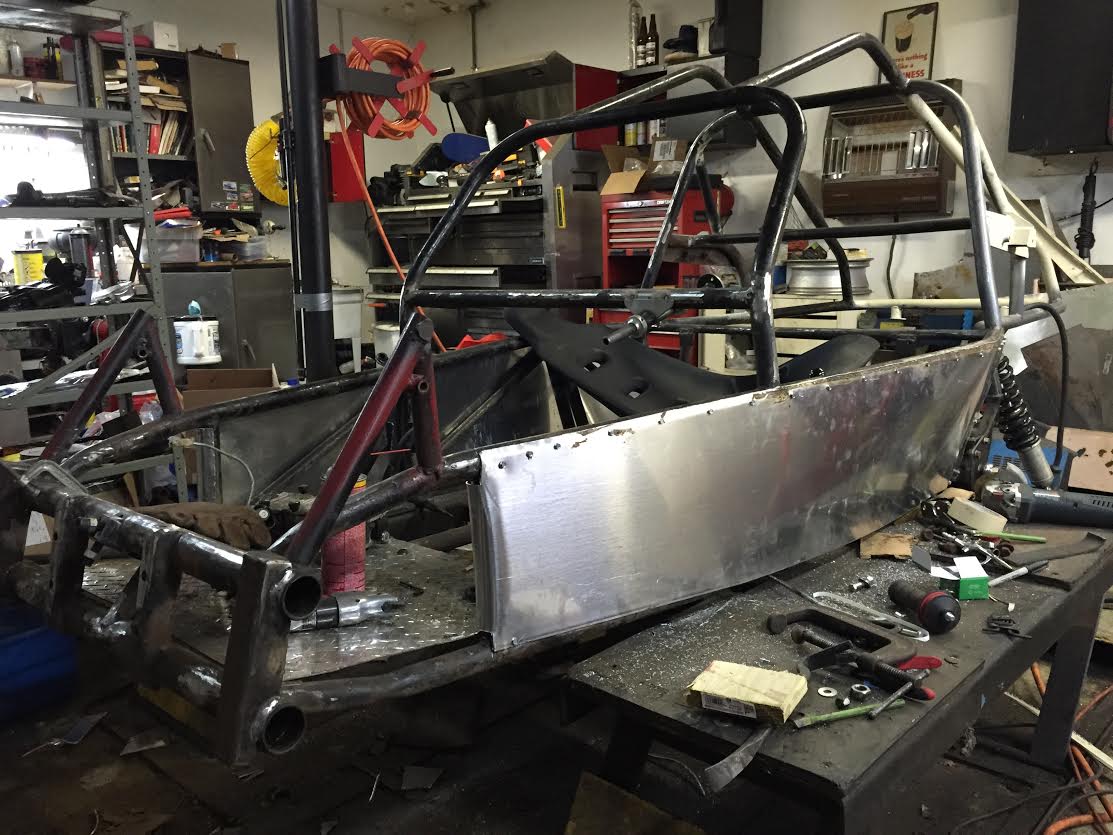
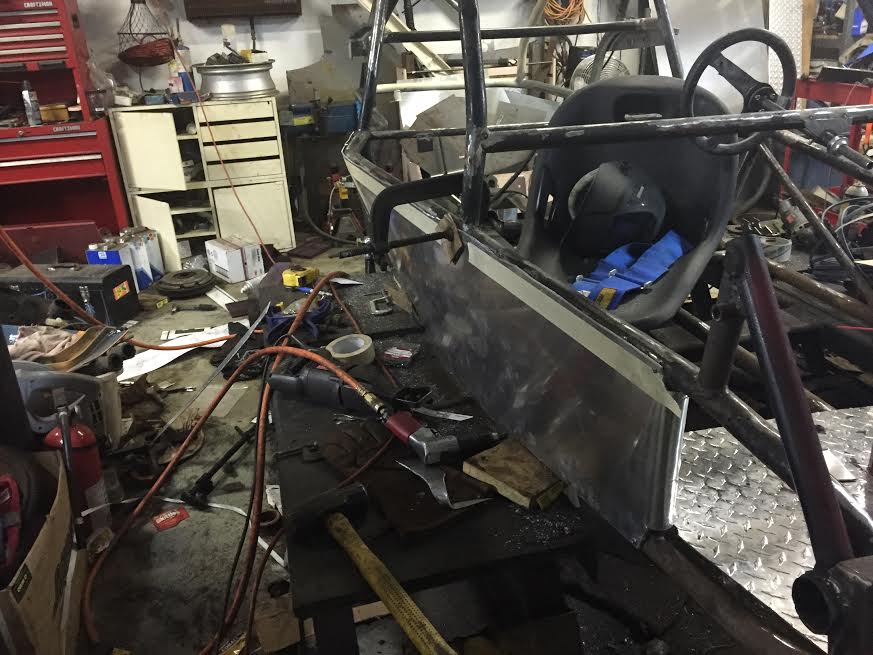
Transfer the template to some .060 aluminum. Its good solid stuff that wont flap in the breeze and would actually offer some degree of intrusion protection. I had hoped to roll it over the top bar for a nice finished look but ti just does not bend easy enough for that. It was hard enough to get the bends to make it fit the side, its much trickier than it looks, many bends in different planes.

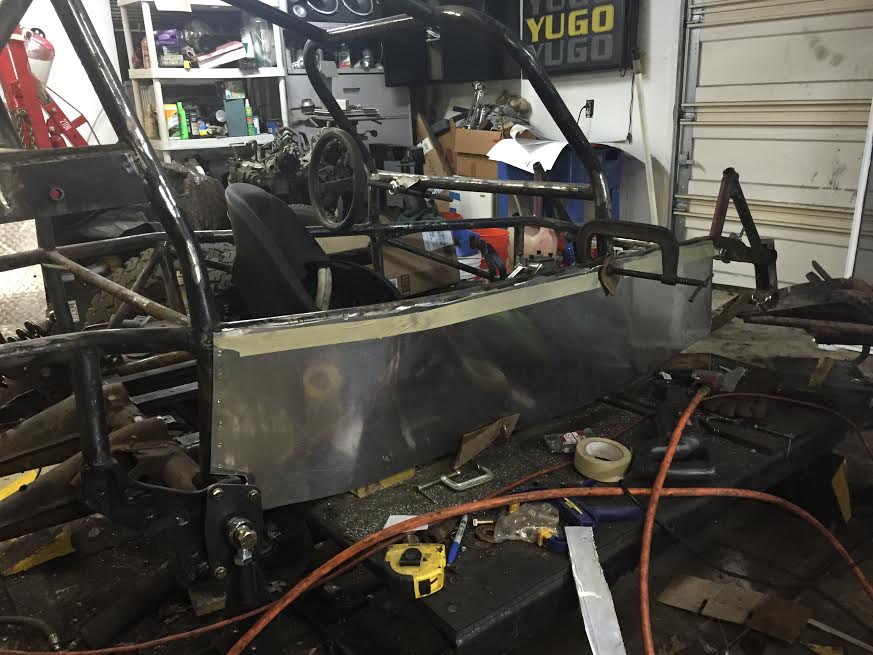
I did manage to get the front edge to roll over at least, with a 5 lb sledge. Right now I'm attaching with self tapping screws. I'll remove the panels when I paint the framework and when they go back on I'll use pop rivets in the screw holes.

I have a few ideas for how I'd like to finish the sides. Polished is not one of them, too much to maintain. Engine turned would be sweet but a lot of effort. Quick and easy will be a sanded finish with some graphics which is probably what I'll bring to the skidpad due to time constraints. But I had an idea for a really cool paintjob to go with our Asphault Adventures theme and just general coolness...we'll see if I ever get time for it.

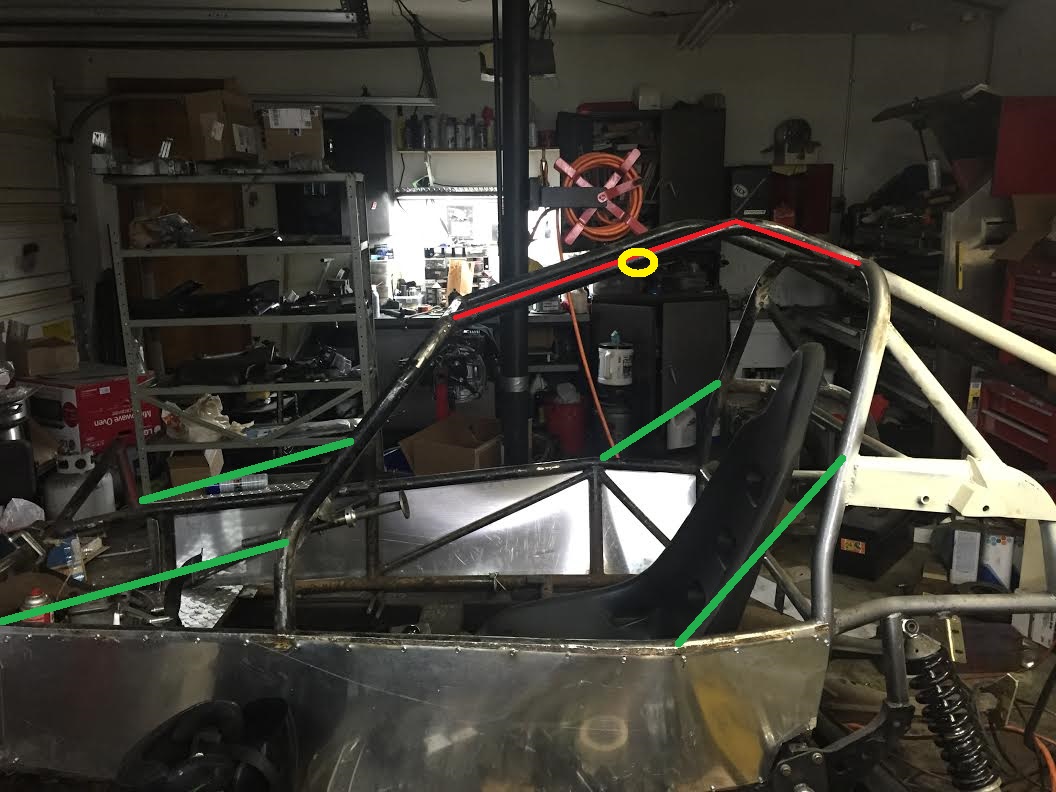
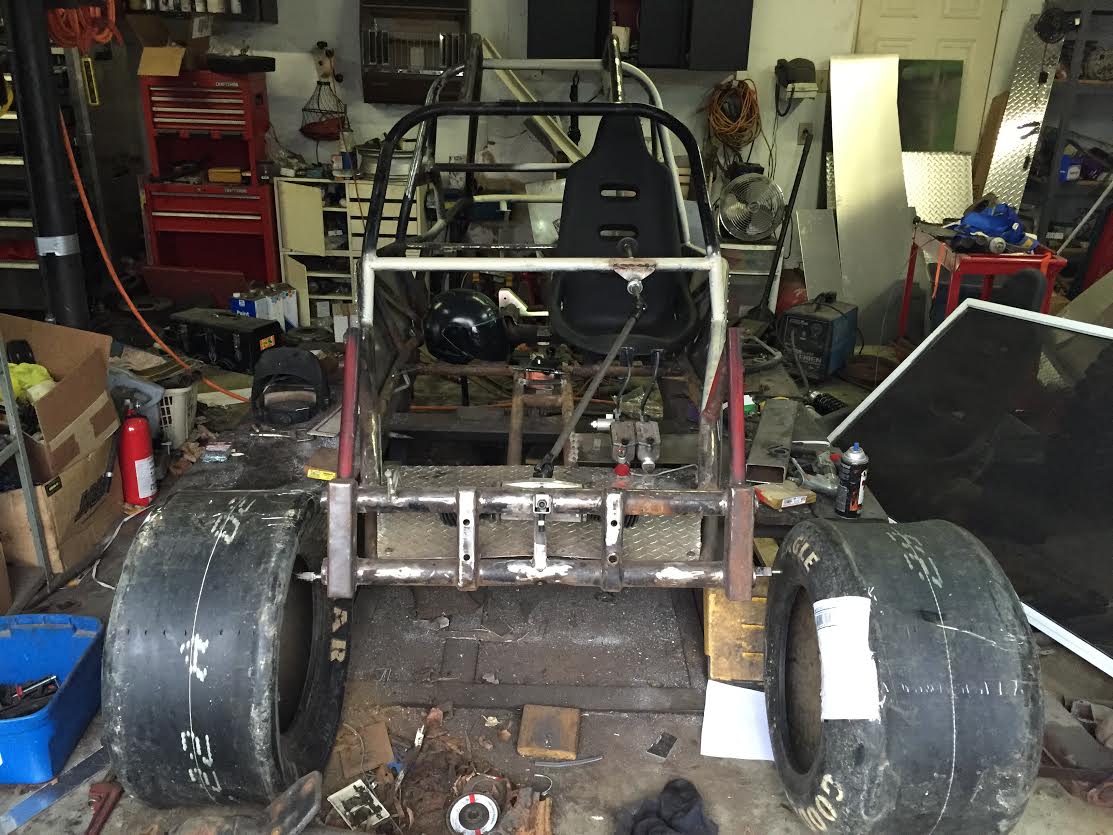
The goal right now is to complete fabrication this week and start paint prep this weekend. I have pretty much everything I need to assemble now except a few small parts so the sooner it's in paint the sooner there can be a final push toward done. On the fabrication list is to finish the side panels, pedal mount, shifter mount (easy projects) Weld some captive nuts on the seatbelt mounts as they wont be accessible with the side panels on, battery mount and...well that may be it.

NOHOME
NOHOME UltraDork
1/20/15 9:41 p.m.

Need to anneal the aluminum sheet and it will roll over like clay.

JThw8
JThw8 PowerDork
1/21/15 6:20 a.m.
NOHOME wrote: Need to anneal the aluminum sheet and it will roll over like clay.

My understanding of the process is I need an oxy acetalene torch to do that though. Which I don't. A garden variety propane torch wont cut it, right?

Sadly I've already cut the top in frustration anyway so this is how it will have to be. It's not terrible actually and it will keep all the pointy edges on the outside away from the passenger's arms.

NOHOME
NOHOME UltraDork
1/21/15 11:21 a.m.
JThw8 wrote:
NOHOME wrote: Need to anneal the aluminum sheet and it will roll over like clay.
My understanding of the process is I need an oxy acetalene torch to do that though. Which I don't. A garden variety propane torch wont cut it, right? Sadly I've already cut the top in frustration anyway so this is how it will have to be. It's not terrible actually and it will keep all the pointy edges on the outside away from the passenger's arms.

https://www.youtube.com/watch?v=FxhdFsrzSmY

Looks like some soap and MAP gas will do the trick. I had to look cause the only way I know is to use the soot from a torch and burn it off as an indication of temperature.

JThw8
JThw8 PowerDork
1/21/15 3:31 p.m.
NOHOME wrote:
JThw8 wrote:
NOHOME wrote: Need to anneal the aluminum sheet and it will roll over like clay.
My understanding of the process is I need an oxy acetalene torch to do that though. Which I don't. A garden variety propane torch wont cut it, right? Sadly I've already cut the top in frustration anyway so this is how it will have to be. It's not terrible actually and it will keep all the pointy edges on the outside away from the passenger's arms.
https://www.youtube.com/watch?v=FxhdFsrzSmY Looks like some soap and MAP gas will do the trick. I had to look cause the only way I know is to use the soot from a torch and burn it off as an indication of temperature.

hmmm, interesting, I only knew the soot method myself. Thanks for sharing!

JThw8
JThw8 PowerDork
1/24/15 12:35 p.m.

Got the drivers side panel "finished"

Just about done with all fabrication mock up and I have to make a choice. The red bars (top) are the existing roof bars. When in the seat with helmet on, I have clearance but if I lean forward the helmet will impact about where the yellow circle is, kinda too close for comfort and proably wont pass the 2" rule. My thought is to cut the top bars out and then reinforce the fore and aft hoops with the green bars. This is autox only so rules wise it will suffice but before I start cutting Im open to other theories.

Keith Tanner
Keith Tanner GRM+ Memberand MegaDork
1/24/15 12:45 p.m.

I've been able to anneal aluminum using a propane torch. I use a sharpie mark for my indicator - once it's burned off, you're good to go. You can also buy different alloys of aluminum, some will bend much more easily than others.

Too late for now, but good to know for later.

Kenny_McCormic
Kenny_McCormic PowerDork
1/24/15 12:48 p.m.

Do you actually need more than a 6 point rollbar to keep it legal? If not, why not cut the front hoop down to a dash bar while you're at it?

JThw8
JThw8 PowerDork
1/24/15 2:16 p.m.
Keith Tanner wrote: I've been able to anneal aluminum using a propane torch. I use a sharpie mark for my indicator - once it's burned off, you're good to go. You can also buy different alloys of aluminum, some will bend much more easily than others. Too late for now, but good to know for later.

Yeah this stuff was listed as "bendable" but it still takes a bit of effort. I'll keep the sharpie trick in mind, thanks! :)

JThw8
JThw8 PowerDork
1/24/15 2:18 p.m.
Kenny_McCormic wrote: Do you actually need more than a 6 point rollbar to keep it legal? If not, why not cut the front hoop down to a dash bar while you're at it?

For autocross I could just have the back part and be legal, if I do cut Im going to loose the front hoop too but now Im thinking of leaving it, further measurements show its tight but not as bad as I thought.

Another angle for those thinking on it. The driver actually sits slightly outboard of the overhead bar so its not directly overhead.

Dusterbd13
Dusterbd13 SuperDork
1/24/15 2:55 p.m.

Why not some slightly curved barsat the eextreme outside corners? Max headhiom and protection.

JThw8
JThw8 PowerDork
1/24/15 3:14 p.m.
Dusterbd13 wrote: Why not some slightly curved barsat the eextreme outside corners? Max headhiom and protection.

I dont have a bender so I have to use what I have here to start with. 2nd, and an engineer friend of mine was commenting on this over on FB. The 2 upper bars are barely doing anything to begin with and they'll flatten out in a roll anyway. Moving them to the sides they'd do even less.

Really tempted just to cut the whole mess out...just broke my last sawzall blade or I'd have probably done it without looking at the options.

CarKid1989
CarKid1989 SuperDork
1/24/15 5:54 p.m.

If you cut the mess out it starts lookin more and more like a mutant big formula vee

JThw8
JThw8 PowerDork
1/24/15 6:01 p.m.
CarKid1989 wrote: If you cut the mess out it starts lookin more and more like a mutant big formula vee

That was kinda the point all along anyway wasn't it?

JThw8
JThw8 PowerDork
1/25/15 12:33 p.m.

Time for some assembly! Yea! Going back together is always good.

First up, the control arms which I tried to do last week but ran into parts issues. Good parts arrived this week so lets look at what we have.

From left to right, Seal, spacer, bearing, spacer, bearing, spacer, o-ring, outer cap with seal.

Here it is all together, right before I took it apart again because I left out that big spacer in the middle of everything...DOH.

Next up, axles. Here's almost everything needed to put them together. Can you spot the missing piece?

4 circlips but only 3 of the retainer rings. They actually came apart this way, previous assembler missed one. Luckily I keep spare axles around, usually already rebuilt but it seems I gave my dad my rebuilt set and brough his back to rebuild and never did. Scavenged the missing part from them at least.

Here's where that retainer ring goes.

And here are the CV joints. Most folks hate rebuilding these things but for some reason I enjoy it.

All done, little trick I picked up doing so many of these, since Im wearing gloves for all the grease I just pop them over the finished ends to keep things clean until ready to use. I used to toss zip lock bags over the ends but this seemed a better use of something I was already using.

Yes my shop is a mess...its how I work...I don't like it either. Feeling run down today, spent the night in the hospital for a sleep study so that's probably all for today, maybe some cleaning.

Adrian_Thompson
Adrian_Thompson UltimaDork
1/26/15 8:58 a.m.

I thought I saw a different thread yesterday about the roll cage and the over head bars, but thanks to the non existent search function I'll be berkeleyed if I can find it. This is my thoughts. Red wiggles is stuff to remove. Brown is stuff too add, Gray is optional and the blue is a diagonal behind the driver.

You could also add a Petty bar if you don't want passengers.

JThw8
JThw8 PowerDork
1/26/15 11:36 a.m.
Adrian_Thompson wrote: I thought I saw a different thread yesterday about the roll cage and the over head bars, but thanks to the non existent search function I'll be berkeleyed if I can find it. This is my thoughts. Red wiggles is stuff to remove. Brown is stuff too add, Gray is optional and the blue is a diagonal behind the driver. You could also add a Petty bar if you don't want passengers.

It was over in the Grassroots Motorsports forum. Thanks for the input you have some very good design ideas there. Unfortunately due to time constraints I'm going to leave it as is. I can get the seat a little lower and eek out just 2" of clearance so that's what I'll do for now.

The optional grey bars would mean entering from the front and climbing over the dash because they are a lot higher up than you may realize if you put them there :)

JThw8
JThw8 PowerDork
1/26/15 5:10 p.m.

So I dropped off my front control arms at a local shop 3 weeks ago to have the ball joints pressed out and new ones pressed in.

As of today they have one done. Not that they've been slacking, the ball joints have just become one with the control arm. That's why I dropped them with a shop in the first place. I think I'd better have a case of beer with me when I pick those up.

Kenny_McCormic
Kenny_McCormic PowerDork
1/26/15 6:55 p.m.
Adrian_Thompson wrote: I thought I saw a different thread yesterday about the roll cage and the over head bars, but thanks to the non existent search function I'll be berkeleyed if I can find it. This is my thoughts. Red wiggles is stuff to remove. Brown is stuff too add, Gray is optional and the blue is a diagonal behind the driver. You could also add a Petty bar if you don't want passengers.

I feel like with this, you could get away with just the brown on the side the diagonal across the front hits the dash(and the diagonal itself, the primary area of concern being adding torsional stiffness. Reverse that front diagonal and maintain easy driver egress.

This thing was initially designed to get air, I doubt it needs any reinforcement beyond the front twisting.

JThw8
JThw8 PowerDork
1/26/15 7:24 p.m.
Kenny_McCormic wrote: This thing was initially designed to get air, I doubt it needs any reinforcement beyond the front twisting.

Yes but offroad you want the twisting and the flexibility so these chassis aren't designed for rigidity. Still I was not out to fix that issue, I just want to fit inside with a helmet enough to pass tech. Im not out to make this thing perfect, just fun.

OHSCrifle
OHSCrifle GRM+ Memberand HalfDork
1/26/15 9:15 p.m.

Diablo has new carbide tipped reciprocating saw blades that cut up to 1/2" steel plate like buttah

JThw8
JThw8 PowerDork
1/28/15 7:57 p.m.

On the clean and paint tasks again. Disassembled the disk brake spindles for the front and cleaned them up. New rotors bearings and all the other good bits are waiting to go back on these.

a couple quick coats of high temp paint on the exhaust manifolts before the motor goes back together.

Spent the rest of the night digging through my shelves and boxes of "parts I might need someday" to find a supertrapp muffler I bought off someone here (sorry memory escapes me as to who) back during the 2010 challenge. I didn't need it then but the price was right and I knew I'd find a use for it. I have to fab us some kind of exhaust for this thing so I figure I'll try to go with a stinger style using the supertrapp to cap it off.

tb
tb HalfDork
1/29/15 7:45 a.m.

You can have those two glasspacks if you want them for a dual stinger setup if that appeals to you. They are just taking up space at my place at the moment.

It would look a bit less old school veedub and a bit more mad max.

JThw8
JThw8 PowerDork
1/29/15 7:57 a.m.
tb wrote: You can have those two glasspacks if you want them for a dual stinger setup if that appeals to you. They are just taking up space at my place at the moment. It would look a bit less old school veedub and a bit more mad max.

Many thanks, I did find the supertrapp so I'm going to give that a shot but if the single setup proves problematic for design and packaging.

nothing wrong with looking a little mad max ;)

JThw8
JThw8 PowerDork
1/29/15 4:00 p.m.

So before all the scope creep set in I said I just wanted to slam it to the ground, slap some big ol' tires on it and see what happens. Thanks to Pete Gosset we have the big ol' tires taken care of and then some

Goodyear 27x10x15 They look soooo much wider than 10 since they bulge out a bit.

Can these fit on an 8" wheel? Or should I keep hunting for some 10" ones? What effect would it have if the rears were on 10s and the fronts on 8s? (assuming they'd even fit on 8s.

1 ... 7 8 9 10 11 ... 23

You'll need to log in to post.

Our Preferred Partners
IZnqOALK2Lb1Xa6IvskxOkDTpFlgYUnPuF1ffgpxFMmat56wAs1DNS2AHoIR5uHy