Toolpen
New Reader
12/30/08 11:32 a.m.
Mental is correct as replacing the chain and sprockets at the same time is a safety issue, and especially on a chain that appears as worn as the one on your Nighthawk. Most chains used on street bikes use a rivet type link (endless chain) and this will require a special rivet tool to install it correctly. Again, the master link is the weak link in your drive chain and you want to install it correctly. To save money, you could install the new chain and sprockets on your bike, and if you don't have access to a chain rivet tool, trailer the bike to a dealership or independent repair shop and have them rivet the link in place. The expense should be minimal and well worth the effort.
Also, don't purchse a drive chain and set the rivet before installing the chain on your bike. I'm not sure but I don't think you can install an endless chain on your Nighthawk with the swing arm installed on the bike.
I don't really have a way of transporting the bike to a dealer but I found this method that apparently eliminates the need for the rivet tool:
http://lostbiro.com/blog/?p=308
I think I could use a C-clamp to pop the plate in escpecially if I use a couple of plates stacked so as to not bend the plate. It'd be cleaner and then flare the rivet heads.
EDIT: http://www.kawiforums.com/showthread.php?t=121549
That's the c-clamp idea I was thinking about.

If you're going budget, then a cheap chain like a Diamond will be fine. I assume that takes a 530 chain. Find a shop that has them in bulk and can just count you out however many links you need. JC Whitney is also a cheap source for stuff like that, although sometimes the quality is better than others. But even a cheap chain will be enough for a 450 cc bike. If the sprockets teeth are real pointy and a bit hollowed out, I'd replace them, otherwise, just slap a new cheap chain on it and go. I'd use an OEM sprocket for the front if it is a PITA to replace. As for the chain breaker, you don't really need one. An angle grinder and a punch will work just as well. I have a couple of chain breakers, and my favorite one is a mini one maybe 1.5" long that will fit anywhere. It is probably the cheapest you could find too. I don't have a bike with a chain anymore so I don't worry about it. Some needle nose piers, vice grips, punch, hammer are all you need to put the new master link back on. Save the old master link. Put it under your seat or in a saddle bag with the mini chain breaker.
You're going to need a can of spray-on chain lube, unless you get an O ring chain, which are really nice but really expensive. I don't see signs/symptoms of chain lube all over the back of the bike in your picture, so that's probably why your existing chain is shot, unless it's the original one.
On a Harley, I'd burn through a cheap chain in 8K miles, and adjust it every 500 miles or every night on the road. But that's a lot heavier bike with a lot more torque. Some friends of mine rode their Harleys from Central Texas up to Anchorage, AK. One of them adjusted his chain nightly and it was worn out when he got there. At the Anchorage dealer, all they had were O-ring chains, which cost 3-4X as much at the time. He didn't want one, but bought it because he had to. On the way back, he adjusted the chain one time and that was it.

therex
SuperDork
12/30/08 1:26 p.m.
You will need a Fram 6008 oil filter to do the oil. You will also need 3.6 quarts of 10W-40. Don't bother with special motorcycle oil, just get regular dinosaur oil. The oil filter is in a "canister" underneath your engine. you'll see it, it looks like a little bump with fins on it, with a bolt in the middle. Remove the bolt (after draining the oil) and prepare to get oil all over yourself. The air filter is underneath your seat, in a canister, that isn't replaceable, you just clean it.
Thanks guys. Dr. Hess, I'll try your tips though unlike you I can't align a clutch using a tree twig like you 
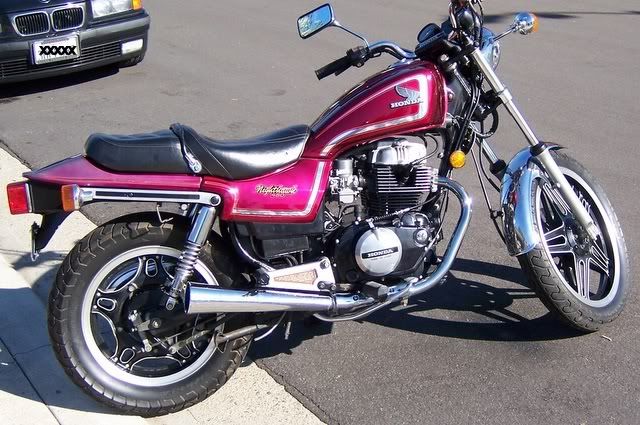
therex, thanks man, any idea where the fuses are? And I want to see a pic of your bike, got a thread here or somewhere else about it?
What tires should I get for it? What's the Azenis or Kumho MX equivalent in the bike world, you know cheap but sticky enough.
therex
SuperDork
12/30/08 6:01 p.m.
RussellH wrote:
therex, thanks man, any idea where the fuses are? And I want to see a pic of your bike, got a thread here or somewhere else about it?
The Fuses are exactly where Woody said they are.
If you go here:
http://rextastic.com/Nighthawk450/
You'll find pictures of my bike tooooooooooooootally naked, and you'll be able to see where both the battery and the fuse plates are.
BE VERY FREAKING CAREFUL WITH THOSE SIDE COVERS.
They are made of Fabergé eggs or something. Fragile and nearly impossible to replace. They are held in by pegs being pressed into rubber holes.
I can't even remember what kind of tires I bought. They were cheap, that's all I remember. ;)
Motorcycle tires are a whole other subject and generally opens up a huge soap box session of "only thing between you and the road, I don't run cheap tires on my megabuck bike," etc. Personally, I have found the best performing tire for my bikes is Metzler Lasertecs. Used to be Mezlaser, but they changed the name. They aren't cheap, though. I don't know what the squid crowd runs now, but they used to use the Mezlasers for rain tires on road race bikes. You can hit rain grooves with those and not even know they are there. I have a Metzler touring tire on the front of my bike and a Dunlop on the back right now, and two Metzler sport tires on my wife's bike. I need new rear tires for both bikes at the moment.
I have known guys who have run those ChenShing super cheapo tires on their bikes, again Harleys. They said they didn't last too long, but for $35, who cares? The Metzlers don't last too long on my bike either. So, performance, I'd recommend Metzlers. Budget, whatever you can get, and JC Whitney sells those Chenshings.

Thanks guys, nice site Rex and wow what a deal you got on it even if it needs work. Love the new paint too. Sorry about the repeat question, I totally forgot that Woody had already told me about the fuses and I even acknowledged it duh! Too many things at once.
OK so here's what I did yesterday when I got home, I gave the bike its first wash, then took it up and down my street a few times and the chain felt so much better even though it needs to be replaced. I quickly looked at the rear sprocket and it didn't look pointy to me but I'll post some pics today.
I then started to troubleshoot my tail lights and the front side lights. The tail light worked when the previous owner rode the bike to my house and then it stopped working. So I spent 4 hours trying to trace down the wires. I finally found that the brown wire in the main loom connector that's in the front headlight housing wasn't getting any voltage. I also noticed that it has a second wire attached to it that's supposed to connect to something. I figured I'd feed it the voltage through that unclaimed wire. So I took another available wire that was on the taillight circuit and spliced it with this brown wire and viola! Still very strange that the light used to work but not anymore. Someone had apparently been in the headlight housing I could tell that much.
So now I have all the running lights as well as the flashers. I might get those blinking-hyper-lights and replace the bulbs with LED bulbs so the 'cagers' can see me - yeah new vocabulary, been meaning to use that word.
I also order the factory shop manual from Helms it was $45.
So a few more issues:
-
The exhaust has a blap, blap sound when I open the throttle right around 2000 to 2500rpm along with hesitation. Also when I close the throttle from 4000rpm I almost hear what I'd describe as a quieter backfire. Is that normal? Exhaust leak? carb adjustment? It also requires a good 5 minute warm up to feel nice and loose.
-
It's hard to put the bike in neutral when the motor's running, in fact sometimes it won't even go in second while not moving, so if I'm sitting in the garage in first I pull the shifter up and it goes flying past neutral into 2nd, so I push it down to first and try again but this time the shifter's won't move up as hard as I might try. At this point if I turn the bike off it easily goes into neutral right away. Is it the clutch adjustment or the clutch itself?
On an aircooled bike it's going to take a while for it to feel warmed up, I just choke mine till it's warmed up a bunch. That 5 mins sounds about right for warm up.
Many shifting issues go away after an oil change... the rest with a new and adjusted chain 
LEDs are cool but I found that simply replacing the bulbs with brighter ones did wonders. Example, my Triumph uses 1157 type bulbs for the tail/brake light. I replaced them with 2397 (identical form factor) and the tail light is a bit brighter, but the brake light is OMFG MY EYES brighter... all for $2.99 a pair.
Make sure your clutch is adjusted properly for the shifting. Also check for intake leaks (spray carb cleaner around the carb-manifold/head connections while idling, listen for change in engine speed). But, yeah, carbed vehicles in general are gonna need more warmup time than EFI, and air cooled ones can be more tempermental.
therex
SuperDork
12/31/08 1:04 p.m.
I wouldn't worry too much about your shifting.
Also, If by "won't go into neutral" make sure you mean "Won't go into neutral" and not "Won't turn on the neutral light." Remember: The neutral light only means the neutral light is on.
But also, it's very hard to go into neutral from second. Much easier to shift all the way to one, and then just a little nudge up into neutral. If I'm sitting still, the bike doesn't like to go into neutral. I normally go into neutral with the bike still moving. You'll find the sweet spot and then you'll be fine.
Yeah there's definitely a sputter/intake leak at around 2500-3000rpm, if I hold the throttle steady the motor bucks up and down constantly.
As for the choke, it doesn't like it. When I first pull it the motor speeds up like it should and then it dies unless I close the choke quickly.
I just took it out for a spin, man o man, what fun it is to ride a bike. I opened it up just a little to 5000rpm in second gear a couple of times, it feels like you're flying with the wind howling - too bad that riding is a dangerous afair.
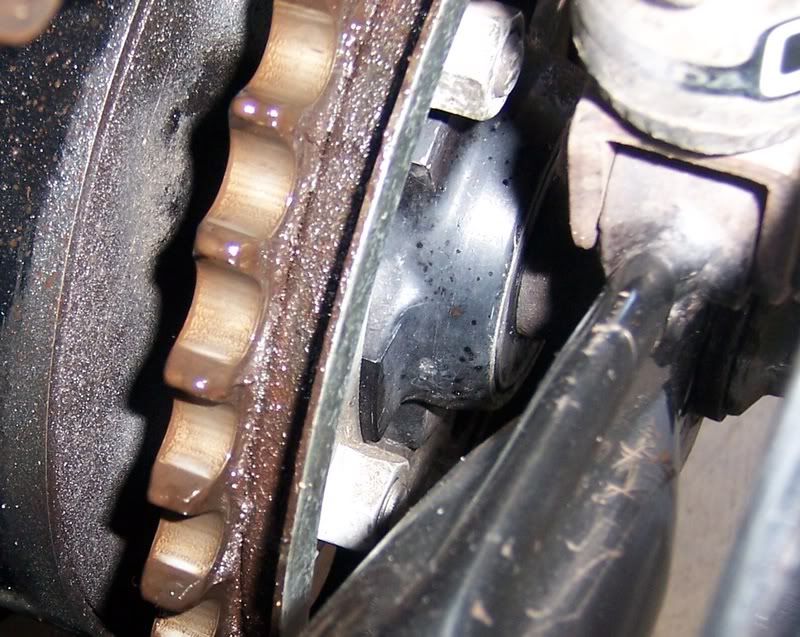
Here're the rear sprocket, couldn't take a pic of the front one:
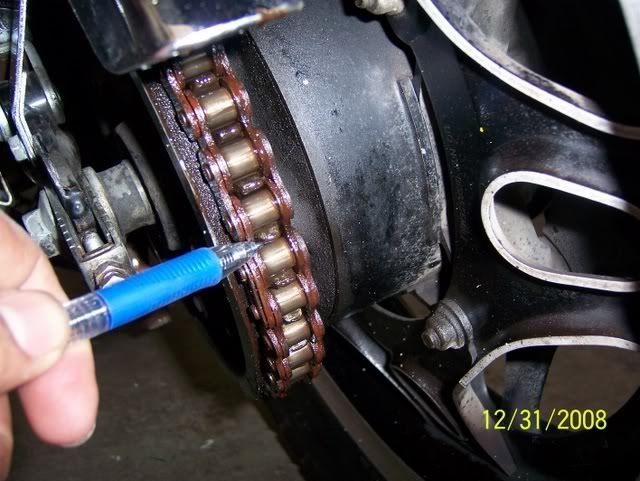
Too lean in the middle. Probably gunked up intermediate jets/circuits/whatever those carbs have. Hard to tell from the angle of your pics, but if that was my sprocket, I'd put a new cheap chain on it and go.
Yeah, 2500-3000 is right at the end of the idle circuit and the main circuit begins to come into play. Lots of '80's bikes are super lean off the bottom for emissions reasons and that will definitely cause a stumble.
Your carbs might have an easy to access idle circuit mixture screw. Here's the thing: some of them are air screws and some of them are fuel screws. If it's an air screw, turning it in will richen the idle circuit, vice versa with a fuel screw. Try turning them 1/4 turn either way and see if it changes. Remember that you have to do the same thing to each carb! Here's where they are on a Suzuki carb setup:

If you can't see a screw somewhere in this area, it's probably under a plug and this has now gotten out of the quick fix realm. Also, search the forums: the XS650 I just picked up has a well known low/mid stumble and flatspot problem and there is a jetting kit available to fix it.
Ugh, why are people so retarded?
The previous owner said he'd just replaced the oil so the night I'd gotten the bike I checked the oil and other than the fact it looked pretty thin and it was all over the dipstick I didn't think much of it since it had been ridden 20 mins prior to that. So today I thought I'd go ahead and change the oil since I have the recommended 10-40w in the garage. I'd be damned, I undid the drain plug and the oil came gushing out like a levy broke. Pretty soon my 7Qt drain pan was almost full!!!!! I said a few expletives as I wiped the oil off the floor, my hands etc. The bike's only supposed to hold 2.6qts!! I mean the guy was kind of a moron as he didn't know much about the bike at all but come on! especially for someone that used to ride dirt bikes growing up, ugh!
The oil was definitely thin like the cough syrup and smelled like gasoline so then I had to look at the spark plugs and air filter to see what he'd done there. The plugs are worn down and had black caked on goo on one cylinder, it's the one that makes the blap, blap sound I'm pretty sure. The other side was OK. They were totally dry though, I thought I'd find them soaked in oil. I cleaned them with a wire brush and put them back in. The red air filter element is pretty much gray so it needs to be changed or cleaned.
Also, I looked at the speedometer cable since my speedometer doesn't work. The cable is intact and I can move the odometer by turning the other end of the cable by hand so that's a relief but looks like I'll need to buy the speedo-gear housing that the cable connects to at the front wheel. It looks like the wheel has to come off to get to it.
Jensenman, it's about time you checked in, I thought you'd be the first guy to say 'hey, glad you didn't get a 250cc thumper' :)
Dr. Hess, I think I'm going to go with just a chain for now. Although, I haven't seen any for less than $60 or so. Also, I need a 530x106 most have 114 links so does that mean I have to remove the extra ones? What's a DID chain, it's what's recommended on the label on the bike or should I just get any 530 chain?
Edit: I cropped the pic for more clarity:
Also, I'm thinking of peeling off the chrome sticker that runs from the tank and the fairings. What can I use to peel it off cleanly? I was thinking of using the heat gun and then just pulling it off. I don't know if the paint underneath will match what's on the top though?
In reply to RussellH:
The heat gun should work some goo gone might help too, test on a hidden spot first though.
Chain
Does this chain sound like something that'll work?
Western Power Sports 530H Heavy Duty Motorcycle Chain
* Quality engineered for strength and durability
* All chains are pre-stretched and shot-peened
* Precision tolerances for perfect balance in every pitch
* Complete with oiling hole in the bushing to insure proper lubrication
* New Gold chain has nickel plated inner plates and gold outer plates
* Heavy Duty chains have Quad Staked riveted pins for added strength
From: http://parts.motorcycle-superstore.com/1/1/3821-530h-heavy-duty-motorcycle-chain-western-power-sports.html
Flea-bay also has it for $23+7= $30
http://cgi.ebay.com/ebaymotors/WPS-Heavy-Duty-Street-Bike-Chain-530-x-106-Links_W0QQcmdZViewItemQQ_trksidZp3286Q2em20Q2el1116QQitemZ390014636190QQptZMotorcyclesQ5fPartsQ5fAccessories
ebay item#: 390014636190
Tires I'm pretty sure I'm going with Kendal K671 based on the reviews I read on JcWhitney. They'll be just a little over $100 for both tires.
http://www.jcwhitney.com/KENDA-K671-CRUISER-ST-TIRES/GP_2015164_N_111+1982+200730459+600014323_10111.jcw
I removed one of those decals on my '77 CB550F Super Sport.
It took forever. I tried the heat gun, Goo-Gone and finally used a razor blade, very carefully. As I recall, it took about half a day. What I found was that (on my bike) Honda applied the reflective decal and then clearcoated it. Not only was the paint noticeably darker underneath, but there was an obvious ridge of clearcoat where the edges of the stripe used to be. I ended up tracing the ridge with black pinstripe tape.
Suggestion: Learn to live with the stripe unless you're painting the tank.
If you choose to remove it anyway, you may want to try one of these:
http://www.eastwoodco.com/jump.jsp?itemID=1914&itemType=PRODUCT
I bought one for one of my Honda CT70 Mini Trail projects, but I haven't gotten around to trying it yet, so I can't give it a thumbs up / thumbs down at this point.
In reply to Woody:
psst you want to ride again i know it lol
Glad you didn't get a 250 thumper.
Dunno about the stickers, but on the chain: yeah most of them are sold 114 link, you have to remove the extra. No biggie, make sure where the chain needs to be shortened then grind the head off the pin where it needs to be shortened and drive the pin out with a punch. Here's a good page outlining that procedure: http://www.canyonchasers.net/shop/generic/chain-rplc.php
Do yourself a BIG favor and get an O ring chain. They are more expensive at the outset but after initial seating time will last a helluva lot longer. I used to run EK (not RK/Tsubaki) chains and they lasted just fine. The great thing: they do not require sticky nasty lubricants which sling up onto the back of whatever you happen to be wearing at the time.
therex
SuperDork
12/31/08 10:49 p.m.
Woody wrote:
It took forever. I tried the heat gun, Goo-Gone and finally used a razor blade, very carefully. As I recall, it took about half a day. What I found was that (on my bike) Honda applied the reflective decal and then clearcoated it. Not only was the paint noticeably darker underneath, but there was an obvious ridge of clearcoat where the edges of the stripe used to be. I ended up tracing the ridge with black pinstripe tape.
THIS.
Seriously. It took A HUGE amount of work to remove the stripe from my side cover. Like, I had to use a sanderto get it off. But as Woody said, I was painting it so it didn't really matter.
If you can live with it, live with it.
Alright, I'll leave the stripes alone but everytime I look at it I get a flashback from the 70s tv.
So unless you guys wave big red flags, in the interest of keeping things economical, I'm going to go ahead and order the Western Power Sports 530H Heavy Duty Motorcycle chain and the Kendal tires. I'll definitely buy the O-ring chain next time when I do the sprockets too. I'm trying to keep the bike's cost down since who knows what else it might need in the near future.
Any ideas on the speedometer gear housing?

Make sure it's really a problem with the speedo drive. I have never seen a bad one, of course there's always the first time.  Lift the front wheel off the ground, spin the wheel and watch the speedo drive gear. If it turns it's very doubtful it's bad. Make sure the speedo cable is seating in the gear, too.
About the chain: I can't tell from the pix, are the sprocket teeth evenly worn or are they J-shaped?

If they are evenly worn and not J shaped, I'd hold off on sprockets but buy the O ring chain. Here's why: you need to lube a non O ring chain pretty regularly. Dirt and grit build up on the oiled surface and that's just like having valve grinding compound on the different parts. If you run an O ring chain, the dry surfaces actually experience less wear. That means you will save $$ in the long run. I could get 2 enduro/HS race seasons out of a set of JT steel sprockets and an EK O ring chain.
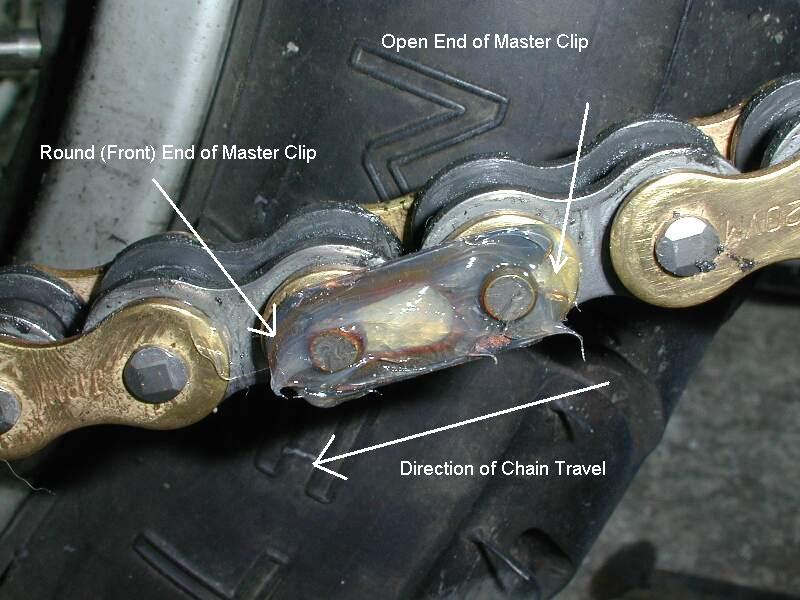
BTW, about endless chains: they are great but they are a PITA to install since you generally have to rivet the master link (special tool) or get one the right size and then remove the swingarm to install it (major PITA). I used to run a 520 chain on just about everything I rode with a clip type master link and I never had a master link let go. Here's why: I always made real sure the closed end of the link clip faced forward and about every six months or so I replaced the clip just in case. This one has been siliconed, I never did that but never had a problem.
Installing the side plate on an O ring chain master link can be a beeyotch without the special tools. I came up with a budget solution: Vise Grips and a small nut that will slip over the chain link pin. Get the side plate started, put the nut over the pin, put the Vise Grips over the nut and use them to squeeze the plate on. Do this on both pins, then put the clip in place. Last and probably most important step: tap the pins on the clip side with a small hammer. When you are done, the clip should be solidly in place, i.e. you should not be able to move it without tools. Some guys used to wrap safety wire around the side plate and clip as an added safety thing, if there's nothing for the wire to hit like a chain guide etc that seems to work pretty well.