1 ... 6 7 8 9 10 ... 52
Rodan
Rodan Reader
1/28/18 9:29 a.m.

So... I finished the brake installation on the NA yesterday.  It took far longer than anticipated, and some things were a PITA.  The result, however, is well worth it... incredible improvement over the 1.6 brakes!  I don't recall if I outlined the specifics, but the fronts are a V8 Roadsters kit supplied by 949 with 11.75" rotors and Wilwood Dynapro radial mount calipers.  The rear set is an FM kit with Wilwood Powerlite radial mount calipers on NB Sport rotors.

First, a few nits to pick with the Wilwood calipers...

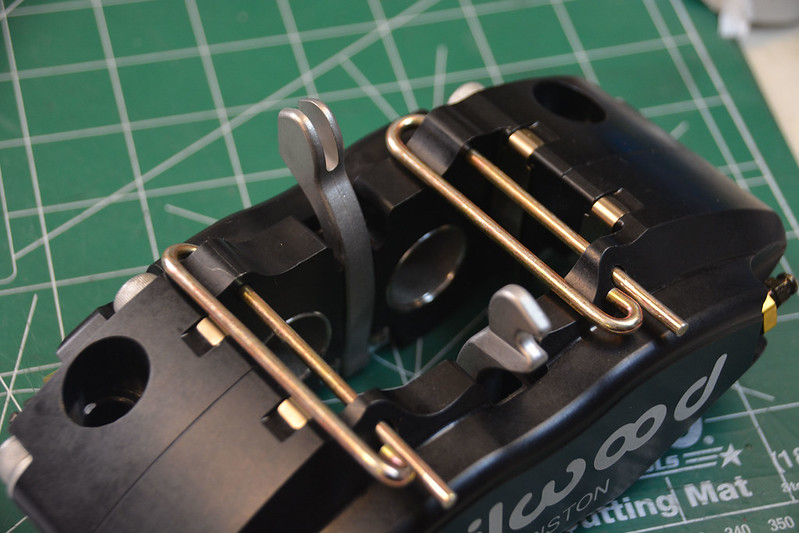
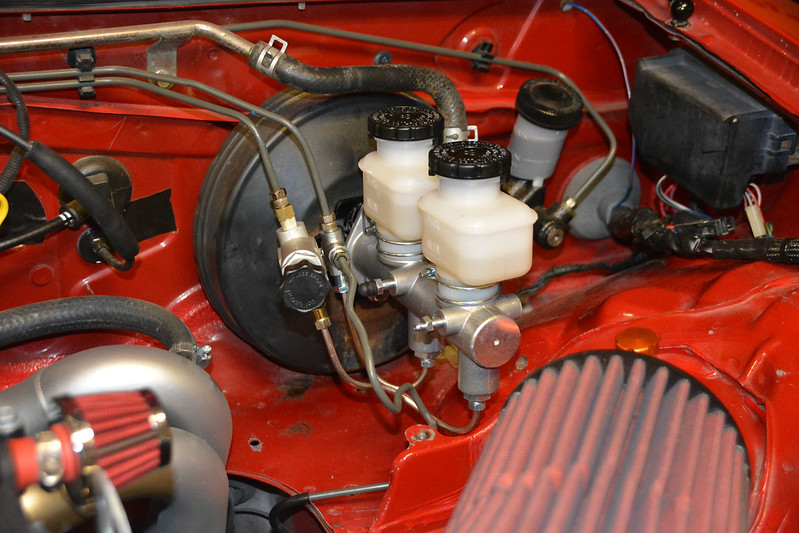
All four calipers came with these nice little stickers to cover the inlet ports for shipping:

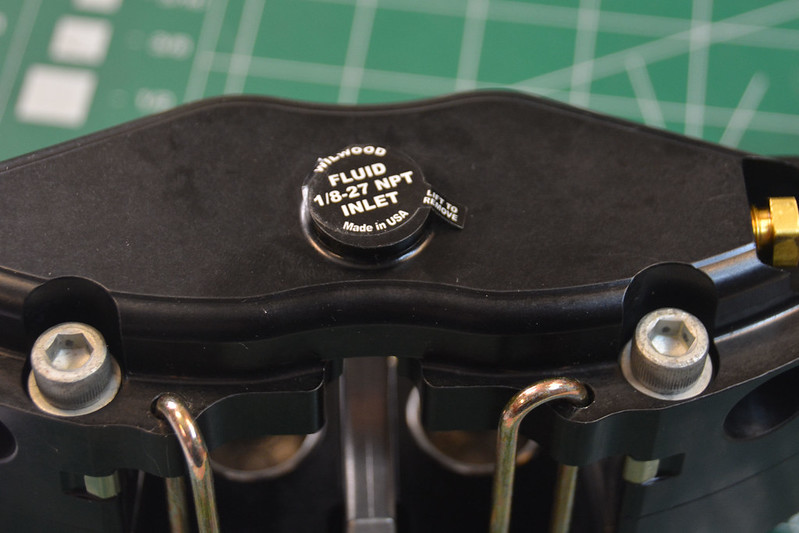
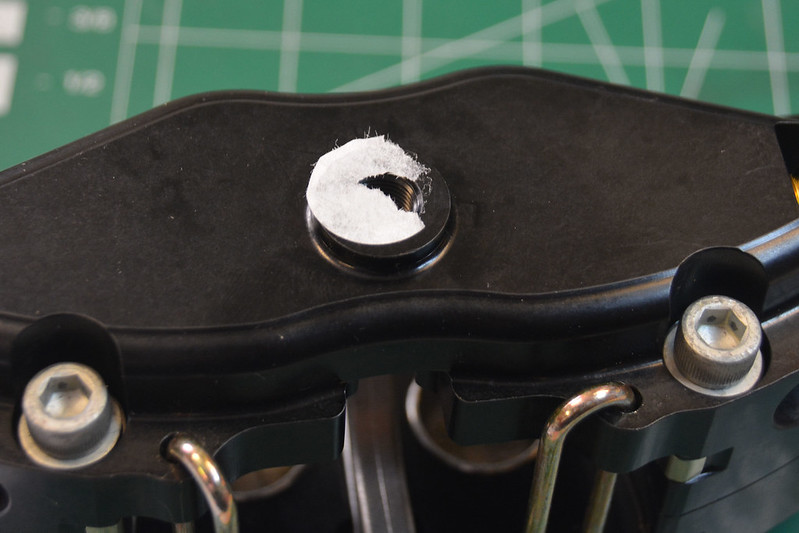
Great idea, but every single one left a mess to clean up.  Loads of fun when your trying to keep the shreds from falling into the port...

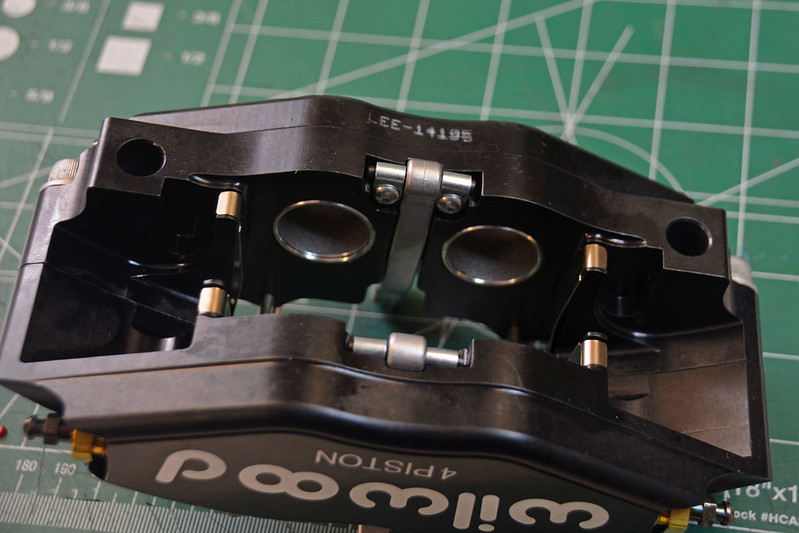
And the design of the calipers themselves...  The inlet port is a pipe fitting, with all the sealing implications thereof.  It took several attempts to get them tight enough to not leak, while trying to not over tighten them.  I did use teflon tape, per a call to the Wilwood tech line (15 minutes on hold...).  Also, each caliper has 4 bleed nipples which screw into brass fittings, screwed into the caliper body.

The brass fittings are recessed in a machined area which is tight enough that it's nearly impossible to get a wrench on them.  On one side of the caliper you can use a socket, but the other side has the heads of the bolts that hold the caliper together in the way.  This became an issue because several of the bleed nipples were so tight that attempting to loosen them brought the brass fittings along, and they needed to be retightened.  

I understand the reasoning behind the four bleed locations, but it does introduce additional failure points.  At least you only have to bleed the uppers, which is still twice as much bleeding as "normal" calipers.

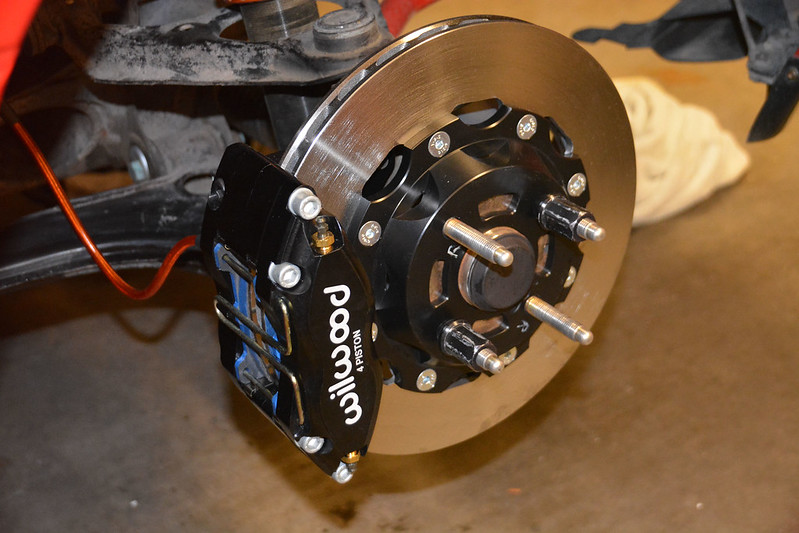
Other than the above issues, the rotors and calipers went on without much fuss.
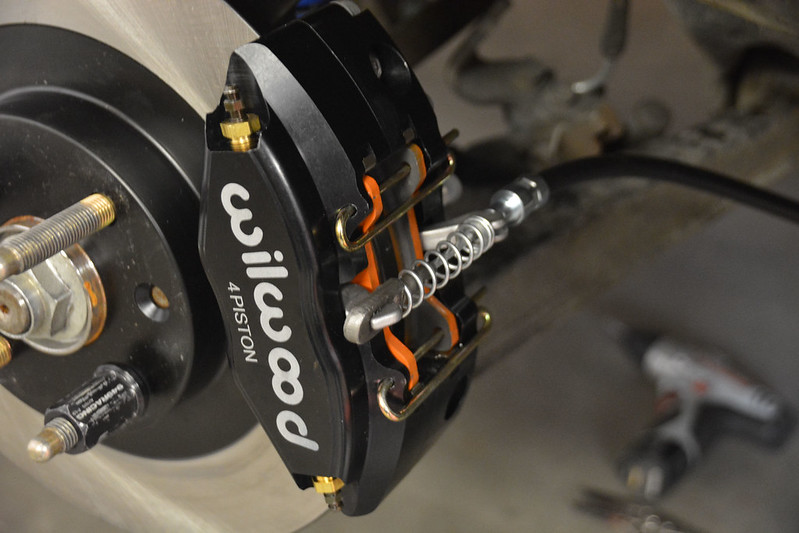
Fronts

The rear calipers are set up with a basic parking brake.  It's a little Rube Goldberg, but it works reasonably well.  Each caliper has a set of arms that hinge on the hub side of the caliper, and are pulled at the outer side, 'pinching' the pads against the rotors.

Rear installed

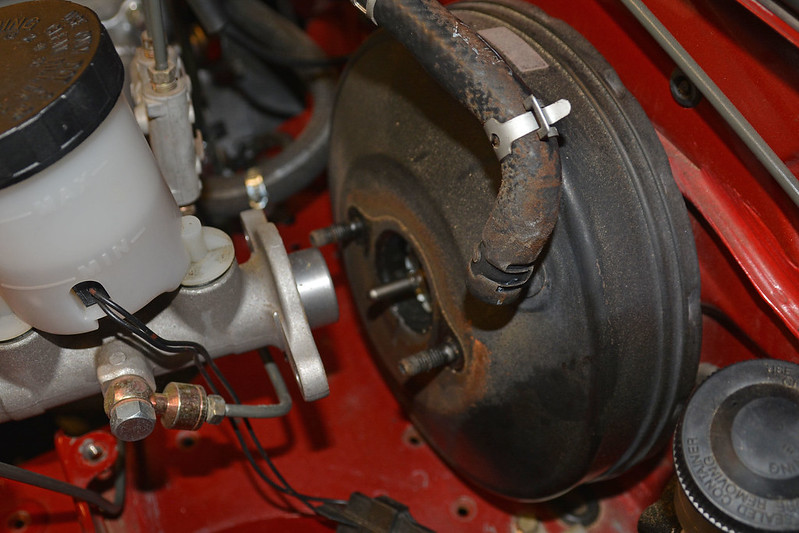
The parking brake cables supplied by FM were a perfect fit to replace the stock cables, but installation will likely require removing the exhaust to access the connection to the parking brake handle... unless you're an octopus.

Brake pads are G-Loc, R12 front and R10 rear.

Rodan
Rodan Reader
1/28/18 9:54 a.m.

Next was the hydraulics.

I went with a Wilwood 1" master cylinder kit from 949.  The conventional wisdom when upgrading an NA is to use an NB Sport vacuum booster with this master for the best combination of power and feel, and 949 references on their site that it will work with an "01-05 Sport Booster".  So, I had ordered an '03 Sport booster.

Turns out it doesn't work...

I'm still trying to research the specifics, as far as part numbers, because all the info I had prior indicated that a Mazdaspeed Miata used a different booster than the NB2 Sport.  Looking them both up shows the same part number...

Here's the issue:  the piston rod on the NA (and NB1?) protrudes from the mounting surface of the booster into the master:

On the NB2/Mazdaspeed unit, the piston rod is recessed:

Obviously, the recessed version is not going to contact the piston in the master.  This was when I started looking at part numbers and trying to figure out the mess.  I put in a call to 949, but it was late afternoon on Friday, and they didn't get back to me before close of business for the week.

In the interests of not having the car on stands for another week, I put everything together with the stock NA booster, which will work fine, but has a lower level of power assistance.  If I end up changing the booster later, at least the hydraulics don't have to come apart.

Speaking of hydraulics, I added a Wilwood prop valve into the mix as well.  Everthing was able to hook up with the provided adapter hard lines, but it's definitely not 'show car' stuff.

I need to fab up a bracket for the prop valve and T fitting for the front lines, and I also lost my master cylinder brace, as the Wilwood master is too long to work with it, so that will require a little more fabrication.

Rodan
Rodan Reader
1/28/18 10:00 a.m.

The result...

So far, I've only bedded the pads, but I'm really impressed with the power and feel.  Even bedding the pads, it was wanting to lock the rears, but was easy to modulate.  Now that they're bedded, I'll start working on balance.

The G-Loc pads do dust a little... cheeky

And that was only from bedding the pads!

I'm still watching for leaks, and I need to clean up the aftermath...

[

Anyone need some 1.6 brakes...? 

So, I need to figure out the whole booster fiasco and get the balance dialed in... but I think the prep for this track season is done.

smiley

docwyte
docwyte SuperDork
1/28/18 10:53 a.m.

Surprised the Wilwoods don't come with a crossover tube to install on the bottom of the caliper, like every other multi piston caliper I've ever seen...

Rodan
Rodan Reader
1/28/18 11:15 a.m.
docwyte said:

Surprised the Wilwoods don't come with a crossover tube to install on the bottom of the caliper, like every other multi piston caliper I've ever seen...

That would be an excellent idea!

Of course, you'd never be able tighten the fittings properly... cheeky

In all seriousness, the lug mount Dynapro appears to have better access to the fittings.  I need to do some looking around for narrow profile wrenches, or I may end up grinding on one.  If I can grind the closed end of a combo wrench down a bit, it might slip between the fitting and the caliper bolt head.  That wouldn't work with a crossover, though.  Maybe grinding on a flare wrench...

Rodan
Rodan Reader
1/28/18 1:26 p.m.

Took a longer test drive this morning and worked on getting the bias adjusted.

These pads really don't like street driving...  SQUEAL city... cheeky

I'm working on my technique to keep the noise down.  The car doesn't get street driven much anymore anyway.  I ended up with the valve all the way closed, and was still locking the rears before the fronts.  However, this was with cold tires on a dirty industrial park street...  Anyway, I can achieve hard braking before the rears lock, so I'll give it a go at the track before doing anything drastic.

If it's an issue, I'll look into changing the rear pads, or if necessary going to a non-sport rear rotor to reduce leverage.


Rodan
Rodan Reader
1/28/18 5:33 p.m.

In other news, while I was fiddling with the NA, my wife went to run some errands in the NC and found the battery dead.  It wasn't entirely unexpected, as it had been a little slow cranking this winter.  So, she took the NB.  When she got home, I took  the NB to get a battery for the NC.

So, today, we thoroughly covered our A's, B's and C's... cheeky

MazdaFace
MazdaFace HalfDork
1/28/18 5:48 p.m.

Absolutely beautiful brakes. Well done 

Rodan
Rodan Reader
2/5/18 4:44 p.m.

Not much going on in Miataland lately...  oil/filter change and tire rotation on the NC, treated the top on the NB with fabric protectant, and a few other fiddly little things.

Since my 'street' wheels (15x8 Konig Flatouts) don't fit over the new brakes on the NA, they'll get handed down to the NB.  And since I needed new stuff for the NA, I might as well step up to 15x9s for the new 'street' setup.  The 'super 200' tires tend to go on backorder in the spring, so I decided to pull the trigger on rubber first.  Wheels are usually a bit easier...

Rival S 2-18 by Rodan AZ, on Flickr

The Rivals should also complement my set of NT01s, if I'm running shorter tracks/sessions, or decide to AutoX the car.  And when the NT01s need replacement, I don't need any pretense at streetability.  I just wish RE71Rs came in 225/45-15... I really like them on the wife's NC.

I also ordered up something cool from DiY Autotune...  more on that later.

Opti
Opti HalfDork
2/5/18 5:07 p.m.

I need some 1.6 brakes. Id you want to sell the stuff enail me some details.


Joshua dot tondre at outlook

Rodan
Rodan Reader
2/20/18 5:49 p.m.

Time for an update...

I had previously noted how I was using my phone with the MSDroid app to display ECU info, primarily coolant temp.  This was an interim solution until something better came along.  Well, something better has arrived.

A short while ago, DiY Autotune and Perfect Tuning announced a configurable gauge that communicates with the MS3 over CAN, and is able to display a variety of info, and provide warnings if programmed parameters are met.  Pretty cool...

The gauge:

A YT video overview:


Now, CAN communications seemed a lot like black magic to me, but I ordered one up anyway and it arrived about a week ago.

I pulled the center panel out of my dash, and mounted up the gauge.

You might notice in the above pic a small button under the AFR gauge.  The MS3 has the ability to datalog onto an on-board SD card.  I had always planned to make use of this function, but hadn't got around to wiring it up.  The button is a momentary switch to activate the function, and the hole next to it is for an LED indicator (which hadn't arrived when I took the pic).

Today, I got everything wired up, configured, and tested.  And amazingly, it all works!

Pic of the gauge installed when I was testing.  Note the panel is not fully installed...

I've got it set to display coolant temp on top, and voltage on the bottom.  It's set up to warn for temperature  (outer LEDs flash red) over 210*, and voltage (outer LEDs flash green) under 11.8V.  There's four other warnings I can program and a ton of other display options to fiddle with, but that's all I really need for the first trackday of the year in a couple weeks.


Rodan
Rodan HalfDork
2/25/18 6:27 a.m.

Our first track outing of the year is next weekend, so I've been getting some last minute detail items taken care of.

Got a set of Storm S1 wheels in 15x9, and got the Rivals mounted up.

StormS1 by Rodan AZ, on Flickr

Since several of our planned events require car numbers, I splurged on some nice vinyl placards.

Numbers 2-24-18 by Rodan AZ, on Flickr

Putting on vinyl in a 50* garage isn't all that much fun.  I'm sure I'm going to have lots of bubbles when the sun hits these later in the year.  After doing these, I've pretty much ruled out a DiY wrap on the NB.  cheeky  I'd much rather paint!

Also finalized the gauge installation.  Everything is configured and tested, and the datalog trigger works.

CANgauge by Rodan AZ, on Flickr

I still need to do a final once-over on both the NA and NC, and get the NC's track wheels out of the spare bedroom and air them up.

Rodan
Rodan HalfDork
2/27/18 6:00 p.m.

Mounted up the S1/Rival combo this morning.  I needed to top off the fuel for this weekend, so I figured I'd make sure they were round.  

Also picked up a new toy...

Never used a tire pyrometer, looking forward to figuring it all out.

Rodan
Rodan HalfDork
3/4/18 9:15 a.m.

Great day at the track yesterday... 75 degrees and sunny in Phoenix!

We were running with ProAuto Sports at Arizona Motorsports Park, a great track right next to Luke AFB.  I had been there before, but it was my wife's first time here.  The track opened back in 2003.  I was doing trackdays on 2 wheels back then, and only got to run the track once before the county shut it down.  Big controversy over noise (next to an Air Force runway!!) that was driven by a developer.  The track shut down for several years as lawsuits ensued, and eventually re-opened with sound testing and a 95db sound limit.  I took my NA there once in 2013, the NA's very first trackday.

I was glad to finally be back, and it was a busy day!

My wife had to go through the 'beginner' routine, since it was her first time with the organization.  So she was stuck with classroom, and then a 'track tour' in the 'rolling classroom':

Seemed like an interesting idea, but she said you couldn't see anything useful unless you were sitting in the front row.  Then it was one session with an instructor and after that, on her own.

Since I hadn't driven with this organization in almost 5 years, I thought they had me assigned to the run group just above the beginners (they put me in the intermediate group), so I went out in the wrong session first time out.  It wasn't really a bad thing, 'cause it allowed me to reacquaint myself with the track, but it was a total E36 M3show... blasting down straights, parking in the corners and nobody giving point bys.  Next session went much better, but there was some serious horsepower in attendance...  ZL1 Camaros, 'Vettes, even a McLaren 675.  I felt like I should just duct tape one of those foam football fan finger things to the side of my car.  cheeky

Here's the track - 2.23 miles overall:

Good news was my corner speed was as good or better than most of them.  I got to watch a ZL1 go through a pretty good tankslapper in my mirror at one point...   and I only had to deal with a couple of boneheaded passes.  

I ran the Rivals for the first two sessions to get a couple of heat cycles on them, and ran the NT01s the rest of the day.  As a result, I never got the pressures completely dialed in, but I did get some good data that I still need to sit down and colate.  That should give me a leg up next time out as far as starting pressures.  The Rivals felt a lot looser than the NT01s, but we're just as fast, so I've got some learning to do to maximize the results.

The brakes were FANTASTIC.  In fact, I never locked a wheel, so I think I can still push them a little harder.

All in all, the NA was a trooper.  I haven't looked at the datalogs, but the highest temp I saw glancing at my new gauge from time to time was in the mid 90s.  The last time it was here, it had a stock 1.6, VMaxx suspension, stock brakes and 205 NT01s.  I was about 10 seconds a lap faster yesterday!  Now that's progress... laugh

Hopefully I'll have some more pics and a video up later this week.

Now I need to get my ass back into fabrication mode and build a tire cart and workbench for the trailer...  things were a little disorganized yesterday.  I'd rather have things tightened up for our next outing in April:  AROSC driver's school at Willow Springs for my wife... I get to play pit crew.

Rodan
Rodan HalfDork
3/8/18 9:10 p.m.

Video is finally up.  3 laps from the end of the 2nd session on Rivals... you can see they're starting to get a little loose.  Apologies for the video quality... YT seems determined to turn decent video into crap.


Rodan
Rodan HalfDork
3/11/18 5:22 p.m.

So I've been planning to build a new welding/work bench since I've got some fab projects on the list.  Had the whole thing planned out...  steel frame, steel worktop, cabinet w/ drawers and tig, mig and plasma underneath the work top.  I was going to buy steel tomorrow, so I was just checking to see if HF was running a sale on the cabinet.  I was planning to use the 7 drawer side cabinet for the 44" roller chest... and they discontinued it.  angry  Already gone from inventory, and disappeared from the website.  Back to the drawing board... good thing I didn't buy the steel yet.

Instead, I started on the workbench/toolbox for the trailer...

I had been looking at several options (including the Yukon tool cabinet HF discontinued a month after releasing...), and finally settled on a 5 drawer cart.  With the cart, I can build a bench around it, and still have it mobile enough to roll out to the car in the pits.  Plus, they were on sale this weekend...

The first issue I ran into was the wheels provided.  Only one pair swiveled, and they were designed to bolt on in a direction that wouldn't work with my plans.  Fortunately, I had swiveling casters in stock from my aborted workbench project that were just the right size.

Next up was the height.  The cart, as it comes, has an opening top, and is pretty tall.  I ended up taking 3" out of the 'legs' to drop it to regular workbench height.  I then had to re-drill all the bolt holes in the four legs.  Once assembled, it's just about right.

Once I got everything tightened up, installed the handle to the 'front' instead of the 'side', since it will roll into place in the center of the bench at the front of the trailer.

It should be just the right size for a pit box.  

Next up is designing and building the side benches, and figuring out what to use for a work top...  

Rodan
Rodan HalfDork
3/15/18 9:48 p.m.

I rolled the toolbox into the trailer to take some measurements...

I'm going to end up moving the winch relay box and wiring so the toolbox won't be rolling over them coming in and out.  The plan is to build a bench on each side.

I judged the height just about perfectly, as the lid just clears the overhead cabinets.  Pretty good considering I didn't even think about that... cheeky  I was only looking at the bench height!

Rodan
Rodan HalfDork
3/15/18 10:06 p.m.

In another major development... the 'hers' part of our Miata equation is no more...

With some significant sadness, we traded the wife's NC off the other night.  A while back, her commute became a lot longer and the realities of daily driving the NC 100 miles/day were starting to wear.  We had been thinking for a while about a little more comfort and room, and more quiet on the highway.  And since a good portion of her drive is rural two-lane, a little more passing power wouldn't hurt.

So I stopped in at the local Dodge dealer to make an oil change appointment for the truck, and they had something that instantly sucked me in...  Brought the wife by to look at it, and she was hooked as well.  A test drive sealed the deal and we brought it home that night... probably the most impulsive car purchase we've ever made... cheeky

It's a '17 GT with the Performance Package, 6sp manual.  The first owner was kind enough to only put 4500 miles on it while eating the depreciation.  

We had driven a '16 GT Premium Convertible about a year ago, and it felt bloated, soft and slow.  This '17 is a whole different animal...  devil

We had a lot of great times in the NC, but this will be an even better GT car, and occasional track car.  And we're certainly not abandoning Miatas... we've got the NA for the track, and the NB for when we want to get our roadster on... 

Rodan
Rodan HalfDork
3/16/18 8:40 p.m.

No Miata content, but I finally got around to looking underneath our Mustang this evening, and was pleasantly surprised to find it already has a Magnaflow catback.  laugh

I thought it sounded to good to be stock, but it's not at all loud, so I wasn't sure.  One less thing to do! 

Rodan
Rodan HalfDork
3/19/18 6:16 p.m.

Today I picked up an N2 cylinder to adjust tires at the track.  I've got one of those little air tanks that I've had for 30 years, but it's getting so it loses a lot of pressure overnight, and it was cumbersome and not very good for more than a couple of adjustments.  I picked up a 60 cubic foot bottle that should last a good long time, since I'll only be using it for tires.

I ordered some parts to clean up the regulator and eliminate some of the adapters.  I originally used the regulator with my Argon/CO2 bottle with an airbrush for painting, and just threw it together with what I had laying around.  I'll either be mounting the N2 cylinder on the end of a tire cart, or making a small dolly for it.  Either way, it will have some sort of halo to protect the regulator, support to prevent a tip over.

Rodan
Rodan HalfDork
3/20/18 5:16 p.m.

Today I started on a cart for the N2 bottle.  I had originally been thinking of attaching the bottle to a tire cart, but the more I thought about it I realized that would be cumbersome at the track.  So, I decided on a hand cart/dolly.  I had some ideas in my head for a scratch build, but knew I would end up in time and materials for as much as an HF hand truck, so I picked one up this morning.

I began with some flat stock, bent into a circle to support the bottom of the cylinder, and then welded to the dolly.

Next, I chopped about a foot off the thing so it was sized more appropriately for the cylinder.

Once that was all welded back together, I had a pretty good start.

I want to get the regulator all straightened out before I finalize the upper mounting and protection for the regulator.  I'll probably also add a small tray for things like a tire gauge, extra lug nuts, and maybe even a rack for a torque wrench... we'll see.

Rodan
Rodan HalfDork
3/20/18 5:26 p.m.

The other day, I pried the Mustang out of my wife's hands for long enough to wash it and take a few decent pictures.

I still haven't had a chance to really drive it yet... cheeky

I was debating whether to start a new thread, but I really don't plan to do much to it in the way of a 'build', so I think I'll just post a few updates here on it now and then.  Hope you guys don't mind... wink


Eatsleepdrift
Eatsleepdrift
3/23/18 7:34 p.m.

In reply to Rodan :

Need moar lol awesome thread bro. Can't wait for more updates

Rodan
Rodan HalfDork
3/23/18 7:55 p.m.

Thanks!

Fixed the wonky adapter mess on the N2 regulator today...

Before:

After:


And the Mustang got its first mod... nothing very impressive, but the chrome 5.0 emblems just didn't work with the rest of the car... cheeky

Mezzanine
Mezzanine Dork
3/24/18 11:24 a.m.
Rodan said:

Took a longer test drive this morning and worked on getting the bias adjusted.

These pads really don't like street driving...  SQUEAL city... cheeky

I'm working on my technique to keep the noise down.  The car doesn't get street driven much anymore anyway.  I ended up with the valve all the way closed, and was still locking the rears before the fronts.  However, this was with cold tires on a dirty industrial park street...  Anyway, I can achieve hard braking before the rears lock, so I'll give it a go at the track before doing anything drastic.

If it's an issue, I'll look into changing the rear pads, or if necessary going to a non-sport rear rotor to reduce leverage.


Still squealing? I'm running the same calipers and have all the same complaints as you. Note that crossover tubes aren't used because the crossover is internal to the caliper.

If the squeal persists, liberal application of that brake pad squeal stopper goo cured my street-driven car of pretty much all the noise. Smeared all over the pad backing, let it cure, and off you go.

1 ... 6 7 8 9 10 ... 52

You'll need to log in to post.

Our Preferred Partners
GBjum897LkfyDma6D465Sesi2hQjOtGw56CymLG6mlv1YYoIYaFRE7wITBcEeT4X